
Owners Manual
Page 4
... GEAR FOR OPERATOR AND PASSENGERS NEVER USE ON PUBLIC ROADS - FOLLOW ALL INSTRUCTIONS AND WARNINGS. avoid sharp turns or sudden braking. • make sure passengers read and understand all safety labels. • avoid branches or other hazards that could enter vehicle. NEVER USE WITH DRUGS OR ALCOHOL LOCATE AND READ OWNER'S MANUAL. IF OWNER'S MANUAL IS MISSING, CONTACT A POLARIS DEALER FOR A REPLACEMENT. For your nearest Polaris...
... GEAR FOR OPERATOR AND PASSENGERS NEVER USE ON PUBLIC ROADS - FOLLOW ALL INSTRUCTIONS AND WARNINGS. avoid sharp turns or sudden braking. • make sure passengers read and understand all safety labels. • avoid branches or other hazards that could enter vehicle. NEVER USE WITH DRUGS OR ALCOHOL LOCATE AND READ OWNER'S MANUAL. IF OWNER'S MANUAL IS MISSING, CONTACT A POLARIS DEALER FOR A REPLACEMENT. For your nearest Polaris...

Owners Manual
Page 32
To avoid injury and property damage, always heed the warnings and towing capacities outlined on pages 64-65. 28 Trailer towing equipment is equipped with this vehicle. FEATURES AND CONTROLS Component Locations Taillights Muffler (Spark Arrestor) Receiver Hitch Trailer Receiver Hitch Bracket This vehicle is not supplied with a receiver hitch bracket for a trailer hitch.
To avoid injury and property damage, always heed the warnings and towing capacities outlined on pages 64-65. 28 Trailer towing equipment is equipped with this vehicle. FEATURES AND CONTROLS Component Locations Taillights Muffler (Spark Arrestor) Receiver Hitch Trailer Receiver Hitch Bracket This vehicle is not supplied with a receiver hitch bracket for a trailer hitch.

Owners Manual
Page 41
... for starting procedures. Light Switch Use the headlight switch to turn the lights on . ON All Wheel Drive (AWD) Switch The AWD Switch has two positions: • All Wheel Drive (AWD) • Two Wheel Drive (2WD). Turn the key to the START position to engage All Wheel Drive. Press the bottom of the rocker switch to engage the electric starter. OFF AWD 2WD 37 The key returns to operate in the ON position to start the engine. Switches FEATURES AND CONTROLS Ignition Switch The ignition switch is...
... for starting procedures. Light Switch Use the headlight switch to turn the lights on . ON All Wheel Drive (AWD) Switch The AWD Switch has two positions: • All Wheel Drive (AWD) • Two Wheel Drive (2WD). Turn the key to the START position to engage All Wheel Drive. Press the bottom of the rocker switch to engage the electric starter. OFF AWD 2WD 37 The key returns to operate in the ON position to start the engine. Switches FEATURES AND CONTROLS Ignition Switch The ignition switch is...

Owners Manual
Page 44
... enable the AWD until the AWD switch is in AWD, the demand drive unit will automatically disengage. If the switch is turned off . Always switch to AWD while the rear wheels are spinning, release the throttle before getting into conditions where front wheel drive may be needed. When in all times. Engaging AWD The AWD switch may be turned on . FEATURES AND CONTROLS All Wheel Drive (AWD) System The All Wheel Drive system is below 3100. Initially, the vehicle's electronic...
... enable the AWD until the AWD switch is in AWD, the demand drive unit will automatically disengage. If the switch is turned off . Always switch to AWD while the rear wheels are spinning, release the throttle before getting into conditions where front wheel drive may be needed. When in all times. Engaging AWD The AWD switch may be turned on . FEATURES AND CONTROLS All Wheel Drive (AWD) System The All Wheel Drive system is below 3100. Initially, the vehicle's electronic...

Owners Manual
Page 46
... the battery charged. Do not operate the vehicle if this occurs, take the vehicle to protect the electronic speedometer. This warning usually indicates that the vehicle is operating at idle and high electrical load (lights, cooling fan, accessories) is activated. This indicator illuminates 1 when the AWD switch is located in the instrument cluster. This indicator serves two purposes. FEATURES AND CONTROLS Instrument Cluster Rider Information Center The rider information center is...
... the battery charged. Do not operate the vehicle if this occurs, take the vehicle to protect the electronic speedometer. This warning usually indicates that the vehicle is operating at idle and high electrical load (lights, cooling fan, accessories) is activated. This indicator illuminates 1 when the AWD switch is located in the instrument cluster. This indicator serves two purposes. FEATURES AND CONTROLS Instrument Cluster Rider Information Center The rider information center is...

Owners Manual
Page 53
... damage brake pads and rotors. Pull only light loads. Check the oil level. Perform regular checks on fluid levels, controls and areas outlined on page 49. 5. During the break-in of the brakes. PVT Break-in (Clutches/Belt) A proper break-in period, change both the oil and the filter at sustained idle. 6. Always exercise extreme caution whenever handling gasoline. 2. Avoid aggressive use of the clutches and drive belt...
... damage brake pads and rotors. Pull only light loads. Check the oil level. Perform regular checks on fluid levels, controls and areas outlined on page 49. 5. During the break-in of the brakes. PVT Break-in (Clutches/Belt) A proper break-in period, change both the oil and the filter at sustained idle. 6. Always exercise extreme caution whenever handling gasoline. 2. Avoid aggressive use of the clutches and drive belt...

Owners Manual
Page 59
On level surfaces, practice starting, stopping, turning, maneuvering, using the throttle and brakes and driving in reverse. Learn how the vehicle handles when making turns and begin driving. 14. After you become skilled at making both hands on the steering wheel, slowly release the brakes and depress the throttle with your right foot to begin to operate at faster speeds, follow these precautions: • Avoid sharp...
On level surfaces, practice starting, stopping, turning, maneuvering, using the throttle and brakes and driving in reverse. Learn how the vehicle handles when making turns and begin driving. 14. After you become skilled at making both hands on the steering wheel, slowly release the brakes and depress the throttle with your right foot to begin to operate at faster speeds, follow these precautions: • Avoid sharp...

Owners Manual
Page 68
... the stated load capacity for your vehicle. Slow down and drive in loss of control of control or brake instability. Vehicle should never exceed 5 mph (8 kph) when towing loads in the cargo box. OPERATION WARNING Hauling Cargo Overloading the vehicle or carrying or towing cargo improperly can create unstable operating conditions, which could result in a passenger seat with moving components. REDUCE SPEED AND ALLOW GREATER...
... the stated load capacity for your vehicle. Slow down and drive in loss of control of control or brake instability. Vehicle should never exceed 5 mph (8 kph) when towing loads in the cargo box. OPERATION WARNING Hauling Cargo Overloading the vehicle or carrying or towing cargo improperly can create unstable operating conditions, which could result in a passenger seat with moving components. REDUCE SPEED AND ALLOW GREATER...

Owners Manual
Page 69
... box. Belt Life To extend belt life, use low gear when hauling or towing heavy cargo. Always follow these precautions when towing: 1. Towing a trailer increases braking distance. 3. The total load (operator, passengers, accessories, cargo and weight on warning labels and in loss of control of control or brake instability. Never load more than the recommended weight for the vehicle. 4. Attach a trailer to carry or tow specific capacities. Hauling Cargo OPERATION Your Polaris vehicle has...
... box. Belt Life To extend belt life, use low gear when hauling or towing heavy cargo. Always follow these precautions when towing: 1. Towing a trailer increases braking distance. 3. The total load (operator, passengers, accessories, cargo and weight on warning labels and in loss of control of control or brake instability. Never load more than the recommended weight for the vehicle. 4. Attach a trailer to carry or tow specific capacities. Hauling Cargo OPERATION Your Polaris vehicle has...
Owners Manual
Page 75
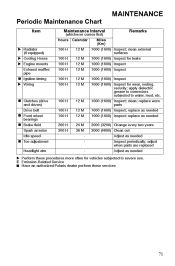
... X Radiator (if equipped) X Cooling Hoses X Engine mounts Exhaust muffler/ pipe Q Ignition timing MAINTENANCE Remarks Miles (Km) 1000 (1600) Inspect; apply dielectric grease to connectors subjected to severe use. clean external surfaces 1000 (1600) Inspect for leaks 1000 (1600) Inspect 1000 (1600) Inspect 1000 (1600) Inspect 1000 (1600) Inspect for vehicles subjected to water, mud, etc. 1000 (1600) Inspect; Q Front wheel bearings Q Brake fluid Spark arrestor Idle speed Q Toe adjustment Headlight aim X Perform these services 71...
... X Radiator (if equipped) X Cooling Hoses X Engine mounts Exhaust muffler/ pipe Q Ignition timing MAINTENANCE Remarks Miles (Km) 1000 (1600) Inspect; apply dielectric grease to connectors subjected to severe use. clean external surfaces 1000 (1600) Inspect for leaks 1000 (1600) Inspect 1000 (1600) Inspect 1000 (1600) Inspect 1000 (1600) Inspect for vehicles subjected to water, mud, etc. 1000 (1600) Inspect; Q Front wheel bearings Q Brake fluid Spark arrestor Idle speed Q Toe adjustment Headlight aim X Perform these services 71...

Owners Manual
Page 110
.... 3. Repeat steps 4-5 until the beam is necessary, turn the headlight adjustment screw to the center of the headlight beam should be aimed 8" (20 cm) below the mark placed on the headlights. 4. Apply the brakes. Start the engine. If adjustment is properly adjusted. 106 MAINTENANCE Lights Headlight Beam Adjustment X 25 ft. (7.6 m) X 8" (20 cm) 1. Turn on the wall in PARK. 2. Measure the distance from a wall.
.... 3. Repeat steps 4-5 until the beam is necessary, turn the headlight adjustment screw to the center of the headlight beam should be aimed 8" (20 cm) below the mark placed on the headlights. 4. Apply the brakes. Start the engine. If adjustment is properly adjusted. 106 MAINTENANCE Lights Headlight Beam Adjustment X 25 ft. (7.6 m) X 8" (20 cm) 1. Turn on the wall in PARK. 2. Measure the distance from a wall.
Owners Manual
Page 121
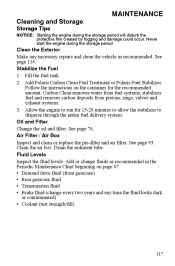
..., valves and exhaust systems. 3. See page 76. Air Filter / Air Box Inspect and clean or replace the pre-filter and air filter. Clean the air box. Fluid Levels Inspect the fluid levels. Stabilize the Fuel 1. Follow the instructions on page 67. • Demand drive fluid (front gearcase) • Rear gearcase fluid • Transmission fluid • Brake fluid (change every two years and any necessary repairs and clean the vehicle as recommended in the Periodic Maintenance...
..., valves and exhaust systems. 3. See page 76. Air Filter / Air Box Inspect and clean or replace the pre-filter and air filter. Clean the air box. Fluid Levels Inspect the fluid levels. Stabilize the Fuel 1. Follow the instructions on page 67. • Demand drive fluid (front gearcase) • Rear gearcase fluid • Transmission fluid • Brake fluid (change every two years and any necessary repairs and clean the vehicle as recommended in the Periodic Maintenance...
Owners Manual
Page 124
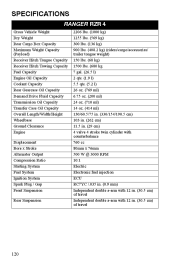
SPECIFICATIONS RANGER RZR 4 Gross Vehicle Weight Dry Weight Rear Cargo Box Capacity Maximum Weight Capacity (Payload) Receiver Hitch Tongue Capacity Receiver Hitch Towing Capacity Fuel Capacity Engine Oil Capacity Coolant Capacity Rear Gearcase Oil Capacity Demand Drive Fluid Capacity Transmission Oil Capacity Transfer Case Oil Capacity Overall Length/Width/Height Wheelbase Ground Clearance Engine Displacement Bore x Stroke Alternator Output Compression Ratio Starting System Fuel System Ignition System Spark Plug / Gap Front Suspension Rear Suspension 2206 lbs. (1000 kg) 1255 lbs. (569 kg) 300...
SPECIFICATIONS RANGER RZR 4 Gross Vehicle Weight Dry Weight Rear Cargo Box Capacity Maximum Weight Capacity (Payload) Receiver Hitch Tongue Capacity Receiver Hitch Towing Capacity Fuel Capacity Engine Oil Capacity Coolant Capacity Rear Gearcase Oil Capacity Demand Drive Fluid Capacity Transmission Oil Capacity Transfer Case Oil Capacity Overall Length/Width/Height Wheelbase Ground Clearance Engine Displacement Bore x Stroke Alternator Output Compression Ratio Starting System Fuel System Ignition System Spark Plug / Gap Front Suspension Rear Suspension 2206 lbs. (1000 kg) 1255 lbs. (569 kg) 300...
Owners Manual
Page 136
... be sure to continue your vehicle was purchased, Warranty or Service Bulletin repairs may also be required to obtain documentation from a private citizen outside of the country where it was purchased will be required to perform the warranty repair. If You Move: If you move. Vehicles importation rules vary considerably from any authorized Polaris dealer who sells the same...
... be sure to continue your vehicle was purchased, Warranty or Service Bulletin repairs may also be required to obtain documentation from a private citizen outside of the country where it was purchased will be required to perform the warranty repair. If You Move: If you move. Vehicles importation rules vary considerably from any authorized Polaris dealer who sells the same...

Owners Manual
Page 137
... emissions Fuel Tank Fuel Cap Fuel Line Fuel Line Fittings Clamps* Pressure Relief Valves* Control Valves* Control Solenoids* Electronic Controls Vacuum Control Diaphragms* Control Cables* Control Linkages* Purge Valves Vapor Hoses Liquid/Vapor Separator Carbon Canister Canister Mounting Brackets Carburetor Purge Port Connector *As related to meet these regulations. For exhaust emissions, emission-related components include any engine parts related to the following systems: • Air-induction system • Fuel system • Ignition system • Exhaust gas...
... emissions Fuel Tank Fuel Cap Fuel Line Fuel Line Fittings Clamps* Pressure Relief Valves* Control Valves* Control Solenoids* Electronic Controls Vacuum Control Diaphragms* Control Cables* Control Linkages* Purge Valves Vapor Hoses Liquid/Vapor Separator Carbon Canister Canister Mounting Brackets Carburetor Purge Port Connector *As related to meet these regulations. For exhaust emissions, emission-related components include any engine parts related to the following systems: • Air-induction system • Fuel system • Ignition system • Exhaust gas...

Owners Manual
Page 142
... AWD System ...40 Axle Nut Torque ...103 C Cab Nets ...33 Cap, Fuel ...32 Cargo ...64-65 Changing Coolant ...87 Changing Gears ...38 Chart, Periodic Maintenance ...67-71 Chrome Wheel Care ...116 Cleaning and Storage...114-119 Cleaning the Air Filter...93 Cleaning the Exhaust System ...94 Cleaning the Spark Arrestor ...94 Clothing ...9 Clutching ...121 Component Locations ...26-28 Condition, Spark Plugs ...86 Coolant Level ...89 Coolant Level, Radiator...90 Coolant, Adding or Changing ...87 Cooling Fan ...88 Cooling...
... AWD System ...40 Axle Nut Torque ...103 C Cab Nets ...33 Cap, Fuel ...32 Cargo ...64-65 Changing Coolant ...87 Changing Gears ...38 Chart, Periodic Maintenance ...67-71 Chrome Wheel Care ...116 Cleaning and Storage...114-119 Cleaning the Air Filter...93 Cleaning the Exhaust System ...94 Cleaning the Spark Arrestor ...94 Clothing ...9 Clutching ...121 Component Locations ...26-28 Condition, Spark Plugs ...86 Coolant Level ...89 Coolant Level, Radiator...90 Coolant, Adding or Changing ...87 Cooling Fan ...88 Cooling...
Owners Manual
Page 143
... Transfer Case ...78 Transmission...80 Fluid Levels During Storage...117 Fluid Recommendations, Gearcase . 84 Fluid, Battery ...111 Fluid, Brake ...98 Fogging the Engine...118 Fouled Plugs ...86 Freeplay Adjustment, Throttle ...96 Freeplay, Steering Wheel ...99 Fuel Cap ...32 Fuel Safety ...19 Fuel Stabilizer ...117 Fuel Tank Filler Cap ...32 G Gap, Spark Plug ...85 Gasoline Handling ...19 Gear Circuit Diagnostics...45 Gear Selector ...38 Gearcase Capacities ...84 Gearcase Oil Demand Drive...82 Front ...82 Main ...80-81 Rear...83 Transfer Case...
... Transfer Case ...78 Transmission...80 Fluid Levels During Storage...117 Fluid Recommendations, Gearcase . 84 Fluid, Battery ...111 Fluid, Brake ...98 Fogging the Engine...118 Fouled Plugs ...86 Freeplay Adjustment, Throttle ...96 Freeplay, Steering Wheel ...99 Fuel Cap ...32 Fuel Safety ...19 Fuel Stabilizer ...117 Fuel Tank Filler Cap ...32 G Gap, Spark Plug ...85 Gasoline Handling ...19 Gear Circuit Diagnostics...45 Gear Selector ...38 Gearcase Capacities ...84 Gearcase Oil Demand Drive...82 Front ...82 Main ...80-81 Rear...83 Transfer Case...

Owners Manual
Page 144
... Switch ...36 N Nets, Cab ...33 New Operator Procedures ...54-55 Noise Emission Control System ...66 I Idle Speed ...96 Ignition Switch...37 Indicator, Service Interval ...45 Inspection, Axle Nuts ...103 Inspection, Brakes ...99 Inspection, Pre-Ride ...50 Inspection, Seat Belts...35 Inspection, Steering Wheel ...99 Inspection, Throttle Freeplay...95 Inspection, Wheel Nuts ...103 Installation, Battery ...110 Installation, Wheels ...104 Instrument Cluster ...41-47 Interference, Electromagnetic ...66 O Obstacles ...61 Odometer ...43 Oil Demand Drive ...82 Engine...
... Switch ...36 N Nets, Cab ...33 New Operator Procedures ...54-55 Noise Emission Control System ...66 I Idle Speed ...96 Ignition Switch...37 Indicator, Service Interval ...45 Inspection, Axle Nuts ...103 Inspection, Brakes ...99 Inspection, Pre-Ride ...50 Inspection, Seat Belts...35 Inspection, Steering Wheel ...99 Inspection, Throttle Freeplay...95 Inspection, Wheel Nuts ...103 Installation, Battery ...110 Installation, Wheels ...104 Instrument Cluster ...41-47 Interference, Electromagnetic ...66 O Obstacles ...61 Odometer ...43 Oil Demand Drive ...82 Engine...

Owners Manual
Page 145
... ...10 Seat Adjustment ...29 Seat Belt Cleaning ...35 Seat Belt Inspection ...35 Seat Belts ...34-35 Seat Removal ...29 R Radiator...88 Radiator Coolant Level ...90 Rear Gearcase Fluid Change...83 Rear Gearcase Oil Change ...83 Receiver Hitch ...28 Removal, Battery ...109 Removal, Seat ...29 Removal, Wheels ...104 Removing the Vehicle from Storage 119 Replacement, Headlight Lamp ...105 Reverse ...62 Rider Information Center ...42-47 Riding Area...53 Riding Gear...8-9 RPM, Idle, Throttle Body ...96 S Safe Operation Practices ...51 Safety Labels...
... ...10 Seat Adjustment ...29 Seat Belt Cleaning ...35 Seat Belt Inspection ...35 Seat Belts ...34-35 Seat Removal ...29 R Radiator...88 Radiator Coolant Level ...90 Rear Gearcase Fluid Change...83 Rear Gearcase Oil Change ...83 Receiver Hitch ...28 Removal, Battery ...109 Removal, Seat ...29 Removal, Wheels ...104 Removing the Vehicle from Storage 119 Replacement, Headlight Lamp ...105 Reverse ...62 Rider Information Center ...42-47 Riding Area...53 Riding Gear...8-9 RPM, Idle, Throttle Body ...96 S Safe Operation Practices ...51 Safety Labels...

Owners Manual
Page 146
... Panel, Rear ...29 Severe Use Definition ...67 Shifting Gears ...38 Shock Compression ...101 Signal Words ...4 Spark Arrestor Cleaning ...94 Spark Arrestor Warning...94 Spark Plug Condition...86 Spark Plug Gap ...85 Spark Plug Removal ...86 Spark Plug Torque ...85 Spark Plugs ...85-86 Spark Plugs, Fouled ...86 Specifications...120-121 Specifications, Gearcase ...84 Speed, Idle ...96 Speed, Towing ...65 Speedometer ...41 Spring Preload ...100 Spring Preload ...102 Spring Preload Adjustment ...101 Stabilizing the Fuel ...117 Starting the Engine ...52 Steering Wheel Adjustment...30 Steering Wheel...
... Panel, Rear ...29 Severe Use Definition ...67 Shifting Gears ...38 Shock Compression ...101 Signal Words ...4 Spark Arrestor Cleaning ...94 Spark Arrestor Warning...94 Spark Plug Condition...86 Spark Plug Gap ...85 Spark Plug Removal ...86 Spark Plug Torque ...85 Spark Plugs ...85-86 Spark Plugs, Fouled ...86 Specifications...120-121 Specifications, Gearcase ...84 Speed, Idle ...96 Speed, Towing ...65 Speedometer ...41 Spring Preload ...100 Spring Preload ...102 Spring Preload Adjustment ...101 Stabilizing the Fuel ...117 Starting the Engine ...52 Steering Wheel Adjustment...30 Steering Wheel...