

Owners Manual
Page 13
...vehicle weight rating (GVWR). • If necessary, adjust the rear shock preload. A passenger who cannot place both feet on the passenger footrests. Department of fatalities in the wheels, causing loss of automobile/motorcycle accidents. • Wear gloves, a jacket, heavy boots and long pants to prevent or reduce injury from engine and exhaust system heat...carry a passenger who rides improperly can catch on pedals or footrests. Approved helmets in handling, acceleration and braking caused by the additional weight of control. • Before riding, be sure your passenger is ...
...vehicle weight rating (GVWR). • If necessary, adjust the rear shock preload. A passenger who cannot place both feet on the passenger footrests. Department of fatalities in the wheels, causing loss of automobile/motorcycle accidents. • Wear gloves, a jacket, heavy boots and long pants to prevent or reduce injury from engine and exhaust system heat...carry a passenger who rides improperly can catch on pedals or footrests. Approved helmets in handling, acceleration and braking caused by the additional weight of control. • Before riding, be sure your passenger is ...
Owners Manual
Page 14
... highway footrests. 10 Safety Gross Vehicle Weight Rating (GVWR) WARNING! Do not attach cargo to an accessory not designed for model-specific information. This capacity is the maximum weight you will be adding to your motorcycle can also block air flow to the handlebars, front fork area or front fender. NEVER exceed the GVWR of control. Cargo in this manual or the Manufacturing Information...
... highway footrests. 10 Safety Gross Vehicle Weight Rating (GVWR) WARNING! Do not attach cargo to an accessory not designed for model-specific information. This capacity is the maximum weight you will be adding to your motorcycle can also block air flow to the handlebars, front fork area or front fender. NEVER exceed the GVWR of control. Cargo in this manual or the Manufacturing Information...
Owners Manual
Page 17
... the tank. Follow the instructions for your skin or clothing, immediately wash it run in a short time. • Never start the engine or let it off with water. Fuel and Exhaust Safety WARNING Gasoline is stored. An improperly designed or installed accessories can cause loss of engine power or lights, or damage to the electrical system. • Always install accessories designed and approved by VICTORY specifically for...
... the tank. Follow the instructions for your skin or clothing, immediately wash it run in a short time. • Never start the engine or let it off with water. Fuel and Exhaust Safety WARNING Gasoline is stored. An improperly designed or installed accessories can cause loss of engine power or lights, or damage to the electrical system. • Always install accessories designed and approved by VICTORY specifically for...
Owners Manual
Page 18
... torque. Always perform the safety maintenance procedures as outlined in the VICTORY Service Manual, or see your authorized VICTORY dealer for service. • Before each ride, perform the pre-ride inspections. Use only approved replacement tires. • Always ensure proper steering head bearing adjustment. • Regularly inspect the rear shock absorber and the front forks for fluid leaks or damage. Electromagnetic Interference This vehicle complies with...
... torque. Always perform the safety maintenance procedures as outlined in the VICTORY Service Manual, or see your authorized VICTORY dealer for service. • Before each ride, perform the pre-ride inspections. Use only approved replacement tires. • Always ensure proper steering head bearing adjustment. • Regularly inspect the rear shock absorber and the front forks for fluid leaks or damage. Electromagnetic Interference This vehicle complies with...

Owners Manual
Page 20
... Air Filter Spark Plugs Ignition Switch Battery (under side cover) Taillight Rear Turn Signal Rear Axle Adjuster (each side) Rear Brake Caliper Passenger's Foot Rest Evaporative Emissions Canister (California Models) Oil Filter Oil Drain Plug (under guard) Exhaust Mufflers 2, 3, 4, 5 1 6 14 13 12 11 10 9 8 7 16 Component Identification Handlebar Area 1. 2. 3. 4. 5. 6. 7. 8. 9. 10. 11. Passenger Seat/Cowl Rear Brake Fluid Reservoir (under cover) Diagnostic Connector Fuses Rear Shock Access Front Turn Signal Front Brake Caliper Rear Brake Pedal Operator's Foot Rest Engine Oil...
... Air Filter Spark Plugs Ignition Switch Battery (under side cover) Taillight Rear Turn Signal Rear Axle Adjuster (each side) Rear Brake Caliper Passenger's Foot Rest Evaporative Emissions Canister (California Models) Oil Filter Oil Drain Plug (under guard) Exhaust Mufflers 2, 3, 4, 5 1 6 14 13 12 11 10 9 8 7 16 Component Identification Handlebar Area 1. 2. 3. 4. 5. 6. 7. 8. 9. 10. 11. Passenger Seat/Cowl Rear Brake Fluid Reservoir (under cover) Diagnostic Connector Fuses Rear Shock Access Front Turn Signal Front Brake Caliper Rear Brake Pedal Operator's Foot Rest Engine Oil...

Owners Manual
Page 22
Engine Identification Number Ignition Switch The ignition switch provides electrical power to the ignition, the lighting system and all electrical switches and buttons. ON All electrical circuits are inactive and the ignition key can be removed. The headlamp, taillight, and instrument lights illuminate. Park On Off 18 The last 5 digits are the engine model number. Push the ignition key inward while selecting the PARK position. The first 8 digits are the serial number. The...
Engine Identification Number Ignition Switch The ignition switch provides electrical power to the ignition, the lighting system and all electrical switches and buttons. ON All electrical circuits are inactive and the ignition key can be removed. The headlamp, taillight, and instrument lights illuminate. Park On Off 18 The last 5 digits are the engine model number. Push the ignition key inward while selecting the PARK position. The first 8 digits are the serial number. The...

Owners Manual
Page 29
Instruments, Features and Controls Fuel Cap Use the ignition key to access the fuses and the rear brake fluid reservoir. 1. Open the fuel cap 1. Turn the key clockwise while pushing downward lightly. An improperly retracted sidestand could contact the ground during operation and cause loss of the motorcycle rests safely on the sidestand. 3. Always make sure each rubber grommet is fully retracted before operating the motorcycle. 1. Turn the key clockwise...
Instruments, Features and Controls Fuel Cap Use the ignition key to access the fuses and the rear brake fluid reservoir. 1. Open the fuel cap 1. Turn the key clockwise while pushing downward lightly. An improperly retracted sidestand could contact the ground during operation and cause loss of the motorcycle rests safely on the sidestand. 3. Always make sure each rubber grommet is fully retracted before operating the motorcycle. 1. Turn the key clockwise...
Owners Manual
Page 30
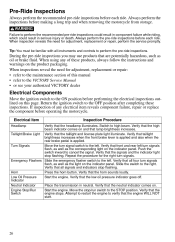
... the maintenance section of this manual • refer to the VICTORY Service Manual • or see your authorized VICTORY dealer Electrical Components Move the ignition switch to the OFF position after completing these products, always follow the instructions and warnings on the indicator panel. Low Oil Pressure Start the engine. Slide the switch to the STOP position. Engine Stop/Run Start the engine. Pre-Ride Inspections Always perform the...
... the maintenance section of this manual • refer to the VICTORY Service Manual • or see your authorized VICTORY dealer Electrical Components Move the ignition switch to the OFF position after completing these products, always follow the instructions and warnings on the indicator panel. Low Oil Pressure Start the engine. Slide the switch to the STOP position. Engine Stop/Run Start the engine. Pre-Ride Inspections Always perform the...

Owners Manual
Page 40
... the fuel tank. Do not allow the engine control module to five times. 36 Turn the ignition switch to contact hot components. Use only the recommended fuel. Do not overfill. To prevent leaks, make sure the fuel filler cap is properly seated and locked. NOTICE: Fuel can damage painted surfaces and plastic parts. Allow the fuel pump to run switch from the STOP position to restart the engine. 1. Move the engine stop /run until...
... the fuel tank. Do not allow the engine control module to five times. 36 Turn the ignition switch to contact hot components. Use only the recommended fuel. Do not overfill. To prevent leaks, make sure the fuel filler cap is properly seated and locked. NOTICE: Fuel can damage painted surfaces and plastic parts. Allow the fuel pump to run switch from the STOP position to restart the engine. 1. Move the engine stop /run until...
Owners Manual
Page 42
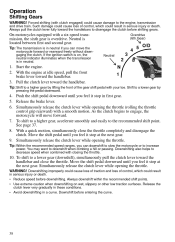
... idle speed, pull the front brake lever toward the handlebar and close the throttle completely and disengage the clutch. If the ignition switch is in neutral. Simultaneously release the clutch lever while opening the throttle. To shift to the engine, transmission and drive train. Move the shift pedal downward until you can downshift to slow the motorcycle or to a higher gear by pressing the pedal downward. 4. Release the clutch...
... idle speed, pull the front brake lever toward the handlebar and close the throttle completely and disengage the clutch. If the ignition switch is in neutral. Simultaneously release the clutch lever while opening the throttle. To shift to the engine, transmission and drive train. Move the shift pedal downward until you can downshift to slow the motorcycle or to a higher gear by pressing the pedal downward. 4. Release the clutch...

Owners Manual
Page 43
... rear wheel traction or engine and transmission damage, which could result in loss of control could result in serious injury or death. The more quickly you reach the recommended speed for upshifting, shift up one gear. WARNING! WARNING! When fully stopped, shift into the STOP position or when the key is in a curve or turn. Loss of control. Avoid braking in neutral. Tip: Idle air control (IAC) noise is a normal engine...
... rear wheel traction or engine and transmission damage, which could result in loss of control could result in serious injury or death. The more quickly you reach the recommended speed for upshifting, shift up one gear. WARNING! WARNING! When fully stopped, shift into the STOP position or when the key is in a curve or turn. Loss of control. Avoid braking in neutral. Tip: Idle air control (IAC) noise is a normal engine...

Owners Manual
Page 52
... Adjuster Axle Adjuster Nut 7. Tighten the adjuster lock nut (screw-style), then tighten the axle nut. Maintenance Rear Wheel Alignment WARNING! Elevate and support the rear of a turn the axle adjuster screws. Inspect the position of the motorcycle. 1. Both adjuster styles: Turn the screw or nut IN (clockwise) to draw the axle back, or OUT (counterclockwise) to allow the axle to reset brake pad distance...
... Adjuster Axle Adjuster Nut 7. Tighten the adjuster lock nut (screw-style), then tighten the axle nut. Maintenance Rear Wheel Alignment WARNING! Elevate and support the rear of a turn the axle adjuster screws. Inspect the position of the motorcycle. 1. Both adjuster styles: Turn the screw or nut IN (clockwise) to draw the axle back, or OUT (counterclockwise) to allow the axle to reset brake pad distance...

Owners Manual
Page 55
... seals or around the inner tubes. 2. The front suspension should operate smoothly and quietly. 5. See the VICTORY Service Manual or your authorized VICTORY dealer. Apply the front brake and push downward (hard) on the sidestand and inspect the front forks. Replace fork oil at the rear axle, inspect the wheel bearings and rear axle. Use an appropriate motorcycle support placed securely under...
... seals or around the inner tubes. 2. The front suspension should operate smoothly and quietly. 5. See the VICTORY Service Manual or your authorized VICTORY dealer. Apply the front brake and push downward (hard) on the sidestand and inspect the front forks. Replace fork oil at the rear axle, inspect the wheel bearings and rear axle. Use an appropriate motorcycle support placed securely under...

Owners Manual
Page 56
... inspected, lubricated and adjusted. Fuel Filters Fuel filter condition affects engine performance and fuel economy. Make sure wires, hoses and control cables do not interfere with the wheel slightly above the ground. See page 13. Maintenance Front Suspension Steering and Front Axle Inspection 1. If there is stable when elevated. Inspect the evaporative canister for dampness or stains that would indicate a leak. See the VICTORY Service Manual or your authorized VICTORY...
... inspected, lubricated and adjusted. Fuel Filters Fuel filter condition affects engine performance and fuel economy. Make sure wires, hoses and control cables do not interfere with the wheel slightly above the ground. See page 13. Maintenance Front Suspension Steering and Front Axle Inspection 1. If there is stable when elevated. Inspect the evaporative canister for dampness or stains that would indicate a leak. See the VICTORY Service Manual or your authorized VICTORY...

Owners Manual
Page 63
... tire air pressure. See the VICTORY Service Manual or your intended load (see table). Tire Tread Depth The raised areas at the base of control or accident. For more precise measurement, use the correct size and type of the wear bars, replace the tire. Replace the tire if the tread depth is less than 1/16 inch (1.6 mm). 59 Replace damaged tires immediately. Always use a depth gauge...
... tire air pressure. See the VICTORY Service Manual or your intended load (see table). Tire Tread Depth The raised areas at the base of control or accident. For more precise measurement, use the correct size and type of the wear bars, replace the tire. Replace the tire if the tread depth is less than 1/16 inch (1.6 mm). 59 Replace damaged tires immediately. Always use a depth gauge...
Owners Manual
Page 81
... regulations of the United States Environmental Protection Agency or the California Air Resources Board for a period of use, depending on the engine displacement, of 12,000 kilometers (7,456 miles), if the motorcycle's engine displacement is equal or greater than 170 cubic centimeters but VICTORY cannot deny warranty solely for your owner's manual. The warranty repairs should contact VICTORY Motorcycle Division, Polaris Sales...
... regulations of the United States Environmental Protection Agency or the California Air Resources Board for a period of use, depending on the engine displacement, of 12,000 kilometers (7,456 miles), if the motorcycle's engine displacement is equal or greater than 170 cubic centimeters but VICTORY cannot deny warranty solely for your owner's manual. The warranty repairs should contact VICTORY Motorcycle Division, Polaris Sales...
Owners Manual
Page 82
... parts in order to receive compensation. air cutoff valves; igniters; II. Inspections, replacement of the following: A. These warranted parts are specifically defined by other services and adjustments necessary for evaporative emission controlled vehicles; VICTORY will reimburse the owner for all of California only, Emission Control System emergency repairs, as a result of: (1) accident (2) misuse (3) repairs improperly performed or replacements improperly installed (4) use in these parts...
... parts in order to receive compensation. air cutoff valves; igniters; II. Inspections, replacement of the following: A. These warranted parts are specifically defined by other services and adjustments necessary for evaporative emission controlled vehicles; VICTORY will reimburse the owner for all of California only, Emission Control System emergency repairs, as a result of: (1) accident (2) misuse (3) repairs improperly performed or replacements improperly installed (4) use in these parts...
Owners Manual
Page 95
... ...11 Error Codes, Engine ...22 Evaporative Emission Control System ...28, 52 Exhaust Safety ...13 Exhaust System Inspection ...61 F Fastener Inspection ...34 Fluid Clutch (Hydraulic) ...56 Front Brake ...57 Rear Brake ...57 Fluid Level, Front Brake...29 Fluid Level, Hydraulic Clutch ...32 Fluid Level, Rear Brake ...31 Fork Inspection ...51 Front Axle Inspection ...52 Front Brake Lever...24, 29 Front Fork Inspection ...51 Fuel Cap Access ...25 Fuel Fill Height...36 Fuel Filters ...52 Fuel Hose Inspection ...52...
... ...11 Error Codes, Engine ...22 Evaporative Emission Control System ...28, 52 Exhaust Safety ...13 Exhaust System Inspection ...61 F Fastener Inspection ...34 Fluid Clutch (Hydraulic) ...56 Front Brake ...57 Rear Brake ...57 Fluid Level, Front Brake...29 Fluid Level, Hydraulic Clutch ...32 Fluid Level, Rear Brake ...31 Fork Inspection ...51 Front Axle Inspection ...52 Front Brake Lever...24, 29 Front Fork Inspection ...51 Fuel Cap Access ...25 Fuel Fill Height...36 Fuel Filters ...52 Fuel Hose Inspection ...52...

Owners Manual
Page 96
... Inspection, Rear Shock...49 Priming the Fuel System ...36 Protectant, Leather, Rubber and Vinyl ...73 Protective Equipment ...9 Pure VICTORY Products ...69 I Identification Number, Engine ...18 Identification Number, Vehicle ...17 Identification Numbers Record ...88 Ignition Key Number...18 Ignition Key Record ...88 Ignition Switch...18 Indicator Lamps ...19 Information Labels...15 Inspections, Pre-Ride...26-34 Instrument Cluster ...19-22 K Key Number...18 R Rear Axle Inspection ...51 Rear Brake Pedal...
... Inspection, Rear Shock...49 Priming the Fuel System ...36 Protectant, Leather, Rubber and Vinyl ...73 Protective Equipment ...9 Pure VICTORY Products ...69 I Identification Number, Engine ...18 Identification Number, Vehicle ...17 Identification Numbers Record ...88 Ignition Key Number...18 Ignition Key Record ...88 Ignition Switch...18 Indicator Lamps ...19 Information Labels...15 Inspections, Pre-Ride...26-34 Instrument Cluster ...19-22 K Key Number...18 R Rear Axle Inspection ...51 Rear Brake Pedal...

Owners Manual
Page 97
...51, 52 Suspension Maintenance, Rear ...49-51 Swing Arm Inspection ...51 Switches Emergency Flasher Switch ...23 Engine Stop/Run Switch ...24 Hazard Switch ...23 High Beam/Low Beam Switch ...23 Horn Button ...23 Ignition Switch...18 Mode Button ...23 Starter Button ...24 Turn Signal Switch ...23 T Throttle Cable Lubrication ...Throttle Control Grip ...Throttle Freeplay ...Throttle Freeplay Adjustment...Throttle Inspection ...Throttle Operation ...Throttle System Maintenance ...Tilt Sensor...Tire Condition...Tire Pressure ...Tire Tread Depth...Tire Condition...Tire Pressure ...Tire Tread Depth...
...51, 52 Suspension Maintenance, Rear ...49-51 Swing Arm Inspection ...51 Switches Emergency Flasher Switch ...23 Engine Stop/Run Switch ...24 Hazard Switch ...23 High Beam/Low Beam Switch ...23 Horn Button ...23 Ignition Switch...18 Mode Button ...23 Starter Button ...24 Turn Signal Switch ...23 T Throttle Cable Lubrication ...Throttle Control Grip ...Throttle Freeplay ...Throttle Freeplay Adjustment...Throttle Inspection ...Throttle Operation ...Throttle System Maintenance ...Tilt Sensor...Tire Condition...Tire Pressure ...Tire Tread Depth...Tire Condition...Tire Pressure ...Tire Tread Depth...