

Owners Manual
Page 1
Operation is prohibited for off-road use by operators with advanced skills and substantial experience. Read this manual carefully. Pantone 419C Owner's Manual for Maintenance and Safety This Category "S" (Sport) ATV is a high-performance ATV for anyone under 16 years of age. OUTLAW 525 IRS It contains important safety information. It is for sport-type recreational and competitive use only.
Operation is prohibited for off-road use by operators with advanced skills and substantial experience. Read this manual carefully. Pantone 419C Owner's Manual for Maintenance and Safety This Category "S" (Sport) ATV is a high-performance ATV for anyone under 16 years of age. OUTLAW 525 IRS It contains important safety information. It is for sport-type recreational and competitive use only.

Owners Manual
Page 4
... AND PROTECTIVE GEAR NEVER USE ON PUBLIC ROADS NEVER CARRY PASSENGERS NEVER USE WITH DRUGS OR ALCOHOL READ OWNER'S MANUAL. For your skills or the conditions S on hills and rough terrain and in turns S avoid paved surfaces - FOLLOW ALL INSTRUCTIONS AND WARNINGS. passengers affect balance and steering and increase risk of losing control ALWAYS: S use can occur with another vehicle S with a passenger - WARNING NEVER...
... AND PROTECTIVE GEAR NEVER USE ON PUBLIC ROADS NEVER CARRY PASSENGERS NEVER USE WITH DRUGS OR ALCOHOL READ OWNER'S MANUAL. For your skills or the conditions S on hills and rough terrain and in turns S avoid paved surfaces - FOLLOW ALL INSTRUCTIONS AND WARNINGS. passengers affect balance and steering and increase risk of losing control ALWAYS: S use can occur with another vehicle S with a passenger - WARNING NEVER...

Owners Manual
Page 6
... expressly prohibited. All information contained within , whether whole or in U.S.A. 2011 OUTLAW 525 IRS ATV Owner's Manual P/N 9923078 2 Any reprinting or reuse of the depictions and/or procedures contained within this vehicle are provided as translations of publication. Printed in part, is based on the latest product information at the time of the original instructions. Copyright 2010 POLARIS Sales Inc.
... expressly prohibited. All information contained within , whether whole or in U.S.A. 2011 OUTLAW 525 IRS ATV Owner's Manual P/N 9923078 2 Any reprinting or reuse of the depictions and/or procedures contained within this vehicle are provided as translations of publication. Printed in part, is based on the latest product information at the time of the original instructions. Copyright 2010 POLARIS Sales Inc.

Owners Manual
Page 42
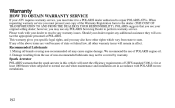
Features and Controls Engine Stop Switch Main Key Switch Start Button 38
Features and Controls Engine Stop Switch Main Key Switch Start Button 38

Owners Manual
Page 65
... the socket when the lamp is replaced Check operation, adjust brake light switch Wear helmet, goggles, protective clothing Check freeplay. Operation Pre-Ride Inspection Pre-Ride Checklist Coolant (if applicable) Coolant hoses (if applicable) Throttle Indicator lights / switches Engine stop switch Air filter Air box sediment tubes Headlamp Brake light / tail lamp Riding gear A-arm ball joints Rear shaft assembly Ensure proper level Inspect for tears, punctures and grease leaks Page 107 -44 40, 41...
... the socket when the lamp is replaced Check operation, adjust brake light switch Wear helmet, goggles, protective clothing Check freeplay. Operation Pre-Ride Inspection Pre-Ride Checklist Coolant (if applicable) Coolant hoses (if applicable) Throttle Indicator lights / switches Engine stop switch Air filter Air box sediment tubes Headlamp Brake light / tail lamp Riding gear A-arm ball joints Rear shaft assembly Ensure proper level Inspect for tears, punctures and grease leaks Page 107 -44 40, 41...

Owners Manual
Page 81
Operation Turning Around on a Hill 7. With the front brakes applied, pull in the clutch lever, shift into neutral and restart the engine. 10. Remount from the uphill side, keeping body 8 ft. (2.4 m) weight uphill. 9. Pull in the clutch lever. See page 75. 77 With the front brakes still applied, release the clutch lever and lock the parking brake. Follow proper procedures for additional speed control if necessary, until it...
Operation Turning Around on a Hill 7. With the front brakes applied, pull in the clutch lever, shift into neutral and restart the engine. 10. Remount from the uphill side, keeping body 8 ft. (2.4 m) weight uphill. 9. Pull in the clutch lever. See page 75. 77 With the front brakes still applied, release the clutch lever and lock the parking brake. Follow proper procedures for additional speed control if necessary, until it...
Owners Manual
Page 93
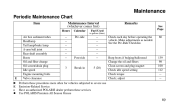
... Air box sediment tubes Headlamp Tail lamp/brake lamp A-arm ball joint Rear shaft assembly Boots Oil and filter change Oil screen/drain plug Idle speed Engine mounting bolts Valve clearance ------3 Calendar Pre-ride Fuel Used in gallons (liters) Remarks See Page 60 Post-ride Break-in ------5 (20) Check each day before operating the vehicle. Perform these procedures more often for vehicles subjected to severe use Emission-Related Service Have an authorized POLARIS dealer perform these services Use POLARIS...
... Air box sediment tubes Headlamp Tail lamp/brake lamp A-arm ball joint Rear shaft assembly Boots Oil and filter change Oil screen/drain plug Idle speed Engine mounting bolts Valve clearance ------3 Calendar Pre-ride Fuel Used in gallons (liters) Remarks See Page 60 Post-ride Break-in ------5 (20) Check each day before operating the vehicle. Perform these procedures more often for vehicles subjected to severe use Emission-Related Service Have an authorized POLARIS dealer perform these services Use POLARIS...

Owners Manual
Page 97
... procedures more often for leaks at tank cap, lines, fuel valve, filter, carburetor; change coolant every 2 years Check for vehicles subjected to severe use Emission-Related Service Have an authorized POLARIS dealer perform these services Use POLARIS Premium All Season Grease 93 X 104 (400) 104 (400) 156 (600) 156 (600) 156 (600) 156 (600) 156 (600) 156 (600) nE E X E n z Check spring length (see dealer) Check ratchet...
... procedures more often for leaks at tank cap, lines, fuel valve, filter, carburetor; change coolant every 2 years Check for vehicles subjected to severe use Emission-Related Service Have an authorized POLARIS dealer perform these services Use POLARIS Premium All Season Grease 93 X 104 (400) 104 (400) 156 (600) 156 (600) 156 (600) 156 (600) 156 (600) 156 (600) nE E X E n z Check spring length (see dealer) Check ratchet...
Owners Manual
Page 99
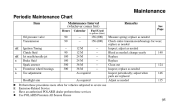
...; Maintenance Periodic Maintenance Chart Item Maintenance Interval (whichever comes first) Hours Oil pressure valve Transmission nE nE n n n Ignition Timing Clutch fluid Jet needle/needle jet Brake fluid Spark arrestor Front/rear wheel bearings Toe adjustment Headlight aim X E n z 90 90 -90 180 180 300 300 Calendar --12 M 12 M 24 M 24 M 36 M 36 M As required As required Fuel Used in gallons (liters) Remarks See Page 156 (600) 156 (600) ------- Measure spring; change yearly 140 Replace Replace...
...; Maintenance Periodic Maintenance Chart Item Maintenance Interval (whichever comes first) Hours Oil pressure valve Transmission nE nE n n n Ignition Timing Clutch fluid Jet needle/needle jet Brake fluid Spark arrestor Front/rear wheel bearings Toe adjustment Headlight aim X E n z 90 90 -90 180 180 300 300 Calendar --12 M 12 M 24 M 24 M 36 M 36 M As required As required Fuel Used in gallons (liters) Remarks See Page 156 (600) 156 (600) ------- Measure spring; change yearly 140 Replace Replace...

Owners Manual
Page 119
Maintenance Lights Headlight Adjustment 1. Position the vehicle on a level surface with the headlight approximately 25 ft. (7.6 m) from the floor to high beam. 25 ft. (7.6 m) Lamp Center Height 2" (5 cm) General Representation 115 Measure the distance from a flat wall. 2. Start the engine and turn the headlight switch to the center of the headlight and make a mark on the wall at the same height. 3.
Maintenance Lights Headlight Adjustment 1. Position the vehicle on a level surface with the headlight approximately 25 ft. (7.6 m) from the floor to high beam. 25 ft. (7.6 m) Lamp Center Height 2" (5 cm) General Representation 115 Measure the distance from a flat wall. 2. Start the engine and turn the headlight switch to the center of the headlight and make a mark on the wall at the same height. 3.

Owners Manual
Page 120
Include rider weight on the wall. Tighten the screw and torque to the desired position. 6. Pivot Screw 116 Loosen the pivot screw and adjust the beam to 27 in. lbs. (3 Nm). Observe the headlight aim on the seat when measuring. 5. The most intense part of the headlight beam should be aimed 2" (5 cm) below the mark placed on the wall. Maintenance Lights 4.
Include rider weight on the wall. Tighten the screw and torque to the desired position. 6. Pivot Screw 116 Loosen the pivot screw and adjust the beam to 27 in. lbs. (3 Nm). Observe the headlight aim on the seat when measuring. 5. The most intense part of the headlight beam should be aimed 2" (5 cm) below the mark placed on the wall. Maintenance Lights 4.

Owners Manual
Page 121
... bulb must be positioned so the harness installs into the lamp at outer side. 4. Rotate firmly. Maintenance Lights Headlight Lamp Replacement When servicing a halogen lamp, avoid touching the lamp with denatured alcohol. 1. Allow lamps to the back of the headlight. 117 Reinstall the connector to cool before servicing. 3. Hot components can cause burns to the socket and install the new bulb. Oil...
... bulb must be positioned so the harness installs into the lamp at outer side. 4. Rotate firmly. Maintenance Lights Headlight Lamp Replacement When servicing a halogen lamp, avoid touching the lamp with denatured alcohol. 1. Allow lamps to the back of the headlight. 117 Reinstall the connector to cool before servicing. 3. Hot components can cause burns to the socket and install the new bulb. Oil...

Owners Manual
Page 122
Remove the headlamp. 5. Connect the wire harness to the headlamp. Remove the front cover. 2. Adjust the lamp as needed (see page 115), then tighten the adjuster screw. 118 Maintenance Lights Headlight Assembly Replacement 1. Remove the two retaining brackets and the adjuster screw. 4. Install the adjuster screw, leaving it in the slots on the frame tabs. Install the new headlamp, placing it loose so the headlight can be adjusted. 7. Reinstall the front cover. 8. Secure the headlamp with the retaining brackets. 6. Remove the wire harness connector from the headlights. 3.
Remove the headlamp. 5. Connect the wire harness to the headlamp. Remove the front cover. 2. Adjust the lamp as needed (see page 115), then tighten the adjuster screw. 118 Maintenance Lights Headlight Assembly Replacement 1. Remove the two retaining brackets and the adjuster screw. 4. Install the adjuster screw, leaving it in the slots on the frame tabs. Install the new headlamp, placing it loose so the headlight can be adjusted. 7. Reinstall the front cover. 8. Secure the headlamp with the retaining brackets. 6. Remove the wire harness connector from the headlights. 3.

Owners Manual
Page 123
... is no pressure on the spring. If the light does not operate properly, grasp the switch body with each use of the brake pedal. 3. Recheck and readjust as needed until the brake light operates properly. 119 Lightly apply and release the foot brake several times. Switch Body Adjustment Nut Spring TIP: Rotate the adjusting nut counter-clockwise to increase tension on the brake pedal. 4. Turn the ignition key on...
... is no pressure on the spring. If the light does not operate properly, grasp the switch body with each use of the brake pedal. 3. Recheck and readjust as needed until the brake light operates properly. 119 Lightly apply and release the foot brake several times. Switch Body Adjustment Nut Spring TIP: Rotate the adjusting nut counter-clockwise to increase tension on the brake pedal. 4. Turn the ignition key on...
Owners Manual
Page 161
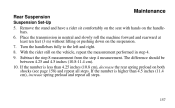
... the rear spring preload on the suspension. 7. Remove the stand and have a rider sit comfortably on the seat with hands on the vehicle, repeat the measurement performed in neutral and slowly roll the machine forward and rearward at least ten feet (3 m) without lifting or pushing down on both shocks (see page 158) and repeat all steps. 157 Maintenance Rear Suspension Suspension Set-Up...
... the rear spring preload on the suspension. 7. Remove the stand and have a rider sit comfortably on the seat with hands on the vehicle, repeat the measurement performed in neutral and slowly roll the machine forward and rearward at least ten feet (3 m) without lifting or pushing down on both shocks (see page 158) and repeat all steps. 157 Maintenance Rear Suspension Suspension Set-Up...

Owners Manual
Page 172
Specifications OUTLAW 525 IRS Max. Turning Radius Engine Oil Capacity Coolant Capacity Engine Displacement Bore x Stroke 215 lbs./97.5 kg 389 lbs./176 kg 3.1 gal...Air Jet Alternator Output Compression Ratio Starting System Carburetor Ignition System Ignition Timing Spark Plug Type Spark Plug Gap Lubrication System 45 148 OBDVS #4 100 200 w @ 3000 RPM 11:1 Electric Keihin FCR-MX 39mm CDI 25° +/- 3° @ 3500 RPM in neutral NGK DCPR8E 0.6 mm / .024 in. Dry Sump/Internal Reservoir 168 Weight Capacity Dry Weight Fuel Capacity Overall Length Overall Width Overall Height Wheelbase Ground...
Specifications OUTLAW 525 IRS Max. Turning Radius Engine Oil Capacity Coolant Capacity Engine Displacement Bore x Stroke 215 lbs./97.5 kg 389 lbs./176 kg 3.1 gal...Air Jet Alternator Output Compression Ratio Starting System Carburetor Ignition System Ignition Timing Spark Plug Type Spark Plug Gap Lubrication System 45 148 OBDVS #4 100 200 w @ 3000 RPM 11:1 Electric Keihin FCR-MX 39mm CDI 25° +/- 3° @ 3500 RPM in neutral NGK DCPR8E 0.6 mm / .024 in. Dry Sump/Internal Reservoir 168 Weight Capacity Dry Weight Fuel Capacity Overall Length Overall Width Overall Height Wheelbase Ground...

Owners Manual
Page 173
All Front Brake Rear Brake Parking Brake Headlights Taillights Brakelight 21 x 7R10 20 x 10R10 4 psi/27.6 KPa Hydraulic Disc, Dual Bore Hydraulic Disc Hydraulic lock, front wheel Dual Beam (55w/60w) LED LED Jetting Chart ALTITUDE ... Main Jet: 138 Needle Clip Position: #3 169 Rear Tire Pressure - Specifications OUTLAW 525 IRS Driving System Type Shift Type Primary Ratio Gear Ratio - 1st Gear Ratio - 2nd Gear Ratio - 3rd Gear Ratio - 4th Gear Ratio - 5th Gear Ratio - Reverse Rear Two-Wheel Drive 5-Speed Manual Shift 2.516 2.500 1.941 1.579 1.333 1.130 2.429 Tire Size - Front Tire Size -
All Front Brake Rear Brake Parking Brake Headlights Taillights Brakelight 21 x 7R10 20 x 10R10 4 psi/27.6 KPa Hydraulic Disc, Dual Bore Hydraulic Disc Hydraulic lock, front wheel Dual Beam (55w/60w) LED LED Jetting Chart ALTITUDE ... Main Jet: 138 Needle Clip Position: #3 169 Rear Tire Pressure - Specifications OUTLAW 525 IRS Driving System Type Shift Type Primary Ratio Gear Ratio - 1st Gear Ratio - 2nd Gear Ratio - 3rd Gear Ratio - 4th Gear Ratio - 5th Gear Ratio - Reverse Rear Two-Wheel Drive 5-Speed Manual Shift 2.516 2.500 1.941 1.579 1.333 1.130 2.429 Tire Size - Front Tire Size -
Owners Manual
Page 196
... resolve any warranty issues. Mixing oil brands or using non-recommended oil may not be covered by warranty. Spark Arrestor POLARIS warrants that you use of non-recommended lubricants may cause engine damage. POLARIS suggests that the spark arrestor in effect. When requesting warranty service you must take it to a POLARIS dealer authorized to repair POLARIS ATVs. Should your dealer require any POLARIS Servicing Dealer to perform warranty service. Damage resulting...
... resolve any warranty issues. Mixing oil brands or using non-recommended oil may not be covered by warranty. Spark Arrestor POLARIS warrants that you use of non-recommended lubricants may cause engine damage. POLARIS suggests that the spark arrestor in effect. When requesting warranty service you must take it to a POLARIS dealer authorized to repair POLARIS ATVs. Should your dealer require any POLARIS Servicing Dealer to perform warranty service. Damage resulting...

Owners Manual
Page 197
... selling dealer's authorized location. Warranty EXPORTED VEHICLES EXCEPT WHERE SPECIFICALLY REQUIRED BY LAW, THERE IS NO WARRANTY OR SERVICE BULLETIN COVERAGE ON THIS VEHICLE IF IT IS SOLD OUTSIDE THE COUNTRY OF THE SELLING DEALER'S AUTHORIZED LOCATION. Dealers may be done by an authorized POLARIS dealer. This policy does not apply to perform the warranty repair. 193 This policy does...
... selling dealer's authorized location. Warranty EXPORTED VEHICLES EXCEPT WHERE SPECIFICALLY REQUIRED BY LAW, THERE IS NO WARRANTY OR SERVICE BULLETIN COVERAGE ON THIS VEHICLE IF IT IS SOLD OUTSIDE THE COUNTRY OF THE SELLING DEALER'S AUTHORIZED LOCATION. Dealers may be done by an authorized POLARIS dealer. This policy does not apply to perform the warranty repair. 193 This policy does...

Owners Manual
Page 210
... Tread Lightly ...64 Turning Around on a Hill ...76-77 T 206 Index Side Panel Removal ...120 Sidehilling ...74 Signal words...6 Spark Arrestor Clean-Out...124-125 Spark Plugs...122-123 Spring Preload ...154 Spring Preload, Front ...155 Spring Preload, Rear ...158 Starting the Engine ...66-67 Steering Inspection ...151 Storage ...163-166 Suspension Front ...152-155 Rear ...156-159 Set-Up ...152-157 S Switches Engine Stop Switch ...Main Key Switch ...Reverse Lock-Out Switch ...Start...
... Tread Lightly ...64 Turning Around on a Hill ...76-77 T 206 Index Side Panel Removal ...120 Sidehilling ...74 Signal words...6 Spark Arrestor Clean-Out...124-125 Spark Plugs...122-123 Spring Preload ...154 Spring Preload, Front ...155 Spring Preload, Rear ...158 Starting the Engine ...66-67 Steering Inspection ...151 Storage ...163-166 Suspension Front ...152-155 Rear ...156-159 Set-Up ...152-157 S Switches Engine Stop Switch ...Main Key Switch ...Reverse Lock-Out Switch ...Start...