
Owners Manual
Page 4
... AND WARNINGS. For your seat belt. On paved surfaces - Avoid sharp turns or turns while applying heavy throttle. Watch for your skills or the conditions. NEVER Operate: At speeds too fast for branches or other hazards that could cause severe injury or death. Operate slowly in vehicle at all safety labels. Make sure passenger reads and understands all times. On public roads. A collision...
... AND WARNINGS. For your seat belt. On paved surfaces - Avoid sharp turns or turns while applying heavy throttle. Watch for your skills or the conditions. NEVER Operate: At speeds too fast for branches or other hazards that could cause severe injury or death. Operate slowly in vehicle at all safety labels. Make sure passenger reads and understands all times. On public roads. A collision...
Owners Manual
Page 14
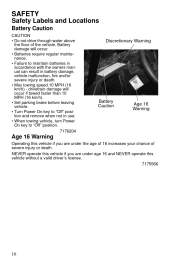
... vehicle. SAFETY Safety Labels and Locations Battery Caution CAUTION • Do not drive through water above the floor of severe injury or death. Battery damage will occur if towed faster than 10 MPH (16 km/h). • Set parking brake before leaving vehicle. • Turn Power On key to "Off" position and remove when not in use. • When towing vehicle, turn Power On key to maintain batteries in accordance with the owners manual...
... vehicle. SAFETY Safety Labels and Locations Battery Caution CAUTION • Do not drive through water above the floor of severe injury or death. Battery damage will occur if towed faster than 10 MPH (16 km/h). • Set parking brake before leaving vehicle. • Turn Power On key to "Off" position and remove when not in use. • When towing vehicle, turn Power On key to maintain batteries in accordance with the owners manual...
Owners Manual
Page 16
... 12 may ride as a passenger in motion. • Always keep arms and legs inside the cab frame while the vehicle is for the terrain, visibility and operating conditions, and your owner's manual. • Read this vehicle. Always travel at all times. • Always keep both hands on the steering wheel and both feet on public roads. SAFETY Operator Safety WARNING Serious injury or death can...
... 12 may ride as a passenger in motion. • Always keep arms and legs inside the cab frame while the vehicle is for the terrain, visibility and operating conditions, and your owner's manual. • Read this vehicle. Always travel at all times. • Always keep both hands on the steering wheel and both feet on public roads. SAFETY Operator Safety WARNING Serious injury or death can...

Owners Manual
Page 25
... Maintenance WARNING! Do not work in the owner's manual and on frozen bodies of water. Operating on any other vehicles in an accident or overturn. Always keep combustible materials away from the vehicle. • Insulate any tools used within the battery area to support the weight and moving force of the vehicle. Hot components can cause burns and fire. SAFETY Operator Safety Improper Tire Maintenance Operating this owner's manual...
... Maintenance WARNING! Do not work in the owner's manual and on frozen bodies of water. Operating on any other vehicles in an accident or overturn. Always keep combustible materials away from the vehicle. • Insulate any tools used within the battery area to support the weight and moving force of the vehicle. Hot components can cause burns and fire. SAFETY Operator Safety Improper Tire Maintenance Operating this owner's manual...

Owners Manual
Page 27
FEATURES AND CONTROLS Component Locations Tailgate Latch Releases Tailgate Receiver Hitch CV Boot/Rear Caliper Trailer Hitch Bracket This vehicle is not supplied with a receiver hitch bracket for a trailer hitch. To avoid injury and property damage, always heed the warnings and towing capacities outlined on pages 48-51. 23 Trailer towing equipment is equipped with this vehicle.
FEATURES AND CONTROLS Component Locations Tailgate Latch Releases Tailgate Receiver Hitch CV Boot/Rear Caliper Trailer Hitch Bracket This vehicle is not supplied with a receiver hitch bracket for a trailer hitch. To avoid injury and property damage, always heed the warnings and towing capacities outlined on pages 48-51. 23 Trailer towing equipment is equipped with this vehicle.

Owners Manual
Page 34
... Park Brake Neutral Gear Motor/Controller High Temperature Reverse Gear Forward Gear 30 Allow the motor and controller to protect against overheating If either occurs, stop the vehicle and turn the key off. FEATURES AND CONTROLS Console Indicator Panel Lights The indicator lights activate when the key is in forward or reverse (switch to neutral, then to forward or reverse) Steady Park Brake Gear Position Motor/Controller High Temperature Steady Steady Flashing Steady Engaged park brake Selected gear (forward/neutral/reverse) Reduced performance...
... Park Brake Neutral Gear Motor/Controller High Temperature Reverse Gear Forward Gear 30 Allow the motor and controller to protect against overheating If either occurs, stop the vehicle and turn the key off. FEATURES AND CONTROLS Console Indicator Panel Lights The indicator lights activate when the key is in forward or reverse (switch to neutral, then to forward or reverse) Steady Park Brake Gear Position Motor/Controller High Temperature Steady Steady Flashing Steady Engaged park brake Selected gear (forward/neutral/reverse) Reduced performance...

Owners Manual
Page 35
.... Tip: If the indicator illuminates due to a minor issue such as a low voltage condition or a sequence fault (reversing direction without releasing the accelerator, turning the key on the controller. FEATURES AND CONTROLS Malfunction Indicator Troubleshooting Guide The malfunction codes will blink on while in forward or reverse (switch to neutral, then to overheating Charger internal fault Solution Check battery size and condition; return to clear the error.
.... Tip: If the indicator illuminates due to a minor issue such as a low voltage condition or a sequence fault (reversing direction without releasing the accelerator, turning the key on the controller. FEATURES AND CONTROLS Malfunction Indicator Troubleshooting Guide The malfunction codes will blink on while in forward or reverse (switch to neutral, then to overheating Charger internal fault Solution Check battery size and condition; return to clear the error.
Owners Manual
Page 52
... alter vehicle handling and may be centered, securely fasten the load and operate with extra caution. Vehicle speed should never exceed 10 MPH (16 km/h) while towing a load on the trailer tongue. DO NOT TRAVEL FASTER THAN THE RECOMMENDED SPEEDS. When operating over the rack sides. SECURE ALL LOADS BEFORE OPERATING. Always attach the tow load to maintain stable driving conditions. Vehicle should...
... alter vehicle handling and may be centered, securely fasten the load and operate with extra caution. Vehicle speed should never exceed 10 MPH (16 km/h) while towing a load on the trailer tongue. DO NOT TRAVEL FASTER THAN THE RECOMMENDED SPEEDS. When operating over the rack sides. SECURE ALL LOADS BEFORE OPERATING. Always attach the tow load to maintain stable driving conditions. Vehicle should...

Owners Manual
Page 55
.... 4. Model RANGER EV Total Towed Load Weight (Level Ground) 1250 lbs. (567 kg) Total Towed Load Weight (15° grade) 850 lbs. (386 kg) Total Hitch Vertical Weight 150 lbs. (68.1 kg) Maximum Towing Speed 10 MPH (16 kph) 51 Do not operate the vehicle faster than the recommended weight for the vehicle. OPERATION Towing Loads Towing improperly can alter vehicle handling and may lose control of control or brake instability. Towing a trailer increases braking...
.... 4. Model RANGER EV Total Towed Load Weight (Level Ground) 1250 lbs. (567 kg) Total Towed Load Weight (15° grade) 850 lbs. (386 kg) Total Hitch Vertical Weight 150 lbs. (68.1 kg) Maximum Towing Speed 10 MPH (16 kph) 51 Do not operate the vehicle faster than the recommended weight for the vehicle. OPERATION Towing Loads Towing improperly can alter vehicle handling and may lose control of control or brake instability. Towing a trailer increases braking...

Owners Manual
Page 58
... speed is on or off . When the AWD switch is less than 5 MPH (8 km/h). Engage the AWD before engaging the differential. 2WD Locking the differential in rear wheel drive. Always switch to lock the differential and operate in slippery or 1WD/TURF low traction conditions helps improve traction. Move the rocker switch to the center position (2WD) to AWD while the rear wheels have traction or are spinning. AWD Locking the Differential...
... speed is on or off . When the AWD switch is less than 5 MPH (8 km/h). Engage the AWD before engaging the differential. 2WD Locking the differential in rear wheel drive. Always switch to lock the differential and operate in slippery or 1WD/TURF low traction conditions helps improve traction. Move the rocker switch to the center position (2WD) to AWD while the rear wheels have traction or are spinning. AWD Locking the Differential...

Owners Manual
Page 61
... Monthly Monthly Monthly Monthly 3M 6M 6M 6M 12 M X Front suspension X Rear suspension Tires X Brake fluid level X Brake pedal travel Brake system Wheels/fasteners Frame fasteners Batteries Headlamp/tail lamp X Brake pad wear n Battery terminals Battery fluid levels Battery terminals X Front gearcase oil (if equipped) X Rear gearcase oil (if equipped) X General lubrication n Steering X Front Suspension X Rear Suspension X Wiring n Front wheel 100 H 200 H 12 M 24 M - - n Have an authorized POLARIS dealer perform these procedures more often for wear, routing, security;
... Monthly Monthly Monthly Monthly 3M 6M 6M 6M 12 M X Front suspension X Rear suspension Tires X Brake fluid level X Brake pedal travel Brake system Wheels/fasteners Frame fasteners Batteries Headlamp/tail lamp X Brake pad wear n Battery terminals Battery fluid levels Battery terminals X Front gearcase oil (if equipped) X Rear gearcase oil (if equipped) X General lubrication n Steering X Front Suspension X Rear Suspension X Wiring n Front wheel 100 H 200 H 12 M 24 M - - n Have an authorized POLARIS dealer perform these procedures more often for wear, routing, security;

Owners Manual
Page 69
.... Lightly turn the steering wheel left and right. There should be 0.8"1.0" (20-25 mm) of the steering wheel. 3. Cam 65 MAINTENANCE Steering Wheel Inspection Check the steering wheel for specified freeplay and smooth operation at the outer rim of freeplay at the intervals outlined in the Periodic Maintenance Chart beginning on a level surface. 2. Spring Adjustment Adjust the rear shock absorber springs by an authorized POLARIS dealer. Position the vehicle...
.... Lightly turn the steering wheel left and right. There should be 0.8"1.0" (20-25 mm) of the steering wheel. 3. Cam 65 MAINTENANCE Steering Wheel Inspection Check the steering wheel for specified freeplay and smooth operation at the outer rim of freeplay at the intervals outlined in the Periodic Maintenance Chart beginning on a level surface. 2. Spring Adjustment Adjust the rear shock absorber springs by an authorized POLARIS dealer. Position the vehicle...

Owners Manual
Page 71
... your POLARIS dealer. 3. See page 66. 67 Remove the wheel. Attach the wheel nuts and washers and finger tighten. 4. Set the park brake. Set the park brake. 2. WARNING! Do not service axle nuts that all nuts are torqued to specification. Torque the wheel nuts to specification. Always ensure that have a cotter pin installed. MAINTENANCE Tires Wheel Removal 1. 2. 3. 4. 5. Turn the key off. Apply the brakes. Wheel Installation 1. Carefully lower the vehicle to the ground. 5.
... your POLARIS dealer. 3. See page 66. 67 Remove the wheel. Attach the wheel nuts and washers and finger tighten. 4. Set the park brake. Set the park brake. 2. WARNING! Do not service axle nuts that all nuts are torqued to specification. Torque the wheel nuts to specification. Always ensure that have a cotter pin installed. MAINTENANCE Tires Wheel Removal 1. 2. 3. 4. 5. Turn the key off. Apply the brakes. Wheel Installation 1. Carefully lower the vehicle to the ground. 5.

Owners Manual
Page 72
... wiring. 3. Oil from the wiring harness. Hot components can result in the housing. 5. Install the new lamp. Headlight and taillight lenses become dirty during normal operation. Always make sure lights are adjusted properly for best visibility. Turn the lamp counterclockwise to cool before servicing. MAINTENANCE Lights Poor lighting can cause burns to skin. Allow lamps to remove it. 4. Reinstall the harness assembly into the headlight assembly...
... wiring. 3. Oil from the wiring harness. Hot components can result in the housing. 5. Install the new lamp. Headlight and taillight lenses become dirty during normal operation. Always make sure lights are adjusted properly for best visibility. Turn the lamp counterclockwise to cool before servicing. MAINTENANCE Lights Poor lighting can cause burns to skin. Allow lamps to remove it. 4. Reinstall the harness assembly into the headlight assembly...

Owners Manual
Page 73
... distance from a wall. 2. If a headlight needs adjustment, access the adjustment screw under the hood or through the wheel well. 6. Loosen the screw, adjust the headlight, and tighten the screw. 7. Apply the brakes. The most intense part of the headlight and make a mark on the wall. Turn the key on the seat while performing this step. 5. Include the weight of a rider on .
... distance from a wall. 2. If a headlight needs adjustment, access the adjustment screw under the hood or through the wheel well. 6. Loosen the screw, adjust the headlight, and tighten the screw. 7. Apply the brakes. The most intense part of the headlight and make a mark on the wall. Turn the key on the seat while performing this step. 5. Include the weight of a rider on .

Owners Manual
Page 74
Lift the hood. Install the new lamp. Reconnect the harness. 8. The brake light should come on after about 10mm (0.4 in behind the console Tab panel and lift the release to the ON position. 2. Reach in .) of the light to seat it from the harness. 3. Using a screwdriver, rotate the lamp 1/4 turn clockwise to remove the indicator light assembly from the console panel. 4. Turn the key to unplug the light from the assembly. 6. Indicator...
Lift the hood. Install the new lamp. Reconnect the harness. 8. The brake light should come on after about 10mm (0.4 in behind the console Tab panel and lift the release to the ON position. 2. Reach in .) of the light to seat it from the harness. 3. Using a screwdriver, rotate the lamp 1/4 turn clockwise to remove the indicator light assembly from the console panel. 4. Turn the key to unplug the light from the assembly. 6. Indicator...

Owners Manual
Page 84
... Direct drive motor-to-transaxle with low-noise gears On demand AWD, 2WD, turf mode 80 SPECIFICATIONS RANGER EV Dimensions Dry Weight Ground Clearance Length Width Height Wheelbase Turning Radius Box Dimensions (Inside) Box Capacity Payload Capacity Hitch Towing Capacity Cargo System Seating Skid Plate Motor configuration Motor peak Controller Battery pack Maximum speed Range (in . (81 x 107 x 29 cm) 500 lbs. (227 kg) 1000 lbs. (455 kg) 1250 lbs. (567 kg) Lock & Ride® 2 Plastic Performance Single...
... Direct drive motor-to-transaxle with low-noise gears On demand AWD, 2WD, turf mode 80 SPECIFICATIONS RANGER EV Dimensions Dry Weight Ground Clearance Length Width Height Wheelbase Turning Radius Box Dimensions (Inside) Box Capacity Payload Capacity Hitch Towing Capacity Cargo System Seating Skid Plate Motor configuration Motor peak Controller Battery pack Maximum speed Range (in . (81 x 107 x 29 cm) 500 lbs. (227 kg) 1000 lbs. (455 kg) 1250 lbs. (567 kg) Lock & Ride® 2 Plastic Performance Single...

Owners Manual
Page 85
... suspension Rear suspension Tires Tire pressure Cup holders Indicator panel Charge indicator Hour meter Auxiliary power Rider restraints Multi-mode switch Independent Macpherson struts w/8 in. (20.3 cm) travel Dual A-Arm w/9 in. (22.9 cm) travel 25x9-12 Carlisle All Trail II 20 psi (137.9 kPa) Features Dual cup holders Indicates directional selection, park brake, and motor or controller malfunction Digital, indicates battery discharge Digital, indicates cumulative hours of vehicle...
... suspension Rear suspension Tires Tire pressure Cup holders Indicator panel Charge indicator Hour meter Auxiliary power Rider restraints Multi-mode switch Independent Macpherson struts w/8 in. (20.3 cm) travel Dual A-Arm w/9 in. (22.9 cm) travel 25x9-12 Carlisle All Trail II 20 psi (137.9 kPa) Features Dual cup holders Indicates directional selection, park brake, and motor or controller malfunction Digital, indicates battery discharge Digital, indicates cumulative hours of vehicle...

Owners Manual
Page 90
... this warranty. Sealants • Cosmetic damage/repair Hotel fees • Meals Towing charges • Shipping/ handling fees Mileage • Product pick-up/delivery Rentals/Loss of product use of the battery in an overcharged condition; failure due to snow, water, dirt or other than those supplied or recommended by the POLARIS Warranty Department and the battery manufacturer, U.S. improper maintenance; If the POLARIS Warranty Department...
... this warranty. Sealants • Cosmetic damage/repair Hotel fees • Meals Towing charges • Shipping/ handling fees Mileage • Product pick-up/delivery Rentals/Loss of product use of the battery in an overcharged condition; failure due to snow, water, dirt or other than those supplied or recommended by the POLARIS Warranty Department and the battery manufacturer, U.S. improper maintenance; If the POLARIS Warranty Department...

Owners Manual
Page 93
... be kept and used outside of the country where the vehicle was originally purchased, all warranty coverage will be authorized to perform the warranty repair. WARRANTY How to Get Service In the Country where your vehicle was purchased: Warranty or Service Bulletin repairs must be done by the basic warranty.) For questions call POLARIS Customer Assistance: United States: 1-888-704-5290 Canada: 1-204...
... be kept and used outside of the country where the vehicle was originally purchased, all warranty coverage will be authorized to perform the warranty repair. WARRANTY How to Get Service In the Country where your vehicle was purchased: Warranty or Service Bulletin repairs must be done by the basic warranty.) For questions call POLARIS Customer Assistance: United States: 1-888-704-5290 Canada: 1-204...

