
Owners Manual
Page 15
... clothing, immediately wash it run in a short time. The engine exhaust from this vehicle only outdoors or in the owner's manual. 11 SAFETY Safety Warnings Handling Gasoline Gasoline is highly flammable and explosive under certain conditions. • Always exercise extreme caution whenever handling gasoline. • Always refuel with soap and water and change clothing. • Turn the fuel valve off whenever the vehicle is stored or parked. Always inspect the...
... clothing, immediately wash it run in a short time. The engine exhaust from this vehicle only outdoors or in the owner's manual. 11 SAFETY Safety Warnings Handling Gasoline Gasoline is highly flammable and explosive under certain conditions. • Always exercise extreme caution whenever handling gasoline. • Always refuel with soap and water and change clothing. • Turn the fuel valve off whenever the vehicle is stored or parked. Always inspect the...

Owners Manual
Page 35
... fuel with a minimum pump octane number of operation, or annually. Refuel on page 46 for correct choke and throttle settings during starting a cold engine. Always refuel with the engine stopped, and outdoors or in starting . OFF: For vehicle storage and when transporting. Fuel Filter The in the left front wheel well. Refuel when the gauge indicates a low fuel condition. FEATURES AND CONTROLS Fuel Valve The fuel valve is equipped with a digital fuel gauge...
... fuel with a minimum pump octane number of operation, or annually. Refuel on page 46 for correct choke and throttle settings during starting a cold engine. Always refuel with the engine stopped, and outdoors or in starting . OFF: For vehicle storage and when transporting. Fuel Filter The in the left front wheel well. Refuel when the gauge indicates a low fuel condition. FEATURES AND CONTROLS Fuel Valve The fuel valve is equipped with a digital fuel gauge...
Owners Manual
Page 36
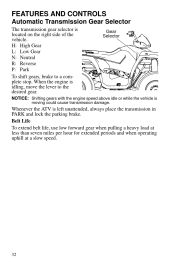
... engine speed above idle or while the vehicle is located on the right side of the vehicle. Belt Life To extend belt life, use low forward gear when pulling a heavy load at less than seven miles per hour for extended periods and when operating uphill at a slow speed. 32 FEATURES AND CONTROLS Automatic Transmission Gear Selector The transmission gear selector is moving could cause transmission damage. H: High Gear L: Low Gear N: Neutral R: Reverse P: Park To shift gears, brake...
... engine speed above idle or while the vehicle is located on the right side of the vehicle. Belt Life To extend belt life, use low forward gear when pulling a heavy load at less than seven miles per hour for extended periods and when operating uphill at a slow speed. 32 FEATURES AND CONTROLS Automatic Transmission Gear Selector The transmission gear selector is moving could cause transmission damage. H: High Gear L: Low Gear N: Neutral R: Reverse P: Park To shift gears, brake...

Owners Manual
Page 37
... enabled, the AWD remains enabled until the AWD switch is turned off while the demand drive unit is moving . When the switch is in all times. When in the instrument cluster will automatically engage any time the rear wheels lose traction. Engaging AWD The AWD switch may be on AWD, the ATV is on . FEATURES AND CONTROLS All Wheel Drive (AWD) System The All Wheel Drive system is on . When the switch is controlled by the AWD switch.
... enabled, the AWD remains enabled until the AWD switch is turned off while the demand drive unit is moving . When the switch is in all times. When in the instrument cluster will automatically engage any time the rear wheels lose traction. Engaging AWD The AWD switch may be on AWD, the ATV is on . FEATURES AND CONTROLS All Wheel Drive (AWD) System The All Wheel Drive system is on . When the switch is controlled by the AWD switch.
Owners Manual
Page 39
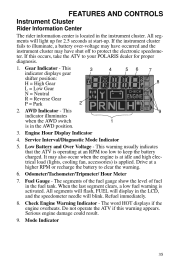
If this warning appears. Service Interval/Diagnostic Mode Indicator 5. When the last segment clears, a low fuel warning is applied. Check Engine Warning Indicator - This 9 indicator illuminates when the AWD switch 1 is in the instrument cluster. Odometer/Tachometer/Tripmeter/ Hour Meter 7. Mode Indicator 35 This 6 3 4 5 7 indicator displays gear shifter position: 8 H = High Gear L = Low Gear N = Neutral R = Reverse Gear 2 P = Park 2. Serious engine damage could result. 9. FEATURES AND CONTROLS Instrument Cluster Rider Information Center The rider information...
If this warning appears. Service Interval/Diagnostic Mode Indicator 5. When the last segment clears, a low fuel warning is applied. Check Engine Warning Indicator - This 9 indicator illuminates when the AWD switch 1 is in the instrument cluster. Odometer/Tachometer/Tripmeter/ Hour Meter 7. Mode Indicator 35 This 6 3 4 5 7 indicator displays gear shifter position: 8 H = High Gear L = Low Gear N = Neutral R = Reverse Gear 2 P = Park 2. Serious engine damage could result. 9. FEATURES AND CONTROLS Instrument Cluster Rider Information Center The rider information...

Owners Manual
Page 46
... on fluid levels, controls and areas outlined on the dipstick. Pull only light loads. 7. Pull only light loads. Add oil if necessary to familiarize yourself with gasoline. Drive slowly at sustained idle. 5. Avoid aggressive acceleration and high speed operation during the break-in period, change both the oil and the filter at slower speeds during the break-in of the clutches and drive belt will...
... on fluid levels, controls and areas outlined on the dipstick. Pull only light loads. 7. Pull only light loads. Add oil if necessary to familiarize yourself with gasoline. Drive slowly at sustained idle. 5. Avoid aggressive acceleration and high speed operation during the break-in period, change both the oil and the filter at slower speeds during the break-in of the clutches and drive belt will...

Owners Manual
Page 62
...rear rack. OPERATE ONLY WITH STABLE AND SAFELY ARRANGED LOADS. HEAVY LOADS CAN CAUSE BRAKING AND CONTROL PROBLEMS. Use extreme caution when applying brakes with loads that extend over rough or hilly terrain, reduce speed and cargo to the vehicle, include the weight of the operator, accessories, loads in the rack... Hauling Cargo WARNING Overloading the vehicle or carrying or towing cargo improperly can alter vehicle handling and may cause loss of control or brake instability, which can create unstable operating conditions, which could result in loss of control of the vehicle. SECURE ALL...
...rear rack. OPERATE ONLY WITH STABLE AND SAFELY ARRANGED LOADS. HEAVY LOADS CAN CAUSE BRAKING AND CONTROL PROBLEMS. Use extreme caution when applying brakes with loads that extend over rough or hilly terrain, reduce speed and cargo to the vehicle, include the weight of the operator, accessories, loads in the rack... Hauling Cargo WARNING Overloading the vehicle or carrying or towing cargo improperly can alter vehicle handling and may cause loss of control or brake instability, which can create unstable operating conditions, which could result in loss of control of the vehicle. SECURE ALL...

Owners Manual
Page 63
... speed and cargo weight to extend belt life. Towing Loads Always attach a towed load to the vehicle and will void your ATV warranty. If towing a load, reduce rear rack cargo weight by the amount of tongue weight. • The combination of rear rack cargo weight and tongue weight must not exceed the rear rack capacity. • The total load (operator, accessories, cargo and weight on hitch) must not exceed the maximum weight capacity of this manual...
... speed and cargo weight to extend belt life. Towing Loads Always attach a towed load to the vehicle and will void your ATV warranty. If towing a load, reduce rear rack cargo weight by the amount of tongue weight. • The combination of rear rack cargo weight and tongue weight must not exceed the rear rack capacity. • The total load (operator, accessories, cargo and weight on hitch) must not exceed the maximum weight capacity of this manual...
Owners Manual
Page 68
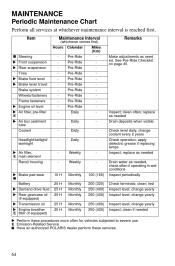
... Coolant Headlight/taillight/ worklight Air filter, E main element Recoil housing Brake pad wear - change coolant every 2 years Check operation; Weekly Weekly - 10 H 20 H 25 H 25 H 25 H 25 H Monthly Monthly Monthly Monthly Monthly Monthly 100 (160) 200 (320) 250 (400) 250 (400) 250 (400) 250 (400) Battery Demand drive fluid Rear gearcase oil (if equipped) Transmission oil Engine breather E filter (if equipped) Perform these services. 64 replace...
... Coolant Headlight/taillight/ worklight Air filter, E main element Recoil housing Brake pad wear - change coolant every 2 years Check operation; Weekly Weekly - 10 H 20 H 25 H 25 H 25 H 25 H Monthly Monthly Monthly Monthly Monthly Monthly 100 (160) 200 (320) 250 (400) 250 (400) 250 (400) 250 (400) Battery Demand drive fluid Rear gearcase oil (if equipped) Transmission oil Engine breather E filter (if equipped) Perform these services. 64 replace...

Owners Manual
Page 69
...; Throttle Cable/ E ETC Switch Choke cable Remarks Miles (Km) 500 (800) 500 (800) 500 (800) 500 (800) 500 (800) 500 (800) Lubricate all fittings, pivots, cables, etc. Drain bowl periodically and prior to water, mud, etc. 100 H 100 H 100 H 100 H 6M 6M 12 M 12 M Radiator (if applicable) Cooling hoses (if applicable) Engine mounts Exhaust muffler/ pipe E E Spark plug Ignition timing...
...; Throttle Cable/ E ETC Switch Choke cable Remarks Miles (Km) 500 (800) 500 (800) 500 (800) 500 (800) 500 (800) 500 (800) Lubricate all fittings, pivots, cables, etc. Drain bowl periodically and prior to water, mud, etc. 100 H 100 H 100 H 100 H 6M 6M 12 M 12 M Radiator (if applicable) Cooling hoses (if applicable) Engine mounts Exhaust muffler/ pipe E E Spark plug Ignition timing...

Owners Manual
Page 86
... the wheel on the hub with the valve stem toward the outside and rotation arrows on the tire pointing toward forward rotation. 4. Wheel Nut Torque Specifications Check the wheel nut torques occasionally and when they've been loosened for maintenance service. WARNING! Loose nuts could cause a tire to specification. Nut Type Lug Nut (Aluminum Wheels) Nut Torque 30 ft. Lock the parking brake. 3. Torque the wheel nuts...
... the wheel on the hub with the valve stem toward the outside and rotation arrows on the tire pointing toward forward rotation. 4. Wheel Nut Torque Specifications Check the wheel nut torques occasionally and when they've been loosened for maintenance service. WARNING! Loose nuts could cause a tire to specification. Nut Type Lug Nut (Aluminum Wheels) Nut Torque 30 ft. Lock the parking brake. 3. Torque the wheel nuts...

Owners Manual
Page 90
... life of the pod. 3. Apply dielectric grease to cool before servicing. 5. MAINTENANCE Lights Poor lighting can cause burns to pull on the connector, not on the wiring. 6. Oil from the rear of the lamp. 1. Remove the two screws on the...rear of the headlight pod. 2. CAUTION! Hot components can result in the housing. 8. Be sure to skin. Turn the lamp counter-clockwise to remove it. 7. Always make sure lights are adjusted properly for best visibility. Lift the pod cover and disconnect the speedometer harnesses from the wiring harness. Make sure the tab on the lower...
... life of the pod. 3. Apply dielectric grease to cool before servicing. 5. MAINTENANCE Lights Poor lighting can cause burns to pull on the connector, not on the wiring. 6. Oil from the rear of the lamp. 1. Remove the two screws on the...rear of the headlight pod. 2. CAUTION! Hot components can result in the housing. 8. Be sure to skin. Turn the lamp counter-clockwise to remove it. 7. Always make sure lights are adjusted properly for best visibility. Lift the pod cover and disconnect the speedometer harnesses from the wiring harness. Make sure the tab on the lower...

Owners Manual
Page 91
... high beam. 4. Observe the headlight aim on a level surface with the headlight approximately 25 ft. (7.6 m) from the floor to the desired position by turning the knob either clockwise or counter-clockwise. Start the engine.Turn the headlight switch to make a mark on the wall. Include rider weight on the right side of the headlamp. 2. Place the transmission in PARK. 2. The adjustment knob...
... high beam. 4. Observe the headlight aim on a level surface with the headlight approximately 25 ft. (7.6 m) from the floor to the desired position by turning the knob either clockwise or counter-clockwise. Start the engine.Turn the headlight switch to make a mark on the wall. Include rider weight on the right side of the headlamp. 2. Place the transmission in PARK. 2. The adjustment knob...

Owners Manual
Page 92
.... MAINTENANCE Lights Headlight Housing Replacement 1. Lift the pod cover and disconnect the speedometer harnesses from the wiring harness. 5. Unplug the headlamp from the speedometer. 4. The distance from the headlight mounting tabs. 6. Remove the two screws on the lower front corners of the pod. 9. Adjust the headlight aim by 5 1/8" turning the adjusting knob. (13 cm) 88 Carefully pull the assembly up and out of the headlight pod. 2. Lift...
.... MAINTENANCE Lights Headlight Housing Replacement 1. Lift the pod cover and disconnect the speedometer harnesses from the wiring harness. 5. Unplug the headlamp from the speedometer. 4. The distance from the headlight mounting tabs. 6. Remove the two screws on the lower front corners of the pod. 9. Adjust the headlight aim by 5 1/8" turning the adjusting knob. (13 cm) 88 Carefully pull the assembly up and out of the headlight pod. 2. Lift...

Owners Manual
Page 93
... headlight assembly. 2. Reinstall the harness assembly into the headlight assembly. 4. Turn the lamp counter-clockwise to secure the headlamp. Test the light for proper operation. 89 Turn the headlight harness clockwise to remove it. 3. Apply dielectric grease to the socket and install the new Lamp lamp. 4. Harness Taillight/Brakelight Lamp Replacement 1. Reinstall the harness connector. 5. Remove the headlamp and install the new headlamp. 3. MAINTENANCE Lights Lower Headlamp Replacement 1. Turn...
... headlight assembly. 2. Reinstall the harness assembly into the headlight assembly. 4. Turn the lamp counter-clockwise to secure the headlamp. Test the light for proper operation. 89 Turn the headlight harness clockwise to remove it. 3. Apply dielectric grease to the socket and install the new Lamp lamp. 4. Harness Taillight/Brakelight Lamp Replacement 1. Reinstall the harness connector. 5. Remove the headlamp and install the new headlamp. 3. MAINTENANCE Lights Lower Headlamp Replacement 1. Turn...

Owners Manual
Page 111
... scratch the finish of your POLARIS dealer to evaporate any water that will scratch the finish. 107 Polishing the Vehicle POLARIS recommends the use clean cloths and pads for a while to purchase a replacement. Replacement safety labels are provided by POLARIS at the following items: • Wheel bearings • Radiator • Transmission seals • Brakes • Cab and body panels • Electrical components • Switches and controls • Labels and decals...
... scratch the finish of your POLARIS dealer to evaporate any water that will scratch the finish. 107 Polishing the Vehicle POLARIS recommends the use clean cloths and pads for a while to purchase a replacement. Replacement safety labels are provided by POLARIS at the following items: • Wheel bearings • Radiator • Transmission seals • Brakes • Cab and body panels • Electrical components • Switches and controls • Labels and decals...

Owners Manual
Page 114
... a protective film of engine oil into the cylinder. 3. Reinstall the spark plug. To eliminate any time the fluid looks dark or contaminated) • Coolant (test strength/fill) Fog the Engine 1. Remove the spark plug. Rotate the piston to the inside of the machine so the engine is not used, the fuel tank, fuel lines, and carburetor should be forced in the carburetor, run the engine until it stops...
... a protective film of engine oil into the cylinder. 3. Reinstall the spark plug. To eliminate any time the fluid looks dark or contaminated) • Coolant (test strength/fill) Fog the Engine 1. Remove the spark plug. Rotate the piston to the inside of the machine so the engine is not used, the fuel tank, fuel lines, and carburetor should be forced in the carburetor, run the engine until it stops...

Owners Manual
Page 117
... below freezing). Slow/easy clutch engage- Inspect clutch seals for fouled plugs or foreign material in gas tank or fuel lines. Wrong or missing belt Install the recommended belt. TROUBLESHOOTING Drive Belt Wear/Burn Possible Cause Driving onto a pickup or tall trailer in high range Starting out going up a steep incline Driving at low RPM or ground speed (3-7 MPH) Insufficient warm-up belt one mile (5 miles or more when temperature...
... below freezing). Slow/easy clutch engage- Inspect clutch seals for fouled plugs or foreign material in gas tank or fuel lines. Wrong or missing belt Install the recommended belt. TROUBLESHOOTING Drive Belt Wear/Burn Possible Cause Driving onto a pickup or tall trailer in high range Starting out going up a steep incline Driving at low RPM or ground speed (3-7 MPH) Insufficient warm-up belt one mile (5 miles or more when temperature...
Owners Manual
Page 122
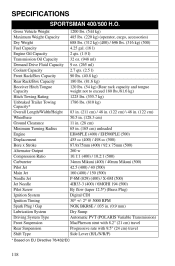
... Capacity Dry Weight Fuel Capacity Engine Oil Capacity Transmission Oil Capacity Demand Drive Fluid Capacity Coolant Capacity Front Rack/Box Capacity Rear Rack/Box Capacity Receiver Hitch Tongue Capacity Hitch Towing Rating Unbraked Trailer Towing Capacity* Overall Length/Width/Height Wheelbase Ground Clearance Minimum Turning Radius Engine Displacement Bore x Stroke Alternator Output Compression Ratio Carburetor Pilot Jet Main Jet Needle Jet Jet Needle Pilot Screw Ignition System Ignition Timing Spark Plug / Gap Lubrication System Driving System Type Front Suspension Rear Suspension Shift...
... Capacity Dry Weight Fuel Capacity Engine Oil Capacity Transmission Oil Capacity Demand Drive Fluid Capacity Coolant Capacity Front Rack/Box Capacity Rear Rack/Box Capacity Receiver Hitch Tongue Capacity Hitch Towing Rating Unbraked Trailer Towing Capacity* Overall Length/Width/Height Wheelbase Ground Clearance Minimum Turning Radius Engine Displacement Bore x Stroke Alternator Output Compression Ratio Carburetor Pilot Jet Main Jet Needle Jet Jet Needle Pilot Screw Ignition System Ignition Timing Spark Plug / Gap Lubrication System Driving System Type Front Suspension Rear Suspension Shift...

Owners Manual
Page 130
... U.S. Repairing or replacing other components not covered by this emissions-certified vehicle starts on the date the vehicle is designed, built and equipped so it to fail to the evaporative emission control system. 126 The warranty period for evaporative emissions Fuel Tank Fuel Cap Fuel Line Fuel Line Fittings Clamps* Pressure Relief Valves* Control Valves* Control Solenoids* Electronic Controls Vacuum Control Diaphragms* Control Cables* Control Linkages* Purge Valves Vapor Hoses Liquid/Vapor Separator Carbon Canister Canister Mounting...
... U.S. Repairing or replacing other components not covered by this emissions-certified vehicle starts on the date the vehicle is designed, built and equipped so it to fail to the evaporative emission control system. 126 The warranty period for evaporative emissions Fuel Tank Fuel Cap Fuel Line Fuel Line Fittings Clamps* Pressure Relief Valves* Control Valves* Control Solenoids* Electronic Controls Vacuum Control Diaphragms* Control Cables* Control Linkages* Purge Valves Vapor Hoses Liquid/Vapor Separator Carbon Canister Canister Mounting...
