
Owners Manual
Page 12
... operate controls. Remove the ignition key to the electrical system. Limit suspension or steering travel or your authorized VICTORY dealer. Park the motorcycle where people are not likely to touch the hot engine or exhaust system or place combustible materials near a flammable source such as a kerosene heater or an open flame, where hot components could ignite combustible materials. Safety Use of Accessories Because...
... operate controls. Remove the ignition key to the electrical system. Limit suspension or steering travel or your authorized VICTORY dealer. Park the motorcycle where people are not likely to touch the hot engine or exhaust system or place combustible materials near a flammable source such as a kerosene heater or an open flame, where hot components could ignite combustible materials. Safety Use of Accessories Because...

Owners Manual
Page 14
... tubes above the lower triple clamp. Place tiedowns as wide apart as towing will impair the motorcycle's steering and handling. • Position and restrain the motorcycle so it run in a short time. • Never start the engine or let it remains upright on the truck or trailer bed for best stability. Do not tow the motorcycle with soap and water and change clothing. Gasoline...
... tubes above the lower triple clamp. Place tiedowns as wide apart as towing will impair the motorcycle's steering and handling. • Position and restrain the motorcycle so it run in a short time. • Never start the engine or let it remains upright on the truck or trailer bed for best stability. Do not tow the motorcycle with soap and water and change clothing. Gasoline...

Owners Manual
Page 15
... plate. • Fasteners must meet original specifications for fluid leaks or damage. Always perform the safety maintenance procedures as recommended. Perform maintenance and repairs promptly as outlined in the Periodic Maintenance section beginning on page 56. • Always maintain proper tire pressure, tread condition and wheel and tire balance. Safety Safety Maintenance WARNING Failure to perform safety maintenance as recommended can result in difficult handling and loss of repair. • Make sure all legally...
... plate. • Fasteners must meet original specifications for fluid leaks or damage. Always perform the safety maintenance procedures as recommended. Perform maintenance and repairs promptly as outlined in the Periodic Maintenance section beginning on page 56. • Always maintain proper tire pressure, tread condition and wheel and tire balance. Safety Safety Maintenance WARNING Failure to perform safety maintenance as recommended can result in difficult handling and loss of repair. • Make sure all legally...

Owners Manual
Page 20
Operator Seat 5. Fuel Gauge 4. Left Handlebar Switches 10. Radio Display 14. Clutch Lever Mirror Speedometer Indicator Light Panel Tachometer (if equipped) Front Brake Fluid Reservoir Front Brake Lever Throttle Control Grip Switches Throttle Cables Fuel Cap Auxiliary Forward Lighting Switch (if equipped) 13. Turn Signals 8. Tail Lamps 9. Speedometer 5. Tachometer 8. Audio Control Switches 12. 12-Volt Accessory Outlet 13. Clutch Lever 3. Fuel Filler Cap 4. Front Brake Lever 10. Speakers 2. Mode Switch 3. Volt Meter 9. Front Brake Fluid Reservoir 11. Radio Fuse (...
Operator Seat 5. Fuel Gauge 4. Left Handlebar Switches 10. Radio Display 14. Clutch Lever Mirror Speedometer Indicator Light Panel Tachometer (if equipped) Front Brake Fluid Reservoir Front Brake Lever Throttle Control Grip Switches Throttle Cables Fuel Cap Auxiliary Forward Lighting Switch (if equipped) 13. Turn Signals 8. Tail Lamps 9. Speedometer 5. Tachometer 8. Audio Control Switches 12. 12-Volt Accessory Outlet 13. Clutch Lever 3. Fuel Filler Cap 4. Front Brake Lever 10. Speakers 2. Mode Switch 3. Volt Meter 9. Front Brake Fluid Reservoir 11. Radio Fuse (...

Owners Manual
Page 21
... electrical circuits are located on the lower left edge of the seat. The radio can be removed. Parking Lights On Engine On/All Lights On Engine Off Seat Heater Switches (CROSS COUNTRY TOUR) The seat heater switches are inactive and the ignition key can be operated and the instrumentation is active. Before starting the engine, read the instructions for starting the engine. The engine stop/run switch must push the ignition key into the switch while selecting this position. Parking Lights On...
... electrical circuits are located on the lower left edge of the seat. The radio can be removed. Parking Lights On Engine On/All Lights On Engine Off Seat Heater Switches (CROSS COUNTRY TOUR) The seat heater switches are inactive and the ignition key can be operated and the instrumentation is active. Before starting the engine, read the instructions for starting the engine. The engine stop/run switch must push the ignition key into the switch while selecting this position. Parking Lights On...

Owners Manual
Page 22
... error codes for diagnosis. Instruments, Features and Controls Instrument Cluster (CROSS ROADS) Speedometer The speedometer displays vehicle speed in the fuel tank. Speedometer Indicator Lamps Multi-Function Display Indicator Lamps Lamp Indicates Neutral High Beam Turn Signal Condition This lamp illuminates when the transmission is in the signal system, the lamp flashes at more than twice the normal rate. The light will remain on if the tilt sensor shuts down the engine...
... error codes for diagnosis. Instruments, Features and Controls Instrument Cluster (CROSS ROADS) Speedometer The speedometer displays vehicle speed in the fuel tank. Speedometer Indicator Lamps Multi-Function Display Indicator Lamps Lamp Indicates Neutral High Beam Turn Signal Condition This lamp illuminates when the transmission is in the signal system, the lamp flashes at more than twice the normal rate. The light will remain on if the tilt sensor shuts down the engine...

Owners Manual
Page 27
.... Instruments, Features and Controls Instrument Cluster (CROSS COUNTRY) Indicator Lamps High Beam Left Turn Anti-Lock Brake System (ABS) Low Fuel Right Turn Cruise Control Oil Pressure Check Engine Lamp Indicates Neutral High Beam Check Engine Neutral Battery Warning Condition This lamp illuminates when the transmission is in neutral and the ignition key is activated. This lamp illuminates when the headlamp switch is in the fuel tank. Retrieve the error codes for diagnosis. This lamp illuminates when approximately one gallon (3.8 liters) of fuel...
.... Instruments, Features and Controls Instrument Cluster (CROSS COUNTRY) Indicator Lamps High Beam Left Turn Anti-Lock Brake System (ABS) Low Fuel Right Turn Cruise Control Oil Pressure Check Engine Lamp Indicates Neutral High Beam Check Engine Neutral Battery Warning Condition This lamp illuminates when the transmission is in neutral and the ignition key is activated. This lamp illuminates when the headlamp switch is in the fuel tank. Retrieve the error codes for diagnosis. This lamp illuminates when approximately one gallon (3.8 liters) of fuel...

Owners Manual
Page 31
... the upper portion Switch of the switch to toggle through the features, a system error has been logged. Starter Interlock Switch The starter interlock switch prevents the electric starter from operating when the transmission is in gear and the clutch is released. Move the switch to the left handlebar switch. Read the engine starting the engine. See page 26. Instruments, Features and Controls Left Handlebar Switches High/Low Light Switch Flasher (Hazard) Switch Turn Signal Switch Lamp Switch Horn Button Description...
... the upper portion Switch of the switch to toggle through the features, a system error has been logged. Starter Interlock Switch The starter interlock switch prevents the electric starter from operating when the transmission is in gear and the clutch is released. Move the switch to the left handlebar switch. Read the engine starting the engine. See page 26. Instruments, Features and Controls Left Handlebar Switches High/Low Light Switch Flasher (Hazard) Switch Turn Signal Switch Lamp Switch Horn Button Description...

Owners Manual
Page 41
... gear position display. Tires Inspect condition, pressure and tread depth. Sidestand Verify smooth operation, inspect pivot bolt, spring and pad. CROSS COUNTRY Verify that the horn sounds loudly. Display Engine Stop/Run Start the engine. Brake Fluid Levels Check front and rear brake fluid levels. Throttle Inspect hand grip and throttle freeplay. Front Suspension Check for smooth operation. Rear Suspension Check shock movement and air pressure, verify ground clearance. Verify that the low oil pressure lamp illuminates. Verify that the neutral...
... gear position display. Tires Inspect condition, pressure and tread depth. Sidestand Verify smooth operation, inspect pivot bolt, spring and pad. CROSS COUNTRY Verify that the horn sounds loudly. Display Engine Stop/Run Start the engine. Brake Fluid Levels Check front and rear brake fluid levels. Throttle Inspect hand grip and throttle freeplay. Front Suspension Check for smooth operation. Rear Suspension Check shock movement and air pressure, verify ground clearance. Verify that the low oil pressure lamp illuminates. Verify that the neutral...
Owners Manual
Page 51
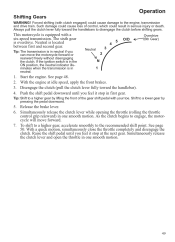
Operation Shifting Gears WARNING! Forced shifting (with clutch engaged) could cause loss of the gear shift pedal with a six-speed transmission. This motorcycle is overdrive. With a quick motion, simultaneously close the throttle completely and disengage the clutch. Raise the shift pedal until you can move forward. 7. Tip: Shift to the engine, transmission and drive train. Simultaneously release the clutch lever while opening the throttle (rolling the throttle control grip rearward) in one...
Operation Shifting Gears WARNING! Forced shifting (with clutch engaged) could cause loss of the gear shift pedal with a six-speed transmission. This motorcycle is overdrive. With a quick motion, simultaneously close the throttle completely and disengage the clutch. Raise the shift pedal until you can move forward. 7. Tip: Shift to the engine, transmission and drive train. Simultaneously release the clutch lever while opening the throttle (rolling the throttle control grip rearward) in one...

Owners Manual
Page 55
...'s weight without sinking into soft asphalt and the motorcycle may fall. WARNING! Tip: A momentary clicking sound from traffic. 1. When fully stopped, shift into neutral. 2. Turn the handlebars to the left and lean the motorcycle to neutral or disengage the clutch. Move the ignition switch to park the motorcycle. 1. Parking Choose a firm level surface to the OFF position. Remove the ignition key. Stop the engine...
...'s weight without sinking into soft asphalt and the motorcycle may fall. WARNING! Tip: A momentary clicking sound from traffic. 1. When fully stopped, shift into neutral. 2. Turn the handlebars to the left and lean the motorcycle to neutral or disengage the clutch. Move the ignition switch to park the motorcycle. 1. Parking Choose a firm level surface to the OFF position. Remove the ignition key. Stop the engine...

Owners Manual
Page 59
...L I I I L P L I I I I L I I I Component Air Filter Battery Brake Fluid Brake Pads Clutch Cable Clutch Lever (Mechanical) Control Cables Crankcase Vent Drive Belt Drive Belt Adjustment Engine Oil & Filter* Exhaust System Fasteners Front Brake Lever Front Fork Oil** Front Fork / Axle Fuel System Fuel Filter Headlamp Ignition Switch / Locks Radio/Radio Software ABS Components Rear Wheel Align Rear Shock Rear Brake Pedal Road Test Sidestand Sidestand Pad Spark Plugs Steering Head Bearings Swingarm Throttle Cable Tires Wheel Spokes Wheel Condition Page 60 81 76 43 74 73 74 73 74 71 64 67 59 89 90...
...L I I I L P L I I I I L I I I Component Air Filter Battery Brake Fluid Brake Pads Clutch Cable Clutch Lever (Mechanical) Control Cables Crankcase Vent Drive Belt Drive Belt Adjustment Engine Oil & Filter* Exhaust System Fasteners Front Brake Lever Front Fork Oil** Front Fork / Axle Fuel System Fuel Filter Headlamp Ignition Switch / Locks Radio/Radio Software ABS Components Rear Wheel Align Rear Shock Rear Brake Pedal Road Test Sidestand Sidestand Pad Spark Plugs Steering Head Bearings Swingarm Throttle Cable Tires Wheel Spokes Wheel Condition Page 60 81 76 43 74 73 74 73 74 71 64 67 59 89 90...

Owners Manual
Page 71
.... To reduce air pressure, push the bleed button on the gauge. Swing Arm / Rear Axle Inspection 1. If the wheel does not rotate smoothly, inspect the wheel bearings, rear axle, belt adjustment and wheel alignment. wheel bearing area 69 Remove the cap from the air fitting and reinstall the cap. Remove the hose from the air fitting. 3. Make sure the suspension moves freely without binding. Listen for service if you detect noise or movement...
.... To reduce air pressure, push the bleed button on the gauge. Swing Arm / Rear Axle Inspection 1. If the wheel does not rotate smoothly, inspect the wheel bearings, rear axle, belt adjustment and wheel alignment. wheel bearing area 69 Remove the cap from the air fitting and reinstall the cap. Remove the hose from the air fitting. 3. Make sure the suspension moves freely without binding. Listen for service if you detect noise or movement...

Owners Manual
Page 90
... side cover. Fuse Recommendations Fuse Application Engine Fuel Pump/Ignition Coil Lights Turn Signals/Horn Ignition Chassis Anti-Lock Brakes (ABS) Fuse Size 15 amp 15 amp 20 amp 10 amp 10 amp 20 amp 30 amp (2) Fuse Application Reverse (if equipped) (on each side of motorcycle). 5. Lift the release tab and slide the fuse box upward to remove a fuse. 1. Release the tabs on rear tire debris flap) CROSS COUNTRY ONLY Accessory (under right side cover) Radio (in fairing behind headlight) 12...
... side cover. Fuse Recommendations Fuse Application Engine Fuel Pump/Ignition Coil Lights Turn Signals/Horn Ignition Chassis Anti-Lock Brakes (ABS) Fuse Size 15 amp 15 amp 20 amp 10 amp 10 amp 20 amp 30 amp (2) Fuse Application Reverse (if equipped) (on each side of motorcycle). 5. Lift the release tab and slide the fuse box upward to remove a fuse. 1. Release the tabs on rear tire debris flap) CROSS COUNTRY ONLY Accessory (under right side cover) Radio (in fairing behind headlight) 12...

Owners Manual
Page 93
... Fuel Engine Oil Level Incorrect Or Wrong Type Loose, Broken, Shorted Ignition Coil Wires Air Intake Restricted Possible Remedy/Action Fully charge the battery. See starting procedures on page 48. Inspect coil primary wires. See dealer. Maintenance Troubleshooting For your mechanical ability or tool resources. Inspect spark plugs. Shift transmission into neutral or pull the clutch lever in RUN position. Engine Starts But Misses or Runs Poorly Tip: Turn engine OFF before inspecting any inspection or repair...
... Fuel Engine Oil Level Incorrect Or Wrong Type Loose, Broken, Shorted Ignition Coil Wires Air Intake Restricted Possible Remedy/Action Fully charge the battery. See starting procedures on page 48. Inspect coil primary wires. See dealer. Maintenance Troubleshooting For your mechanical ability or tool resources. Inspect spark plugs. Shift transmission into neutral or pull the clutch lever in RUN position. Engine Starts But Misses or Runs Poorly Tip: Turn engine OFF before inspecting any inspection or repair...
Owners Manual
Page 106
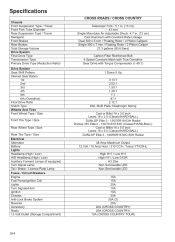
... Tires Front Wheel Type / Size Front Tire Type / Size Rear Wheel Type / Size Rear Tire Type / Size Electrical Alternator Battery Lights Headlamp (High / Low) HID Headlamp (High / Low) Auxiliary Forward Lamps (if equipped) Turn Signal Lamp Tail / Brake / License Plate Lamp Fuses / Circuit Breakers Engine Fuel Pump/Ignition Coil Lights Turn Signals/Horn Ignition Chassis Anti-Lock Brake System Reverse Accessory Radio 12-Volt Outlet (Storage Compartment) Telescopic Fork / 5.1 in. (13 cm) 43 mm Single Monotube Air Adjustable Shock: 4.7 in. (12 cm) Cast Aluminum with Constant Rate...
... Tires Front Wheel Type / Size Front Tire Type / Size Rear Wheel Type / Size Rear Tire Type / Size Electrical Alternator Battery Lights Headlamp (High / Low) HID Headlamp (High / Low) Auxiliary Forward Lamps (if equipped) Turn Signal Lamp Tail / Brake / License Plate Lamp Fuses / Circuit Breakers Engine Fuel Pump/Ignition Coil Lights Turn Signals/Horn Ignition Chassis Anti-Lock Brake System Reverse Accessory Radio 12-Volt Outlet (Storage Compartment) Telescopic Fork / 5.1 in. (13 cm) 43 mm Single Monotube Air Adjustable Shock: 4.7 in. (12 cm) Cast Aluminum with Constant Rate...

Owners Manual
Page 126
...NAV MP3 for navigation unit MP3 player use the audio system. The audio integration kit must be no interface with the vehicle's audio system. Press TUNE (+) or TUNE (-) to set the mode to AUX (for setting procedures. Changing to NAV MP3 Mode The ignition key must be installed...release the MODE button until AUX is fully functional without the kit installed, but navigation instructions may need to turn down the "media volume" on the GARMIN unit to turn the audio system on the radio from radio to MP3 player, change the active source to become familiar with all unit features...
...NAV MP3 for navigation unit MP3 player use the audio system. The audio integration kit must be no interface with the vehicle's audio system. Press TUNE (+) or TUNE (-) to set the mode to AUX (for setting procedures. Changing to NAV MP3 Mode The ignition key must be installed...release the MODE button until AUX is fully functional without the kit installed, but navigation instructions may need to turn down the "media volume" on the GARMIN unit to turn the audio system on the radio from radio to MP3 player, change the active source to become familiar with all unit features...

Owners Manual
Page 128
...36 Fluid Change, Engine Oil ...59 Fluid Level Engine Oil ...40 Front Brake ...41 Front Brake Fluid...76 Rear Brake ...42 Rear Brake Fluid ...75 Fork Inspection ...70 Fuel Cap...32 Fuel Gauge...24 Fuel Handling Safety ...12 Fuel Level ...40 I Identification Number Record ...105 Idle Inspection ...71 Ignition Key Number...16 Ignition Switch ...19 Ignition Switch Lubrication...82 Indicator Lamps...20, 25 Information Labels ...14-15 Instrument Cluster (Cross Country) ...24-28 Instrument Cluster (Cross Roads) ...20-23 Intercom System ...115-118 iPod Playlists ...120 iPod Song Control ...119 iPod...
...36 Fluid Change, Engine Oil ...59 Fluid Level Engine Oil ...40 Front Brake ...41 Front Brake Fluid...76 Rear Brake ...42 Rear Brake Fluid ...75 Fork Inspection ...70 Fuel Cap...32 Fuel Gauge...24 Fuel Handling Safety ...12 Fuel Level ...40 I Identification Number Record ...105 Idle Inspection ...71 Ignition Key Number...16 Ignition Switch ...19 Ignition Switch Lubrication...82 Indicator Lamps...20, 25 Information Labels ...14-15 Instrument Cluster (Cross Country) ...24-28 Instrument Cluster (Cross Roads) ...20-23 Intercom System ...115-118 iPod Playlists ...120 iPod Song Control ...119 iPod...

Owners Manual
Page 129
... ...5 Safety While Servicing ...55 Seat Removal/Installation ...86 Service Manual ...92 Service Procedure Safety ...55 Shift Points ...50 Shifting Gears ...49-50 Side Covers, Removal/Installation ...84 Sidestand...34 Sidestand Inspection ...45 Sidestand Lubrication ...82 Signal Words ...5 Spark Plugs ...80 Speedometer ...20, 24 Squelch ...116 Starter Interlock Switch ...29 Steering Head Inspection ...70 Steering Inspection ...44 Storage Battery Care ...99 Clean/Protect the Motorcycle ...98 Engine Protection ...99 Fuel Stabilizer ...98 Maintenance...
... ...5 Safety While Servicing ...55 Seat Removal/Installation ...86 Service Manual ...92 Service Procedure Safety ...55 Shift Points ...50 Shifting Gears ...49-50 Side Covers, Removal/Installation ...84 Sidestand...34 Sidestand Inspection ...45 Sidestand Lubrication ...82 Signal Words ...5 Spark Plugs ...80 Speedometer ...20, 24 Squelch ...116 Starter Interlock Switch ...29 Steering Head Inspection ...70 Steering Inspection ...44 Storage Battery Care ...99 Clean/Protect the Motorcycle ...98 Engine Protection ...99 Fuel Stabilizer ...98 Maintenance...

Owners Manual
Page 130
...29 Engine Starter Switch ...30 Engine Stop/Run Switch ...30 Hand Grip Heater Switch...28 Hazard Switch ...29 High Beam/Low Beam Switch ...29 Horn Button ...29 Ignition Switch ...19 Ignition Switch Lubrication...82 Mode Button ...29 Seat Heater Switches ...19 Sidestand Interlock Switch ...34 Starter Interlock Switch ...29 Turn Signal Switch ...29 Switches, Console (Cross Country)...Switches, Left Handlebar...Switches, Right Handlebar ...69 T Tone Ring/Sensor Inspection, ABS...78 Tool Kit ...37 Transporting the Motorcycle ...12 Trip Odometer ...28 Troubleshooting...91-92 Trunk Door Lock ...31...
...29 Engine Starter Switch ...30 Engine Stop/Run Switch ...30 Hand Grip Heater Switch...28 Hazard Switch ...29 High Beam/Low Beam Switch ...29 Horn Button ...29 Ignition Switch ...19 Ignition Switch Lubrication...82 Mode Button ...29 Seat Heater Switches ...19 Sidestand Interlock Switch ...34 Starter Interlock Switch ...29 Turn Signal Switch ...29 Switches, Console (Cross Country)...Switches, Left Handlebar...Switches, Right Handlebar ...69 T Tone Ring/Sensor Inspection, ABS...78 Tool Kit ...37 Transporting the Motorcycle ...12 Trip Odometer ...28 Troubleshooting...91-92 Trunk Door Lock ...31...