

Owners Manual
Page 1
Operation is an adult vehicle only. It contains important safety information. This is prohibited for Maintenance and Safety Read this manual carefully. Hawkeye 400 HO 2X4 Owner's Manual for those under 16 years of age.
Operation is an adult vehicle only. It contains important safety information. This is prohibited for Maintenance and Safety Read this manual carefully. Hawkeye 400 HO 2X4 Owner's Manual for those under 16 years of age.

Owners Manual
Page 4
... inaccuracies. Other languages are registered trademarks of POLARIS Industries Inc. All information contained within , whether whole or in U.S.A. 2013 HAWKEYE 400 HO 2X4 Owner's Manual P/N 9923932 2 Printed in part, is based on the latest product information at the time of publication. POLARIS and HAWKEYE are provided as translations of the original instructions. Copyright 2012 POLARIS Sales Inc. No liability can be accepted for...
... inaccuracies. Other languages are registered trademarks of POLARIS Industries Inc. All information contained within , whether whole or in U.S.A. 2013 HAWKEYE 400 HO 2X4 Owner's Manual P/N 9923932 2 Printed in part, is based on the latest product information at the time of publication. POLARIS and HAWKEYE are provided as translations of the original instructions. Copyright 2012 POLARIS Sales Inc. No liability can be accepted for...

Owners Manual
Page 32
... fuel condition. Fuel Filter The in a well ventilated area. Fuel Tank Cap This vehicle is located in starting procedure on a level surface. Refer to the engine starting a cold engine. Do not use fuel with a minimum pump octane number of operation, or annually. Use either leaded or unleaded gasoline with ethanol content greater than 10 percent, such as E-85 fuel. 30 FEATURES AND CONTROLS Fuel Valve The fuel valve is equipped with a digital fuel gauge...
... fuel condition. Fuel Filter The in a well ventilated area. Fuel Tank Cap This vehicle is located in starting procedure on a level surface. Refer to the engine starting a cold engine. Do not use fuel with a minimum pump octane number of operation, or annually. Use either leaded or unleaded gasoline with ethanol content greater than 10 percent, such as E-85 fuel. 30 FEATURES AND CONTROLS Fuel Valve The fuel valve is equipped with a digital fuel gauge...
Owners Manual
Page 33
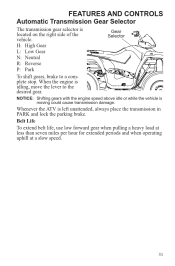
... cause transmission damage. H: High Gear L: Low Gear N: Neutral R: Reverse P: Park To shift gears, brake to the desired gear. When the engine is located on the right side of the vehicle. Belt Life To extend belt life, use low forward gear when pulling a heavy load at less than seven miles per hour for extended periods and when operating uphill at a slow speed. 31 FEATURES AND CONTROLS Automatic Transmission Gear Selector The transmission gear selector is idling...
... cause transmission damage. H: High Gear L: Low Gear N: Neutral R: Reverse P: Park To shift gears, brake to the desired gear. When the engine is located on the right side of the vehicle. Belt Life To extend belt life, use low forward gear when pulling a heavy load at less than seven miles per hour for extended periods and when operating uphill at a slow speed. 31 FEATURES AND CONTROLS Automatic Transmission Gear Selector The transmission gear selector is idling...
Owners Manual
Page 35
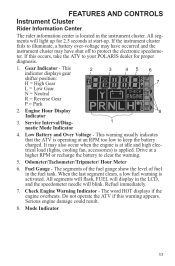
... battery charged. Engine Hour Display 8 Indicator 1 3. Drive at start-up for proper diagnosis. 1. Odometer/Tachometer/Tripmeter/ Hour Meter 6. Check Engine Warning Indicator - Low Battery and Over Voltage - Refuel immediately. 7. Gear Indicator - When the last segment clears, a low fuel warning is operating at idle and high electrical load (lights, cooling fan, accessories) is located in the instrument cluster. Mode Indicator 33 This warning usually indicates that the ATV is activated. Fuel Gauge...
... battery charged. Engine Hour Display 8 Indicator 1 3. Drive at start-up for proper diagnosis. 1. Odometer/Tachometer/Tripmeter/ Hour Meter 6. Check Engine Warning Indicator - Low Battery and Over Voltage - Refuel immediately. 7. Gear Indicator - When the last segment clears, a low fuel warning is operating at idle and high electrical load (lights, cooling fan, accessories) is located in the instrument cluster. Mode Indicator 33 This warning usually indicates that the ATV is activated. Fuel Gauge...
Owners Manual
Page 42
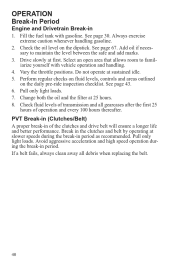
Drive slowly at sustained idle. 5. Vary the throttle positions. Do not operate at first. Pull only light loads. 7. Perform regular checks on fluid levels, controls and areas outlined on the dipstick. Fill the fuel tank with vehicle operation and handling. 4. See page 67. Change both the oil and the filter at slower speeds during the break-in of operation and every 100 hours thereafter. If a belt fails...
Drive slowly at sustained idle. 5. Vary the throttle positions. Do not operate at first. Pull only light loads. 7. Perform regular checks on fluid levels, controls and areas outlined on the dipstick. Fill the fuel tank with vehicle operation and handling. 4. See page 67. Change both the oil and the filter at slower speeds during the break-in of operation and every 100 hours thereafter. If a belt fails...
Owners Manual
Page 58
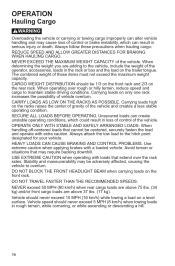
... maneuverability may be 1/3 on the front rack and 2/3 on the rear rack. Vehicle speed should never exceed 5 MPH (8 km/h) when towing loads in serious injury or death. OPERATION Hauling Cargo WARNING Overloading the vehicle or carrying or towing cargo improperly can alter vehicle handling and may cause loss of control or brake instability, which can create unstable operating conditions, which could result in the...
... maneuverability may be 1/3 on the front rack and 2/3 on the rear rack. Vehicle speed should never exceed 5 MPH (8 km/h) when towing loads in serious injury or death. OPERATION Hauling Cargo WARNING Overloading the vehicle or carrying or towing cargo improperly can alter vehicle handling and may cause loss of control or brake instability, which can create unstable operating conditions, which could result in the...

Owners Manual
Page 59
... on 2/3 warning labels and in serious damage to the hitch point. Use low forward gear when hauling or towing heavy cargo to maintain stable driving conditions. NOTICE: Using an improper hitch or exceeding the maximum tongue weight capacity can result in the specifications section of the vehicle. Never install a hitch longer than 4" (10 cm). Never install automotive accessories on the rear rack) and mounted as low...
... on 2/3 warning labels and in serious damage to the hitch point. Use low forward gear when hauling or towing heavy cargo to maintain stable driving conditions. NOTICE: Using an improper hitch or exceeding the maximum tongue weight capacity can result in the specifications section of the vehicle. Never install a hitch longer than 4" (10 cm). Never install automotive accessories on the rear rack) and mounted as low...
Owners Manual
Page 64
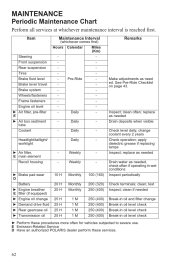
...(320) 250 (400) 250 (400) 250 (400) 250 (400) 250 (400) Ź Perform these services. 62 apply dielectric grease if replacing lamps Inspect; MAINTENANCE Periodic Maintenance Chart Perform all services at whichever maintenance interval is reached first. Item Maintenance Interval (whichever comes first) Hours Calendar Steering Front suspension Rear suspension Tires Brake fluid level Brake lever travel Brake system Wheels/fasteners Frame fasteners Engine oil level Ź Air filter, pre-filter E Ź Air box sediment tube Coolant Headlight/taillight/ worklight Ź Air filter, E main...
...(320) 250 (400) 250 (400) 250 (400) 250 (400) 250 (400) Ź Perform these services. 62 apply dielectric grease if replacing lamps Inspect; MAINTENANCE Periodic Maintenance Chart Perform all services at whichever maintenance interval is reached first. Item Maintenance Interval (whichever comes first) Hours Calendar Steering Front suspension Rear suspension Tires Brake fluid level Brake lever travel Brake system Wheels/fasteners Frame fasteners Engine oil level Ź Air filter, pre-filter E Ź Air box sediment tube Coolant Headlight/taillight/ worklight Ź Air filter, E main...

Owners Manual
Page 65
...; Engine oil change Ź Demand drive fluid Ź Rear gearcase oil Ź Transmission oil D Valve clearance E D Fuel system/filter E 100 H 100 H 100 H 100 H 100 H 100 H 6M 12 M 12 M 12 M 12 M 12 M Ź Radiator (if applicable) Ź Cooling hoses (if applicable) Ź Engine mounts Exhaust muffler/ pipe D Spark plug E D Ignition timing E Ź Wiring 100 H 100 H 100 H 100 H 100 H 100 H 100 H 12 M 12 M 12 M 12 M 12 M 12 M 12 M 63 replace if necessary Inspect; MAINTENANCE Periodic Maintenance Chart Item Maintenance Interval...
...; Engine oil change Ź Demand drive fluid Ź Rear gearcase oil Ź Transmission oil D Valve clearance E D Fuel system/filter E 100 H 100 H 100 H 100 H 100 H 100 H 6M 12 M 12 M 12 M 12 M 12 M Ź Radiator (if applicable) Ź Cooling hoses (if applicable) Ź Engine mounts Exhaust muffler/ pipe D Spark plug E D Ignition timing E Ź Wiring 100 H 100 H 100 H 100 H 100 H 100 H 100 H 12 M 12 M 12 M 12 M 12 M 12 M 12 M 63 replace if necessary Inspect; MAINTENANCE Periodic Maintenance Chart Item Maintenance Interval...

Owners Manual
Page 80
... all nuts are torqued to the ground. 6. Nut Type Lug Nut (Aluminum Wheels) Nut Torque 30 ft. Lower the vehicle to specification. lbs. (41 Nm) PLUS 1/4 TURN 2-Piece Flange Nut (Steel Wheels) 27 ft. MAINTENANCE Tires Wheel Installation 1. Lock the parking brake. 3. Torque the wheel nuts to come off during operation, which could result in PARK. 2. Wheel Nut Torque Specifications Check the wheel nut torques occasionally and when they...
... all nuts are torqued to the ground. 6. Nut Type Lug Nut (Aluminum Wheels) Nut Torque 30 ft. Lower the vehicle to specification. lbs. (41 Nm) PLUS 1/4 TURN 2-Piece Flange Nut (Steel Wheels) 27 ft. MAINTENANCE Tires Wheel Installation 1. Lock the parking brake. 3. Torque the wheel nuts to come off during operation, which could result in PARK. 2. Wheel Nut Torque Specifications Check the wheel nut torques occasionally and when they...

Owners Manual
Page 84
... the speedometer. Lift the pod cover and disconnect the speedometer harnesses from the rear of the headlight pod. 2. Remove the two screws on the wiring. 6. Allow lamps to remove it. 7. Always make sure lights are adjusted properly for best visibility. Turn the lamp counter-clockwise to cool before servicing. 5. MAINTENANCE Lights Poor lighting can cause burns to skin. Oil from the wiring harness. Lift the pod slightly...
... the speedometer. Lift the pod cover and disconnect the speedometer harnesses from the rear of the headlight pod. 2. Remove the two screws on the wiring. 6. Allow lamps to remove it. 7. Always make sure lights are adjusted properly for best visibility. Turn the lamp counter-clockwise to cool before servicing. 5. MAINTENANCE Lights Poor lighting can cause burns to skin. Oil from the wiring harness. Lift the pod slightly...

Owners Manual
Page 85
Position the vehicle on the wall. Start the engine.Turn the headlight switch to make a mark on the wall. The most intense part of the headlight beam should be two inches (5 cm) below the mark on a level surface with the headlight approximately 25 ft. (7.6 m) from the floor to the desired position by turning the knob either clockwise or counter-clockwise. Tilt...
Position the vehicle on the wall. Start the engine.Turn the headlight switch to make a mark on the wall. The most intense part of the headlight beam should be two inches (5 cm) below the mark on a level surface with the headlight approximately 25 ft. (7.6 m) from the floor to the desired position by turning the knob either clockwise or counter-clockwise. Tilt...

Owners Manual
Page 86
... to remove the o-rings from the locking tabs. 7. Lift the pod cover and disconnect the speedometer harnesses from the wiring harness. 5. Lift the adjusting knob up and out of the adjustment knob stop is 5 1/8" (13 cm). 10. Adjust the headlight aim by 5 1/8" turning the adjusting knob. (13 cm) 84 Carefully pull the assembly up to install the new housing and...
... to remove the o-rings from the locking tabs. 7. Lift the pod cover and disconnect the speedometer harnesses from the wiring harness. 5. Lift the adjusting knob up and out of the adjustment knob stop is 5 1/8" (13 cm). 10. Adjust the headlight aim by 5 1/8" turning the adjusting knob. (13 cm) 84 Carefully pull the assembly up to install the new housing and...

Owners Manual
Page 87
... dielectric grease to remove it. 3. Turn the headlight harness clockwise to secure the headlamp. Test the light for proper operation. 85 Turn the back of the headlight harness counter-clockwise and pull the harness assembly away from the back of the light assembly. 2. Reinstall the harness connector. 5. Remove the headlamp and install the new headlamp. 3. Remove the harness connector Connector from the headlight assembly. 2. MAINTENANCE Lights Lower Headlamp Replacement 1.
... dielectric grease to remove it. 3. Turn the headlight harness clockwise to secure the headlamp. Test the light for proper operation. 85 Turn the back of the headlight harness counter-clockwise and pull the harness assembly away from the back of the light assembly. 2. Reinstall the harness connector. 5. Remove the headlamp and install the new headlamp. 3. Remove the harness connector Connector from the headlight assembly. 2. MAINTENANCE Lights Lower Headlamp Replacement 1.

Owners Manual
Page 105
... fittings immediately after washing. MAINTENANCE Cleaning and Storage Washing the Vehicle If a high pressure water system is used for cleaning and polishing. Allow the engine to run for polishing the finish on the container. Replacement safety labels are provided by POLARIS at the following items: • Wheel bearings • Radiator • Transmission seals • Brakes • Cab and body panels • Electrical components • Switches and controls • Labels and...
... fittings immediately after washing. MAINTENANCE Cleaning and Storage Washing the Vehicle If a high pressure water system is used for cleaning and polishing. Allow the engine to run for polishing the finish on the container. Replacement safety labels are provided by POLARIS at the following items: • Wheel bearings • Radiator • Transmission seals • Brakes • Cab and body panels • Electrical components • Switches and controls • Labels and...

Owners Manual
Page 111
.... 109 TROUBLESHOOTING Drive Belt Wear/Burn Possible Cause Driving onto a pickup or tall trailer in high range Starting out going up a steep incline Driving at low RPM or ground speed (3-7 MPH) Insufficient warm-up belt one mile (5 miles or more when temperature is below 30 MPH for fouled plugs or foreign material in gas tank or fuel lines. Excessive throttle may cause loss of control and vehicle overturn. Wrong...
.... 109 TROUBLESHOOTING Drive Belt Wear/Burn Possible Cause Driving onto a pickup or tall trailer in high range Starting out going up a steep incline Driving at low RPM or ground speed (3-7 MPH) Insufficient warm-up belt one mile (5 miles or more when temperature is below 30 MPH for fouled plugs or foreign material in gas tank or fuel lines. Excessive throttle may cause loss of control and vehicle overturn. Wrong...
Owners Manual
Page 116
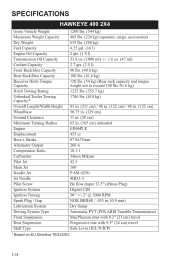
SPECIFICATIONS HAWKEYE 400 2X4 Gross Vehicle Weight Maximum Weight Capacity Dry Weight Fuel Capacity Engine Oil Capacity Transmission Oil Capacity Coolant Capacity Front Rack/Box Capacity Rear Rack/Box Capacity Receiver Hitch Tongue Capacity Hitch Towing Rating Unbraked Trailer Towing Capacity* Overall Length/Width/Height Wheelbase Ground Clearance Minimum Turning Radius Engine Displacement Bore x Stroke Alternator Output Compression Ratio Carburetor Pilot Jet Main Jet Needle Jet Jet Needle Pilot Screw Ignition System Ignition Timing Spark Plug / Gap Lubrication System Driving System Type ...
SPECIFICATIONS HAWKEYE 400 2X4 Gross Vehicle Weight Maximum Weight Capacity Dry Weight Fuel Capacity Engine Oil Capacity Transmission Oil Capacity Coolant Capacity Front Rack/Box Capacity Rear Rack/Box Capacity Receiver Hitch Tongue Capacity Hitch Towing Rating Unbraked Trailer Towing Capacity* Overall Length/Width/Height Wheelbase Ground Clearance Minimum Turning Radius Engine Displacement Bore x Stroke Alternator Output Compression Ratio Carburetor Pilot Jet Main Jet Needle Jet Jet Needle Pilot Screw Ignition System Ignition Timing Spark Plug / Gap Lubrication System Driving System Type ...

Owners Manual
Page 119
... a warranty claim: Spark Plugs Filters Fuel Sealants Hotel fees Towing charges Mileage Rentals/Loss of product use of aftermarket components resulting in competition or for coverage of personal loss. improper maintenance; repairs made after the warranty period expires or by external stress, heat, cold or contamination; use Lubricants such as oil, grease, etc. The following items: Wheels and tires Suspension components Brake components Seat components Clutches and components Steering components Batteries Light bulbs/Sealed...
... a warranty claim: Spark Plugs Filters Fuel Sealants Hotel fees Towing charges Mileage Rentals/Loss of product use of aftermarket components resulting in competition or for coverage of personal loss. improper maintenance; repairs made after the warranty period expires or by external stress, heat, cold or contamination; use Lubricants such as oil, grease, etc. The following items: Wheels and tires Suspension components Brake components Seat components Clutches and components Steering components Batteries Light bulbs/Sealed...

Owners Manual
Page 124
... Replacement ...82 Headlight Switch ...24 Helmet ...8 High Beam Adjustment ...83 High Range Use...92 N Noise Emission Control System ...59 O Oil Engine ...66-67 Transmission...70-71 Oil and Filter Change ...68-70 Oil Level, Engine...67 Oil Pump Priming ...70 Oil Recommendations ...66 Override Switch...24 I Idle RPM Adjustment ...100 Immersion Maintenance ...88 Instrument Cluster ...32-38 P Parking Brake ...28 Parking on an Incline...58 Periodic Maintenance Chart ...60-64 Polaris Product List ...113 Polishing the Vehicle...
... Replacement ...82 Headlight Switch ...24 Helmet ...8 High Beam Adjustment ...83 High Range Use...92 N Noise Emission Control System ...59 O Oil Engine ...66-67 Transmission...70-71 Oil and Filter Change ...68-70 Oil Level, Engine...67 Oil Pump Priming ...70 Oil Recommendations ...66 Override Switch...24 I Idle RPM Adjustment ...100 Immersion Maintenance ...88 Instrument Cluster ...32-38 P Parking Brake ...28 Parking on an Incline...58 Periodic Maintenance Chart ...60-64 Polaris Product List ...113 Polishing the Vehicle...