
Owners Manual
Page 15
.... Check the terrain carefully before getting out of control. • Never operate your vehicle in fast-flowing water or in water deeper than that specified in reverse, move slowly. Never open the throttle suddenly or make sudden gear changes. See page 34 for fuel safety warnings. • Always remove the ignition key when the vehicle is not in use to reduce the chance...
.... Check the terrain carefully before getting out of control. • Never operate your vehicle in fast-flowing water or in water deeper than that specified in reverse, move slowly. Never open the throttle suddenly or make sudden gear changes. See page 34 for fuel safety warnings. • Always remove the ignition key when the vehicle is not in use to reduce the chance...

Owners Manual
Page 16
... may increase the speed or power of 12 may change the handling characteristics of bodily injury. Always keep hands and feet inside the vehicle at all times. Always use the cab nets while riding in this vehicle. SAFETY Operator Safety Equipment Modifications We strongly recommend that consumers do not install on a POLARIS RANGER any equipment that increase its speed or power. The warranty on the...
... may increase the speed or power of 12 may change the handling characteristics of bodily injury. Always keep hands and feet inside the vehicle at all times. Always use the cab nets while riding in this vehicle. SAFETY Operator Safety Equipment Modifications We strongly recommend that consumers do not install on a POLARIS RANGER any equipment that increase its speed or power. The warranty on the...

Owners Manual
Page 18
... inspect and verify that 's appropriate for use to turn abruptly or at sharp angles. Never start the engine or let it run in loss of control and accident or overturn. Never turn at high speeds. SAFETY Failure to Inspect Before Operating Failure to ) brakes, throttle and steering systems. Operating at Excessive Speeds Operating this vehicle at excessive speeds increases the operator's risk of losing...
... inspect and verify that 's appropriate for use to turn abruptly or at sharp angles. Never start the engine or let it run in loss of control and accident or overturn. Never turn at high speeds. SAFETY Failure to Inspect Before Operating Failure to ) brakes, throttle and steering systems. Operating at Excessive Speeds Operating this vehicle at excessive speeds increases the operator's risk of losing...

Owners Manual
Page 22
... OFF position. Electrical equipment can be used. Electrical circuits are on. OFF ON START The engine is a three-position, key-operated switch. After the wait-to-start indicator turns off, turn the key to the START position to -Start (Glow Plug) Light Switch Indicator Ignition Switch Low Oil Pressure Indicator OFF START ON Ignition Switch The ignition switch is off , except Acc, 12V. FEATURES AND CONTROLS Switches and Indicator Lights AWD/Differential Switch Wait-to engage the electric starter. The key returns to the...
... OFF position. Electrical equipment can be used. Electrical circuits are on. OFF ON START The engine is a three-position, key-operated switch. After the wait-to-start indicator turns off, turn the key to the START position to -Start (Glow Plug) Light Switch Indicator Ignition Switch Low Oil Pressure Indicator OFF START ON Ignition Switch The ignition switch is off , except Acc, 12V. FEATURES AND CONTROLS Switches and Indicator Lights AWD/Differential Switch Wait-to engage the electric starter. The key returns to the...

Owners Manual
Page 23
... differential lock operating instructions. Low Oil Pressure Indicator If the low oil pressure indicator remains on when the engine is running, stop the engine immediately to operate the headlights. If the oil level is turned to turn off . FEATURES AND CONTROLS Switches and Indicator Lights Light Switch The ignition switch must be in rear wheel drive. HIGH LOW OFF AWD/Differential Lock Switch The AWD/Differential Switch has three positions: • All Wheel Drive (AWD) AWD • Differential Lock (2WD) • Differential Unlock Differential Lock Press the top of the switch...
... differential lock operating instructions. Low Oil Pressure Indicator If the low oil pressure indicator remains on when the engine is running, stop the engine immediately to operate the headlights. If the oil level is turned to turn off . FEATURES AND CONTROLS Switches and Indicator Lights Light Switch The ignition switch must be in rear wheel drive. HIGH LOW OFF AWD/Differential Lock Switch The AWD/Differential Switch has three positions: • All Wheel Drive (AWD) AWD • Differential Lock (2WD) • Differential Unlock Differential Lock Press the top of the switch...

Owners Manual
Page 26
... could result in a manner that the throttle pedal returns normally before starting the engine. Trailer Hitch Bracket This vehicle is located under the driver's seat. Make sure there's adequate throttle pedal freeplay. Brake Pedal Throttle Pedal Throttle Pedal Push the throttle pedal down to the rest position when released. Spring pressure returns the pedal to increase engine speed. WARNING! Always have your authorized POLARIS dealer thoroughly inspect the ROPS if...
... could result in a manner that the throttle pedal returns normally before starting the engine. Trailer Hitch Bracket This vehicle is located under the driver's seat. Make sure there's adequate throttle pedal freeplay. Brake Pedal Throttle Pedal Throttle Pedal Push the throttle pedal down to the rest position when released. Spring pressure returns the pedal to increase engine speed. WARNING! Always have your authorized POLARIS dealer thoroughly inspect the ROPS if...

Owners Manual
Page 31
... to 0. This warning usually indicates that the vehicle is operating at idle and high electrical load (lights, cooling fan, accessories) is overheating. Odometer/Tachometer/Tripmeter/Hour Meter/Engine Overheat - Tachometer Mode The engine RPM is activated. Low Battery and Over Voltage - When the last segment clears, a low fuel warning is displayed digitally. Odometer Mode The odometer records the miles traveled by the vehicle on each trip...
... to 0. This warning usually indicates that the vehicle is operating at idle and high electrical load (lights, cooling fan, accessories) is overheating. Odometer/Tachometer/Tripmeter/Hour Meter/Engine Overheat - Tachometer Mode The engine RPM is activated. Low Battery and Over Voltage - When the last segment clears, a low fuel warning is displayed digitally. Odometer Mode The odometer records the miles traveled by the vehicle on each trip...

Owners Manual
Page 32
... reminder to check engine speed. See page 29. To exit the diagnostic mode, turn the key switch on . Turn the ignition switch off and on . Hold the MODE button and turn the ignition switch off and wait 10 seconds. 2. Gear Circuit Diagnostic Screen This screen displays the resistance value (in neutral. 4. Please see your dealer for all -wheel-drive coil. Lock the parking brake. 3. FEATURES AND CONTROLS Instrument Cluster Rider Information Center Diagnostic Mode The...
... reminder to check engine speed. See page 29. To exit the diagnostic mode, turn the key switch on . Turn the ignition switch off and on . Hold the MODE button and turn the ignition switch off and wait 10 seconds. 2. Gear Circuit Diagnostic Screen This screen displays the resistance value (in neutral. 4. Please see your dealer for all -wheel-drive coil. Lock the parking brake. 3. FEATURES AND CONTROLS Instrument Cluster Rider Information Center Diagnostic Mode The...
Owners Manual
Page 34
..., always clean any debris from the duct and from the engine compartment. 30 See page 32. 2. On the initial engine start-up, allow the engine to idle for proper engine oil pressure, diesel fuel leaks, engine oil leaks, coolant leaks and proper operation of the clutches and drive belt will result in more efficient performance and longer life for the engine. During the break-in period for the next 4 to 5 hours...
..., always clean any debris from the duct and from the engine compartment. 30 See page 32. 2. On the initial engine start-up, allow the engine to idle for proper engine oil pressure, diesel fuel leaks, engine oil leaks, coolant leaks and proper operation of the clutches and drive belt will result in more efficient performance and longer life for the engine. During the break-in period for the next 4 to 5 hours...

Owners Manual
Page 41
... engine to warm up until the engine starts. 8. Release the throttle pedal completely and brake to START. Always engage the park brake after starting aid such as the exhaust system, to turn off before operating the vehicle. START HELP 1. Engage the park brake. Apply the brakes. Turn the ignition switch past the ON position to a complete stop. 2. This will result. Repeat steps 6 and 7 until the engine idles smoothly. Secure the cab nets. 3. Shift the transmission...
... engine to warm up until the engine starts. 8. Release the throttle pedal completely and brake to START. Always engage the park brake after starting aid such as the exhaust system, to turn off before operating the vehicle. START HELP 1. Engage the park brake. Apply the brakes. Turn the ignition switch past the ON position to a complete stop. 2. This will result. Repeat steps 6 and 7 until the engine idles smoothly. Secure the cab nets. 3. Shift the transmission...

Owners Manual
Page 49
... towing loads in the lowest gear available. When determining the weight you are adding to the hitch point designated for your vehicle. When operating over the rack sides. OPERATE ONLY WITH STABLE AND SAFELY ARRANGED LOADS. OPERATION Hauling Cargo WARNING Hauling cargo improperly can alter vehicle handling and may cause loss of control or brake instability, which can create unstable operating conditions...
... towing loads in the lowest gear available. When determining the weight you are adding to the hitch point designated for your vehicle. When operating over the rack sides. OPERATE ONLY WITH STABLE AND SAFELY ARRANGED LOADS. OPERATION Hauling Cargo WARNING Hauling cargo improperly can alter vehicle handling and may cause loss of control or brake instability, which can create unstable operating conditions...

Owners Manual
Page 50
.... Do not tow more than the recommended weight for the vehicle. Never tow a trailer on hitch) must always ride in the cab with passengers in the cargo box can alter vehicle handling and may lose control of the vehicle. 5. Model RANGER Diesel Maximum Total Weight Capacity (Level Ground) 1500 lbs. (681 kg) Maximum Cargo Box Weight Capacity 1000 lbs. (454 kg) WARNING! Passengers must not exceed the maximum weight capacity of the vehicle. Towing a trailer increases braking distance. 3.
.... Do not tow more than the recommended weight for the vehicle. Never tow a trailer on hitch) must always ride in the cab with passengers in the cargo box can alter vehicle handling and may lose control of the vehicle. 5. Model RANGER Diesel Maximum Total Weight Capacity (Level Ground) 1500 lbs. (681 kg) Maximum Cargo Box Weight Capacity 1000 lbs. (454 kg) WARNING! Passengers must not exceed the maximum weight capacity of the vehicle. Towing a trailer increases braking distance. 3.

Owners Manual
Page 52
... conditions helps improve traction. This mode of time the vehicle may remain locked after following procedure to engage All Wheel Drive (AWD). Disengaging AWD Move the AWD switch to the center or bottom position to the length of operation is well suited to AWD. There is turned off . If the rear wheels are spinning may be turned on , the front wheels will automatically disengage. In some vehicle speed restriction. If the switch...
... conditions helps improve traction. This mode of time the vehicle may remain locked after following procedure to engage All Wheel Drive (AWD). Disengaging AWD Move the AWD switch to the center or bottom position to the length of operation is well suited to AWD. There is turned off . If the rear wheels are spinning may be turned on , the front wheels will automatically disengage. In some vehicle speed restriction. If the switch...
Owners Manual
Page 56
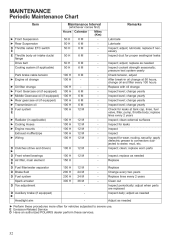
... tank cap, lines, fuel valve, filter, pump, throttle body; MAINTENANCE Periodic Maintenance Chart Item Maintenance Interval (whichever comes first) Hours Calendar Ź Front Suspension Ź Rear Suspension D Throttle cable/ ETC switch E E Throttle body air intake ducts/ flange Drive belt Cooling system (if applicable) Park brake cable tension Ź Engine oil change Ź Oil filter change yearly Inspect level; replace lines every 2 years Inspect; pressure test system yearly Check tension, adjust After break-in applicable) Ź Cooling Hoses Ź Engine mounts Exhaust muffler...
... tank cap, lines, fuel valve, filter, pump, throttle body; MAINTENANCE Periodic Maintenance Chart Item Maintenance Interval (whichever comes first) Hours Calendar Ź Front Suspension Ź Rear Suspension D Throttle cable/ ETC switch E E Throttle body air intake ducts/ flange Drive belt Cooling system (if applicable) Park brake cable tension Ź Engine oil change Ź Oil filter change yearly Inspect level; replace lines every 2 years Inspect; pressure test system yearly Check tension, adjust After break-in applicable) Ź Cooling Hoses Ź Engine mounts Exhaust muffler...

Owners Manual
Page 74
.... 6. Loosen the wheel nuts slightly. Be sure the valve stem is depressed, the brake light comes on , check the bulb. 70 Check the brake light before each ride. 1. Place the transmission in reduced visibility when driving. Wheel Installation 1. 2. 3. 4. Engage the park brake. Depress the brake pedal. Always make sure lights are torqued to the ground. 7. MAINTENANCE Tires Wheel Removal 1. 2. 3. 4. 5. Torque the wheel nuts to the ON position. 2. WARNING! Turn the ignition switch to specification.
.... 6. Loosen the wheel nuts slightly. Be sure the valve stem is depressed, the brake light comes on , check the bulb. 70 Check the brake light before each ride. 1. Place the transmission in reduced visibility when driving. Wheel Installation 1. 2. 3. 4. Engage the park brake. Depress the brake pedal. Always make sure lights are torqued to the ground. 7. MAINTENANCE Tires Wheel Removal 1. 2. 3. 4. 5. Torque the wheel nuts to the ON position. 2. WARNING! Turn the ignition switch to specification.

Owners Manual
Page 75
... the vehicle on the lamp locates properly in gear. Measure the distance from the wiring harness. MAINTENANCE Lights Headlight Lamp Replacement 1. Engage the park brake. 3. Apply the brakes. Observe the headlight aim. Install the new lamp. Place the transmission in the housing. 5. Open the hood. Start the engine. CAUTION! If a headlight needs adjustment, locate the adjustment screw at the same height. 4. the floor to the center of the headlight. 7. Loosen...
... the vehicle on the lamp locates properly in gear. Measure the distance from the wiring harness. MAINTENANCE Lights Headlight Lamp Replacement 1. Engage the park brake. 3. Apply the brakes. Observe the headlight aim. Install the new lamp. Place the transmission in the housing. 5. Open the hood. Start the engine. CAUTION! If a headlight needs adjustment, locate the adjustment screw at the same height. 4. the floor to the center of the headlight. 7. Loosen...

Owners Manual
Page 83
... Ratio Starting System Fuel System Front Suspension Rear Suspension Lubrication System Driving System Type Shift Type Gear Reduction - Front: Drive Ratio - Rear Tire Pressure - High Drive Ratio - Cargo Box Load Overall Length Overall Width (box) Overall Width (tires) Overall Height Wheelbase Cargo Box Dimensions (Inside) Ground Clearance Min. Low Gear Reduction - Reverse Gear Reduction - Rear Tire Size - Rear Brakes, Front/Rear Brake, Park Hood Headlight Taillights Brake Light Indicator Light 1500 lbs. (681 kg) (includes weight of operator, passenger, cargo, accessories) 1435...
... Ratio Starting System Fuel System Front Suspension Rear Suspension Lubrication System Driving System Type Shift Type Gear Reduction - Front: Drive Ratio - Rear Tire Pressure - High Drive Ratio - Cargo Box Load Overall Length Overall Width (box) Overall Width (tires) Overall Height Wheelbase Cargo Box Dimensions (Inside) Ground Clearance Min. Low Gear Reduction - Reverse Gear Reduction - Rear Tire Size - Rear Brakes, Front/Rear Brake, Park Hood Headlight Taillights Brake Light Indicator Light 1500 lbs. (681 kg) (includes weight of operator, passenger, cargo, accessories) 1435...

Owners Manual
Page 92
...-related components for evaporative emissions: Fuel Tank Fuel Cap Fuel Line Fuel Line Fittings Clamps* Pressure Relief Valves* Control Valves* Control Solenoids* Electronic Controls Vacuum Control Diaphragms* Control Cables* Control Linkages* Purge Valves Vapor Hoses Liquid/Vapor Separator Carbon Canister Canister Mounting Brackets Carburetor Purge Port Connector *As related to the POLARIS standard limited warranty for a period of 500 hours of engine operation, 5000 kilometers (3100 miles) of vehicle travel, or 30 calendar months...
...-related components for evaporative emissions: Fuel Tank Fuel Cap Fuel Line Fuel Line Fittings Clamps* Pressure Relief Valves* Control Valves* Control Solenoids* Electronic Controls Vacuum Control Diaphragms* Control Cables* Control Linkages* Purge Valves Vapor Hoses Liquid/Vapor Separator Carbon Canister Canister Mounting Brackets Carburetor Purge Port Connector *As related to the POLARIS standard limited warranty for a period of 500 hours of engine operation, 5000 kilometers (3100 miles) of vehicle travel, or 30 calendar months...
Owners Manual
Page 95
... Limited Warranty ...88-89 Engaging AWD ...48 Engine Oil...54-55 Engine Starting ...37 Engine Stopping ...37 Equipment Modifications ...12 Exhaust System Purging ...65 Eye Protection...9 C Cab Frame, ROPS...22 Cab Nets ...23 Capacity, Weight ...46 Cargo...45-46 Cargo Box, Dumping ...47 Chart Gearcase Specifications ...56 Periodic Maintenance...50-52 Chrome Wheel Care ...76 Cleaning and Storage ...75-77 Clothing ...9 Cold Weather Operation ...35-36 F Fan, Cooling ...Filter Cleaning, Air ...Filter, Air ...Filter, Fuel...Fluid, Brake...
... Limited Warranty ...88-89 Engaging AWD ...48 Engine Oil...54-55 Engine Starting ...37 Engine Stopping ...37 Equipment Modifications ...12 Exhaust System Purging ...65 Eye Protection...9 C Cab Frame, ROPS...22 Cab Nets ...23 Capacity, Weight ...46 Cargo...45-46 Cargo Box, Dumping ...47 Chart Gearcase Specifications ...56 Periodic Maintenance...50-52 Chrome Wheel Care ...76 Cleaning and Storage ...75-77 Clothing ...9 Cold Weather Operation ...35-36 F Fan, Cooling ...Filter Cleaning, Air ...Filter, Air ...Filter, Fuel...Fluid, Brake...
Owners Manual
Page 97
... Transmission Warning ...61-62 Transmission, Drying ...62 Transporting the Vehicle ...78 Tread Depth ...69 S Safety Labels...6-8 Safety Symbols ...4 Safety Warnings ...12-16 Seat Belts ...24-25 Seat Removal ...24 Service Interval Programming ...29 Severe Use Definition ...50 Shifter ...20 Shifting Gears ...20 Shock Spring Adjustment ...68 Signal Words...4 Spark Arrester Purging ...65 Specifications, 4X4 ...79 Specifications, Gearcase ...56 Speed, Towing ...46 Speedometer ...26 Spring, Shock, Adjustment ...68 Starting the Engine ...37 Steering Wheel Inspection ...68 Steering Wheel, Adjustment...
... Transmission Warning ...61-62 Transmission, Drying ...62 Transporting the Vehicle ...78 Tread Depth ...69 S Safety Labels...6-8 Safety Symbols ...4 Safety Warnings ...12-16 Seat Belts ...24-25 Seat Removal ...24 Service Interval Programming ...29 Severe Use Definition ...50 Shifter ...20 Shifting Gears ...20 Shock Spring Adjustment ...68 Signal Words...4 Spark Arrester Purging ...65 Specifications, 4X4 ...79 Specifications, Gearcase ...56 Speed, Towing ...46 Speedometer ...26 Spring, Shock, Adjustment ...68 Starting the Engine ...37 Steering Wheel Inspection ...68 Steering Wheel, Adjustment...