

Owners Manual
Page 29
... lever to start the engine. NOTICE: Shifting gears with the engine speed above idle or while the vehicle is left or right to the OFF position to the vehicle, including lights. Both the main switch and the engine stop switch will not start or run when the switch is off all electrical power to stop the engine quickly. Selector H: High Gear L: Low Gear N: Neutral R: Reverse P: Park To shift gears, brake to start the engine. Belt Life To extend belt life...
... lever to start the engine. NOTICE: Shifting gears with the engine speed above idle or while the vehicle is left or right to the OFF position to the vehicle, including lights. Both the main switch and the engine stop switch will not start or run when the switch is off all electrical power to stop the engine quickly. Selector H: High Gear L: Low Gear N: Neutral R: Reverse P: Park To shift gears, brake to start the engine. Belt Life To extend belt life...

Owners Manual
Page 41
... is engaged (switch is activated. H = High Gear L = Low Gear N = Neutral R = Reverse Gear P = Park -- = Gear Signal Error (or shifter between gears) 2. If the engine is turned off, press the MODE button. See page 39 for 5-10 seconds. Gear Display - FEATURES AND CONTROLS Instrument Cluster Digital/Analog Gauge Rider Information Center 1. A flashing wrench symbol alerts the operator that the preset service interval has been reached. Fuel Gauge Display - See page 39 for scheduled maintenance.
... is engaged (switch is activated. H = High Gear L = Low Gear N = Neutral R = Reverse Gear P = Park -- = Gear Signal Error (or shifter between gears) 2. If the engine is turned off, press the MODE button. See page 39 for 5-10 seconds. Gear Display - FEATURES AND CONTROLS Instrument Cluster Digital/Analog Gauge Rider Information Center 1. A flashing wrench symbol alerts the operator that the preset service interval has been reached. Fuel Gauge Display - See page 39 for scheduled maintenance.

Owners Manual
Page 47
... occurs. EPS Warning Indicator - FEATURES AND CONTROLS Instrument Cluster Multi-Function Display (MFD) Gauge (EPS Models) 4. Fuel Gauge - The segments of the fuel gauge show the level of fuel in a 12-hour or 24-hour format. Refuel immediately. See your dealer for resetting instructions. 9. If the engine is activated. Service Reminder Display - See page 46 for scheduled maintenance. Check Engine Warning - Do not operate the ATV if this indicator light remains...
... occurs. EPS Warning Indicator - FEATURES AND CONTROLS Instrument Cluster Multi-Function Display (MFD) Gauge (EPS Models) 4. Fuel Gauge - The segments of the fuel gauge show the level of fuel in a 12-hour or 24-hour format. Refuel immediately. See your dealer for resetting instructions. 9. If the engine is activated. Service Reminder Display - See page 46 for scheduled maintenance. Check Engine Warning - Do not operate the ATV if this indicator light remains...

Owners Manual
Page 52
... has shorted internally. SCRAMBLER 850 XP / 850 XP EPS Diagnostic Codes Component Throttle Position Sensor Engine Temperature Sensor Condition Voltage Too High Voltage Too Low Voltage Too High Voltage Too Low Temperature Too High Engine Overheat Shutdown Intake Air Temperature Sensor Manifold Absolute Pressure Sensor Voltage Too High Voltage Too Low Voltage Too High Voltage Too Low Signal Out of Range Crankshaft Position Sensor Vehicle Speed Signal Gear Sensor Signal Circuit Fault Plausibility Fault Speed Too High Plausibility...
... has shorted internally. SCRAMBLER 850 XP / 850 XP EPS Diagnostic Codes Component Throttle Position Sensor Engine Temperature Sensor Condition Voltage Too High Voltage Too Low Voltage Too High Voltage Too Low Temperature Too High Engine Overheat Shutdown Intake Air Temperature Sensor Manifold Absolute Pressure Sensor Voltage Too High Voltage Too Low Voltage Too High Voltage Too Low Signal Out of Range Crankshaft Position Sensor Vehicle Speed Signal Gear Sensor Signal Circuit Fault Plausibility Fault Speed Too High Plausibility...

Owners Manual
Page 53
FEATURES AND CONTROLS Instrument Cluster Diagnostic Display Code Definitions SCRAMBLER 850 XP / 850 XP EPS Diagnostic Codes Component Condition Driver Circuit Short to B+ Driver Circuit Grounded Ignition Coil Primary Driver 1 (MAG) Ignition Coil Primary Driver 2 (PTO) Fuel Pump Driver Circuit Driver Circuit Short to B+ Driver Circuit Short to B+ Driver Circuit Open/Grounded Driver Circuit Short to B+ Driver Circuit Grounded Fan Relay Driver Circuit Driver Circuit Open/Grounded Driver Circuit Short to B+ Driver Circuit Grounded Idle Air Control Driver Circuit Open/Grounded Driver Circuit Short ...
FEATURES AND CONTROLS Instrument Cluster Diagnostic Display Code Definitions SCRAMBLER 850 XP / 850 XP EPS Diagnostic Codes Component Condition Driver Circuit Short to B+ Driver Circuit Grounded Ignition Coil Primary Driver 1 (MAG) Ignition Coil Primary Driver 2 (PTO) Fuel Pump Driver Circuit Driver Circuit Short to B+ Driver Circuit Short to B+ Driver Circuit Open/Grounded Driver Circuit Short to B+ Driver Circuit Grounded Fan Relay Driver Circuit Driver Circuit Open/Grounded Driver Circuit Short to B+ Driver Circuit Grounded Idle Air Control Driver Circuit Open/Grounded Driver Circuit Short ...

Owners Manual
Page 57
... at 25 hours. 8. Always exercise extreme caution whenever handling gasoline. 2. Check the engine oil level on the daily pre-ride inspection checklist. Change both the oil and the filter at slower speeds during the break-in period as recommended. PVT Break-in (Clutches/Belt) A proper break-in 1. Perform regular checks on fluid levels, controls and areas outlined on the dipstick. See page...
... at 25 hours. 8. Always exercise extreme caution whenever handling gasoline. 2. Check the engine oil level on the daily pre-ride inspection checklist. Change both the oil and the filter at slower speeds during the break-in period as recommended. PVT Break-in (Clutches/Belt) A proper break-in 1. Perform regular checks on fluid levels, controls and areas outlined on the dipstick. See page...

Owners Manual
Page 72
... WARNING Overloading the vehicle or carrying or towing cargo improperly can alter vehicle handling and may cause loss of control or brake instability, which can create unstable operating conditions, which could result in serious injury or death. Carrying loads on the front rack. NEVER EXCEED THE MAXIMUM WEIGHT CAPACITY of these precautions when hauling cargo: REDUCE SPEED AND ALLOW GREATER DISTANCES FOR BRAKING...
... WARNING Overloading the vehicle or carrying or towing cargo improperly can alter vehicle handling and may cause loss of control or brake instability, which can create unstable operating conditions, which could result in serious injury or death. Carrying loads on the front rack. NEVER EXCEED THE MAXIMUM WEIGHT CAPACITY of these precautions when hauling cargo: REDUCE SPEED AND ALLOW GREATER DISTANCES FOR BRAKING...

Owners Manual
Page 73
Never exceed the weight capacities specified for your ATV on the rear rack) and mounted as low as possible. 3. Use low forward gear when hauling or towing heavy cargo to maintain stable driving conditions. 4. Cargo weight should be evenly distributed (1/3 on the front rack and 2/3 on warning labels and in the specifications section of 2/3 this manual. 1/3 2. Do not obstruct the headlight beam with cargo. 5. When operating over rough or hilly terrain, reduce speed and cargo weight to extend belt life. 69 OPERATION Hauling Cargo 1.
Never exceed the weight capacities specified for your ATV on the rear rack) and mounted as low as possible. 3. Use low forward gear when hauling or towing heavy cargo to maintain stable driving conditions. 4. Cargo weight should be evenly distributed (1/3 on the front rack and 2/3 on warning labels and in the specifications section of 2/3 this manual. 1/3 2. Do not obstruct the headlight beam with cargo. 5. When operating over rough or hilly terrain, reduce speed and cargo weight to extend belt life. 69 OPERATION Hauling Cargo 1.

Owners Manual
Page 74
... Always attach a towed load to the vehicle and will void your POLARIS ATV. Remove the hitch from the ATV when not towing a trailer. Avoid towing on hitch) must not exceed the rear rack capacity. • The total load (operator, accessories, cargo and weight on inclines. Maximum 4" (10 cm) Maximum Towing Capacities Do not exceed the following maximum capacities when towing. SCRAMBLER 850 XP/850 XP EPS Maximum Towed Load (Level Ground) Maximum Vertical Hitch Weight 1500 lbs...
... Always attach a towed load to the vehicle and will void your POLARIS ATV. Remove the hitch from the ATV when not towing a trailer. Avoid towing on hitch) must not exceed the rear rack capacity. • The total load (operator, accessories, cargo and weight on inclines. Maximum 4" (10 cm) Maximum Towing Capacities Do not exceed the following maximum capacities when towing. SCRAMBLER 850 XP/850 XP EPS Maximum Towed Load (Level Ground) Maximum Vertical Hitch Weight 1500 lbs...

Owners Manual
Page 79
...) Inspect; replace as needed Remarks Ź Engine mounts Exhaust muffler/ pipe D Spark plug E Ź Wiring 100 H 100 H 100 H 100 H 12 M 12 M 12 M 12 M D Clutches (drive and driven) D Front wheel bearings D Brake fluid Spark arrester D Valve clearance E D Toe adjustment Headlight aim 100 H 100 H 200 H 300 H 1000 H 12 M 12 M 24 M 36 M - 75 clean; adjust Inspect periodically; MAINTENANCE Periodic Maintenance Chart Item Maintenance Interval (whichever comes first) Hours Calendar Fuel system 100 H 12 M Miles (Km...
...) Inspect; replace as needed Remarks Ź Engine mounts Exhaust muffler/ pipe D Spark plug E Ź Wiring 100 H 100 H 100 H 100 H 12 M 12 M 12 M 12 M D Clutches (drive and driven) D Front wheel bearings D Brake fluid Spark arrester D Valve clearance E D Toe adjustment Headlight aim 100 H 100 H 200 H 300 H 1000 H 12 M 12 M 24 M 36 M - 75 clean; adjust Inspect periodically; MAINTENANCE Periodic Maintenance Chart Item Maintenance Interval (whichever comes first) Hours Calendar Fuel system 100 H 12 M Miles (Km...

Owners Manual
Page 95
... Nut Type Lug Nut Lug Nut Nut Torque 75 ft. lbs. (102 Nm) Cast Aluminum Steel 45 ft. lbs. (102 Nm) 45 ft. Lower the vehicle to specification. lbs. (61 Nm) Wheel Nut Torque Specifications Check the wheel nut torques occasionally and when they've been loosened for maintenance service. Lock the parking brake. 3. Place the wheel on the hub with the valve stem toward...
... Nut Type Lug Nut Lug Nut Nut Torque 75 ft. lbs. (102 Nm) Cast Aluminum Steel 45 ft. lbs. (102 Nm) 45 ft. Lower the vehicle to specification. lbs. (61 Nm) Wheel Nut Torque Specifications Check the wheel nut torques occasionally and when they've been loosened for maintenance service. Lock the parking brake. 3. Place the wheel on the hub with the valve stem toward...

Owners Manual
Page 98
... rider weight on the wall. Headlight Beam Adjustment (XP EPS) The headlight beam can be adjusted slightly. Place the transmission in PARK. 25 ft. (7.6 m) Lamp Center Height 2 in reduced visibility when driving. Measure the distance from a wall. Screws 94 Headlight Beam Inspection The headlight beam can be adjusted horizontally and vertically. Start the engine. Headlight and taillight lenses become dirty during normal operation. Turn the headlight switch...
... rider weight on the wall. Headlight Beam Adjustment (XP EPS) The headlight beam can be adjusted slightly. Place the transmission in PARK. 25 ft. (7.6 m) Lamp Center Height 2 in reduced visibility when driving. Measure the distance from a wall. Screws 94 Headlight Beam Inspection The headlight beam can be adjusted horizontally and vertically. Start the engine. Headlight and taillight lenses become dirty during normal operation. Turn the headlight switch...

Owners Manual
Page 99
... headlamp. 2. Turn the headlight harness clockwise to operate properly, replace the entire taillight assembly. 95 MAINTENANCE Lights Headlight Beam Adjustment (XP) The headlight beam can be replaced. Tighten the screw. Loosen the phillips screw located at the rear of the headlight harness counter-clockwise and pull the harness assembly away from the headlight assembly. 2. Reinstall the harness assembly into the headlight assembly. 4. Harness Headlamp Replacement (XP EPS) If a headlight becomes damaged or inoperable, the entire headlight assembly must be...
... headlamp. 2. Turn the headlight harness clockwise to operate properly, replace the entire taillight assembly. 95 MAINTENANCE Lights Headlight Beam Adjustment (XP) The headlight beam can be replaced. Tighten the screw. Loosen the phillips screw located at the rear of the headlight harness counter-clockwise and pull the harness assembly away from the headlight assembly. 2. Reinstall the harness assembly into the headlight assembly. 4. Harness Headlamp Replacement (XP EPS) If a headlight becomes damaged or inoperable, the entire headlight assembly must be...

Owners Manual
Page 117
Replacement safety labels are provided by POLARIS at the following items: • Wheel bearings • Electrical components • Radiator • Switches and controls • Transmission seals • Fuel system components • Cab and body panels • Labels and decals If an informational or graphic label becomes illegible or comes off, contact your POLARIS dealer to evaporate any water that will scratch the finish. 113 Follow the instructions...
Replacement safety labels are provided by POLARIS at the following items: • Wheel bearings • Electrical components • Radiator • Switches and controls • Transmission seals • Fuel system components • Cab and body panels • Labels and decals If an informational or graphic label becomes illegible or comes off, contact your POLARIS dealer to evaporate any water that will scratch the finish. 113 Follow the instructions...
Owners Manual
Page 118
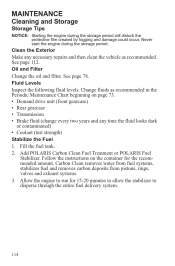
... occur. Change fluids as recommended. Add POLARIS Carbon Clean Fuel Treatment or POLARIS Fuel Stabilizer. MAINTENANCE Cleaning and Storage Storage Tips NOTICE: Starting the engine during the storage period. See page 112. Follow the instructions on page 73. • Demand drive unit (front gearcase) • Rear gearcase • Transmission • Brake fluid (change every two years and any necessary repairs and then clean the vehicle as recommended...
... occur. Change fluids as recommended. Add POLARIS Carbon Clean Fuel Treatment or POLARIS Fuel Stabilizer. MAINTENANCE Cleaning and Storage Storage Tips NOTICE: Starting the engine during the storage period. See page 112. Follow the instructions on page 73. • Demand drive unit (front gearcase) • Rear gearcase • Transmission • Brake fluid (change every two years and any necessary repairs and then clean the vehicle as recommended...

Owners Manual
Page 121
... your dealer. Poor engine performance Check for fouled plugs or foreign material in a new belt and/or clutch. See your POLARIS dealer. WARNING! Excessive throttle may cause loss of control and vehicle overturn. Use the throttle quickly and effectively. Climbing over large Shift the transmission to 7 times. Inspect clutch seals for warm up belt one mile (5 miles or more flexible and prevent belt burning. Slippage from water Dry out the...
... your dealer. Poor engine performance Check for fouled plugs or foreign material in a new belt and/or clutch. See your POLARIS dealer. WARNING! Excessive throttle may cause loss of control and vehicle overturn. Use the throttle quickly and effectively. Climbing over large Shift the transmission to 7 times. Inspect clutch seals for warm up belt one mile (5 miles or more flexible and prevent belt burning. Slippage from water Dry out the...
Owners Manual
Page 126
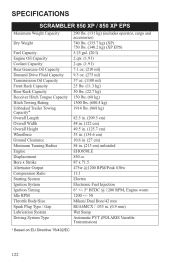
SPECIFICATIONS SCRAMBLER 850 XP / 850 XP EPS Maximum Weight Capacity Dry Weight Fuel Capacity Engine Oil Capacity Coolant Capacity Rear Gearcase Oil Capacity Demand Drive Fluid Capacity Transmission Oil Capacity Front Rack Capacity Rear Rack Capacity Receiver Hitch Tongue Capacity Hitch Towing Rating Unbraked Trailer Towing Capacity* Overall Length Overall Width Overall Height Wheelbase Ground Clearance Minimum Turning Radius Engine Displacement Bore x Stroke Alternator Output Compression Ratio Starting System Ignition System Ignition Timing Idle RPM Throttle Body/Size Spark Plug Type / Gap ...
SPECIFICATIONS SCRAMBLER 850 XP / 850 XP EPS Maximum Weight Capacity Dry Weight Fuel Capacity Engine Oil Capacity Coolant Capacity Rear Gearcase Oil Capacity Demand Drive Fluid Capacity Transmission Oil Capacity Front Rack Capacity Rear Rack Capacity Receiver Hitch Tongue Capacity Hitch Towing Rating Unbraked Trailer Towing Capacity* Overall Length Overall Width Overall Height Wheelbase Ground Clearance Minimum Turning Radius Engine Displacement Bore x Stroke Alternator Output Compression Ratio Starting System Ignition System Ignition Timing Idle RPM Throttle Body/Size Spark Plug Type / Gap ...

Owners Manual
Page 134
... not increase the vehicle's regulated emissions. This emissions limited warranty does not cover components whose only purpose is first purchased and continues for evaporative emissions Fuel Tank Fuel Cap Fuel Line Fuel Line Fittings Clamps* Pressure Relief Valves* Control Valves* Control Solenoids* Electronic Controls Vacuum Control Diaphragms* Control Cables* Control Linkages* Purge Valves Vapor Hoses Liquid/Vapor Separator Carbon Canister Canister Mounting Brackets Carburetor Purge Port Connector *As related to control emissions. WARRANTY U.S.A. POLARIS Industries Inc.
... not increase the vehicle's regulated emissions. This emissions limited warranty does not cover components whose only purpose is first purchased and continues for evaporative emissions Fuel Tank Fuel Cap Fuel Line Fuel Line Fittings Clamps* Pressure Relief Valves* Control Valves* Control Solenoids* Electronic Controls Vacuum Control Diaphragms* Control Cables* Control Linkages* Purge Valves Vapor Hoses Liquid/Vapor Separator Carbon Canister Canister Mounting Brackets Carburetor Purge Port Connector *As related to control emissions. WARRANTY U.S.A. POLARIS Industries Inc.
Owners Manual
Page 139
... Lower Headlamp Replacement...95 Lubrication Guide ...76 M Maintenance Chart ...72-75 Master Cylinder ...28 Metric Display ...38, 45 Mode Switch ...24 Modifications ...9 G Gasoline Handling ...11 Gauge, Code Definitions...48-50 Gauge, Digital/Analog ...34-41 Gauge, MFD (EPS Models) ...42-47 Gauge, MFD (XP EPS Models) ...46 Gear Selector...25 Gearcase Oil, Rear ...82-83 Gloves ...9 N Noise Emission Control System ...71 O Oil Engine ...77-79 Rear Gearcase ...82-83 Transmission...80 Oil and Filter Change ...78-79 Oil Change Rear Gearcase ...83 Transmission...
... Lower Headlamp Replacement...95 Lubrication Guide ...76 M Maintenance Chart ...72-75 Master Cylinder ...28 Metric Display ...38, 45 Mode Switch ...24 Modifications ...9 G Gasoline Handling ...11 Gauge, Code Definitions...48-50 Gauge, Digital/Analog ...34-41 Gauge, MFD (EPS Models) ...42-47 Gauge, MFD (XP EPS Models) ...46 Gear Selector...25 Gearcase Oil, Rear ...82-83 Gloves ...9 N Noise Emission Control System ...71 O Oil Engine ...77-79 Rear Gearcase ...82-83 Transmission...80 Oil and Filter Change ...78-79 Oil Change Rear Gearcase ...83 Transmission...
Owners Manual
Page 140
... Gear ...8-9 S Safe Operation Practices ...55 Safety Labels ...20-23 Safety Training ...7 Safety Warnings...10-19 Severe Use ...72 Shock Compression (XP EPS)...105 Shock Spring Adjustment (XP) ...104 Side Panel Removal...89 Sidehilling ...62 Signal Words ...4 Spark Arrester ...99 Spark Plug Inspection ...96-97 Spark Plug Recommendations...96 Spark Plugs ...96-97 Speedometer ...34 Starting the Engine ...57 Steering Assembly ...84, 88 Storage ...112-115 Storage Tips ...114-115 Switches 4X4 Switch ...24, 32 Engine Stop Switch ...25 Headlight Switch...
... Gear ...8-9 S Safe Operation Practices ...55 Safety Labels ...20-23 Safety Training ...7 Safety Warnings...10-19 Severe Use ...72 Shock Compression (XP EPS)...105 Shock Spring Adjustment (XP) ...104 Side Panel Removal...89 Sidehilling ...62 Signal Words ...4 Spark Arrester ...99 Spark Plug Inspection ...96-97 Spark Plug Recommendations...96 Spark Plugs ...96-97 Speedometer ...34 Starting the Engine ...57 Steering Assembly ...84, 88 Storage ...112-115 Storage Tips ...114-115 Switches 4X4 Switch ...24, 32 Engine Stop Switch ...25 Headlight Switch...