

Owners Manual
Page 7
... and Noise The driver-perceived noise and hand/arm and whole body vibration levels of this vehicle until the guest has completed the New Operator Driving Procedures. The uncertainty of the DVD can be able to take proper precautions. • Read this owner's manual and review the safety DVD that came with drugs or alcohol, as these conditions impair judgment and reduce operator reaction time...
... and Noise The driver-perceived noise and hand/arm and whole body vibration levels of this vehicle until the guest has completed the New Operator Driving Procedures. The uncertainty of the DVD can be able to take proper precautions. • Read this owner's manual and review the safety DVD that came with drugs or alcohol, as these conditions impair judgment and reduce operator reaction time...

Owners Manual
Page 14
... at all times. 7176701 Passenger Hand Hold Warning Shift Caution CAUTION To avoid transmission damage, shift only when vehicle is stopped, place shift in vehicle damage, SEVERE INJURY or DEATH. Always look for and remove debris inside and around the clutch and vent system when replacing the belt. Read owner's manual or see authorized POLARIS dealer. 7177469 Shift Caution Belt Debris Warning 12 SAFETY Safety Labels and Locations Rear Passenger Cab Frame Warning (RZR 4) WARNING Do...
... at all times. 7176701 Passenger Hand Hold Warning Shift Caution CAUTION To avoid transmission damage, shift only when vehicle is stopped, place shift in vehicle damage, SEVERE INJURY or DEATH. Always look for and remove debris inside and around the clutch and vent system when replacing the belt. Read owner's manual or see authorized POLARIS dealer. 7177469 Shift Caution Belt Debris Warning 12 SAFETY Safety Labels and Locations Rear Passenger Cab Frame Warning (RZR 4) WARNING Do...

Owners Manual
Page 26
Loss of control may change the handling characteristics of the vehicle. Modifications to ) mowers, blades, tires, sprayers, or large racks, may occur at 1-800-342-3764. 24 Failure of increasing speed or power. Any modifications or installation of non-POLARIS-approved accessories could create a substantial safety hazard and increase the risk of certain accessories, including (but not limited to your POLARIS vehicle will be terminated...
Loss of control may change the handling characteristics of the vehicle. Modifications to ) mowers, blades, tires, sprayers, or large racks, may occur at 1-800-342-3764. 24 Failure of increasing speed or power. Any modifications or installation of non-POLARIS-approved accessories could create a substantial safety hazard and increase the risk of certain accessories, including (but not limited to your POLARIS vehicle will be terminated...

Owners Manual
Page 28
... service, the dash outlet connection is in the rear passenger area. OFF ON START The engine is a three-position, key-operated switch. The key returns to start the engine. The rear outlet connection is in the OFF position. Electrical equipment can be used. Electrical circuits are off . One outlet is equipped with one or more 12-volt accessory outlets. FEATURES AND CONTROLS Switches Ignition Switch Instrument Cluster Light Switch AWD Switch 12V Accessory Outlet Auxiliary Outlets The vehicle...
... service, the dash outlet connection is in the rear passenger area. OFF ON START The engine is a three-position, key-operated switch. The key returns to start the engine. The rear outlet connection is in the OFF position. Electrical equipment can be used. Electrical circuits are off . One outlet is equipped with one or more 12-volt accessory outlets. FEATURES AND CONTROLS Switches Ignition Switch Instrument Cluster Light Switch AWD Switch 12V Accessory Outlet Auxiliary Outlets The vehicle...

Owners Manual
Page 38
... demand drive unit will automatically engage any time the rear wheels lose traction. Initially, the vehicle's electronic system will not enable the AWD until the AWD switch is in the instrument cluster will not disengage until the rear wheels regain traction. When in all times. Once enabled, the AWD remains enabled until the engine RPM is controlled by the AWD switch. Always switch to AWD while the rear wheels are spinning, release the throttle before...
... demand drive unit will automatically engage any time the rear wheels lose traction. Initially, the vehicle's electronic system will not enable the AWD until the AWD switch is in the instrument cluster will not disengage until the rear wheels regain traction. When in all times. Once enabled, the AWD remains enabled until the engine RPM is controlled by the AWD switch. Always switch to AWD while the rear wheels are spinning, release the throttle before...

Owners Manual
Page 42
FEATURES AND CONTROLS Instrument Cluster Rider Information Center 2. Tip: If the fuel icon fails to keep the battery charged. See your dealer for scheduled maintenance. This warning usually indicates that the preset service interval has been reached. See page 42 for resetting instructions. 7. 4X4 Indicator - Refuel immediately. The clock displays time in the fuel sensor circuit. Service Indicator - See page 42 for resetting instructions. 6. This area...
FEATURES AND CONTROLS Instrument Cluster Rider Information Center 2. Tip: If the fuel icon fails to keep the battery charged. See your dealer for scheduled maintenance. This warning usually indicates that the preset service interval has been reached. See page 42 for resetting instructions. 7. 4X4 Indicator - Refuel immediately. The clock displays time in the fuel sensor circuit. Service Indicator - See page 42 for resetting instructions. 6. This area...

Owners Manual
Page 49
... speed operation during the break-in period as needed to maintain the oil level in period, change both the oil and the filter at sustained idle. 6. Perform regular checks on fluid levels, controls and areas outlined on pages 52-53. 4. See page 85. Do not operate at 25 hours or one month. 9. See Brake System Break-in of the clutches and drive belt...
... speed operation during the break-in period as needed to maintain the oil level in period, change both the oil and the filter at sustained idle. 6. Perform regular checks on fluid levels, controls and areas outlined on pages 52-53. 4. See page 85. Do not operate at 25 hours or one month. 9. See Brake System Break-in of the clutches and drive belt...

Owners Manual
Page 72
...'s pulling capacity. Avoid ...released by this wrapped cable allows the drum to absorb energy that at all times. Also, never permit others to ensure safe winch use straps, chains or other rigging items that are wrapped around the winch drum at least five (5) full turns of the winch cable length... that the damper can absorb much cable as a damper if no other soft, dense object. Always release the tension on top of the mid-point of winch cable are damaged or worn. 70 WINCH GUIDE Winch Operation 5. D. 9. Release the winch clutch...
...'s pulling capacity. Avoid ...released by this wrapped cable allows the drum to absorb energy that at all times. Also, never permit others to ensure safe winch use straps, chains or other rigging items that are wrapped around the winch drum at least five (5) full turns of the winch cable length... that the damper can absorb much cable as a damper if no other soft, dense object. Always release the tension on top of the mid-point of winch cable are damaged or worn. 70 WINCH GUIDE Winch Operation 5. D. 9. Release the winch clutch...
Owners Manual
Page 83
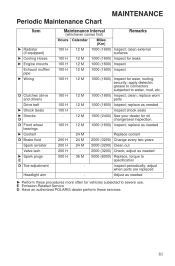
... M 12 M 12 M 12 M Miles (Km) 1000 (1600) Inspect; replace as needed Inspect shock seals 1500 (2400) See your dealer for vehicles subjected to severe use. replace worn parts 1000 (1600) Inspect; adjust as needed Ź Perform these services. 81 replace as needed Replace coolant Remarks D Clutches (drive and driven) Drive belt Ź Shock Seals Ź Shocks D D Front wheel bearings Ź Coolant D Brake fluid Spark arrester Valve lash Ź Spark plugs E D Toe adjustment Headlight aim 100 H 100...
... M 12 M 12 M 12 M Miles (Km) 1000 (1600) Inspect; replace as needed Inspect shock seals 1500 (2400) See your dealer for vehicles subjected to severe use. replace worn parts 1000 (1600) Inspect; adjust as needed Ź Perform these services. 81 replace as needed Replace coolant Remarks D Clutches (drive and driven) Drive belt Ź Shock Seals Ź Shocks D D Front wheel bearings Ź Coolant D Brake fluid Spark arrester Valve lash Ź Spark plugs E D Toe adjustment Headlight aim 100 H 100...

Owners Manual
Page 96
... 20A Feature Supported Lights: Headlights, Taillights Drive: AWD Accessory: Winch Switch, 12V Power Receptacle Fuel Pump Electronic Engine Control, Starting Power Fuse 30A 30A 30A Feature Supported Engine Control Lights, Drive, Accessories Power Steering (if equipped) The main fuse box is located under the dash, above the brake and throttle pedals. Locate and correct any short circuits that may need replacement. MAINTENANCE Fuses If the engine stops or will not start, if the power steering stops working (if equipped), or if you experience other electrical failures, a fuse...
... 20A Feature Supported Lights: Headlights, Taillights Drive: AWD Accessory: Winch Switch, 12V Power Receptacle Fuel Pump Electronic Engine Control, Starting Power Fuse 30A 30A 30A Feature Supported Engine Control Lights, Drive, Accessories Power Steering (if equipped) The main fuse box is located under the dash, above the brake and throttle pedals. Locate and correct any short circuits that may need replacement. MAINTENANCE Fuses If the engine stops or will not start, if the power steering stops working (if equipped), or if you experience other electrical failures, a fuse...

Owners Manual
Page 104
MAINTENANCE Filter Systems Fuel Tank Vent Filter If the engine sputters, the inline fuel tank vent filter may be clogged. Replace the filter with a new filter. 1. Make sure Fuel Tank Vent Filter the direction of the vehicle. Inspect the pre-filters before each use compressed air to clean them frequently to clean the filter. PVT Intake Pre-Filter 102 Tip: Note the direction of the cargo box. Remove the seats and remove the...
MAINTENANCE Filter Systems Fuel Tank Vent Filter If the engine sputters, the inline fuel tank vent filter may be clogged. Replace the filter with a new filter. 1. Make sure Fuel Tank Vent Filter the direction of the vehicle. Inspect the pre-filters before each use compressed air to clean them frequently to clean the filter. PVT Intake Pre-Filter 102 Tip: Note the direction of the cargo box. Remove the seats and remove the...

Owners Manual
Page 116
.... Always ensure that have a cotter pin installed. Attach the wheel nuts and washers and finger tighten. 4. Remove the wheel. Right Rear Wheel (type varies by placing a suitable stand under the frame. 5. Elevate the side of the vehicle by model) Forward Rotation Valve Stem 3. See page 113. 114 MAINTENANCE Tires Wheel Removal 1. 2. 3. 4. Wheel Installation 1. WARNING! Position the vehicle on a level surface. Carefully lower the vehicle to specification.
.... Always ensure that have a cotter pin installed. Attach the wheel nuts and washers and finger tighten. 4. Remove the wheel. Right Rear Wheel (type varies by placing a suitable stand under the frame. 5. Elevate the side of the vehicle by model) Forward Rotation Valve Stem 3. See page 113. 114 MAINTENANCE Tires Wheel Removal 1. 2. 3. 4. Wheel Installation 1. WARNING! Position the vehicle on a level surface. Carefully lower the vehicle to specification.

Owners Manual
Page 117
MAINTENANCE Lights Headlight and taillight lenses become dirty during normal operation. Clean all lights frequently to clear out. Do not operate the vehicle at night or in low light conditions without properly working headlights. Check the brake light before each ride. 1. Headlight Rear View 115 Brake Lights When the brake pedal is replaced. Turn the ignition switch to other vehicles. If the light doesn't come on , check the bulb. Always make sure lights are adjusted...
MAINTENANCE Lights Headlight and taillight lenses become dirty during normal operation. Clean all lights frequently to clear out. Do not operate the vehicle at night or in low light conditions without properly working headlights. Check the brake light before each ride. 1. Headlight Rear View 115 Brake Lights When the brake pedal is replaced. Turn the ignition switch to other vehicles. If the light doesn't come on , check the bulb. Always make sure lights are adjusted...

Owners Manual
Page 118
... on the seat while performing this step. Include the weight of the headlight beam should be approximately 25 ft. (7.6 m) from the floor to the center of the headlight and make a mark on a level surface. Adjust to high beam. 5. As a starting point, the most intense part of a rider on the wall. Start the engine. Apply the brakes. Observe the headlight aim. MAINTENANCE Lights Headlight Beam Adjustment...
... on the seat while performing this step. Include the weight of the headlight beam should be approximately 25 ft. (7.6 m) from the floor to the center of the headlight and make a mark on a level surface. Adjust to high beam. 5. As a starting point, the most intense part of a rider on the wall. Start the engine. Apply the brakes. Observe the headlight aim. MAINTENANCE Lights Headlight Beam Adjustment...

Owners Manual
Page 120
If there is excessive freeplay or strange noises, or if the steering feels rough or "catchy," have the steering system inspected by an authorized POLARIS dealer. 118 MAINTENANCE Steering Wheel Inspection Check the steering wheel for specified freeplay and smooth operation at the intervals outlined in the Periodic Maintenance Chart beginning on level ground. 2. Lightly turn the steering wheel left and right. 3. There should be 0.8-1.0" (20-25 mm) of freeplay. 4. Position the vehicle on page 77. 1.
If there is excessive freeplay or strange noises, or if the steering feels rough or "catchy," have the steering system inspected by an authorized POLARIS dealer. 118 MAINTENANCE Steering Wheel Inspection Check the steering wheel for specified freeplay and smooth operation at the intervals outlined in the Periodic Maintenance Chart beginning on level ground. 2. Lightly turn the steering wheel left and right. 3. There should be 0.8-1.0" (20-25 mm) of freeplay. 4. Position the vehicle on page 77. 1.

Owners Manual
Page 127
... drive fluid (front gearcase) • Rear gearcase fluid (if equipped) • Transmission fluid • Brake fluid (change every two years and any necessary repairs and clean the vehicle as recommended in the Periodic Maintenance Chart beginning on the container for 15-20 minutes to allow the stabilizer to disperse through the entire fuel delivery system. Air Filter / Air Box Replace the air filter. See page 103. Fill the fuel tank. 2. Add POLARIS...
... drive fluid (front gearcase) • Rear gearcase fluid (if equipped) • Transmission fluid • Brake fluid (change every two years and any necessary repairs and clean the vehicle as recommended in the Periodic Maintenance Chart beginning on the container for 15-20 minutes to allow the stabilizer to disperse through the entire fuel delivery system. Air Filter / Air Box Replace the air filter. See page 103. Fill the fuel tank. 2. Add POLARIS...

Owners Manual
Page 141
... will be required to present documentation of the Warranty Registration From to perform the warranty repair. If you move: If you move to continue your warranty coverage and to country. If you purchase from a private party: If you purchase a POLARIS product from POLARIS in order to a POLARIS Servicing Dealer. Product importation rules vary considerably from the country of residence...
... will be required to present documentation of the Warranty Registration From to perform the warranty repair. If you move: If you move to continue your warranty coverage and to country. If you purchase from a private party: If you purchase a POLARIS product from POLARIS in order to a POLARIS Servicing Dealer. Product importation rules vary considerably from the country of residence...
Owners Manual
Page 143
... warranty is extended for a period of 500 hours of engine operation, 5000 kilometers (3100 miles) of vehicle travel , or 30 calendar months from defects in the form of a service contract or other components not covered by this warranty is to meet these regulations. Repairing or replacing other paid warranty extension. Environmental Protection Agency emission regulations. This emissions limited warranty covers components whose failure increases the vehicle's regulated...
... warranty is extended for a period of 500 hours of engine operation, 5000 kilometers (3100 miles) of vehicle travel , or 30 calendar months from defects in the form of a service contract or other components not covered by this warranty is to meet these regulations. Repairing or replacing other paid warranty extension. Environmental Protection Agency emission regulations. This emissions limited warranty covers components whose failure increases the vehicle's regulated...

Owners Manual
Page 149
... Control System . . 76 Exhaust System Warning ...104-105 Eye Protection...9 F Fluid Check Demand Drive...90 Front Gearcase ...90 Main Gearcase ...88 Transmission...88 Fluid Levels During Storage...125 Fluid Recommendations, Gearcase . 92 Fluid, Brake ...108 Fogging the Engine...126 Fouled Plugs ...93 Freeplay, Steering Wheel ...118 Freeplay, Throttle ...106 Fuel Cap ...32 Fuel Safety ...22 Fuel Stabilizer ...125 Fuel Tank Filler Cap ...32 Fuel Tank Vent Filter ...102 Fuses ...94-95 G Gap, Spark Plug ...92 Gasoline Handling ...22 Gear Selector ...34 Gearcase Capacities...
... Control System . . 76 Exhaust System Warning ...104-105 Eye Protection...9 F Fluid Check Demand Drive...90 Front Gearcase ...90 Main Gearcase ...88 Transmission...88 Fluid Levels During Storage...125 Fluid Recommendations, Gearcase . 92 Fluid, Brake ...108 Fogging the Engine...126 Fouled Plugs ...93 Freeplay, Steering Wheel ...118 Freeplay, Throttle ...106 Fuel Cap ...32 Fuel Safety ...22 Fuel Stabilizer ...125 Fuel Tank Filler Cap ...32 Fuel Tank Vent Filter ...102 Fuses ...94-95 G Gap, Spark Plug ...92 Gasoline Handling ...22 Gear Selector ...34 Gearcase Capacities...

Owners Manual
Page 151
... Signal Words ...4 Spark Arrester Warning ...104-105 Spark Arrestor Cleaning ...105 Spark Plugs ...92-93 Condition ...93 Gap ...92 Removal ...93 Torque...92 Fouled ...93 Specifications, Gearcase ...92 Speed, Idle ...106 Speed, Towing ...64 Speedometer ...37 Spring Preload ...109-111 Stabilizing the Fuel ...125 Starting the Engine ...50 Steering Wheel Adjustment ...28 Steering Wheel Inspection ...118 Stopping the Engine ...50 Storage ...123-127 Storage, Battery ...120 Storage, Removal From ...127 R Radiator...96 Radiator Coolant Level...
... Signal Words ...4 Spark Arrester Warning ...104-105 Spark Arrestor Cleaning ...105 Spark Plugs ...92-93 Condition ...93 Gap ...92 Removal ...93 Torque...92 Fouled ...93 Specifications, Gearcase ...92 Speed, Idle ...106 Speed, Towing ...64 Speedometer ...37 Spring Preload ...109-111 Stabilizing the Fuel ...125 Starting the Engine ...50 Steering Wheel Adjustment ...28 Steering Wheel Inspection ...118 Stopping the Engine ...50 Storage ...123-127 Storage, Battery ...120 Storage, Removal From ...127 R Radiator...96 Radiator Coolant Level...