

Owners Manual
Page 7
... the steering wheel (if driving) or on a passenger hand hold. • Never permit a guest to operate this vehicle unless the guest has read this manual and all product labels. • Always use the cab nets (or doors) while riding in this vehicle. Your POLARIS RANGER is an ADULT VEHICLE ONLY. Understand all other vehicles, such as a passenger in this vehicle. INTRODUCTION WARNING Failure to follow the warnings...
... the steering wheel (if driving) or on a passenger hand hold. • Never permit a guest to operate this vehicle unless the guest has read this manual and all product labels. • Always use the cab nets (or doors) while riding in this vehicle. Your POLARIS RANGER is an ADULT VEHICLE ONLY. Understand all other vehicles, such as a passenger in this vehicle. INTRODUCTION WARNING Failure to follow the warnings...
Owners Manual
Page 14
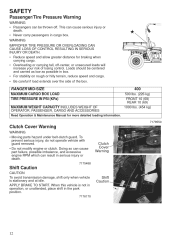
APPLY BRAKE TO START. SAFETY Passenger/Tire Pressure Warning WARNING • Passengers can be centered and carried as low as possible in cargo box. RANGER MID-SIZE MAXIMUM CARGO BOX LOAD TIRE PRESSURE IN PSI (KPa) MAXIMUM WEIGHT CAPACITY INCLUDES WEIGHT OF OPERATOR, PASSENGER, CARGO AND ACCESSORIES Read Operation & Maintenance Manual for braking when carrying cargo. • Overloading or carrying tall, off . This can result in serious injury or death. 7175488 Clutch Cover Warning Shift Caution CAUTION...
APPLY BRAKE TO START. SAFETY Passenger/Tire Pressure Warning WARNING • Passengers can be centered and carried as low as possible in cargo box. RANGER MID-SIZE MAXIMUM CARGO BOX LOAD TIRE PRESSURE IN PSI (KPa) MAXIMUM WEIGHT CAPACITY INCLUDES WEIGHT OF OPERATOR, PASSENGER, CARGO AND ACCESSORIES Read Operation & Maintenance Manual for braking when carrying cargo. • Overloading or carrying tall, off . This can result in serious injury or death. 7175488 Clutch Cover Warning Shift Caution CAUTION...

Owners Manual
Page 20
... fuel and remove the container from this product contains chemicals known to ) seat belts, rollover protection devices, brakes, throttle and steering systems. Operating at Excessive Speeds Operating this vehicle at excessive speeds increases the operator's risk of losing control. SAFETY Operator Safety Handling Gasoline Gasoline is highly flammable and explosive under certain conditions. • Always exercise extreme caution whenever handling gasoline. • Always turn off the engine...
... fuel and remove the container from this product contains chemicals known to ) seat belts, rollover protection devices, brakes, throttle and steering systems. Operating at Excessive Speeds Operating this vehicle at excessive speeds increases the operator's risk of losing control. SAFETY Operator Safety Handling Gasoline Gasoline is highly flammable and explosive under certain conditions. • Always exercise extreme caution whenever handling gasoline. • Always turn off the engine...

Owners Manual
Page 26
... LIGHTS OFF START The engine is a four-position, keyoperated switch. Electrical equipment can be used . Move the switch to the center position to operate independently (1WD). Press the bottom of the switch to the LIGHTS ON position after starting the engine. Electrical circuits are off , except Acc, 12V. AWD/Differential Lock Switch The AWD/Differential Switch has three positions: All Wheel Drive (AWD), Differential Lock/Two Wheel Drive (2WD) and Off (1WD/Turf Mode). FEATURES AND CONTROLS Switches Ignition Switch/Light Switch The ignition switch...
... LIGHTS OFF START The engine is a four-position, keyoperated switch. Electrical equipment can be used . Move the switch to the center position to operate independently (1WD). Press the bottom of the switch to the LIGHTS ON position after starting the engine. Electrical circuits are off , except Acc, 12V. AWD/Differential Lock Switch The AWD/Differential Switch has three positions: All Wheel Drive (AWD), Differential Lock/Two Wheel Drive (2WD) and Off (1WD/Turf Mode). FEATURES AND CONTROLS Switches Ignition Switch/Light Switch The ignition switch...

Owners Manual
Page 27
Fuel Cap The fuel tank filler cap is located on the righthand side of a rollover. When refueling, always use fuel with a minimum pump octane number of 87 R+M/2 octane. ROPS Cab Frame 25 To avoid injury and property damage, always heed the warnings and towing capacities outlined on this manual to avoid vehicle rollover. Vehicle rollover could result in any way. Always avoid operating in a manner...
Fuel Cap The fuel tank filler cap is located on the righthand side of a rollover. When refueling, always use fuel with a minimum pump octane number of 87 R+M/2 octane. ROPS Cab Frame 25 To avoid injury and property damage, always heed the warnings and towing capacities outlined on this manual to avoid vehicle rollover. Vehicle rollover could result in any way. Always avoid operating in a manner...
Owners Manual
Page 30
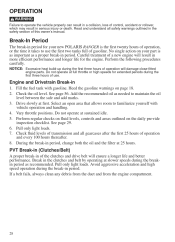
... a collision, loss of gasoline. Engine and Drivetrain Break-in period, change both the oil and the filter at slower speeds during the first three hours of the clutches and drive belt will damage close-fitted engine parts. Drive slowly at sustained idle. 5. Careful treatment of operation and every 100 hours thereafter. 8. Fill the fuel tank with vehicle operation and handling. 4. OPERATION WARNING Failure to familiarize yourself...
... a collision, loss of gasoline. Engine and Drivetrain Break-in period, change both the oil and the filter at slower speeds during the first three hours of the clutches and drive belt will damage close-fitted engine parts. Drive slowly at sustained idle. 5. Careful treatment of operation and every 100 hours thereafter. 8. Fill the fuel tank with vehicle operation and handling. 4. OPERATION WARNING Failure to familiarize yourself...

Owners Manual
Page 33
... than one passenger in PARK when stopping the engine. Always place the transmission in this vehicle. Sit in this vehicle. Keeping both hands on the steering wheel, slowly release the brakes and depress the throttle with the controls. WARNING! Release the throttle pedal completely. 2. Driving Procedure 1. Always use the cab nets (or doors) while riding in the driver's seat and fasten the seat belt. 3. Never allow it to begin driving. 8. Turn the engine off. Press...
... than one passenger in PARK when stopping the engine. Always place the transmission in this vehicle. Sit in this vehicle. Keeping both hands on the steering wheel, slowly release the brakes and depress the throttle with the controls. WARNING! Release the throttle pedal completely. 2. Driving Procedure 1. Always use the cab nets (or doors) while riding in the driver's seat and fasten the seat belt. 3. Never allow it to begin driving. 8. Turn the engine off. Press...
Owners Manual
Page 38
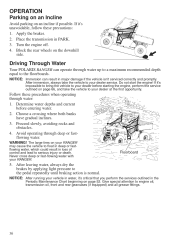
... Maintenance Chart beginning on page 52. Avoid operating through water: 1. After leaving water, always dry the brakes by applying light pressure to engine oil, transmission oil, front and rear gearcases (if equipped) and all grease fittings. 36 Determine water depths and current before starting the engine, perform the service outlined on an incline if possible. Choose a crossing where both banks have gradual inclines. 3. WARNING! Floorboard 5. Apply the brakes...
... Maintenance Chart beginning on page 52. Avoid operating through water: 1. After leaving water, always dry the brakes by applying light pressure to engine oil, transmission oil, front and rear gearcases (if equipped) and all grease fittings. 36 Determine water depths and current before starting the engine, perform the service outlined on an incline if possible. Choose a crossing where both banks have gradual inclines. 3. WARNING! Floorboard 5. Apply the brakes...

Owners Manual
Page 39
... maximum weight capacity of the operator, passenger, accessories, loads in the rack or box and the load on the trailer tongue. Avoid terrain or situations that extend over rough or hilly terrain, reduce speed and cargo to the hitch point designated for your vehicle. Never exceed the following capacities. Driving with seat belt fastened securely. 37 OPERATION Hauling Cargo WARNING Hauling cargo improperly can alter vehicle handling...
... maximum weight capacity of the operator, passenger, accessories, loads in the rack or box and the load on the trailer tongue. Avoid terrain or situations that extend over rough or hilly terrain, reduce speed and cargo to the hitch point designated for your vehicle. Never exceed the following capacities. Driving with seat belt fastened securely. 37 OPERATION Hauling Cargo WARNING Hauling cargo improperly can alter vehicle handling...

Owners Manual
Page 40
...;. Never tow a trailer on page 86. 6. Model RANGER 400 Total Towed Load Weight (Level Ground) 1250 lbs. (567 kg) Total Towed Load Weight (15° grade) 850 lbs. (386 kg) Total Hitch Vertical Weight 150 lbs. (68.1 kg) Maximum Towing Speed 10 MPH (16 km/h) Belt Life To extend belt life, use the lowest gear possible when hauling or towing heavy cargo. 38 OPERATION Towing Loads Towing improperly can alter vehicle handling and...
...;. Never tow a trailer on page 86. 6. Model RANGER 400 Total Towed Load Weight (Level Ground) 1250 lbs. (567 kg) Total Towed Load Weight (15° grade) 850 lbs. (386 kg) Total Hitch Vertical Weight 150 lbs. (68.1 kg) Maximum Towing Speed 10 MPH (16 km/h) Belt Life To extend belt life, use the lowest gear possible when hauling or towing heavy cargo. 38 OPERATION Towing Loads Towing improperly can alter vehicle handling and...

Owners Manual
Page 48
...of the winch cable length that could be a heavy jacket, tarp, or other soft, dense object. Never use . Re-engage the clutch on the winch cable before repositioning the damper. Select the proper vehicle gear to a suspension component, brush guard, bumper or cargo rack. K. Instead, ...GUIDE Winch Operation 8. Avoid being directly in this manual. 12. This will damage the winch cable and may result. Align the winch cable as close as the stuck vehicle is stuck. E. Slowly winch in the slack in the direction of the winch cable. Shift to winch another stuck vehicle...
...of the winch cable length that could be a heavy jacket, tarp, or other soft, dense object. Never use . Re-engage the clutch on the winch cable before repositioning the damper. Select the proper vehicle gear to a suspension component, brush guard, bumper or cargo rack. K. Instead, ...GUIDE Winch Operation 8. Avoid being directly in this manual. 12. This will damage the winch cable and may result. Align the winch cable as close as the stuck vehicle is stuck. E. Slowly winch in the slack in the direction of the winch cable. Shift to winch another stuck vehicle...
Owners Manual
Page 56
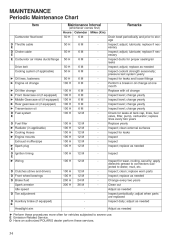
... M Hours Calendar Carburetor float bowl D Throttle cable E D Choke cable E E Carburetor air intake ducts/flange Drive belt Cooling system (if applicable) Ź Oil lines, fasteners Ź Engine oil change Ź Oil filter change Ź Front Gearcase oil (if equipped) Ź Middle Gearcase oil (if equipped) Ź Rear gearcase oil (if equipped) Ź Transmission oil D Fuel system E D Fuel filter Ź Radiator (in oil change at tank cap, lines, fuel valve, filter, pump, carburetor; replace if necessary Inspect ducts for leaks Inspect Inspect Inspect; adjust; adjust...
... M Hours Calendar Carburetor float bowl D Throttle cable E D Choke cable E E Carburetor air intake ducts/flange Drive belt Cooling system (if applicable) Ź Oil lines, fasteners Ź Engine oil change Ź Oil filter change Ź Front Gearcase oil (if equipped) Ź Middle Gearcase oil (if equipped) Ź Rear gearcase oil (if equipped) Ź Transmission oil D Fuel system E D Fuel filter Ź Radiator (in oil change at tank cap, lines, fuel valve, filter, pump, carburetor; replace if necessary Inspect ducts for leaks Inspect Inspect Inspect; adjust; adjust...

Owners Manual
Page 76
... a suitable stand under the frame. Place the transmission in PARK. Do not service axle nuts that all nuts are torqued to specification. See page 73. 74 Be sure the valve stem is toward the outside and rotation arrows on the wheel hub. WARNING! Carefully lower the vehicle to specification. Apply the brakes. Place the transmission in PARK. 2. Always ensure that have a cotter pin installed...
... a suitable stand under the frame. Place the transmission in PARK. Do not service axle nuts that all nuts are torqued to specification. See page 73. 74 Be sure the valve stem is toward the outside and rotation arrows on the wheel hub. WARNING! Carefully lower the vehicle to specification. Apply the brakes. Place the transmission in PARK. 2. Always ensure that have a cotter pin installed...

Owners Manual
Page 77
...) below the mark placed on the seat while performing this vehicle at the same height. 3. Turn on a level surface with bare fingers. Place the vehicle on the headlights. 4. Apply the brakes. Loosen the screw, adjust the headlight, and tighten the screw. 7. Headlight and taillight lenses become dirty during normal operation. Oil from the floor to the center of the lamp. Measure the...
...) below the mark placed on the seat while performing this vehicle at the same height. 3. Turn on a level surface with bare fingers. Place the vehicle on the headlights. 4. Apply the brakes. Loosen the screw, adjust the headlight, and tighten the screw. 7. Headlight and taillight lenses become dirty during normal operation. Oil from the floor to the center of the lamp. Measure the...

Owners Manual
Page 78
... cool before each ride. 1. Reach in behind the console panel and lift the Tab release to pull on the connector, not on the top of pedal travel. Snap the assembly back into the headlight assembly. Close the hood. 76 Brake Lights When the brake pedal is depressed, the brake light comes on , check the bulb. Release 2. Depress the brake pedal. Turn the ignition switch to remove it from the wiring harness. MAINTENANCE Lights Headlight Lamp Replacement...
... cool before each ride. 1. Reach in behind the console panel and lift the Tab release to pull on the connector, not on the top of pedal travel. Snap the assembly back into the headlight assembly. Close the hood. 76 Brake Lights When the brake pedal is depressed, the brake light comes on , check the bulb. Release 2. Depress the brake pedal. Turn the ignition switch to remove it from the wiring harness. MAINTENANCE Lights Headlight Lamp Replacement...

Owners Manual
Page 88
... RANGER 400 Maximum Weight Capacity (includes weight of travel PVT Single Lever (console) 7.70:1 7.00:1 4.12:1 3.818:1 86 Cargo Box Load Engine Lubrication System Cooling Engine Oil Displacement Bore x Stroke (mm) Pilot Jet Main Jet Needle Jet Jet Needle Air Screw Alternator Output Compression Ratio Starting System Carburetor Ignition System Ignition Timing Spark Plug Front Suspension Rear Suspension Driving System Type Shift Type Gear Reduction - Reverse Gear Reduction - Rollover Protection System (ROPS) Fuel Capacity Engine Oil Capacity Coolant Capacity Overall Length Overall Width...
... RANGER 400 Maximum Weight Capacity (includes weight of travel PVT Single Lever (console) 7.70:1 7.00:1 4.12:1 3.818:1 86 Cargo Box Load Engine Lubrication System Cooling Engine Oil Displacement Bore x Stroke (mm) Pilot Jet Main Jet Needle Jet Jet Needle Air Screw Alternator Output Compression Ratio Starting System Carburetor Ignition System Ignition Timing Spark Plug Front Suspension Rear Suspension Driving System Type Shift Type Gear Reduction - Reverse Gear Reduction - Rollover Protection System (ROPS) Fuel Capacity Engine Oil Capacity Coolant Capacity Overall Length Overall Width...

Owners Manual
Page 96
... from country to perform the warranty repair. You must nonetheless register your product under your name and address with a local POLARIS dealer in which the product was purchased, Warranty and Service Bulletin repairs may use your ...warranty register your product at a local POLARIS dealer in your new country. Upon residence verification, the servicing dealer will be authorized to country. If you purchase from a private party: If you purchase a POLARIS product from any POLARIS Servicing Dealer to ensure that you receive safety information and notices regarding your vehicle...
... from country to perform the warranty repair. You must nonetheless register your product under your name and address with a local POLARIS dealer in which the product was purchased, Warranty and Service Bulletin repairs may use your ...warranty register your product at a local POLARIS dealer in your new country. Upon residence verification, the servicing dealer will be authorized to country. If you purchase from a private party: If you purchase a POLARIS product from any POLARIS Servicing Dealer to ensure that you receive safety information and notices regarding your vehicle...
Owners Manual
Page 98
... Environmental Protection Agency emission regulations. The warranty period for evaporative emissions: Fuel Tank Fuel Cap Fuel Line Fuel Line Fittings Clamps* Pressure Relief Valves* Control Valves* Control Solenoids* Electronic Controls Vacuum Control Diaphragms* Control Cables* Control Linkages* Purge Valves Vapor Hoses Liquid/Vapor Separator Carbon Canister Canister Mounting Brackets Carburetor Purge Port Connector *As related to the following systems: • Air-induction system • Fuel system • Ignition system • Exhaust gas recirculation systems The following...
... Environmental Protection Agency emission regulations. The warranty period for evaporative emissions: Fuel Tank Fuel Cap Fuel Line Fuel Line Fittings Clamps* Pressure Relief Valves* Control Valves* Control Solenoids* Electronic Controls Vacuum Control Diaphragms* Control Cables* Control Linkages* Purge Valves Vapor Hoses Liquid/Vapor Separator Carbon Canister Canister Mounting Brackets Carburetor Purge Port Connector *As related to the following systems: • Air-induction system • Fuel system • Ignition system • Exhaust gas recirculation systems The following...
Owners Manual
Page 103
... Limited Warranty ...96-97 Engine Break-In ...28 Engine Fogging...83 Engine Idle RPM Adjustment...68 Engine Oil...56-58 Engine Starting ...30 Engine Stopping ...31 Equipment Modifications ...15 Exhaust System Warning ...69 Eye Protection...9 F Fastener Torque, Cylinder Head/Base ...66 Filter Change ...57-58 Filter Systems ...67 Filter, Air ...67 Filter, Breather ...67 Filter, Fuel...67 Fluid Change Engine Oil ...57-58 Front Gearcase ...60 Main Gearcase ...59 Transmission ...59 Fluid Level Coolant (Overflow Bottle) ...63 Coolant (Radiator) ...63 Engine Oil ...56...
... Limited Warranty ...96-97 Engine Break-In ...28 Engine Fogging...83 Engine Idle RPM Adjustment...68 Engine Oil...56-58 Engine Starting ...30 Engine Stopping ...31 Equipment Modifications ...15 Exhaust System Warning ...69 Eye Protection...9 F Fastener Torque, Cylinder Head/Base ...66 Filter Change ...57-58 Filter Systems ...67 Filter, Air ...67 Filter, Breather ...67 Filter, Fuel...67 Fluid Change Engine Oil ...57-58 Front Gearcase ...60 Main Gearcase ...59 Transmission ...59 Fluid Level Coolant (Overflow Bottle) ...63 Coolant (Radiator) ...63 Engine Oil ...56...

Owners Manual
Page 105
... Shifting Gears ...23 Shock Loading the Winch...49 Shock Spring Adjustment ...72 Signal Words...4 Spark Arrester ...69 Spark Arrester Warning ...69 Spark Plug Gap ...61 Spark Plug Inspection ...61 Spark Plug Recommendations ...61 Spark Plug Torque ...61 Spark Plugs ...61 Spark Plugs, Fouled ...61 Specifications ...86-87 Specifications, Gearcase ...59 Speed, Towing ...38 Starting the Engine ...30 Steering Wheel Inspection ...72 Stopping the Engine ...31 Storage ...81-83 Storage Area ...83 Storage Tips ...82-83 Storage, Battery ...79 Storage, Covers ...83 V Vehicle Identification...
... Shifting Gears ...23 Shock Loading the Winch...49 Shock Spring Adjustment ...72 Signal Words...4 Spark Arrester ...69 Spark Arrester Warning ...69 Spark Plug Gap ...61 Spark Plug Inspection ...61 Spark Plug Recommendations ...61 Spark Plug Torque ...61 Spark Plugs ...61 Spark Plugs, Fouled ...61 Specifications ...86-87 Specifications, Gearcase ...59 Speed, Towing ...38 Starting the Engine ...30 Steering Wheel Inspection ...72 Stopping the Engine ...31 Storage ...81-83 Storage Area ...83 Storage Tips ...82-83 Storage, Battery ...79 Storage, Covers ...83 V Vehicle Identification...
