

Owners Manual
Page 4
...prohibited. Other languages are registered trademarks of POLARIS Industries Inc. Copyright 2013 POLARIS Sales Inc. Depictions and/or procedures in part, is based on the latest product information at the time of publication. Any reprinting or reuse of... English. POLARIS® and SPORTSMAN® are provided as translations of the original instructions. All information contained within , whether whole or in this vehicle are intended for omissions or inaccuracies. The original instructions for this publication are in U.S.A. 2014 SPORTSMAN 800 EFI Owner's Manual P/N 9924248...
...prohibited. Other languages are registered trademarks of POLARIS Industries Inc. Copyright 2013 POLARIS Sales Inc. Depictions and/or procedures in part, is based on the latest product information at the time of publication. Any reprinting or reuse of... English. POLARIS® and SPORTSMAN® are provided as translations of the original instructions. All information contained within , whether whole or in this vehicle are intended for omissions or inaccuracies. The original instructions for this publication are in U.S.A. 2014 SPORTSMAN 800 EFI Owner's Manual P/N 9924248...
Owners Manual
Page 35
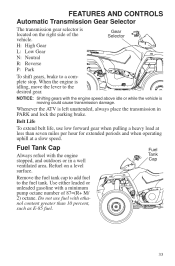
... fuel tank cap to add fuel to a complete stop. Belt Life To extend belt life, use fuel with the engine stopped, and outdoors or in PARK and lock the parking brake. Refuel on the right side of 87=(R+ M/ 2) octane. Fuel Tank Cap 33 FEATURES AND CONTROLS Automatic Transmission Gear Selector The transmission gear selector is located on a level surface. H: High Gear L: Low Gear N: Neutral R: Reverse P: Park To shift gears, brake to the fuel tank. Gear Selector NOTICE: Shifting gears with a minimum pump octane number of the vehicle...
... fuel tank cap to add fuel to a complete stop. Belt Life To extend belt life, use fuel with the engine stopped, and outdoors or in PARK and lock the parking brake. Refuel on the right side of 87=(R+ M/ 2) octane. Fuel Tank Cap 33 FEATURES AND CONTROLS Automatic Transmission Gear Selector The transmission gear selector is located on a level surface. H: High Gear L: Low Gear N: Neutral R: Reverse P: Park To shift gears, brake to the fuel tank. Gear Selector NOTICE: Shifting gears with a minimum pump octane number of the vehicle...

Owners Manual
Page 36
... the AWD switch before switching to AWD while the rear wheels have traction or are spinning, release the throttle before getting into conditions where front wheel drive may cause severe drive shaft and gearcase damage. NOTICE: Switching to the length of time the vehicle may be on 2X4, the ATV is on . If the rear wheels are at all wheel drive and the AWD indicator light AWD in the instrument cluster will Switch be turned on or...
... the AWD switch before switching to AWD while the rear wheels have traction or are spinning, release the throttle before getting into conditions where front wheel drive may cause severe drive shaft and gearcase damage. NOTICE: Switching to the length of time the vehicle may be on 2X4, the ATV is on . If the rear wheels are at all wheel drive and the AWD indicator light AWD in the instrument cluster will Switch be turned on or...
Owners Manual
Page 38
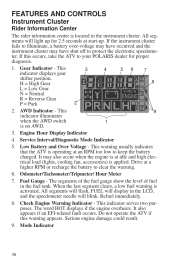
... clears, a low fuel warning is on AWD. 3. It also appears if an EFI-related fault occurs. Mode Indicator 36 AWD Indicator - It may have shut off to clear the warning. 6. Drive at start-up for proper diagnosis. 1. The word HOT displays if the engine overheats. Fuel Gauge - If this warning appears. Refuel immediately. 8. Serious engine damage could result. 9. FEATURES AND CONTROLS Instrument Cluster Rider Information Center The rider...
... clears, a low fuel warning is on AWD. 3. It also appears if an EFI-related fault occurs. Mode Indicator 36 AWD Indicator - It may have shut off to clear the warning. 6. Drive at start-up for proper diagnosis. 1. The word HOT displays if the engine overheats. Fuel Gauge - If this warning appears. Refuel immediately. 8. Serious engine damage could result. 9. FEATURES AND CONTROLS Instrument Cluster Rider Information Center The rider...

Owners Manual
Page 45
...-Battery Starter Enable: Open Load/Short-to-Ground Starter Enable: Shorted Load/Short-to-Battery Gear Sensor Signal 4X4: Open Load/Short-to-Ground 4X4: Shorted Load/Short-to-Battery Rear Differential Enable: Open Load/Short-to-Ground (if equipped) Rear Differential Enable: Shorted Load/Short-to -Battery Injector Circuit Malfunction - Cyl 1: Shorted Load/Short-to -Battery (if equipped) END SEQUENCE 43 FEATURES AND CONTROLS Instrument Cluster Rider Information Center Downloading Codes Blink Code...
...-Battery Starter Enable: Open Load/Short-to-Ground Starter Enable: Shorted Load/Short-to-Battery Gear Sensor Signal 4X4: Open Load/Short-to-Ground 4X4: Shorted Load/Short-to-Battery Rear Differential Enable: Open Load/Short-to-Ground (if equipped) Rear Differential Enable: Shorted Load/Short-to -Battery Injector Circuit Malfunction - Cyl 1: Shorted Load/Short-to -Battery (if equipped) END SEQUENCE 43 FEATURES AND CONTROLS Instrument Cluster Rider Information Center Downloading Codes Blink Code...

Owners Manual
Page 47
... the fuel tank with vehicle operation and handling. 4. Avoid aggressive acceleration and high speed operation during the break-in 1. If a belt fails, always clean away all gearcases after the first 25 hours of the clutches and drive belt will ensure a longer life and better performance. Check the engine oil level on the daily pre-ride inspection checklist. Check fluid levels of transmission and all...
... the fuel tank with vehicle operation and handling. 4. Avoid aggressive acceleration and high speed operation during the break-in 1. If a belt fails, always clean away all gearcases after the first 25 hours of the clutches and drive belt will ensure a longer life and better performance. Check the engine oil level on the daily pre-ride inspection checklist. Check fluid levels of transmission and all...

Owners Manual
Page 63
... mounted as low as possible. Never install a hitch longer than 4" (10 cm). Towing Loads Always attach a towed load to extend belt life. When operating over rough or hilly terrain, reduce speed and cargo weight to the vehicle and will void your ATV on warning labels and in serious damage to maintain stable driving conditions. Never install automotive accessories on hitch) must not exceed the rear rack capacity...
... mounted as low as possible. Never install a hitch longer than 4" (10 cm). Towing Loads Always attach a towed load to extend belt life. When operating over rough or hilly terrain, reduce speed and cargo weight to the vehicle and will void your ATV on warning labels and in serious damage to maintain stable driving conditions. Never install automotive accessories on hitch) must not exceed the rear rack capacity...

Owners Manual
Page 81
... Shift linkage D Steering Ź Front suspension Ź Rear suspension D Throttle Cable/ E Release Switch E Throttle Body Intake Duct Drive belt Cooling system (if applicable) Ź Engine oil change Ź Oil lines and fasteners Ź Demand drive fluid (normal use) Ź Rear gearcase oil Ź Transmission oil Fuel system Ź Radiator Ź Cooling hoses (if applicable) Ź Engine mounts Exhaust muffler/ pipe D Spark plug E Ź Wiring 50 H 50 H 50 H 50 H 50 H 50 H 50 H 50 H 50 H 3M 6M 6M 6M 6M 6M 6M 6M 6M Miles (Km) 500 (800) 500 (800...
... Shift linkage D Steering Ź Front suspension Ź Rear suspension D Throttle Cable/ E Release Switch E Throttle Body Intake Duct Drive belt Cooling system (if applicable) Ź Engine oil change Ź Oil lines and fasteners Ź Demand drive fluid (normal use) Ź Rear gearcase oil Ź Transmission oil Fuel system Ź Radiator Ź Cooling hoses (if applicable) Ź Engine mounts Exhaust muffler/ pipe D Spark plug E Ź Wiring 50 H 50 H 50 H 50 H 50 H 50 H 50 H 50 H 50 H 3M 6M 6M 6M 6M 6M 6M 6M 6M Miles (Km) 500 (800) 500 (800...

Owners Manual
Page 98
... all nuts are torqued to the ground. 6. Wheel Nut Torque Specifications Check the wheel nut torques occasionally and when they've been loosened for maintenance service. lbs. (41 Nm) PLUS 1/4 TURN 2-Piece Flange Nut (Steel Wheels) 27 ft. lbs. (37 Nm) 96 Lower the vehicle to specification. Loose nuts could result in PARK. 2. Lock the parking brake. 3. Torque the wheel nuts to come off during operation...
... all nuts are torqued to the ground. 6. Wheel Nut Torque Specifications Check the wheel nut torques occasionally and when they've been loosened for maintenance service. lbs. (41 Nm) PLUS 1/4 TURN 2-Piece Flange Nut (Steel Wheels) 27 ft. lbs. (37 Nm) 96 Lower the vehicle to specification. Loose nuts could result in PARK. 2. Lock the parking brake. 3. Torque the wheel nuts to come off during operation...

Owners Manual
Page 101
... rear of the lamp. 1. Headlight Lamp Replacement When servicing a halogen lamp, don't touch the lamp with bare fingers. Hot components can result in the housing. 8. Make sure the tab on the lower front corners of the pod. 4. Reassemble the pod. 99 Unplug the headlamp from the speedometer. Lift the pod cover and disconnect the speedometer harnesses from the wiring harness. MAINTENANCE Lights...
... rear of the lamp. 1. Headlight Lamp Replacement When servicing a halogen lamp, don't touch the lamp with bare fingers. Hot components can result in the housing. 8. Make sure the tab on the lower front corners of the pod. 4. Reassemble the pod. 99 Unplug the headlamp from the speedometer. Lift the pod cover and disconnect the speedometer harnesses from the wiring harness. MAINTENANCE Lights...

Owners Manual
Page 104
MAINTENANCE Lights Headlight Housing Replacement 1. The distance from the wiring harness. 5. Pull the headlight housing up to release it from the headlight mounting tabs. 6. Lift the pod slightly while depressing the tabs at the rear of the adjustment knob stop is 5 1/8" (13 cm). 10. Lift the pod cover and disconnect the speedometer harnesses from the locking tabs. 7. Lift the adjusting knob up and out of the headlight pod. 2. Reverse...
MAINTENANCE Lights Headlight Housing Replacement 1. The distance from the wiring harness. 5. Pull the headlight housing up to release it from the headlight mounting tabs. 6. Lift the pod slightly while depressing the tabs at the rear of the adjustment knob stop is 5 1/8" (13 cm). 10. Lift the pod cover and disconnect the speedometer harnesses from the locking tabs. 7. Lift the adjusting knob up and out of the headlight pod. 2. Reverse...

Owners Manual
Page 105
MAINTENANCE Lights Lower Headlamp Replacement 1. Reinstall the harness connector. 5. Harness Taillight/Brakelight Lamp Replacement 1. Test the light for proper operation. 103 Turn the headlight harness clockwise to remove it. 3. Remove the harness connector Connector from the back of the headlight harness counter-clockwise and pull the harness assembly away from the headlight assembly. 2. Turn the back of the light assembly. 2. Turn the lamp counter-clockwise to secure the headlamp. Reinstall the harness assembly into the...
MAINTENANCE Lights Lower Headlamp Replacement 1. Reinstall the harness connector. 5. Harness Taillight/Brakelight Lamp Replacement 1. Test the light for proper operation. 103 Turn the headlight harness clockwise to remove it. 3. Remove the harness connector Connector from the back of the headlight harness counter-clockwise and pull the harness assembly away from the headlight assembly. 2. Turn the back of the light assembly. 2. Turn the lamp counter-clockwise to secure the headlamp. Reinstall the harness assembly into the...

Owners Manual
Page 123
...; Rear gearcase (if equipped) • Transmission • Brake fluid (change every two years and any time the fluid looks dark or contaminated) • Coolant (test strength/fill) Fog the Engine 1. Run the engine for several times. If POLARIS fuel system additive is not used, the fuel tank, fuel lines, and injectors should be forced in the Periodic Maintenance Chart beginning on the can. Apply dielectric grease to specification. 4. Remove the spark plugs...
...; Rear gearcase (if equipped) • Transmission • Brake fluid (change every two years and any time the fluid looks dark or contaminated) • Coolant (test strength/fill) Fog the Engine 1. Run the engine for several times. If POLARIS fuel system additive is not used, the fuel tank, fuel lines, and injectors should be forced in the Periodic Maintenance Chart beginning on the can. Apply dielectric grease to specification. 4. Remove the spark plugs...

Owners Manual
Page 126
... belt. See page 110. With the transmission in neutral, advance the throttle to about 1/8 throttle in short bursts, 5 to engage clutch. Stuck in mud or snow Shift the transmission to engage clutch. See page 110. TROUBLESHOOTING Drive Belt Wear/Burn Possible Cause Driving onto a pickup or tall trailer in high range Starting out going up a steep incline Driving at low RPM or ground speed (3-7 MPH) Insufficient warm-up belt one mile (5 miles...
... belt. See page 110. With the transmission in neutral, advance the throttle to about 1/8 throttle in short bursts, 5 to engage clutch. Stuck in mud or snow Shift the transmission to engage clutch. See page 110. TROUBLESHOOTING Drive Belt Wear/Burn Possible Cause Driving onto a pickup or tall trailer in high range Starting out going up a steep incline Driving at low RPM or ground speed (3-7 MPH) Insufficient warm-up belt one mile (5 miles...

Owners Manual
Page 130
SPECIFICATIONS SPORTSMAN 800 EFI Maximum Weight Capacity Dry Weight Fuel Capacity Engine Oil Capacity Coolant Capacity Demand Drive Fluid Capacity Transmission Oil Capacity Front Rack/Storage Box Capacity Rear Rack Capacity Receiver Hitch Tongue Capacity Hitch Towing Rating Unbraked Trailer Towing Capacity* Overall Length Overall Width Overall Height Wheelbase Ground Clearance Minimum Turning Radius Engine Displacement Bore x Stroke Alternator Output Compression Ratio Starting System Fuel System Ignition System Ignition Timing Spark Plug / Gap Lubrication System Driving System Type Front ...
SPECIFICATIONS SPORTSMAN 800 EFI Maximum Weight Capacity Dry Weight Fuel Capacity Engine Oil Capacity Coolant Capacity Demand Drive Fluid Capacity Transmission Oil Capacity Front Rack/Storage Box Capacity Rear Rack Capacity Receiver Hitch Tongue Capacity Hitch Towing Rating Unbraked Trailer Towing Capacity* Overall Length Overall Width Overall Height Wheelbase Ground Clearance Minimum Turning Radius Engine Displacement Bore x Stroke Alternator Output Compression Ratio Starting System Fuel System Ignition System Ignition Timing Spark Plug / Gap Lubrication System Driving System Type Front ...

Owners Manual
Page 131
SPECIFICATIONS SPORTSMAN 800 EFI Transmission Gear Reduction, Low Gear Reduction, Reverse Gear Reduction, High Drive Ratio, Front Tires/Pressure, Front Tires/Pressure, Rear Brakes, Front Brakes, Rear Brakes, Auxiliary Brake, Parking Headlight Taillights Brake Light Instrument Cluster Automatic PVT with E-Z Shift H/L/N/R/P 23.91:1 21.74:1 8.28:1 3.82:1 25x8-12 / 5 psi (34.5 KPa) 25x11-12 / 5 psi (34.5 KPa) Single-Control Hydraulic Disc Single-Control Hydraulic Disc Foot-Activated Hydraulic Disc Hydraulic lock, all wheel 1 Single Beam on Headlight Pod (50 watt) 2 Single Beam on...
SPECIFICATIONS SPORTSMAN 800 EFI Transmission Gear Reduction, Low Gear Reduction, Reverse Gear Reduction, High Drive Ratio, Front Tires/Pressure, Front Tires/Pressure, Rear Brakes, Front Brakes, Rear Brakes, Auxiliary Brake, Parking Headlight Taillights Brake Light Instrument Cluster Automatic PVT with E-Z Shift H/L/N/R/P 23.91:1 21.74:1 8.28:1 3.82:1 25x8-12 / 5 psi (34.5 KPa) 25x11-12 / 5 psi (34.5 KPa) Single-Control Hydraulic Disc Single-Control Hydraulic Disc Foot-Activated Hydraulic Disc Hydraulic lock, all wheel 1 Single Beam on Headlight Pod (50 watt) 2 Single Beam on...

Owners Manual
Page 136
... country where your product was purchased: Warranty or Service Bulletin repairs must show the dealer photo identification from POLARIS in order to a POLARIS Servicing Dealer. You may be required to present documentation of your move to continue your warranty coverage and to ensure that you receive safety information and notices regarding your vehicle. If you purchase from a private party...
... country where your product was purchased: Warranty or Service Bulletin repairs must show the dealer photo identification from POLARIS in order to a POLARIS Servicing Dealer. You may be required to present documentation of your move to continue your warranty coverage and to ensure that you receive safety information and notices regarding your vehicle. If you purchase from a private party...
Owners Manual
Page 138
... hours of engine operation, 2500 kilometers (3100 miles) of vehicle travel , or 30 calendar months from defects in addition to the following systems: • Air-induction system • Fuel system • Ignition system • Exhaust gas recirculation systems The following parts are also considered emission-related components for your vehicle. This emissions limited warranty covers components whose failure increases the vehicle's regulated emissions...
... hours of engine operation, 2500 kilometers (3100 miles) of vehicle travel , or 30 calendar months from defects in addition to the following systems: • Air-induction system • Fuel system • Ignition system • Exhaust gas recirculation systems The following parts are also considered emission-related components for your vehicle. This emissions limited warranty covers components whose failure increases the vehicle's regulated emissions...
Owners Manual
Page 144
... Control System . . 75 Eye Protection ...9 F Fluid Brake...30 Demand Drive...87 Fluid Change, Demand Drive ...87 Foot Brake, Auxiliary ...32 Footwell Removal ...94 Front Gearcase (Demand Drive) ...87 Fuel Safety...11 Fuel Tank Cap ...33 Fuse Replacement ...98 C Camber Adjustment ...92 Cargo ...60-61 Caster Adjustment ...92 Chrome Wheel Care ...119 Cleaning and Storage...117-122 Clothing ...9 Clutching ...129 Codes ...41-43 Cold Weather Operation ...49 Consumer Product Safety ...7 Coolant Bottle ...88 Coolant, Radiator...89 Cooling...
... Control System . . 75 Eye Protection ...9 F Fluid Brake...30 Demand Drive...87 Fluid Change, Demand Drive ...87 Foot Brake, Auxiliary ...32 Footwell Removal ...94 Front Gearcase (Demand Drive) ...87 Fuel Safety...11 Fuel Tank Cap ...33 Fuse Replacement ...98 C Camber Adjustment ...92 Cargo ...60-61 Caster Adjustment ...92 Chrome Wheel Care ...119 Cleaning and Storage...117-122 Clothing ...9 Clutching ...129 Codes ...41-43 Cold Weather Operation ...49 Consumer Product Safety ...7 Coolant Bottle ...88 Coolant, Radiator...89 Cooling...

Owners Manual
Page 145
... Rider Information Center ...36-43 Riding Area...48 Riding Gear...8-9 S Safe Operation Practices...47 Safety Labels ...22-25 Safety Training ...7 Safety Warnings ...11-21 Safety, Winch Maintenance ...74 Service Interval Programming ...40 Severe Use ...76 Shock Loading the Winch ...72-73 Side Panel Removal ...94 Sidehilling...54 Signal Words ...4 Spark Arrester ...107 M Maintenance Chart ...76-80 Master Cylinder ...30 Mode Switch ...26 Modifications ...9 N Noise Emission Control System ...75...
... Rider Information Center ...36-43 Riding Area...48 Riding Gear...8-9 S Safe Operation Practices...47 Safety Labels ...22-25 Safety Training ...7 Safety Warnings ...11-21 Safety, Winch Maintenance ...74 Service Interval Programming ...40 Severe Use ...76 Shock Loading the Winch ...72-73 Side Panel Removal ...94 Sidehilling...54 Signal Words ...4 Spark Arrester ...107 M Maintenance Chart ...76-80 Master Cylinder ...30 Mode Switch ...26 Modifications ...9 N Noise Emission Control System ...75...