

Owners Manual
Page 1
Operation is an adult vehicle only. This is prohibited for Maintenance and Safety Sportsman 850 Sportsman 850 SP Sportsman Touring 850 Sportsman Touring 850 SP Sportsman XP 1000 Sportsman XP Touring 1000 Read this manual carefully. Owner's Manual for those under 16 years of age. It contains important safety information.
Operation is an adult vehicle only. This is prohibited for Maintenance and Safety Sportsman 850 Sportsman 850 SP Sportsman Touring 850 Sportsman Touring 850 SP Sportsman XP 1000 Sportsman XP Touring 1000 Read this manual carefully. Owner's Manual for those under 16 years of age. It contains important safety information.

Owners Manual
Page 3
2016 Owner's Manual Sportsman® 850 Sportsman® 850 SP Sportsman® Touring 850 Sportsman® Touring 850 SP Sportsman® XP 1000 Sportsman® XP Touring 1000 1
2016 Owner's Manual Sportsman® 850 Sportsman® 850 SP Sportsman® Touring 850 Sportsman® Touring 850 SP Sportsman® XP 1000 Sportsman® XP Touring 1000 1

Owners Manual
Page 39
... could cause transmission damage. Gear Selector NOTICE: Shifting gears with the engine speed above idle or while the vehicle is left unattended, always place the transmission in PARK and lock the parking brake. FEATURES AND CONTROLS Automatic Transmission Gear Selector The transmission gear selector is idling, move the lever to a complete stop. Belt Life To extend belt life, use low forward gear when pulling a heavy load at less than seven miles per hour for extended periods and...
... could cause transmission damage. Gear Selector NOTICE: Shifting gears with the engine speed above idle or while the vehicle is left unattended, always place the transmission in PARK and lock the parking brake. FEATURES AND CONTROLS Automatic Transmission Gear Selector The transmission gear selector is idling, move the lever to a complete stop. Belt Life To extend belt life, use low forward gear when pulling a heavy load at less than seven miles per hour for extended periods and...

Owners Manual
Page 49
... Gear N = Neutral R = Reverse Gear P = Park -- = Gear Signal Error (or shifter between gears) 2. All segments including the fuel icon will display for 5-10 seconds. Active Descent Control Display - This area displays gear shifter position. Clock Display - When the last segment clears, a low fuel warning is turned off, press the MODE button. Gear Display - The clock displays time in a 12-hour or 24-hour format. FEATURES AND CONTROLS Instrument Cluster...
... Gear N = Neutral R = Reverse Gear P = Park -- = Gear Signal Error (or shifter between gears) 2. All segments including the fuel icon will display for 5-10 seconds. Active Descent Control Display - This area displays gear shifter position. Clock Display - When the last segment clears, a low fuel warning is turned off, press the MODE button. Gear Display - The clock displays time in a 12-hour or 24-hour format. FEATURES AND CONTROLS Instrument Cluster...

Owners Manual
Page 59
... add marks. 3. Perform regular checks on fluid levels, controls and areas outlined on the dipstick. See page 58. 6. Fill the fuel tank with vehicle operation and handling. 4. See page 97. If a belt fails, always clean away all gearcases after the first 25 hours of the clutches and drive belt will ensure a longer life and better performance. See page 35. Add oil if necessary...
... add marks. 3. Perform regular checks on fluid levels, controls and areas outlined on the dipstick. See page 58. 6. Fill the fuel tank with vehicle operation and handling. 4. See page 97. If a belt fails, always clean away all gearcases after the first 25 hours of the clutches and drive belt will ensure a longer life and better performance. See page 35. Add oil if necessary...

Owners Manual
Page 79
Balance, handling and control may be evenly distributed (1/3 on the front rack and 2/3 on warning labels and in 2/3 the specifications section of 1/3 this manual. 2. When operating over rough or hilly terrain, reduce speed and cargo weight to extend belt life. 9. Do not obstruct the headlight beam with extreme caution whenever hauling or towing loads. All Models: NEVER exceed 50 MPH (80 km/h) when rear cargo...
Balance, handling and control may be evenly distributed (1/3 on the front rack and 2/3 on warning labels and in 2/3 the specifications section of 1/3 this manual. 2. When operating over rough or hilly terrain, reduce speed and cargo weight to extend belt life. 9. Do not obstruct the headlight beam with extreme caution whenever hauling or towing loads. All Models: NEVER exceed 50 MPH (80 km/h) when rear cargo...

Owners Manual
Page 80
... combination of rear rack cargo weight and tongue weight must not exceed the maximum weight capacity of the vehicle. Never install a hitch longer than 4" (10 cm). Never install automotive accessories on hitch) must not exceed the rear rack capacity. • The total load (operator, passenger, accessories, cargo and weight on your ATV warranty. Always install POLARIS-approved (or equivalent) accessories designed for ATV use. Maximum 4" (10 cm) Maximum Towing Capacities Do...
... combination of rear rack cargo weight and tongue weight must not exceed the maximum weight capacity of the vehicle. Never install a hitch longer than 4" (10 cm). Never install automotive accessories on hitch) must not exceed the rear rack capacity. • The total load (operator, passenger, accessories, cargo and weight on your ATV warranty. Always install POLARIS-approved (or equivalent) accessories designed for ATV use. Maximum 4" (10 cm) Maximum Towing Capacities Do...
Owners Manual
Page 96
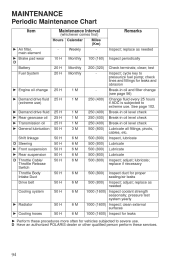
clean; test Inspect; cycle key to extreme use ) Ź Demand drive fluid Ź Rear gearcase oil Ź Transmission oil Ź General lubrication Shift linkage D Steering Ź Front suspension Ź Rear suspension D Throttle Cable/ Throttle Release Switch Throttle Body Intake Duct Drive belt Cooling system Ź Radiator Ź Cooling hoses 25 H 25 H 1M 1M 250 (400) 25 H 25 H 25 H 50 H 50 H 50 H 50 H 50 H 50 H 1M 1M 1M 3M 6M 6M 6M 6M 6M 250 (...
clean; test Inspect; cycle key to extreme use ) Ź Demand drive fluid Ź Rear gearcase oil Ź Transmission oil Ź General lubrication Shift linkage D Steering Ź Front suspension Ź Rear suspension D Throttle Cable/ Throttle Release Switch Throttle Body Intake Duct Drive belt Cooling system Ź Radiator Ź Cooling hoses 25 H 25 H 1M 1M 250 (400) 25 H 25 H 25 H 50 H 50 H 50 H 50 H 50 H 50 H 1M 1M 1M 3M 6M 6M 6M 6M 6M 250 (...

Owners Manual
Page 97
...; Engine oil change Ź Demand drive fluid (normal use) Ź Rear gearcase oil Ź Transmission oil D Fuel system 100 H 100 H 100 H 100 H 100 H 100 H 6M 6M 12 M 12 M 12 M 12 M Miles (Km) 1000 (1600) Inspect for leaks at fill cap, fuel lines/rail and fuel pump; replace as needed Remarks Ź Engine mounts Exhaust muffler/ pipe D Spark plug Ź Wiring 100 H 100 H 100 H 100 H 12 M 12 M 12 M 12 M D Clutches (drive and driven) D Front wheel bearings D Brake fluid Suspension bushings Spark arrester Ź Coolant D Valve clearance...
...; Engine oil change Ź Demand drive fluid (normal use) Ź Rear gearcase oil Ź Transmission oil D Fuel system 100 H 100 H 100 H 100 H 100 H 100 H 6M 6M 12 M 12 M 12 M 12 M Miles (Km) 1000 (1600) Inspect for leaks at fill cap, fuel lines/rail and fuel pump; replace as needed Remarks Ź Engine mounts Exhaust muffler/ pipe D Spark plug Ź Wiring 100 H 100 H 100 H 100 H 12 M 12 M 12 M 12 M D Clutches (drive and driven) D Front wheel bearings D Brake fluid Suspension bushings Spark arrester Ź Coolant D Valve clearance...

Owners Manual
Page 114
MAINTENANCE Tires Wheel Installation 1. Loose nuts could result in PARK. 2. Place the transmission in an accident or overturn. Lower the vehicle to come off during operation, which could cause a tire to the ground. 6. WARNING! Wheel Nut Torque Specifications Check the wheel nut torques occasionally and when they've been loosened for service. Install the wheel nuts and finger-tighten them. 5. Torque the wheel nuts to specification. Wheel Type All...
MAINTENANCE Tires Wheel Installation 1. Loose nuts could result in PARK. 2. Place the transmission in an accident or overturn. Lower the vehicle to come off during operation, which could cause a tire to the ground. 6. WARNING! Wheel Nut Torque Specifications Check the wheel nut torques occasionally and when they've been loosened for service. Install the wheel nuts and finger-tighten them. 5. Torque the wheel nuts to specification. Wheel Type All...

Owners Manual
Page 117
...wiring. 3. CAUTION! Turn the lamp counter-clockwise to remove it with bare fingers. Lift the pod cover and disconnect the speedometer harnesses from the wiring harness. Hot components can result in the housing. 5. Pull the pod cover forward. Non-SP/XP: Remove the five (5) headlight pod screws. Clean headlights frequently and replace...lamp. Oil from your skin leaves a residue, causing a hot spot that will shorten the life of the lamp. Be sure to pull on the connector, not on the lamp locates properly in reduced visibility when driving. MAINTENANCE Lights Poor lighting can cause...
...wiring. 3. CAUTION! Turn the lamp counter-clockwise to remove it with bare fingers. Lift the pod cover and disconnect the speedometer harnesses from the wiring harness. Hot components can result in the housing. 5. Pull the pod cover forward. Non-SP/XP: Remove the five (5) headlight pod screws. Clean headlights frequently and replace...lamp. Oil from your skin leaves a residue, causing a hot spot that will shorten the life of the lamp. Be sure to pull on the connector, not on the lamp locates properly in reduced visibility when driving. MAINTENANCE Lights Poor lighting can cause...

Owners Manual
Page 120
... pod cover forward. 3. Headlight Housing Replacement (Non-SP/XP Models) 1. Lift the pod cover and disconnect the speedometer harnesses from the locking tabs. 6. Pull the headlight housing up to release it from the speedometer. 3. Headlight 4. Pull the headlight housing up and out of the pod. 7. Unplug the headlamp from the bracket for removal. 6. Use a small screwdriver to remove the o-rings from the headlight mounting tabs...
... pod cover forward. 3. Headlight Housing Replacement (Non-SP/XP Models) 1. Lift the pod cover and disconnect the speedometer harnesses from the locking tabs. 6. Pull the headlight housing up to release it from the speedometer. 3. Headlight 4. Pull the headlight housing up and out of the pod. 7. Unplug the headlamp from the bracket for removal. 6. Use a small screwdriver to remove the o-rings from the headlight mounting tabs...

Owners Manual
Page 121
MAINTENANCE Lights Lower Headlamp Replacement 1. Reinstall the harness assembly into the headlight assembly. 4. Harness Taillight/Brakelight Lamp Replacement Connector Lamp 119 Turn the headlight harness clockwise to remove it. 3. Turn the lamp counter-clockwise to secure the headlamp. 1. Reinstall the harness connector. 5. Turn the back of the light assembly. 2. Remove the headlamp and install the new headlamp. 3. Test the light for proper operation. Remove the harness connector from the back of...
MAINTENANCE Lights Lower Headlamp Replacement 1. Reinstall the harness assembly into the headlight assembly. 4. Harness Taillight/Brakelight Lamp Replacement Connector Lamp 119 Turn the headlight harness clockwise to remove it. 3. Turn the lamp counter-clockwise to secure the headlamp. 1. Reinstall the harness connector. 5. Turn the back of the light assembly. 2. Remove the headlamp and install the new headlamp. 3. Test the light for proper operation. Remove the harness connector from the back of...
Owners Manual
Page 146
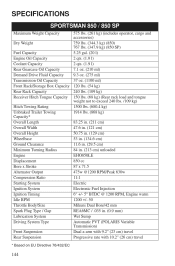
... x 71.5 Alternator Output 475w @1200 RPM/Peak 630w Compression Ratio 11:1 Starting System Electric Ignition System Electronic Fuel Injection Ignition Timing 6° +/- 5° BTDC @ 1200 RPM, Engine warm Idle RPM 1200 +/- 50 Throttle Body/Size Mikuni Dual Bore/42 mm Spark Plug Type / Gap REA6MC / .035 in. (0.9 mm) Lubrication System Wet Sump Driving System Type Automatic PVT (POLARIS Variable Transmission) Front Suspension Dual a-arm with 9.2" (23 cm) travel Rear Suspension Progressive rate with...
... x 71.5 Alternator Output 475w @1200 RPM/Peak 630w Compression Ratio 11:1 Starting System Electric Ignition System Electronic Fuel Injection Ignition Timing 6° +/- 5° BTDC @ 1200 RPM, Engine warm Idle RPM 1200 +/- 50 Throttle Body/Size Mikuni Dual Bore/42 mm Spark Plug Type / Gap REA6MC / .035 in. (0.9 mm) Lubrication System Wet Sump Driving System Type Automatic PVT (POLARIS Variable Transmission) Front Suspension Dual a-arm with 9.2" (23 cm) travel Rear Suspension Progressive rate with...
Owners Manual
Page 150
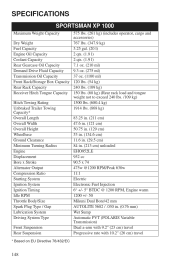
... Alternator Output 475w @1200 RPM/Peak 630w Compression Ratio 11:1 Starting System Electric Ignition System Electronic Fuel Injection Ignition Timing 6° +/- 5° BTDC @ 1200 RPM, Engine warm Idle RPM 1200 +/- 50 Throttle Body/Size Mikuni Dual Bore/42 mm Spark Plug Type / Gap AUTOLITE 5682 / .030 in. (0.76 mm) Lubrication System Wet Sump Driving System Type Automatic PVT (POLARIS Variable Transmission) Front Suspension Dual a-arm with 9.2" (23 cm) travel Rear Suspension Progressive rate...
... Alternator Output 475w @1200 RPM/Peak 630w Compression Ratio 11:1 Starting System Electric Ignition System Electronic Fuel Injection Ignition Timing 6° +/- 5° BTDC @ 1200 RPM, Engine warm Idle RPM 1200 +/- 50 Throttle Body/Size Mikuni Dual Bore/42 mm Spark Plug Type / Gap AUTOLITE 5682 / .030 in. (0.76 mm) Lubrication System Wet Sump Driving System Type Automatic PVT (POLARIS Variable Transmission) Front Suspension Dual a-arm with 9.2" (23 cm) travel Rear Suspension Progressive rate...
Owners Manual
Page 152
... l) Engine Oil Capacity 2 qts. (1.9 l) Coolant Capacity 2 qts. (1.9 l) Demand Drive Fluid Capacity 9.3 oz. (275 ml) Transmission Fluid Capacity 37 oz. (1100 ml) Rear Gearcase Fluid Capacity 7.1 oz. (210 ml) Engine EHO952LE Displacement 952 cc Bore x Stroke 90.5 x 74 Alternator Output 475w @1200 RPM/Peak 630w Compression Ratio 11:1 Starting System Electric Ignition System Electronic Fuel Injection Ignition Timing 6° +/- 5° BTDC @ 1200 RPM, Engine warm Idle RPM 1200 +/- 50 Throttle Body/Size Mikuni Dual Bore/42 mm Spark Plug Type...
... l) Engine Oil Capacity 2 qts. (1.9 l) Coolant Capacity 2 qts. (1.9 l) Demand Drive Fluid Capacity 9.3 oz. (275 ml) Transmission Fluid Capacity 37 oz. (1100 ml) Rear Gearcase Fluid Capacity 7.1 oz. (210 ml) Engine EHO952LE Displacement 952 cc Bore x Stroke 90.5 x 74 Alternator Output 475w @1200 RPM/Peak 630w Compression Ratio 11:1 Starting System Electric Ignition System Electronic Fuel Injection Ignition Timing 6° +/- 5° BTDC @ 1200 RPM, Engine warm Idle RPM 1200 +/- 50 Throttle Body/Size Mikuni Dual Bore/42 mm Spark Plug Type...
Owners Manual
Page 153
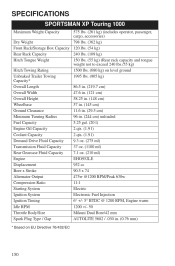
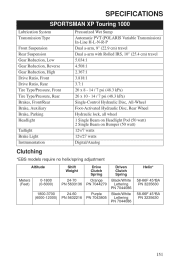
SPECIFICATIONS SPORTSMAN XP Touring 1000 Lubrication System Transmission Type Front Suspension Rear Suspension Gear Reduction, Low Gear Reduction, Reverse Gear Reduction, High Drive Ratio, Front Drive Ratio, Rear Tire Type/Pressure, Front Tire Type/Pressure, Rear Brakes, Front/Rear Brake, Auxiliary Brake, Parking Headlight Taillight Brake Light Instrumentation Pressurized Wet Sump Automatic PVT (POLARIS Variable Transmission) In-Line H-L-N-R-P Dual a-arm, 9" (22.9 cm) travel Dual a-arm with Rolled IRS, 10" (25.4 cm) travel 5.034:1 4.508:1 2.367:1 3.818:1 3.7:1 26 x 8 - 14 / 7 psi (48.3 kPa) 26...
SPECIFICATIONS SPORTSMAN XP Touring 1000 Lubrication System Transmission Type Front Suspension Rear Suspension Gear Reduction, Low Gear Reduction, Reverse Gear Reduction, High Drive Ratio, Front Drive Ratio, Rear Tire Type/Pressure, Front Tire Type/Pressure, Rear Brakes, Front/Rear Brake, Auxiliary Brake, Parking Headlight Taillight Brake Light Instrumentation Pressurized Wet Sump Automatic PVT (POLARIS Variable Transmission) In-Line H-L-N-R-P Dual a-arm, 9" (22.9 cm) travel Dual a-arm with Rolled IRS, 10" (25.4 cm) travel 5.034:1 4.508:1 2.367:1 3.818:1 3.7:1 26 x 8 - 14 / 7 psi (48.3 kPa) 26...

Owners Manual
Page 157
...your product was purchased: Warranty or Service Bulletin repairs must be authorized to perform the warranty repair. Upon residence verification, the servicing dealer will be required to obtain documentation from any authorized POLARIS dealer that you use ...POLARIS in order to register your product in your new country immediately after you move or are traveling temporarily outside the country of the country in order to continue your warranty coverage. If you move to continue your warranty coverage and to ensure that you receive safety information and notices regarding your vehicle...
...your product was purchased: Warranty or Service Bulletin repairs must be authorized to perform the warranty repair. Upon residence verification, the servicing dealer will be required to obtain documentation from any authorized POLARIS dealer that you use ...POLARIS in order to register your product in your new country immediately after you move or are traveling temporarily outside the country of the country in order to continue your warranty coverage. If you move to continue your warranty coverage and to ensure that you receive safety information and notices regarding your vehicle...

Owners Manual
Page 159
... for exhaust emissions: • Aftertreatment devices • Crankcase ventilation valves • Sensors • Electronic control units The following parts are considered emission-related components for evaporative emissions: Fuel Tank Fuel Cap Fuel Line Fuel Line Fittings Clamps* Pressure Relief Valves* Control Valves* Control Solenoids* Electronic Controls Vacuum Control Diaphragms* Control Cables* Control Linkages* Purge Valves Vapor Hoses Liquid/Vapor Separator Carbon Canister Canister Mounting Brackets Carburetor Purge Port Connector *As related to the POLARIS...
... for exhaust emissions: • Aftertreatment devices • Crankcase ventilation valves • Sensors • Electronic control units The following parts are considered emission-related components for evaporative emissions: Fuel Tank Fuel Cap Fuel Line Fuel Line Fittings Clamps* Pressure Relief Valves* Control Valves* Control Solenoids* Electronic Controls Vacuum Control Diaphragms* Control Cables* Control Linkages* Purge Valves Vapor Hoses Liquid/Vapor Separator Carbon Canister Canister Mounting Brackets Carburetor Purge Port Connector *As related to the POLARIS...

Owners Manual
Page 166
... Riding Gear ...10-11 S Safe Operation Practices ...59 Safety Labels ...23-29 Safety Training ...9 Safety Warnings...12-22 Safety, Winch Maintenance...90 Seat Removal (1-Up Models) ...110 Seat Removal (Touring) ...110 Severe Use ...92 Shock Loading the Winch ...88-89 Side Panel Removal...109 Sidehilling ...68 Signal Words ...5 Spark Arrester ...123 Spark Plug Inspection ...120-121 Spark Plug Recommendations...120 Spark Plugs ...120-121 Speedometer ...44 Spring Adjustment, Rear Shock . . 131 Starting the Engine ...61 Steering Assembly ...104...
... Riding Gear ...10-11 S Safe Operation Practices ...59 Safety Labels ...23-29 Safety Training ...9 Safety Warnings...12-22 Safety, Winch Maintenance...90 Seat Removal (1-Up Models) ...110 Seat Removal (Touring) ...110 Severe Use ...92 Shock Loading the Winch ...88-89 Side Panel Removal...109 Sidehilling ...68 Signal Words ...5 Spark Arrester ...123 Spark Plug Inspection ...120-121 Spark Plug Recommendations...120 Spark Plugs ...120-121 Speedometer ...44 Spring Adjustment, Rear Shock . . 131 Starting the Engine ...61 Steering Assembly ...104...