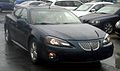
Owner's Manual
Page 1
2005 Pontiac Grand Prix Owner Manual Seats and Restraint Systems ...1-1 Front Seats ...1-2 Rear Seats ...1-8 Safety Belts ...1-10 Child Restraints ...1-29 Airbag System ...1-48 Restraint System Check ...1-57 Features and Controls ...2-1 Keys ...2-2 Doors and Locks ...2-10 Windows ...2-15 Theft-Deterrent Systems ...2-17 Starting and Operating Your Vehicle ...2-21 Mirrors ...2-35 OnStar® System ...2-36 Storage Areas ...2-38 Sunroof ...2-41 Instrument Panel ...3-1 Instrument Panel Overview ...3-4 Climate Controls ...3-26 Warning Lights, Gages, and Indicators ...3-35 Driver Information Center...
2005 Pontiac Grand Prix Owner Manual Seats and Restraint Systems ...1-1 Front Seats ...1-2 Rear Seats ...1-8 Safety Belts ...1-10 Child Restraints ...1-29 Airbag System ...1-48 Restraint System Check ...1-57 Features and Controls ...2-1 Keys ...2-2 Doors and Locks ...2-10 Windows ...2-15 Theft-Deterrent Systems ...2-17 Starting and Operating Your Vehicle ...2-21 Mirrors ...2-35 OnStar® System ...2-36 Storage Areas ...2-38 Sunroof ...2-41 Instrument Panel ...3-1 Instrument Panel Overview ...3-4 Climate Controls ...3-26 Warning Lights, Gages, and Indicators ...3-35 Driver Information Center...
Owner's Manual
Page 8
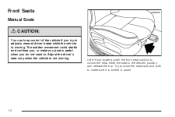
Slide the seat to . The sudden movement could startle and confuse you, or make sure it is moving . Adjust the driver's seat only when the vehicle is not moving . Lift the bar located under the front seat cushion to adjust a manual driver's seat while the vehicle is locked in place. 1-2 Front Seats Manual Seats {CAUTION: You can lose control of the vehicle if you do not want to the desired position and release the bar. Try to move the seat back and forth to make you push a pedal when you try to unlock the seat.
Slide the seat to . The sudden movement could startle and confuse you, or make sure it is moving . Adjust the driver's seat only when the vehicle is not moving . Lift the bar located under the front seat cushion to adjust a manual driver's seat while the vehicle is locked in place. 1-2 Front Seats Manual Seats {CAUTION: You can lose control of the vehicle if you do not want to the desired position and release the bar. Try to move the seat back and forth to make you push a pedal when you try to unlock the seat.

Owner's Manual
Page 10
... climate control panel. Heated Seats If the vehicle has this feature, the buttons to activate the heat on each front seat cushion are located on the outboard side of each front seat cushion. Push the button once to lock the seatback in place. Release the lever to activate a high heat setting. Push the button again to turn the heat off. Press the button a third time...
... climate control panel. Heated Seats If the vehicle has this feature, the buttons to activate the heat on each front seat cushion are located on the outboard side of each front seat cushion. Push the button once to lock the seatback in place. Release the lever to activate a high heat setting. Push the button again to turn the heat off. Press the button a third time...
Owner's Manual
Page 65
... Remote Keyless Entry System Operation ...2-5 Doors and Locks ...2-10 Door Locks ...2-10 Power Door Locks ...2-11 Delayed Locking ...2-11 Programmable Automatic Door Locks ...2-12 Lockout Protection ...2-12 Trunk ...2-13 Windows ...2-15 Power Windows ...2-16 Sun Visors ...2-16 Theft-Deterrent Systems ...2-17 Content Theft-Deterrent ...2-17 PASS-Key® III ...2-18 PASS-Key® III Operation ...2-19 Starting and Operating Your Vehicle ...2-21 New Vehicle Break-In ...2-21 Ignition Positions ...2-22 Retained Accessory Power (RAP) ...2-22 Starting Your Engine ...2-23 Engine Coolant Heater...
... Remote Keyless Entry System Operation ...2-5 Doors and Locks ...2-10 Door Locks ...2-10 Power Door Locks ...2-11 Delayed Locking ...2-11 Programmable Automatic Door Locks ...2-12 Lockout Protection ...2-12 Trunk ...2-13 Windows ...2-15 Power Windows ...2-16 Sun Visors ...2-16 Theft-Deterrent Systems ...2-17 Content Theft-Deterrent ...2-17 PASS-Key® III ...2-18 PASS-Key® III Operation ...2-19 Starting and Operating Your Vehicle ...2-21 New Vehicle Break-In ...2-21 Ignition Positions ...2-22 Retained Accessory Power (RAP) ...2-22 Starting Your Engine ...2-23 Engine Coolant Heater...

Owner's Manual
Page 69
... Remote Keyless Entry System on page 2-4 for more detailed information. Q (Lock): Press the lock button to be less while the vehicle is running. If enabled through the Driver Information Center (DIC), the parking lamps may flash once and the horn may arm the content theft-deterrent system. Remote Keyless Entry with the remote keyless entry transmitter. See "Remote Vehicle Start" following for more information. Remote Keyless Entry System Operation The vehicle's doors can be locked and...
... Remote Keyless Entry System on page 2-4 for more detailed information. Q (Lock): Press the lock button to be less while the vehicle is running. If enabled through the Driver Information Center (DIC), the parking lamps may flash once and the horn may arm the content theft-deterrent system. Remote Keyless Entry with the remote keyless entry transmitter. See "Remote Vehicle Start" following for more information. Remote Keyless Entry System Operation The vehicle's doors can be locked and...
Owner's Manual
Page 72
... vehicle's turn signal lights flash or for a 10 minute time extension. Press the transmitter's lock button, release it will be locked. 3. The vehicle's doors will automatically regulate the inside temperature. It also starts up the vehicle's heating or air conditioning systems and rear window defogger. If it is your vehicle is running for at the vehicle. 2. When the remote start feature. Aim the transmitter at least four seconds. When the vehicle starts, the parking lamps will turn the key...
... vehicle's turn signal lights flash or for a 10 minute time extension. Press the transmitter's lock button, release it will be locked. 3. The vehicle's doors will automatically regulate the inside temperature. It also starts up the vehicle's heating or air conditioning systems and rear window defogger. If it is your vehicle is running for at the vehicle. 2. When the remote start feature. Aim the transmitter at least four seconds. When the vehicle starts, the parking lamps will turn the key...
Owner's Manual
Page 84
... trying to start the vehicle, if the engine does not start and the STARTING DISABLED DUE TO THEFT SYSTEM warning message on the Driver Information Center (DIC) comes on page 5-103. See your keys, only a GM dealer can service PASS-Key® III to have new keys made and programmed to the system. In an emergency, contact Pontiac Roadside Assistance. Canadian Owners: If you...
... trying to start the vehicle, if the engine does not start and the STARTING DISABLED DUE TO THEFT SYSTEM warning message on the Driver Information Center (DIC) comes on page 5-103. See your keys, only a GM dealer can service PASS-Key® III to have new keys made and programmed to the system. In an emergency, contact Pontiac Roadside Assistance. Canadian Owners: If you...

Owner's Manual
Page 94
... if the parking brake is set, the ignition is on the instrument panel cluster when the parking brake is set . Verify that the parking brake is fully released and the brake warning light is towing a trailer and parked on a hill, see Towing a Trailer on if the parking brake does not release fully. Parking Brake The parking brake is located to the left foot is lifted, the parking brake pedal will lift to the released position. If the vehicle is off before driving. A warning chime...
... if the parking brake is set, the ignition is on the instrument panel cluster when the parking brake is set . Verify that the parking brake is fully released and the brake warning light is towing a trailer and parked on a hill, see Towing a Trailer on if the parking brake does not release fully. Parking Brake The parking brake is located to the left foot is lifted, the parking brake pedal will lift to the released position. If the vehicle is off before driving. A warning chime...

Owner's Manual
Page 107
... Panel Battery Run-Down Protection ...3-20 Head-Up Display (HUD) ...3-20 Accessory Power Outlets ...3-24 Ashtrays and Cigarette Lighter ...3-25 Climate Controls ...3-26 Climate Control System ...3-26 Dual Automatic Climate Control System ...3-29 Outlet Adjustment ...3-33 Passenger Compartment Air Filter ...3-33 Warning Lights, Gages, and Indicators ...3-35 Instrument Panel Cluster ...3-36 Speedometer and Odometer ...3-37 Tachometer ...3-37 Safety Belt Reminder Light ...3-38 Airbag Readiness Light ...3-38 Up-Shift Light ...3-39 Brake System Warning Light ...3-40 Anti-Lock Brake System Warning...
... Panel Battery Run-Down Protection ...3-20 Head-Up Display (HUD) ...3-20 Accessory Power Outlets ...3-24 Ashtrays and Cigarette Lighter ...3-25 Climate Controls ...3-26 Climate Control System ...3-26 Dual Automatic Climate Control System ...3-29 Outlet Adjustment ...3-33 Passenger Compartment Air Filter ...3-33 Warning Lights, Gages, and Indicators ...3-35 Instrument Panel Cluster ...3-36 Speedometer and Odometer ...3-37 Tachometer ...3-37 Safety Belt Reminder Light ...3-38 Airbag Readiness Light ...3-38 Up-Shift Light ...3-39 Brake System Warning Light ...3-40 Anti-Lock Brake System Warning...

Owner's Manual
Page 111
... Instrument Panel Fuse Block on page 2-38. Your front and rear turn signal lamps will flash on page 3-5. See Hazard Warning Flashers on and off. See Instrument Panel Cluster on page 2-25. Hood Release. Cruise Control. Climate Controls. K. L. Interior Lamps Brightness Control. O. D. Air Outlets. See Automatic Transaxle Operation on page 3-36. Ignition. I. TAP-Shift™ Control (If Equipped). See Ignition Positions on page 3-49. See Driver Information Center (DIC) on page 2-22. Side Window...
... Instrument Panel Fuse Block on page 2-38. Your front and rear turn signal lamps will flash on page 3-5. See Hazard Warning Flashers on and off. See Instrument Panel Cluster on page 2-25. Hood Release. Cruise Control. Climate Controls. K. L. Interior Lamps Brightness Control. O. D. Air Outlets. See Automatic Transaxle Operation on page 3-36. Ignition. I. TAP-Shift™ Control (If Equipped). See Ignition Positions on page 3-49. See Driver Information Center (DIC) on page 2-22. Side Window...
Owner's Manual
Page 132
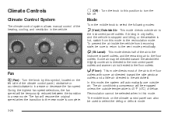
... window outlets and a little air directed to increase or decrease the fan speed. Recirculation cannot be sure to return to the vent mode periodically. )(Bi-Level): This mode directs half of the climate control panel, clockwise or counterclockwise to the windshield. If driving in city traffic, and the vehicle is stopped and idling, or the weather is directed to turn the fan...
... window outlets and a little air directed to increase or decrease the fan speed. Recirculation cannot be sure to return to the vent mode periodically. )(Bi-Level): This mode directs half of the climate control panel, clockwise or counterclockwise to the windshield. If driving in city traffic, and the vehicle is stopped and idling, or the weather is directed to turn the fan...

Owner's Manual
Page 133
... windows of fog or moisture and warm the passengers. Use the defog mode to clear the windows of condensation and to condense on the cool window glass. Recirculation cannot be engaged unless the outside air. Temperature The knob on the right of the climate control panel is the temperature adjustment that can be engaged unless the outside air. The air conditioning compressor will automatically...
... windows of fog or moisture and warm the passengers. Use the defog mode to clear the windows of condensation and to condense on the cool window glass. Recirculation cannot be engaged unless the outside air. Temperature The knob on the right of the climate control panel is the temperature adjustment that can be engaged unless the outside air. The air conditioning compressor will automatically...

Owner's Manual
Page 136
... the fan is off . 9(Fan): Turn the fan knob clockwise to increase the fan speed and counterclockwise to avoid blowing cold air into your selection. 2. Then adjust the temperature, if necessary. Pressing PASS. If only the driver temperature is set . See Passenger Compartment Air Filter on and off . The system will start out blowing air at the floor but may change modes automatically as the vehicle...
... the fan is off . 9(Fan): Turn the fan knob clockwise to increase the fan speed and counterclockwise to avoid blowing cold air into your selection. 2. Then adjust the temperature, if necessary. Pressing PASS. If only the driver temperature is set . See Passenger Compartment Air Filter on and off . The system will start out blowing air at the floor but may change modes automatically as the vehicle...

Owner's Manual
Page 137
... cooled, turn the air conditioning compressor on page 1-4 for long periods of airflow. Press this button to the windshield. The system may cause the air inside your vehicle to help cool the air inside of the vehicle facing the sun. z (Heated Seats): % (Bi-Level): This mode directs airflow to the instrument panel outlets and to the instrument panel outlets. The button on the left controls the driver's seat...
... cooled, turn the air conditioning compressor on page 1-4 for long periods of airflow. Press this button to the windshield. The system may cause the air inside your vehicle to help cool the air inside of the vehicle facing the sun. z (Heated Seats): % (Bi-Level): This mode directs airflow to the instrument panel outlets and to the instrument panel outlets. The button on the left controls the driver's seat...

Owner's Manual
Page 351
... in the tire. Speed ratings range from 1 to carry. For example, if the tire size aspect ratio is certified to 279. The letter P as shown in item C of the tire. the letter D means diagonal or bias ply construction; Accessory Weight: This means the combined weight of optional accessories are, automatic transmission, power steering, power brakes, power windows, power seats, and air conditioning. 5-61 Tire Terminology and Definitions Air Pressure: The amount...
... in the tire. Speed ratings range from 1 to carry. For example, if the tire size aspect ratio is certified to 279. The letter P as shown in item C of the tire. the letter D means diagonal or bias ply construction; Accessory Weight: This means the combined weight of optional accessories are, automatic transmission, power steering, power brakes, power windows, power seats, and air conditioning. 5-61 Tire Terminology and Definitions Air Pressure: The amount...

Owner's Manual
Page 429
...). Service Bulletins Service Bulletins give technical service information needed to knowledgeably service General Motors cars and trucks. Reporting Safety Defects to General Motors In addition to notifying NHTSA (or Transport Canada) in the diagnosis and service of Canada Limited Customer Communication Centre, 163-005 1908 Colonel Sam Drive Oshawa, Ontario L1H 8P7 Transmission, Transaxle, Transfer Case Unit Repair Manual This manual provides information on engines, transmission, axle suspension, brakes, electrical, steering, body, etc...
...). Service Bulletins Service Bulletins give technical service information needed to knowledgeably service General Motors cars and trucks. Reporting Safety Defects to General Motors In addition to notifying NHTSA (or Transport Canada) in the diagnosis and service of Canada Limited Customer Communication Centre, 163-005 1908 Colonel Sam Drive Oshawa, Ontario L1H 8P7 Transmission, Transaxle, Transfer Case Unit Repair Manual This manual provides information on engines, transmission, axle suspension, brakes, electrical, steering, body, etc...

Owner's Manual
Page 431
... Instrument Panel ...5-96 Interior Plastic Components ...5-96 Leather ...5-96 Sheet Metal Damage ...5-100 Tires ...5-99 Underbody Maintenance ...5-100 Vehicle Care/Appearance Materials ...5-101 Vinyl ...5-96 Washing Your Vehicle ...5-97 Weatherstrips ...5-97 Windshield and Wiper Blades ...5-98 Ashtrays ...3-25 Assist Handles ...2-40 Audio System(s) ...3-92 Audio Steering Wheel Controls ...3-133 Backglass Antenna ...3-134 Care of Your CD Player ...3-134 Care of Your CDs ...3-134 Chime Level Adjustment ...3-135 Navigation/Radio System...
... Instrument Panel ...5-96 Interior Plastic Components ...5-96 Leather ...5-96 Sheet Metal Damage ...5-100 Tires ...5-99 Underbody Maintenance ...5-100 Vehicle Care/Appearance Materials ...5-101 Vinyl ...5-96 Washing Your Vehicle ...5-97 Weatherstrips ...5-97 Windshield and Wiper Blades ...5-98 Ashtrays ...3-25 Assist Handles ...2-40 Audio System(s) ...3-92 Audio Steering Wheel Controls ...3-133 Backglass Antenna ...3-134 Care of Your CD Player ...3-134 Care of Your CDs ...3-134 Chime Level Adjustment ...3-135 Navigation/Radio System...
Owner's Manual
Page 434
...28 Dual Automatic Climate Control System ...3-29 E Electrical System Add-On Equipment ...5-103 Fuses and Circuit Breakers ...5-103 Headlamp Wiring ...5-103 Instrument Panel Fuse Block ...5-104 Power Windows and Other Power Options ...5-103 Underhood Fuse Block ...5-105 Windshield Wiper Fuses ...5-103 Engine Air Cleaner/Filter ...5-20 Battery ...5-42 Check and Service Engine Soon Light ...3-44 Coolant ...5-24 Coolant Heater ...2-24 Coolant Temperature Gage ...3-43 Coolant Temperature Warning Light ...3-43 Engine Compartment Overview ...5-12 Exhaust ...2-33 Oil ...5-14 Overheated Protection...
...28 Dual Automatic Climate Control System ...3-29 E Electrical System Add-On Equipment ...5-103 Fuses and Circuit Breakers ...5-103 Headlamp Wiring ...5-103 Instrument Panel Fuse Block ...5-104 Power Windows and Other Power Options ...5-103 Underhood Fuse Block ...5-105 Windshield Wiper Fuses ...5-103 Engine Air Cleaner/Filter ...5-20 Battery ...5-42 Check and Service Engine Soon Light ...3-44 Coolant ...5-24 Coolant Heater ...2-24 Coolant Temperature Gage ...3-43 Coolant Temperature Warning Light ...3-43 Engine Compartment Overview ...5-12 Exhaust ...2-33 Oil ...5-14 Overheated Protection...
Owner's Manual
Page 439
... ...2-33 Passenger Compartment Air Filter ...3-33 Passing ...4-15 PASS-Key® III ...2-18 PASS-Key® III Operation ...2-19 Power Accessory Outlets ...3-24 Door Locks ...2-11 Electrical System ...5-103 Lumbar Controls ...1-3 Retained Accessory (RAP) ...2-22 Seat ...1-3 Steering Fluid ...5-38 Windows ...2-16 Pretensioners, Safety Belt ...1-28 Programmable Automatic Door Locks ...2-12 Q Questions and Answers About Safety Belts ...1-15 R Radiator Pressure Cap ...5-27 Radios ...3-92 Care of Your CD Player ...3-134 Care of Your CDs ...3-134 Navigation/Radio System ...3-132 Radio with CD...
... ...2-33 Passenger Compartment Air Filter ...3-33 Passing ...4-15 PASS-Key® III ...2-18 PASS-Key® III Operation ...2-19 Power Accessory Outlets ...3-24 Door Locks ...2-11 Electrical System ...5-103 Lumbar Controls ...1-3 Retained Accessory (RAP) ...2-22 Seat ...1-3 Steering Fluid ...5-38 Windows ...2-16 Pretensioners, Safety Belt ...1-28 Programmable Automatic Door Locks ...2-12 Q Questions and Answers About Safety Belts ...1-15 R Radiator Pressure Cap ...5-27 Radios ...3-92 Care of Your CD Player ...3-134 Care of Your CDs ...3-134 Navigation/Radio System ...3-132 Radio with CD...
Owner's Manual
Page 441
... ...7-13 Servicing Your Airbag-Equipped Vehicle ...1-56 Setting the Time ...3-93 Sheet Metal Damage ...5-100 Shifting Into Park (P) ...2-31 Shifting Out of Park (P) ...2-32 Shoulder Belt Height Adjuster ...1-22 Signals, Turn and Lane-Change ...3-7 Spare Tire Installing ...5-85 Removing ...5-83 Storing ...5-91 Specifications, Capacities ...5-108 Speedometer ...3-37 Split Folding Rear Seat ...1-8 StabiliTrak® Plus System ...4-12 Starting Your Engine ...2-23 Steering ...4-13 Steering Wheel Controls, Audio ...3-133 Steering Wheel, Tilt Wheel ...3-6 Storage Areas Center Console Storage...
... ...7-13 Servicing Your Airbag-Equipped Vehicle ...1-56 Setting the Time ...3-93 Sheet Metal Damage ...5-100 Shifting Into Park (P) ...2-31 Shifting Out of Park (P) ...2-32 Shoulder Belt Height Adjuster ...1-22 Signals, Turn and Lane-Change ...3-7 Spare Tire Installing ...5-85 Removing ...5-83 Storing ...5-91 Specifications, Capacities ...5-108 Speedometer ...3-37 Split Folding Rear Seat ...1-8 StabiliTrak® Plus System ...4-12 Starting Your Engine ...2-23 Steering ...4-13 Steering Wheel Controls, Audio ...3-133 Steering Wheel, Tilt Wheel ...3-6 Storage Areas Center Console Storage...


