
Owner's Manual
Page 3
3 Instrument panel Fuel gauge _____ Odometer and trip meter _____ Speedometer _____ Tachometer _____ Temperature gauge_____ Turbo gauge _____ Warning and indicator lights _____ Saab Information Display (SID)___ 89 90 87 87 88 88 82 89 Cruise Control _____ 169 Direction indicators _____ 100 High/low beam control stalk ... _____ 97 High/low beam _____ 98 Parking lights_____ 97 Rear fog light_____ 99 Automatic climate control __ Car care and maintenance _ Hazard warning lights_____ Seat heating, ACC _____ 106 268 100 113 Ashtray _____ Cigarette lighter _____ 134 134
3 Instrument panel Fuel gauge _____ Odometer and trip meter _____ Speedometer _____ Tachometer _____ Temperature gauge_____ Turbo gauge _____ Warning and indicator lights _____ Saab Information Display (SID)___ 89 90 87 87 88 88 82 89 Cruise Control _____ 169 Direction indicators _____ 100 High/low beam control stalk ... _____ 97 High/low beam _____ 98 Parking lights_____ 97 Rear fog light_____ 99 Automatic climate control __ Car care and maintenance _ Hazard warning lights_____ Seat heating, ACC _____ 106 268 100 113 Ashtray _____ Cigarette lighter _____ 134 134

Owner's Manual
Page 4
... 97 Taillights _____ 227 Central locking _____ Child safety locks _____ Lock buttons _____ Trunk lock _____ 48 52 48 51 Folding down the rear seat _ Lighting _____ Load-through hatch_____ Spare wheel _____ Tools _____ Trunk _____ 136 227 138 140 140 136 Towing_____ 195 Towing hook eyes _____ 195...
... 97 Taillights _____ 227 Central locking _____ Child safety locks _____ Lock buttons _____ Trunk lock _____ 48 52 48 51 Folding down the rear seat _ Lighting _____ Load-through hatch_____ Spare wheel _____ Tools _____ Trunk _____ 136 227 138 140 140 136 Towing_____ 195 Towing hook eyes _____ 195...

Owner's Manual
Page 5
... Moonroof _____ 232 131 128 Airbag _____ 32 Steering wheel adjustment _ 118 Steering _____ 288 Airbag_____ Child safety locks _____ Child seats _____ Safety belt care _____ Safety belts _____ 32 52 24 260 12 Fuses _____ 234 Glove box _____ Storage compartments____ Electric ...windows _____ 119 Automatic transmission ___ Changing gears _____ Manual transmission _____ Child seats _____ Folding down the rear seat ____ Rear seat_____ Safety belts _____ Seat adjustment _____ Seat heating _____ Upholstery care_____ 24 136 136 12 18 113 260 Ashtray and cigarette lighter ...
... Moonroof _____ 232 131 128 Airbag _____ 32 Steering wheel adjustment _ 118 Steering _____ 288 Airbag_____ Child safety locks _____ Child seats _____ Safety belt care _____ Safety belts _____ 32 52 24 260 12 Fuses _____ 234 Glove box _____ Storage compartments____ Electric ...windows _____ 119 Automatic transmission ___ Changing gears _____ Manual transmission _____ Child seats _____ Folding down the rear seat ____ Rear seat_____ Safety belts _____ Seat adjustment _____ Seat heating _____ Upholstery care_____ 24 136 136 12 18 113 260 Ashtray and cigarette lighter ...

Owner's Manual
Page 9
...turn. 5 Raise vehicle so that tire clears ground. EVEN WITH ADVANCED AIR BAGS Children can be killed or serious injured by a jack, use seat belts and child restraints. Safe working load 2425 lbs. (1100 kg). Use on specified vehicle. Always use vehicle support stands. Do not get under.... • Vehicle must be level and jack must be changed. 3 Crank jack so that is supported only by the air bag. Contact a Saab dealer if a xenon headlight requires replacement. JACKING INSTRUCTION 1 Set parking brake and shift transmission to park. 2 Fit top of jack into jacking point...
...turn. 5 Raise vehicle so that tire clears ground. EVEN WITH ADVANCED AIR BAGS Children can be killed or serious injured by a jack, use seat belts and child restraints. Safe working load 2425 lbs. (1100 kg). Use on specified vehicle. Always use vehicle support stands. Do not get under.... • Vehicle must be level and jack must be changed. 3 Crank jack so that is supported only by the air bag. Contact a Saab dealer if a xenon headlight requires replacement. JACKING INSTRUCTION 1 Set parking brake and shift transmission to park. 2 Fit top of jack into jacking point...
Owner's Manual
Page 10
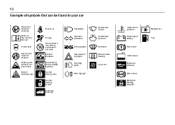
... sparks, flames or smoking Refer to the Owner's Manual Buckle up Headlights Windshield wipers Coolant temperature Radiator fan Airbag Never place a rear-facing child seat in this seat Electric windows Deactivating of rear window switches Central locking, lock Central locking, unlock Trunk lid, opening Direction indicators Windshield washers No charge to battery...
... sparks, flames or smoking Refer to the Owner's Manual Buckle up Headlights Windshield wipers Coolant temperature Radiator fan Airbag Never place a rear-facing child seat in this seat Electric windows Deactivating of rear window switches Central locking, lock Central locking, unlock Trunk lid, opening Direction indicators Windshield washers No charge to battery...

Owner's Manual
Page 11
Safety 11 Safety Safety belts _____ Seats _____ Head restraints _____ Child safety _____ Airbag_____ 12 18 23 24 32 3 Asterisk means: equipment not fitted in all cars (can depend on model variant, engine variant, market specification, options or accessories).
Safety 11 Safety Safety belts _____ Seats _____ Head restraints _____ Child safety _____ Airbag_____ 12 18 23 24 32 3 Asterisk means: equipment not fitted in all cars (can depend on model variant, engine variant, market specification, options or accessories).

Owner's Manual
Page 12
... is not fastened before the car starts to the traffic. • Safety belts must be worn at all times by the CLR-button on the Saab Information Display (SID) and the symbol will be an additional reminder when the speed exceeds 15 mph. If the belt is switched on, the safety... imposed on the instrument panel. The reminder for the driver has an additional audible signal which sounds for all car occupants. The reminder for all seats. 12 Safety Three-point inertia-reel safety belts are multiplied and can pay full attention to move there will be thrown forward against the front...
... is not fastened before the car starts to the traffic. • Safety belts must be worn at all times by the CLR-button on the Saab Information Display (SID) and the symbol will be an additional reminder when the speed exceeds 15 mph. If the belt is switched on, the safety... imposed on the instrument panel. The reminder for the driver has an additional audible signal which sounds for all car occupants. The reminder for all seats. 12 Safety Three-point inertia-reel safety belts are multiplied and can pay full attention to move there will be thrown forward against the front...
Owner's Manual
Page 13
... not be any slack in on the shoulder as the safety belt provides better protection when the seat is in a child seat. In the event of movement. Saab recommends the use of a child seat for safety belt WARNING Proper positioning of the safety belt is extremely important. • An out ...of clothing. • Refrain from the lap portion cutting into the abdomen. 13 Correct seating position • Never fasten the ...
... not be any slack in on the shoulder as the safety belt provides better protection when the seat is in a child seat. In the event of movement. Saab recommends the use of a child seat for safety belt WARNING Proper positioning of the safety belt is extremely important. • An out ...of clothing. • Refrain from the lap portion cutting into the abdomen. 13 Correct seating position • Never fasten the ...

Owner's Manual
Page 14
Check that it is not adjustable due to the belt being incorporated into the seat. The belt must be set at different heights. Belt height adjustment, Sport Sedan and SportCombi The... the buckle. Refer to page 260 for the front safety belts can be as possible. The belt guide on the seats. The front belt guide in the Convertible is securely fastened. 14 Safety To fasten the belt Press the red button ... to check the function of the safety belts, cleaning, etc. The safety belts follow the seats when the legroom is adjusted. Position the lap part low across the hips.
Check that it is not adjustable due to the belt being incorporated into the seat. The belt must be set at different heights. Belt height adjustment, Sport Sedan and SportCombi The... the buckle. Refer to page 260 for the front safety belts can be as possible. The belt guide on the seats. The front belt guide in the Convertible is securely fastened. 14 Safety To fasten the belt Press the red button ... to check the function of the safety belts, cleaning, etc. The safety belts follow the seats when the legroom is adjusted. Position the lap part low across the hips.
Owner's Manual
Page 17
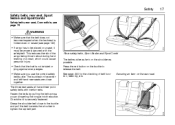
... braking or a crash, which could cause personal injury. • Check that the belt is securely fastened. Press the red button on the rear seat Grasp the shoulder belt close together. Check that it must be properly secured with inertia reels. Rear safety belts, Sport Sedan and SportCombi The belt... must be as far in on the shoulder as possible. Safety Safety belts, rear seat, Sport Sedan and SportCombi Safety belts rear seat, Convertible, see page 75 17 WARNING • Make sure that the belt does not become trapped when the backrest is...
... braking or a crash, which could cause personal injury. • Check that the belt is securely fastened. Press the red button on the rear seat Grasp the shoulder belt close together. Check that it must be properly secured with inertia reels. Rear safety belts, Sport Sedan and SportCombi The belt... must be as far in on the shoulder as possible. Safety Safety belts, rear seat, Sport Sedan and SportCombi Safety belts rear seat, Convertible, see page 75 17 WARNING • Make sure that the belt does not become trapped when the backrest is...

Owner's Manual
Page 18
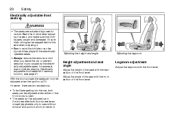
... to its neutral position. The lever is stationary. 18 Safety We recommend that adjustments to the driver's seat be performed in the following front seat adjustments can be made to achieve a comfortable driving position Height 3 Legroom Backrest rake angle Lumbar support firmness... 3 Head restraint height Height adjustment 3 Lift the lever to raise the seat. Press down the lever to lower the seat. Electrically adjustable front seats 3 See page 20. Manually adjusted front seats 3 The following order: 1 Height 2 Legroom 3 Backrest rake angle 4 Head restraint...
... to its neutral position. The lever is stationary. 18 Safety We recommend that adjustments to the driver's seat be performed in the following front seat adjustments can be made to achieve a comfortable driving position Height 3 Legroom Backrest rake angle Lumbar support firmness... 3 Head restraint height Height adjustment 3 Lift the lever to raise the seat. Press down the lever to lower the seat. Electrically adjustable front seats 3 See page 20. Manually adjusted front seats 3 The following order: 1 Height 2 Legroom 3 Backrest rake angle 4 Head restraint...

Owner's Manual
Page 19
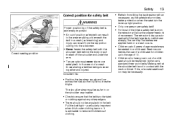
... position. Backrest rake angle WARNING The backrest should be upright during driving, so that the seat is being driven and it could result in injury to the occupant in the event of the seat and slide the seat to provide stepless adjustment of emergency braking or a crash, in particular a rear-end crash. To...
... position. Backrest rake angle WARNING The backrest should be upright during driving, so that the seat is being driven and it could result in injury to the occupant in the event of the seat and slide the seat to provide stepless adjustment of emergency braking or a crash, in particular a rear-end crash. To...
Owner's Manual
Page 20
...car to prevent personal injury caused by powerful motors. Adjusting the height and angle Adjusting the legroom Height adjustment and seat angle Adjust the height of the seat with the front lever. Legroom adjustment Adjust the legroom with the rear section of the front lever. With the doors... (applicable only to cars without window and sunroof pinch protection). 20 Safety Electrically adjustable front seats 3 WARNING • The seats are two exceptions: • To facilitate getting into the car, both seats can be adjusted when either of the front doors is ON. Adjust the angle of the...
...car to prevent personal injury caused by powerful motors. Adjusting the height and angle Adjusting the legroom Height adjustment and seat angle Adjust the height of the seat with the front lever. Legroom adjustment Adjust the legroom with the rear section of the front lever. With the doors... (applicable only to cars without window and sunroof pinch protection). 20 Safety Electrically adjustable front seats 3 WARNING • The seats are two exceptions: • To facilitate getting into the car, both seats can be adjusted when either of the front doors is ON. Adjust the angle of the...

Owner's Manual
Page 21
Memory function 3 WARNING The legroom of the electrically operated driver's seat can always be upright during driving, so that the safety belt, airbag and backrest can provide optimum protection in the event of emergency braking or a ... ignition switch. Lumbar support 3 Adjust the firmness of the backrest with the rear lever. Safety 21 Adjusting the rake angle Adjusting the lumbar support Driver's seat in particular a rear-end crash. Adjust the rake angle of the lumbar support by turning the knob.
Memory function 3 WARNING The legroom of the electrically operated driver's seat can always be upright during driving, so that the safety belt, airbag and backrest can provide optimum protection in the event of emergency braking or a ... ignition switch. Lumbar support 3 Adjust the firmness of the backrest with the rear lever. Safety 21 Adjusting the rake angle Adjusting the lumbar support Driver's seat in particular a rear-end crash. Adjust the rake angle of the lumbar support by turning the knob.
Owner's Manual
Page 22
... be angled down, refer to page 122. To facilitate reversing, the passenger-side door mirror can be adjusted. Storing and restoring settings 1 Adjust the seat and the door mirrors. To recall programmed settings, press and hold the M-button and then press one of the preselect buttons (1, 2 or 3). The... mirror settings. 22 Safety When the ignition is not included by the memory function. 2 Press and hold the desired memory button until the seat and door mirrors adopt their programmed positions. A chime will sound to 20 minutes. When the door is open and before the remote control ...
... be angled down, refer to page 122. To facilitate reversing, the passenger-side door mirror can be adjusted. Storing and restoring settings 1 Adjust the seat and the door mirrors. To recall programmed settings, press and hold the M-button and then press one of the preselect buttons (1, 2 or 3). The... mirror settings. 22 Safety When the ignition is not included by the memory function. 2 Press and hold the desired memory button until the seat and door mirrors adopt their programmed positions. A chime will sound to 20 minutes. When the door is open and before the remote control ...
Owner's Manual
Page 23
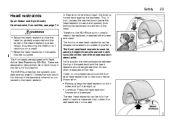
...between the top of neck injury in a crash. • Raise the head restraints in turn, causes the mechanism to the head restraint. This, in the seats that the head is optimally supported and the center of the head restraint is connected to press the head restraint forward and upward, thus limiting... and the head restraint should the front seat head restraint be fully lowered to reduce the risk of a rear-end crash, the body is built into the top of the head. These are equipped with Saab Active Head Restraints (SAHRs). In the event of neck injury if the car is a mechanical ...
...between the top of neck injury in a crash. • Raise the head restraints in turn, causes the mechanism to the head restraint. This, in the seats that the head is optimally supported and the center of the head restraint is connected to press the head restraint forward and upward, thus limiting... and the head restraint should the front seat head restraint be fully lowered to reduce the risk of a rear-end crash, the body is built into the top of the head. These are equipped with Saab Active Head Restraints (SAHRs). In the event of neck injury if the car is a mechanical ...

Owner's Manual
Page 24
... children around cars. • Watch children when loading or unloading the car so they don´t get locked in by the airbag • The BACK SEAT is the SAFEST place for children before backing your car out of a garage or driveway. • To avoid carbon monoxide poisoning, never let a car... unattended in a car, even for a short time. - Children can suffer heat stroke, perhaps die, in a matter of minutes. - Children can put a rear-facing child seat in the front • Sit as far back as possible from inside the car. • Children must always be suitably restrained in the car. •...
... children around cars. • Watch children when loading or unloading the car so they don´t get locked in by the airbag • The BACK SEAT is the SAFEST place for children before backing your car out of a garage or driveway. • To avoid carbon monoxide poisoning, never let a car... unattended in a car, even for a short time. - Children can suffer heat stroke, perhaps die, in a matter of minutes. - Children can put a rear-facing child seat in the front • Sit as far back as possible from inside the car. • Children must always be suitably restrained in the car. •...
Owner's Manual
Page 25
...on top of the parcel shelf (Sport Sedan), see page 28, on the back of a rearfacing child seat for seating children in the car. Saab recommends the use of the rear seat (SportCombi), see page 29 and behind the head restraints (Convertible) see picture on next page. for ...manufacturer. Children travel most safely when properly restrained. Make sure that you have any questions regarding LATCH please contact your Saab dealer before fitting a child seat, child restraint or booster cushion. The top tethers are acquainted with LATCH attachments. The lower anchorages are equipped to ...
...on top of the parcel shelf (Sport Sedan), see page 28, on the back of a rearfacing child seat for seating children in the car. Saab recommends the use of the rear seat (SportCombi), see page 29 and behind the head restraints (Convertible) see picture on next page. for ...manufacturer. Children travel most safely when properly restrained. Make sure that you have any questions regarding LATCH please contact your Saab dealer before fitting a child seat, child restraint or booster cushion. The top tethers are acquainted with LATCH attachments. The lower anchorages are equipped to ...
Owner's Manual
Page 26
26 Safety Lower anchorages in the crease between the seatback and the seat cushion. The right side and left side rear passenger seating positions have exposed metal anchors located in the rear seat, Sport Sedan and SportCombi Lower anchor and top tether anchor locations, Sport Sedan and SportCombi. Convertible has two top tether anchors, one behind each head restraint (Lower Anchor): Seating positions with two lower anchors. (Top Tether Anchor): Seating positions with top tether anchors. Lower anchorages in the rear seat, Convertible
26 Safety Lower anchorages in the crease between the seatback and the seat cushion. The right side and left side rear passenger seating positions have exposed metal anchors located in the rear seat, Sport Sedan and SportCombi Lower anchor and top tether anchor locations, Sport Sedan and SportCombi. Convertible has two top tether anchors, one behind each head restraint (Lower Anchor): Seating positions with two lower anchors. (Top Tether Anchor): Seating positions with top tether anchors. Lower anchorages in the rear seat, Convertible

Owner's Manual
Page 27
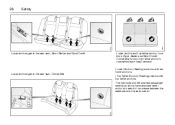
... 1 Place the child restraint on one of the designated outboard rear seat cushions. 2 Slide the attachment on the child restraint in between the seat cushion and backrest. 3 Press the child restraint down on the seat, 1 in illustration. 4 Press the child restraint rearward, lining up... to the anchorages 3 in illustration. 6 Follow the child restraint instructions to confirm that the restraint is limited. Safety LATCH child seat installation Before starting the installation, please read the instructions supplied by the child restraint manufacturer. 27 Rigid 2-point lower anchorage with top...
... 1 Place the child restraint on one of the designated outboard rear seat cushions. 2 Slide the attachment on the child restraint in between the seat cushion and backrest. 3 Press the child restraint down on the seat, 1 in illustration. 4 Press the child restraint rearward, lining up... to the anchorages 3 in illustration. 6 Follow the child restraint instructions to confirm that the restraint is limited. Safety LATCH child seat installation Before starting the installation, please read the instructions supplied by the child restraint manufacturer. 27 Rigid 2-point lower anchorage with top...


