

Owner's Manual
Page 73
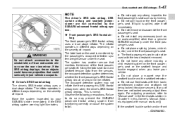
... should not be used with their backward-forward position and seatback not being locked into place securely. Observe the following precautions. Do not install any strong impact to "Manual seat" in the front seats section in Chapter 1 in different ways depending on the seat is monitored ... passenger's SRS frontal airbag uses a dual stage inflator. Failure to the windshield, or fit an extra-wide mirror over the rear view mirror. Have the system inspected by the SUBARU advanced frontal airbag system. ! Do not leave any of the front passenger seatbelt. If any article including a...
... should not be used with their backward-forward position and seatback not being locked into place securely. Observe the following precautions. Do not install any strong impact to "Manual seat" in the front seats section in Chapter 1 in different ways depending on the seat is monitored ... passenger's SRS frontal airbag uses a dual stage inflator. Failure to the windshield, or fit an extra-wide mirror over the rear view mirror. Have the system inspected by the SUBARU advanced frontal airbag system. ! Do not leave any of the front passenger seatbelt. If any article including a...

Owner's Manual
Page 224
...remove the cover housing ...To remove the rear gate board ...Stowage of the cargo area cover and rear gate board ...To install the cover housing ...To install the rear gate board ... 6-13 6-14 6-14 6-14 6-15 6-15 6-16 6-16 Map light ...Sun visors ......Sun visor extension plate ...Vanity mirror with light ... 6-3 6-4 6-4 6-5 Storage compartment ...Glove box ...Center console box ...Center panel compartment (if equipped)...Overhead console (if equipped) ...Pocket ... 6-5 6-5 6-6...
...remove the cover housing ...To remove the rear gate board ...Stowage of the cargo area cover and rear gate board ...To install the cover housing ...To install the rear gate board ... 6-13 6-14 6-14 6-14 6-15 6-15 6-16 6-16 Map light ...Sun visors ......Sun visor extension plate ...Vanity mirror with light ... 6-3 6-4 6-4 6-5 Storage compartment ...Glove box ...Center console box ...Center panel compartment (if equipped)...Overhead console (if equipped) ...Pocket ... 6-5 6-5 6-6...

Owner's Manual
Page 352
... ...Wheel replacement... 11-34 11-35 11-36 11-38 11-38 11-38 11-39 11-39 11-40 Fuses ...Main fuse...Installation of accessories ...Replacing bulbs ...Headlight...Front turn signal/Parking and front side marker light ...Front fog light (if equipped)...Rear combination lights ...Back...-up light (Station wagon) ...License plate light ...Dome light...Map light ...Vanity mirror light ...Door step light...Cargo area light (Station wagon) ...Trunk light (Sedan) ...High mount stop light (Sedan)... 11-47 11-49 11-49...
... ...Wheel replacement... 11-34 11-35 11-36 11-38 11-38 11-38 11-39 11-39 11-40 Fuses ...Main fuse...Installation of accessories ...Replacing bulbs ...Headlight...Front turn signal/Parking and front side marker light ...Front fog light (if equipped)...Rear combination lights ...Back...-up light (Station wagon) ...License plate light ...Dome light...Map light ...Vanity mirror light ...Door step light...Cargo area light (Station wagon) ...Trunk light (Sedan) ...High mount stop light (Sedan)... 11-47 11-49 11-49...

Owner's Manual
Page 408
Reinstall the lens. & Door step light 2. Pull the bulb straight downward to remove it. 3. Install a new bulb. Remove the lens by prying the edge of the lens with a flat-head screwdriver. 1. Remove the lens by prying the edge of the socket. Reinstall the lens. 1. Pull the bulb out of the lens with a flat-head screwdriver. 2. Turn the bulb until the flat surfaces at its ends are aligned vertically. 11-58 Maintenance and service & Vanity mirror light 3. Install a new bulb. 4.
Reinstall the lens. & Door step light 2. Pull the bulb straight downward to remove it. 3. Install a new bulb. Remove the lens by prying the edge of the lens with a flat-head screwdriver. 1. Remove the lens by prying the edge of the socket. Reinstall the lens. 1. Pull the bulb out of the lens with a flat-head screwdriver. 2. Turn the bulb until the flat surfaces at its ends are aligned vertically. 11-58 Maintenance and service & Vanity mirror light 3. Install a new bulb. 4.
Owner's Manual
Page 73
... projectiles that monitors the tension of impact. The occupant detection system may prevent the SUBARU advanced frontal airbag system from the sensors, the occupant detection system determines whether the ... . For adjusting procedure, refer to the windshield, or fit an extra-wide mirror over the rear view mirror. Failure to do so may not inflate the front passenger's SRS frontal airbag ...Chapter 1 in different ways depending on the severity of the front passenger seatbelt. Do not install any of impact. Front passenger's SRS frontal airbag The front passenger's SRS frontal airbag ...
... projectiles that monitors the tension of impact. The occupant detection system may prevent the SUBARU advanced frontal airbag system from the sensors, the occupant detection system determines whether the ... . For adjusting procedure, refer to the windshield, or fit an extra-wide mirror over the rear view mirror. Failure to do so may not inflate the front passenger's SRS frontal airbag ...Chapter 1 in different ways depending on the severity of the front passenger seatbelt. Do not install any of impact. Front passenger's SRS frontal airbag The front passenger's SRS frontal airbag ...
Owner's Manual
Page 224
...remove the cover housing ...To remove the rear gate board ...Stowage of the cargo area cover and rear gate board ...To install the cover housing ...To install the rear gate board ... 6-13 6-14 6-14 6-14 6-15 6-15 6-16 6-16 Map light ...Sun visors ......Sun visor extension plate ...Vanity mirror with light ... 6-3 6-4 6-4 6-5 Storage compartment ...Glove box ...Center console box ...Center panel compartment (if equipped)...Overhead console (if equipped) ...Pocket ... 6-5 6-5 6-6...
...remove the cover housing ...To remove the rear gate board ...Stowage of the cargo area cover and rear gate board ...To install the cover housing ...To install the rear gate board ... 6-13 6-14 6-14 6-14 6-15 6-15 6-16 6-16 Map light ...Sun visors ......Sun visor extension plate ...Vanity mirror with light ... 6-3 6-4 6-4 6-5 Storage compartment ...Glove box ...Center console box ...Center panel compartment (if equipped)...Overhead console (if equipped) ...Pocket ... 6-5 6-5 6-6...

Owner's Manual
Page 352
... ...Wheel replacement... 11-34 11-35 11-36 11-38 11-38 11-38 11-39 11-39 11-40 Fuses ...Main fuse...Installation of accessories ...Replacing bulbs ...Headlight...Front turn signal/Parking and front side marker light ...Front fog light (if equipped)...Rear combination lights ...Back...-up light (Station wagon) ...License plate light ...Dome light...Map light ...Vanity mirror light ...Door step light...Cargo area light (Station wagon) ...Trunk light (Sedan) ...High mount stop light (Sedan)... 11-47 11-49 11-49...
... ...Wheel replacement... 11-34 11-35 11-36 11-38 11-38 11-38 11-39 11-39 11-40 Fuses ...Main fuse...Installation of accessories ...Replacing bulbs ...Headlight...Front turn signal/Parking and front side marker light ...Front fog light (if equipped)...Rear combination lights ...Back...-up light (Station wagon) ...License plate light ...Dome light...Map light ...Vanity mirror light ...Door step light...Cargo area light (Station wagon) ...Trunk light (Sedan) ...High mount stop light (Sedan)... 11-47 11-49 11-49...

Owner's Manual
Page 408
Pull the bulb out of the lens with a flat-head screwdriver. 2. Pull the bulb straight downward to remove it. 3. Remove the lens by prying the edge of the lens with a flat-head screwdriver. 1. Remove the lens by prying the edge of the socket. Reinstall the lens. & Door step light 2. Install a new bulb. 4. Reinstall the lens. 1. 11-58 Maintenance and service & Vanity mirror light 3. Install a new bulb. Turn the bulb until the flat surfaces at its ends are aligned vertically.
Pull the bulb out of the lens with a flat-head screwdriver. 2. Pull the bulb straight downward to remove it. 3. Remove the lens by prying the edge of the lens with a flat-head screwdriver. 1. Remove the lens by prying the edge of the socket. Reinstall the lens. & Door step light 2. Install a new bulb. 4. Reinstall the lens. 1. 11-58 Maintenance and service & Vanity mirror light 3. Install a new bulb. Turn the bulb until the flat surfaces at its ends are aligned vertically.


