
Owners Manual
Page 520
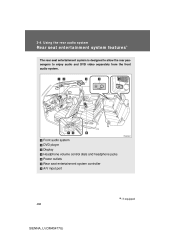
3 -4 . Front audio system DVD player Display Headphone volume control dials and headphone jacks Power outlets Rear seat entertainment system controller A/V input port ∗: If equipped 488 SIENNA_U (OM45477U) U sing t he re a r a udio syst e m Re a r se at e nt e r t a inm e nt syst e m fe at ure s ∗ The rear seat entertainment system is designed to allow the rear passengers to enjoy audio and DVD video separately from the front audio system.
3 -4 . Front audio system DVD player Display Headphone volume control dials and headphone jacks Power outlets Rear seat entertainment system controller A/V input port ∗: If equipped 488 SIENNA_U (OM45477U) U sing t he re a r a udio syst e m Re a r se at e nt e r t a inm e nt syst e m fe at ure s ∗ The rear seat entertainment system is designed to allow the rear passengers to enjoy audio and DVD video separately from the front audio system.

Owners Manual
Page 526
Using the rear audio system Headphone jacks To use the headphones, connect them to increase the volume. To adjust the volume Turn the knob clockwise to the jack. Turn the knob counterclockwise to decrease the volume. 3-4.
Using the rear audio system Headphone jacks To use the headphones, connect them to increase the volume. To adjust the volume Turn the knob clockwise to the jack. Turn the knob counterclockwise to decrease the volume. 3-4.
Owners Manual
Page 684
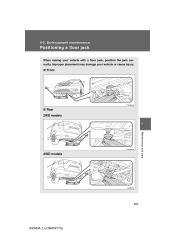
Improper placement may damage your vehicle with a floor jack, position the jack correctly. Do-it -yourse lf m a int e na nc e Posit ioning a floor ja ck When raising your vehicle or cause injury. 4 -3 .
Improper placement may damage your vehicle with a floor jack, position the jack correctly. Do-it -yourse lf m a int e na nc e Posit ioning a floor ja ck When raising your vehicle or cause injury. 4 -3 .
Owners Manual
Page 778
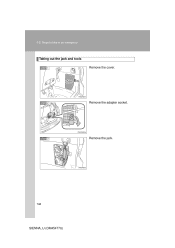
STEP 3 Remove the jack. 748 SIENNA_U (OM45477U) 5-2. STEP 2 Remove the adapter socket. Steps to take in an emergency Taking out the jack and tools STEP 1 Remove the cover.
STEP 3 Remove the jack. 748 SIENNA_U (OM45477U) 5-2. STEP 2 Remove the adapter socket. Steps to take in an emergency Taking out the jack and tools STEP 1 Remove the cover.

Owners Manual
Page 779
5-2. Taking out the spare tire STEP 1 Slide the front passenger's seat to the frontmost lock position and the right side second seat to the rearmost lock position so they will find the spare tire clamp bolt. STEP 2 5 When trouble arises 749 SIENNA_U (OM45477U) Pull back the flap to take in an emergency STEP 4 Remove the wheel nut wrench. Steps to find the flap on the floor. Open the right side sliding door and you will not interfere with the jack handle.
5-2. Taking out the spare tire STEP 1 Slide the front passenger's seat to the frontmost lock position and the right side second seat to the rearmost lock position so they will find the spare tire clamp bolt. STEP 2 5 When trouble arises 749 SIENNA_U (OM45477U) Pull back the flap to take in an emergency STEP 4 Remove the wheel nut wrench. Steps to find the flap on the floor. Open the right side sliding door and you will not interfere with the jack handle.

Owners Manual
Page 780
Connect the jack handle and the adapter socket. The tire will be lowered completely to take in an emergency STEP 3 Attach the adapter socket over the spare tire clamp bolt. STEP 4 Take the spare tire out from underneath the vehicle and remove the holding bracket. 750 SIENNA_U (OM45477U) Turn the jack handle. 5-2. Steps to the ground.
Connect the jack handle and the adapter socket. The tire will be lowered completely to take in an emergency STEP 3 Attach the adapter socket over the spare tire clamp bolt. STEP 4 Take the spare tire out from underneath the vehicle and remove the holding bracket. 750 SIENNA_U (OM45477U) Turn the jack handle. 5-2. Steps to the ground.
Owners Manual
Page 782
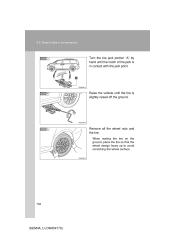
STEP 4 Raise the vehicle until the notch of the jack is in an emergency STEP 3 Turn the tire jack portion "A" by hand until the tire is slightly raised off the ground. STEP 5 Remove all the wheel nuts and the tire. When resting the tire on the ground, place the tire so that the wheel design faces up to take in contact with the jack point. 5-2. Steps to avoid scratching the wheel surface. 752 SIENNA_U (OM45477U)
STEP 4 Raise the vehicle until the notch of the jack is in an emergency STEP 3 Turn the tire jack portion "A" by hand until the tire is slightly raised off the ground. STEP 5 Remove all the wheel nuts and the tire. When resting the tire on the ground, place the tire so that the wheel design faces up to take in contact with the jack point. 5-2. Steps to avoid scratching the wheel surface. 752 SIENNA_U (OM45477U)
Owners Manual
Page 784
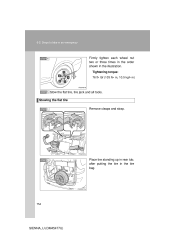
STEP 2 Place tire standing up in rear tub, after putting the tire in the illustration. Tightening torque: 76 ft• lbf (103 N• m, 10.5 kgf• m) STEP 5 Stow the flat tire, tire jack and all tools. Steps to take in an emergency STEP 4 Firmly tighten each wheel nut two or three times in the order shown in the tire bag. 754 SIENNA_U (OM45477U) 5-2. Stowing the flat tire STEP 1 Remove clasps and strap.
STEP 2 Place tire standing up in rear tub, after putting the tire in the illustration. Tightening torque: 76 ft• lbf (103 N• m, 10.5 kgf• m) STEP 5 Stow the flat tire, tire jack and all tools. Steps to take in an emergency STEP 4 Firmly tighten each wheel nut two or three times in the order shown in the tire bag. 754 SIENNA_U (OM45477U) 5-2. Stowing the flat tire STEP 1 Remove clasps and strap.