
Owners Manual
Page 6
... warning light checking method ...4-4 Switches ...4-5 Accelerator pedal ...4-11 Brake pedal ...4-12 Parking brake lever ...4-13 2 3 Drive select lever ...4-14 Fuel tank cap ...4-14 Fuel level check window ...4-15 Starter (choke) ...4-15 Seats ...4-16 Seat belts ...4-17 Cargo bed ...4-19 Front and rear shock absorber adjustment ...4-22 Trailer hitch bracket ...4-24 Auxiliary DC jack...4-24 5 PRE-OPERATION CHECKS ...5-1 Front and rear brakes ...5-2 Fuel ...5-4 Engine oil ...5-5 Coolant...5-6 Final gear oil ...5-7 Differential gear oil ...5-7 Accelerator pedal ...5-7 Seat belts ...5-7 Steering...
... warning light checking method ...4-4 Switches ...4-5 Accelerator pedal ...4-11 Brake pedal ...4-12 Parking brake lever ...4-13 2 3 Drive select lever ...4-14 Fuel tank cap ...4-14 Fuel level check window ...4-15 Starter (choke) ...4-15 Seats ...4-16 Seat belts ...4-17 Cargo bed ...4-19 Front and rear shock absorber adjustment ...4-22 Trailer hitch bracket ...4-24 Auxiliary DC jack...4-24 5 PRE-OPERATION CHECKS ...5-1 Front and rear brakes ...5-2 Fuel ...5-4 Engine oil ...5-5 Coolant...5-6 Final gear oil ...5-7 Differential gear oil ...5-7 Accelerator pedal ...5-7 Seat belts ...5-7 Steering...
Owners Manual
Page 7
... operate your vehicle ...7-5 Turning your vehicle...7-6 Braking ...7-7 Going uphill...7-7 Going downhill ...7-9 Crossing through shallow water ...7-11 Riding over rough terrain...7-13 Riding in brush or wooded areas...7-14 Encountering obstacles on the trail ...7-15 8 PERIODIC MAINTENANCE AND ADJUSTMENT ...8-1 Owner's manual and tool kit...8-1 Periodic maintenance/ lubrication ...8-4 Hood ...8-6 Console...8-8 Engine oil and oil filter cartridge ...8-9 Final gear oil ...8-13 Differential gear oil...8-15 Coolant ...8-17 Axle boots...8-19 Spark plug inspection ...8-20 Air filter element cleaning...
... operate your vehicle ...7-5 Turning your vehicle...7-6 Braking ...7-7 Going uphill...7-7 Going downhill ...7-9 Crossing through shallow water ...7-11 Riding over rough terrain...7-13 Riding in brush or wooded areas...7-14 Encountering obstacles on the trail ...7-15 8 PERIODIC MAINTENANCE AND ADJUSTMENT ...8-1 Owner's manual and tool kit...8-1 Periodic maintenance/ lubrication ...8-4 Hood ...8-6 Console...8-8 Engine oil and oil filter cartridge ...8-9 Final gear oil ...8-13 Differential gear oil...8-15 Coolant ...8-17 Axle boots...8-19 Spark plug inspection ...8-20 Air filter element cleaning...
Owners Manual
Page 8
...; SIDE VEHICLE LIMITED WARRANTY ...13-1 10 11 12 13 Storage ...9-3 SPECIFICATIONS ...10-1 NOISE REGULATION...11-1 MAINTENANCE RECORD ...12-1 YAMAHA MOTOR CORPORATION, U.S.A. V-belt cooling duct check hose ...8-26 V-belt case drain plug...8-26 Spark arrester cleaning ...8-27 Carburetor adjustment...8-29 Idle speed adjustment ...8-29 Valve clearance adjustment ...8-30 Front brake pad check ...8-30 Rear brake pad check ...8-31 Checking the brake fluid level ...8-32 Brake fluid replacement...8-33 Checking the brake pedal ...8-33 Parking brake cable free play adjustment...8-34 Brake light switch...
...; SIDE VEHICLE LIMITED WARRANTY ...13-1 10 11 12 13 Storage ...9-3 SPECIFICATIONS ...10-1 NOISE REGULATION...11-1 MAINTENANCE RECORD ...12-1 YAMAHA MOTOR CORPORATION, U.S.A. V-belt cooling duct check hose ...8-26 V-belt case drain plug...8-26 Spark arrester cleaning ...8-27 Carburetor adjustment...8-29 Idle speed adjustment ...8-29 Valve clearance adjustment ...8-30 Front brake pad check ...8-30 Rear brake pad check ...8-31 Checking the brake fluid level ...8-32 Brake fluid replacement...8-33 Checking the brake pedal ...8-33 Parking brake cable free play adjustment...8-34 Brake light switch...

Owners Manual
Page 12
...the vehicle with cargo or towing a trailer: Reduce speed and allow more room to stop. YAMAHA 5UG-K7764-00 WARNING Severe INJURY or DEATH can affect handling and stability. Be sure cargo is secured - Top-heavy loads increase the risk of overturn. YAMAHA ... bed. Avoid hills and rough terrain. When loading with bed up. a loose load could change handling unexpectedly. Read Owner's Manual before loading or towing. 3 4 WARNING Keep hands, body, other persons away when closing bed. Never carry passengers in Cargo Bed:181kg. (400lb). Keep weight in the cargo bed centered,...
...the vehicle with cargo or towing a trailer: Reduce speed and allow more room to stop. YAMAHA 5UG-K7764-00 WARNING Severe INJURY or DEATH can affect handling and stability. Be sure cargo is secured - Top-heavy loads increase the risk of overturn. YAMAHA ... bed. Avoid hills and rough terrain. When loading with bed up. a loose load could change handling unexpectedly. Read Owner's Manual before loading or towing. 3 4 WARNING Keep hands, body, other persons away when closing bed. Never carry passengers in Cargo Bed:181kg. (400lb). Keep weight in the cargo bed centered,...
Owners Manual
Page 14
... a seat belt when riding in 4WD-LOCK ("DIFF.LOCK") takes more effort. make sharp, high-speed turns-the vehicle could roll over or go out of overturn. 7 WARNING Turning the off -highway utility vehicle will handle and maneuver differently from an ordinary passenger car or other hazards that could cause the vehicle to overturn. ALWAYS USE AN APPROVED HELMET AND PROTECTIVE GEAR NEVER operate through water deeper...
... a seat belt when riding in 4WD-LOCK ("DIFF.LOCK") takes more effort. make sharp, high-speed turns-the vehicle could roll over or go out of overturn. 7 WARNING Turning the off -highway utility vehicle will handle and maneuver differently from an ordinary passenger car or other hazards that could cause the vehicle to overturn. ALWAYS USE AN APPROVED HELMET AND PROTECTIVE GEAR NEVER operate through water deeper...
Owners Manual
Page 15
..., including sidewalks, driveways, parking lots, and streets. G Never give a ride to a passenger who is designed to reach and hold the handgrip on any public street, road, or highway, even a dirt or gravel one passenger. G Never operate this vehicle. G Never operate at a speed that fits properly. G Always be sure the driver and passenger are wearing seat belts. You should also wear...
..., including sidewalks, driveways, parking lots, and streets. G Never give a ride to a passenger who is designed to reach and hold the handgrip on any public street, road, or highway, even a dirt or gravel one passenger. G Never operate this vehicle. G Never operate at a speed that fits properly. G Always be sure the driver and passenger are wearing seat belts. You should also wear...

Owners Manual
Page 20
Brake fluid reservoir 4. Tail/brake lights 11. Headlights 2. Air filter element 5. Driver seat belt 8. Rear shock absorber assembly adjusting ring 12. Passenger seat belt 15. Battery 19. Driver seat 7. Cargo bed 10. Radiator cap 22. EBU00320 1- Spark plug 9. V-belt case 6. Cargo bed release lever 13. DESCRIPTION AND VEHICLE IDENTIFICATION 1. Front shock absorber assembly adjusting ring 3. Spark arrester 14. Passenger seat 16. Oil filter cartridge 17. Engine oil dipstick 18. Fuses 20. Coolant reservoir 21. Fuel level check window 23. Fuel tank ...
Brake fluid reservoir 4. Tail/brake lights 11. Headlights 2. Air filter element 5. Driver seat belt 8. Rear shock absorber assembly adjusting ring 12. Passenger seat belt 15. Battery 19. Driver seat 7. Cargo bed 10. Radiator cap 22. EBU00320 1- Spark plug 9. V-belt case 6. Cargo bed release lever 13. DESCRIPTION AND VEHICLE IDENTIFICATION 1. Front shock absorber assembly adjusting ring 3. Spark arrester 14. Passenger seat 16. Oil filter cartridge 17. Engine oil dipstick 18. Fuses 20. Coolant reservoir 21. Fuel level check window 23. Fuel tank ...
Owners Manual
Page 21
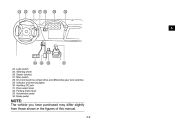
Main switch 28. Drive select lever 32. Steering wheel 26. 1 2 3 4 5 6 7 8 24. Starter (choke) 27. Indicator and warning lights 30. Accelerator pedal 34. On-Command four-wheel drive and differential gear lock switches 29. Light switch 25. Parking brake lever 33. Auxiliary DC jack 31. Brake pedal 9 10 11 12 13 14 NOTE: _ The vehicle you have purchased may differ slightly from those shown in the figures of this manual. _ 3-2
Main switch 28. Drive select lever 32. Steering wheel 26. 1 2 3 4 5 6 7 8 24. Starter (choke) 27. Indicator and warning lights 30. Accelerator pedal 34. On-Command four-wheel drive and differential gear lock switches 29. Light switch 25. Parking brake lever 33. Auxiliary DC jack 31. Brake pedal 9 10 11 12 13 14 NOTE: _ The vehicle you have purchased may differ slightly from those shown in the figures of this manual. _ 3-2
Owners Manual
Page 43
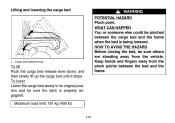
... be sure the latch is being lowered. HOW TO AVOID THE HAZARD Before closing the bed, be pinched between the bed and the frame. 1. Cargo bed release lever To lift Push the cargo bed release lever down, and then slowly lift up the cargo bed until it stops. Keep hands and fingers away from the vehicle. Lifting and lowering the cargo bed WARNING POTENTIAL HAZARD Pinch...
... be sure the latch is being lowered. HOW TO AVOID THE HAZARD Before closing the bed, be pinched between the bed and the frame. 1. Cargo bed release lever To lift Push the cargo bed release lever down, and then slowly lift up the cargo bed until it stops. Keep hands and fingers away from the vehicle. Lifting and lowering the cargo bed WARNING POTENTIAL HAZARD Pinch...
Owners Manual
Page 51
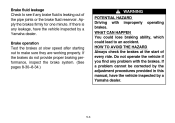
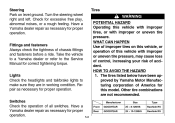
... braking performance, inspect the brake system. (See pages 8-30-8-34.) WARNING POTENTIAL HAZARD Driving with the brakes. WHAT CAN HAPPEN You could lose braking ability, which could lead to make sure they are working properly. If there is leaking out of every ride. If a problem cannot be corrected by the adjustment procedures provided in this manual, have the vehicle inspected by a Yamaha dealer. 5-3 Brake fluid...
... braking performance, inspect the brake system. (See pages 8-30-8-34.) WARNING POTENTIAL HAZARD Driving with the brakes. WHAT CAN HAPPEN You could lose braking ability, which could lead to make sure they are working properly. If there is leaking out of every ride. If a problem cannot be corrected by the adjustment procedures provided in this manual, have the vehicle inspected by a Yamaha dealer. 5-3 Brake fluid...
Owners Manual
Page 56
... tires, or with improper or uneven tire pressure, may cause loss of control, increasing your risk of this model. HOW TO AVOID THE HAZARD 1. EBU10030 Lights Check the headlights and tail/brake lights to the Service Manual for proper operation. Repair as necessary for correct tightening torque. Have a Yamaha dealer repair as necessary for excessive free play, abnormal noises, or a rough feeling. Manufacturer Front Rear GOODYEAR GOODYEAR Size...
... tires, or with improper or uneven tire pressure, may cause loss of control, increasing your risk of this model. HOW TO AVOID THE HAZARD 1. EBU10030 Lights Check the headlights and tail/brake lights to the Service Manual for proper operation. Repair as necessary for correct tightening torque. Have a Yamaha dealer repair as necessary for excessive free play, abnormal noises, or a rough feeling. Manufacturer Front Rear GOODYEAR GOODYEAR Size...
Owners Manual
Page 61
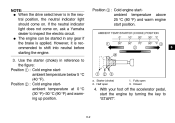
..., start the engine by turning the key to shift into neutral before starting the engine. _ _ Position 3 : Cold engine startambient temperature above 25 °C (80 °F) and warm engine start position. 1 2 3 4 5 6 7 8 9 10 3. Fully open 1. However, it is applied. Starter (choke) 2. Use the starter (choke) in reference to inspect the electric circuit. If the neutral indicator light does not come on , ask a Yamaha dealer to the figure: Position 1 : Cold engine...
..., start the engine by turning the key to shift into neutral before starting the engine. _ _ Position 3 : Cold engine startambient temperature above 25 °C (80 °F) and warm engine start position. 1 2 3 4 5 6 7 8 9 10 3. Fully open 1. However, it is applied. Starter (choke) 2. Use the starter (choke) in reference to inspect the electric circuit. If the neutral indicator light does not come on , ask a Yamaha dealer to the figure: Position 1 : Cold engine...
Owners Manual
Page 65
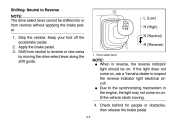
...: G When in the engine, the light may not come on, ask a Yamaha dealer to the synchronizing mechanism in reverse, the reverse indicator light should be shifted into or from neutral to Reverse NOTE: The drive select lever cannot be on until the vehicle starts moving the drive select lever along the shift guide. 1. Apply the brake pedal. 3. If the light does not come...
...: G When in the engine, the light may not come on, ask a Yamaha dealer to the synchronizing mechanism in reverse, the reverse indicator light should be shifted into or from neutral to Reverse NOTE: The drive select lever cannot be on until the vehicle starts moving the drive select lever along the shift guide. 1. Apply the brake pedal. 3. If the light does not come...
Owners Manual
Page 77
... 5-1-5-11. The centrifugal clutch will start the engine. Avoid higher speeds until you are ready to accelerate. Take the time to lose traction, reducing control and increasing the possibility of the accelerator pedal, brakes, steering, and drive select lever. With the engine idling, shift the drive select lever into low or high. Also practice driving in four-wheel drive (4WD) and four-wheel drive with the differential locked (DIFF. Press the...
... 5-1-5-11. The centrifugal clutch will start the engine. Avoid higher speeds until you are ready to accelerate. Take the time to lose traction, reducing control and increasing the possibility of the accelerator pedal, brakes, steering, and drive select lever. With the engine idling, shift the drive select lever into low or high. Also practice driving in four-wheel drive (4WD) and four-wheel drive with the differential locked (DIFF. Press the...
Owners Manual
Page 88
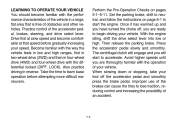
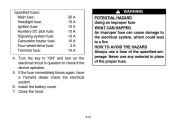
The most efficient condition possible. WHAT CAN HAPPEN Moving parts can start fires. Put the owner's tool kit and tire pressure gauge in the safest and most important points of the body, causing injury. EBU05620 WARNING POTENTIAL HAZARD Servicing an engine while it on the following pages. HOW TO AVOID THE HAZARD Turn off the engine when performing maintenance unless otherwise specified. 8-1 Owner's manual and tool kit You are recommended...
The most efficient condition possible. WHAT CAN HAPPEN Moving parts can start fires. Put the owner's tool kit and tire pressure gauge in the safest and most important points of the body, causing injury. EBU05620 WARNING POTENTIAL HAZARD Servicing an engine while it on the following pages. HOW TO AVOID THE HAZARD Turn off the engine when performing maintenance unless otherwise specified. 8-1 Owner's manual and tool kit You are recommended...
Owners Manual
Page 123
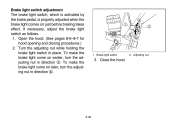
... hood. 8-36 EBU90006 Brake light switch adjustment The brake light switch, which is activated by the brake pedal, is properly adjusted when the brake light comes on earlier, turn the adjusting nut in direction b. 1. If necessary, adjust the brake light switch as follows. 1. To make the brake light come on just before braking takes effect. Turn the adjusting nut while holding the brake light switch in direction a. Brake light switch 2. Adjusting nut 3. Open the hood...
... hood. 8-36 EBU90006 Brake light switch adjustment The brake light switch, which is activated by the brake pedal, is properly adjusted when the brake light comes on earlier, turn the adjusting nut in direction b. 1. If necessary, adjust the brake light switch as follows. 1. To make the brake light come on just before braking takes effect. Turn the adjusting nut while holding the brake light switch in direction a. Brake light switch 2. Adjusting nut 3. Open the hood...
Owners Manual
Page 130
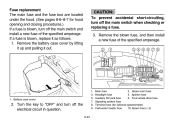
Remove the battery case cover by lifting it up and pulling it as follows. 1. CAUTION: _ To prevent accidental short-circuiting, turn off the electrical circuit in question. 8-43 1. 3. 5. 7. 8. 9. Turn the key to "OFF" and turn off the main switch and install a new fuse of the specified amperage. 1. Ignition fuse Auxiliary DC jack fuse 6. Four-wheel-drive fuse Signaling system fuse Terminal fuse (for hood opening and closing procedures.) If a fuse is blown, replace it...
Remove the battery case cover by lifting it up and pulling it as follows. 1. CAUTION: _ To prevent accidental short-circuiting, turn off the electrical circuit in question. 8-43 1. 3. 5. 7. 8. 9. Turn the key to "OFF" and turn off the main switch and install a new fuse of the specified amperage. 1. Ignition fuse Auxiliary DC jack fuse 6. Four-wheel-drive fuse Signaling system fuse Terminal fuse (for hood opening and closing procedures.) If a fuse is blown, replace it...
Owners Manual
Page 131
Install the battery cover. 7. Never use a fuse of the proper fuse. 4. If the fuse immediately blows again, have a Yamaha dealer check the electrical system. 6. Close the hood. 8-44 HOW TO AVOID THE HAZARD Always use any material in question to check if the device operates. 5. Turn the key to a fire. Specified fuses: Main fuse: Headlight fuse: Ignition fuse: Auxiliary DC jack fuse: Signaling system fuse: Carburetor heater fuse: Four-wheel-drive fuse: Terminal fuse: WARNING 30 A 15 A 10 A 10...
Install the battery cover. 7. Never use a fuse of the proper fuse. 4. If the fuse immediately blows again, have a Yamaha dealer check the electrical system. 6. Close the hood. 8-44 HOW TO AVOID THE HAZARD Always use any material in question to check if the device operates. 5. Turn the key to a fire. Specified fuses: Main fuse: Headlight fuse: Ignition fuse: Auxiliary DC jack fuse: Signaling system fuse: Carburetor heater fuse: Four-wheel-drive fuse: Terminal fuse: WARNING 30 A 15 A 10 A 10...
Owners Manual
Page 139
... extend the useful life of wheel bearings, brakes, transmission seals and electrical devices. Rinse the dirt and degreaser off immediately with clean water and dry all filler caps are properly installed. 2. A plastic bag and strong rubber band may cause water seepage and deterioration of many components. 1. Make sure the spark plug and all surfaces with a garden hose. Use only enough pressure to the wheel axles...
... extend the useful life of wheel bearings, brakes, transmission seals and electrical devices. Rinse the dirt and degreaser off immediately with clean water and dry all filler caps are properly installed. 2. A plastic bag and strong rubber band may cause water seepage and deterioration of many components. 1. Make sure the spark plug and all surfaces with a garden hose. Use only enough pressure to the wheel axles...
Owners Manual
Page 148
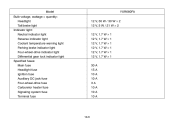
Model Bulb voltage, wattage × quantity: Headlight Tail/brake light Indicator light: Neutral indicator light Reverse indicator light Coolant temperature warning light Parking brake indicator light Four-wheel-drive indicator light Differential gear lock indicator light Specified fuses: Main fuse Headlight fuse Ignition fuse Auxiliary DC jack fuse Four-wheel-drive fuse Carburetor heater fuse Signaling system fuse Terminal fuse YXR660FA 12 V, 30 W / 30 W × 2 12 V, 5 W / 21 W × 2 12 V, 1.7 W × 1 12 V, 1.7 W × 1 12 V, 1.7 W × 1 12 V, 1.7 W × 1 12 V, 1.7 W × 1...
Model Bulb voltage, wattage × quantity: Headlight Tail/brake light Indicator light: Neutral indicator light Reverse indicator light Coolant temperature warning light Parking brake indicator light Four-wheel-drive indicator light Differential gear lock indicator light Specified fuses: Main fuse Headlight fuse Ignition fuse Auxiliary DC jack fuse Four-wheel-drive fuse Carburetor heater fuse Signaling system fuse Terminal fuse YXR660FA 12 V, 30 W / 30 W × 2 12 V, 5 W / 21 W × 2 12 V, 1.7 W × 1 12 V, 1.7 W × 1 12 V, 1.7 W × 1 12 V, 1.7 W × 1 12 V, 1.7 W × 1...