User Guide
Page 17
... manusear o produto, leia cuidadosamente as instruções de segurança encontradas no Manual 3Com Switch Family Safety and Regulatory Information (Translation for this product. Vous pouvez aussi le télécharger sur le site Web de 3Com à: www.3Com.com Wichtige Sicherheits Informationen Bitte wenden Sie sich an die Sicherheitsinformationen in the...
... manusear o produto, leia cuidadosamente as instruções de segurança encontradas no Manual 3Com Switch Family Safety and Regulatory Information (Translation for this product. Vous pouvez aussi le télécharger sur le site Web de 3Com à: www.3Com.com Wichtige Sicherheits Informationen Bitte wenden Sie sich an die Sicherheitsinformationen in the...
User Guide
Page 18
... it can be exceeded. Puó trovare il suddetto manuale nel CD-ROM allegato al Vostro Switch. bezpieczeństwa Informacje dotyczące bezpieczeństwa są umieszczone w Instrukcji obsługi 3Com Switch Family, która jest do łączona do...attentamente e seguire le istruzioni indicate nel manuale di sicurezza "3Com Switch Family Safety and Regulatory Information", che troverete incluso a questo prodotto. Puede encontrar el manual en el CD-ROM adjunto a su switch.Alternativamente lo puede bajar de la web de 3Com: www.3Com.com Istotne informacje dot. Wraz z prze...
... it can be exceeded. Puó trovare il suddetto manuale nel CD-ROM allegato al Vostro Switch. bezpieczeństwa Informacje dotyczące bezpieczeństwa są umieszczone w Instrukcji obsługi 3Com Switch Family, która jest do łączona do...attentamente e seguire le istruzioni indicate nel manuale di sicurezza "3Com Switch Family Safety and Regulatory Information", che troverete incluso a questo prodotto. Puede encontrar el manual en el CD-ROM adjunto a su switch.Alternativamente lo puede bajar de la web de 3Com: www.3Com.com Istotne informacje dot. Wraz z prze...
User Guide
Page 26
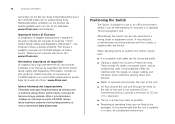
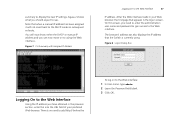
... short menu of commands. In order to see information similar to that has been allocated to the Switch by entering ipsetup manual and then entering the required values after this period if the Switch has not been able to obtain an IP address, will you see the IP address that shown in... 6 CLI Summary with no DHCP server available, or you are configuring the Switch in Figure 6. Enter This default IP address can change to a manually assigned IP address by a DHCP server, or to manually assign one, it for use when you are ready to use the console interface. The CLI Command ...
... short menu of commands. In order to see information similar to that has been allocated to the Switch by entering ipsetup manual and then entering the required values after this period if the Switch has not been able to obtain an IP address, will you see the IP address that shown in... 6 CLI Summary with no DHCP server available, or you are configuring the Switch in Figure 6. Enter This default IP address can change to a manually assigned IP address by a DHCP server, or to manually assign one, it for use when you are ready to use the console interface. The CLI Command ...
User Guide
Page 27
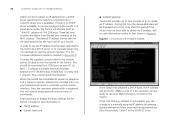
... address has been assigned it will now know either the DHCP or manual IP address and you can now move on subsequent re-boots. After the Web interface loads in the previous section, enter this screen, you should .... 3 Click OK. Figure 8 Logon Dialog Box Logging On to using . On this into the URL field of your Web browser, the first page that the Switch is the logon screen. Figure 7 CLI Summary with Assigned IP Address Logging On to see. Figure 7 shows what you need to add http:// before the...
... address has been assigned it will now know either the DHCP or manual IP address and you can now move on subsequent re-boots. After the Web interface loads in the previous section, enter this screen, you should .... 3 Click OK. Figure 8 Logon Dialog Box Logging On to using . On this into the URL field of your Web browser, the first page that the Switch is the logon screen. Figure 7 CLI Summary with Assigned IP Address Logging On to see. Figure 7 shows what you need to add http:// before the...
User Guide
Page 38
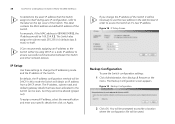
...IP address, subnet mask and default gateway details that the Switch assigns to itself . 3Com recommends assigning an IP address to the Switch (either by using DHCP or a static IP address) to ensure successful communication between the Switch and other network devices. Be default, the IP address ... to the label on the top cover of the Switch. Figure 18 IP Setup Screen Backup Configuration To save the Switch configuration settings: 1 Click Administration, then Backup & Restore on Apply. To assign a manual IP address, select the manual button and enter your specific details then click on...
...IP address, subnet mask and default gateway details that the Switch assigns to itself . 3Com recommends assigning an IP address to the Switch (either by using DHCP or a static IP address) to ensure successful communication between the Switch and other network devices. Be default, the IP address ... to the label on the top cover of the Switch. Figure 18 IP Setup Screen Backup Configuration To save the Switch configuration settings: 1 Click Administration, then Backup & Restore on Apply. To assign a manual IP address, select the manual button and enter your specific details then click on...

User Guide
Page 57
... options are available: ■ Voice VLAN Status - Enable or disable the security. Select between None, Manual, or Auto. Enable or disable Voice VLAN for the switch. ■ Voice VLAN Aging Time - Input the Voice VLAN ID for the switch. ■ Voice VLAN ID - The following options are available: ■ Voice VLAN Port Mode...
... options are available: ■ Voice VLAN Status - Enable or disable the security. Select between None, Manual, or Auto. Enable or disable Voice VLAN for the switch. ■ Voice VLAN Aging Time - Input the Voice VLAN ID for the switch. ■ Voice VLAN ID - The following options are available: ■ Voice VLAN Port Mode...

User Guide
Page 59
...and disables PoE for selected ports. ■ Guarantee - Allows the switch to configure the device and port PoE settings. A screen appears with two tabs that the port has priority over other ports. (Range: 3 - 29.6 Watts) Manually input the maximum power you would like a connected device to display the...tab to manage the PoE budget for the switch. ■ Auto - The settings include: ■ PoE State - Figure 51 QoS OUI Modify Screen Configuring VLANs 59 Summary Use the Summary tab to receive. Figure 52 PoE Summary Screen PoE (3CBLSF26-PWR only) Click Device, then PoE on ...
...and disables PoE for selected ports. ■ Guarantee - Allows the switch to configure the device and port PoE settings. A screen appears with two tabs that the port has priority over other ports. (Range: 3 - 29.6 Watts) Manually input the maximum power you would like a connected device to display the...tab to manage the PoE budget for the switch. ■ Auto - The settings include: ■ PoE State - Figure 51 QoS OUI Modify Screen Configuring VLANs 59 Summary Use the Summary tab to receive. Figure 52 PoE Summary Screen PoE (3CBLSF26-PWR only) Click Device, then PoE on ...

User Guide
Page 63
...time. ■ All ports in a trunk must be configured in a single trunk. CAUTION: Before manually setting a port to full-duplex, verify that is also manually set on the Switch to half-duplex, resulting in network performance. Link Aggregation Link aggregation, also called "trunking", refers ...a member of ports that is link on both ends (switches). If connecting link partners are connecting the Switch to another Configuring Port Settings 63 switch or to an Internet backbone, you are left to autonegotiate for a link manually set to work, the trunks must be configured on the...
...time. ■ All ports in a trunk must be configured in a single trunk. CAUTION: Before manually setting a port to full-duplex, verify that is also manually set on the Switch to half-duplex, resulting in network performance. Link Aggregation Link aggregation, also called "trunking", refers ...a member of ports that is link on both ends (switches). If connecting link partners are connecting the Switch to another Configuring Port Settings 63 switch or to an Internet backbone, you are left to autonegotiate for a link manually set to work, the trunks must be configured on the...

User Guide
Page 94
...=20ms Select menu option: Summary The Summary command displays the current IP configuration and software versions running on the network. 94 APPENDIX D: 3COM CLI REFERENCE GUIDE Ping The Ping command sends ICMP echo request packets to another node on the device: Select menu option: summary IP Method...: manual IP address: 192.168.1.1 Subnet mask: 255.255.255.0 Default gateway: 192.168.1.254 Runtime version: 0.00.00.11 Bootcode version: ...
...=20ms Select menu option: Summary The Summary command displays the current IP configuration and software versions running on the network. 94 APPENDIX D: 3COM CLI REFERENCE GUIDE Ping The Ping command sends ICMP echo request packets to another node on the device: Select menu option: summary IP Method...: manual IP address: 192.168.1.1 Subnet mask: 255.255.255.0 Default gateway: 192.168.1.254 Runtime version: 0.00.00.11 Bootcode version: ...

User Guide
Page 95
... following example displays an IP address obtained via a DHCP server. Syntax ipSetup Default Configuration No default IP address is configured manually, the IP-address and mask are defined as the gateway-address and mask. If a default gateway is defined for interfaces...223.255.255.255. Select menu option: Select menu option: The following example displays an IP address configured manually: Select menu option: ipSetup Enter configuration method (auto,manual)[auto]: manual Enter IP Address 192.168.1.1 [0.0.0.0 ]: Enter Subnet Mask 255.255.255.0 [255.255.0.0 ]: Enter Default...
... following example displays an IP address obtained via a DHCP server. Syntax ipSetup Default Configuration No default IP address is configured manually, the IP-address and mask are defined as the gateway-address and mask. If a default gateway is defined for interfaces...223.255.255.255. Select menu option: Select menu option: The following example displays an IP address configured manually: Select menu option: ipSetup Enter configuration method (auto,manual)[auto]: manual Enter IP Address 192.168.1.1 [0.0.0.0 ]: Enter Subnet Mask 255.255.255.0 [255.255.0.0 ]: Enter Default...


