User Guide
Page 3
... 5 Related Documentation 6 Documentation Comments 6 Product Registration 6 1 INTRODUCING THE BASELINE SWITCH Overview of the Baseline Switch 7 Features and Capabilities 7 Autosensing of MDI/MDIX Connections 7 Autonegotiating 10/100/1000 Mbps Ports 7 SFP Ports 7 Physical Features 8 Front Panel 8 Rear Panel 11 Package Contents 11 2 INSTALLING THE SWITCH Before You Begin 13 Positioning the Switch 13 Rack-Mounting or Free-Standing 14 Using...
... 5 Related Documentation 6 Documentation Comments 6 Product Registration 6 1 INTRODUCING THE BASELINE SWITCH Overview of the Baseline Switch 7 Features and Capabilities 7 Autosensing of MDI/MDIX Connections 7 Autonegotiating 10/100/1000 Mbps Ports 7 SFP Ports 7 Physical Features 8 Front Panel 8 Rear Panel 11 Package Contents 11 2 INSTALLING THE SWITCH Before You Begin 13 Positioning the Switch 13 Rack-Mounting or Free-Standing 14 Using...

User Guide
Page 4
...the Admin Password 28 Modifying the IP Address Settings 29 Automatic IP Configuration 29 Setting the IP Address 30 Configuring Port Settings 31 Basic Port Configuration 31 Advanced Port Configuration 33 Configuring VLANs 33 Creating a VLAN 34 Sample VLAN Configurations 35 Removing a VLAN 37 Configuring Link Aggregation ...of an Aggregated Link 38 Modifying Settings and Deleting an Aggregated Link 39 Viewing the Trunk Summary 39 Viewing Statistics 40 Mirroring Port Traffic 41 Running Cable Diagnostic 42 Using the System Tools 42 Restart 42 Configuration 43 Resetting to Factory Defaults 43 Backing ...
...the Admin Password 28 Modifying the IP Address Settings 29 Automatic IP Configuration 29 Setting the IP Address 30 Configuring Port Settings 31 Basic Port Configuration 31 Advanced Port Configuration 33 Configuring VLANs 33 Creating a VLAN 34 Sample VLAN Configurations 35 Removing a VLAN 37 Configuring Link Aggregation ...of an Aggregated Link 38 Modifying Settings and Deleting an Aggregated Link 39 Viewing the Trunk Summary 39 Viewing Statistics 40 Mirroring Port Traffic 41 Running Cable Diagnostic 42 Using the System Tools 42 Restart 42 Configuration 43 Resetting to Factory Defaults 43 Backing ...
User Guide
Page 7
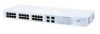
... both medium dependent interface (MDI) and medium dependent interface crossover (MDIX) connections. Overview of the Baseline Switch The 3Com Baseline Switch 2816-SFP/2824-SFP Plus is shipped ready for use configurable Switch. The Switch is a versatile, easy-to fiber-based Gigabit media. The 1000BASE-T ports also support automatic 10/100/1000 Mbps speed detection. 10/100 Mbps connections on the other...
... both medium dependent interface (MDI) and medium dependent interface crossover (MDIX) connections. Overview of the Baseline Switch The 3Com Baseline Switch 2816-SFP/2824-SFP Plus is shipped ready for use configurable Switch. The Switch is a versatile, easy-to fiber-based Gigabit media. The 1000BASE-T ports also support automatic 10/100/1000 Mbps speed detection. 10/100 Mbps connections on the other...
User Guide
Page 8
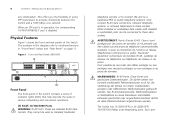
...233;seaux à ces prises. 8 CHAPTER 1: INTRODUCING THE BASELINE SWITCH any combination. When an SFP port is in "Front Panel" below and "Rear Panel" on page 11. Figure 1 Front and Rear Panels (2816-SFP) 1 1 9 8 4 5 12 13 Baseline Switch 2816-SFP Plus Module Present 8 16 Link/Activity : Green = 1000M, Yellow...réseau téléphonique central privé ou public. WARNHINWEIS: RJ-45-Porte. The Switch has 16 (2816-SFP) or 24 (2824-SFP) 10/100/1000 Mbps auto-negotiating ports. Physical Features Figure 1 shows the front and rear panels of various networking and connection ...
...233;seaux à ces prises. 8 CHAPTER 1: INTRODUCING THE BASELINE SWITCH any combination. When an SFP port is in "Front Panel" below and "Rear Panel" on page 11. Figure 1 Front and Rear Panels (2816-SFP) 1 1 9 8 4 5 12 13 Baseline Switch 2816-SFP Plus Module Present 8 16 Link/Activity : Green = 1000M, Yellow...réseau téléphonique central privé ou public. WARNHINWEIS: RJ-45-Porte. The Switch has 16 (2816-SFP) or 24 (2824-SFP) 10/100/1000 Mbps auto-negotiating ports. Physical Features Figure 1 shows the front and rear panels of various networking and connection ...
User Guide
Page 9
... you may notice some degradation of network performance. 3Com recommends that you use devices that are capable of the connected device. When an SFP port is active, it is disabled. The corresponding 10/100/1000 port is disabled when an SFP transceiver is operating at 1000 Mbps. Yellow The .... Flashing Packets are numbered 13 to 16 (2816-SFP) and 21 to 24 (2824-SFP) on the front of using Physical Features 9 SFP transceivers to provide connectivity between the Switch and remote 1000 Mbps workgroups or to color. The four SFP ports support fiber Gigabit Ethernet short-wave (SX) and ...
... you may notice some degradation of network performance. 3Com recommends that you use devices that are capable of the connected device. When an SFP port is active, it is disabled. The corresponding 10/100/1000 port is disabled when an SFP transceiver is operating at 1000 Mbps. Yellow The .... Flashing Packets are numbered 13 to 16 (2816-SFP) and 21 to 24 (2824-SFP) on the front of using Physical Features 9 SFP transceivers to provide connectivity between the Switch and remote 1000 Mbps workgroups or to color. The four SFP ports support fiber Gigabit Ethernet short-wave (SX) and ...
User Guide
Page 10
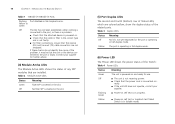
10 CHAPTER 1: INTRODUCING THE BASELINE SWITCH Table 1 10BASE-T/100BASE-TX Ports Flashing Port disabled or link loopback error. If these checks do not identify the cause of any SFP modules that are not swapped. Flashing Green ■ Power-on self test or loopback test failed. Switch is in full-duplex ...mode. (6) Power LED The Power LED shows the power status of the related ports. Contact your supplier. Yellow ...
10 CHAPTER 1: INTRODUCING THE BASELINE SWITCH Table 1 10BASE-T/100BASE-TX Ports Flashing Port disabled or link loopback error. If these checks do not identify the cause of any SFP modules that are not swapped. Flashing Green ■ Power-on self test or loopback test failed. Switch is in full-duplex ...mode. (6) Power LED The Power LED shows the power status of the related ports. Contact your supplier. Yellow ...
User Guide
Page 14
... mounting the unit, you should take note of different size Baseline or Superstack® 3 units, the smaller units must be rack-mounted in "Positioning the Switch" on one is not available, try to position the Switch, ensure that: ■ It is accessible and cables can...a mounting bracket over the mounting holes on page 13. Using the Mounting Kit The Switch is not restricted (3Com recommends that the unit is supplied with a grounded rack and avoid touching the unit's ports and connectors, if possible. These include lift shafts, microwave ovens, and air conditioning ...
... mounting the unit, you should take note of different size Baseline or Superstack® 3 units, the smaller units must be rack-mounted in "Positioning the Switch" on one is not available, try to position the Switch, ensure that: ■ It is accessible and cables can...a mounting bracket over the mounting holes on page 13. Using the Mounting Kit The Switch is not restricted (3Com recommends that the unit is supplied with a grounded rack and avoid touching the unit's ports and connectors, if possible. These include lift shafts, microwave ovens, and air conditioning ...
User Guide
Page 17
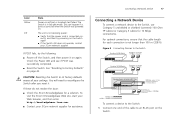
...If these do not resolve the issue: ■ Check the 3Com Knowledgebase for 10 Mbps connections). Connecting a Network Device 17 Connecting a Network Device To connect a network device to the Switch, use Category 5 unshielded or shielded (screened) 100 Ohm ...Switch. CAUTION: Resetting the Switch to an RJ-45 port on self-test or loopback test failed. Figure 3 Connecting Devices to the Switch Baseline 10/100 Switch Endstations on switched 100 Mbps connections Baseline 10/100 Switch Endstations on switched 100 Mbps connections BaselineBSawsietclihne28S1w6i/t2ch82242-5S0FP Plus...
...If these do not resolve the issue: ■ Check the 3Com Knowledgebase for 10 Mbps connections). Connecting a Network Device 17 Connecting a Network Device To connect a network device to the Switch, use Category 5 unshielded or shielded (screened) 100 Ohm ...Switch. CAUTION: Resetting the Switch to an RJ-45 port on self-test or loopback test failed. Figure 3 Connecting Devices to the Switch Baseline 10/100 Switch Endstations on switched 100 Mbps connections Baseline 10/100 Switch Endstations on switched 100 Mbps connections BaselineBSawsietclihne28S1w6i/t2ch82242-5S0FP Plus...
User Guide
Page 18
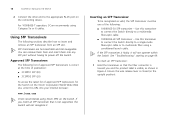
... into your Internet browser: www.3com.com 3Com recommends using Category 5e or 6 cables. For 1000BASE-T operation, 3Com recommends using 3Com SFPs on the 3Com Corporation World Wide Web site, enter this URL into any SFP port without having to power off the Switch. See "Troubleshooting" starting on the connecting device. To insert an SFP transceiver: 1 Hold the transceiver so...
... into your Internet browser: www.3com.com 3Com recommends using Category 5e or 6 cables. For 1000BASE-T operation, 3Com recommends using 3Com SFPs on the 3Com Corporation World Wide Web site, enter this URL into any SFP port without having to power off the Switch. See "Troubleshooting" starting on the connecting device. To insert an SFP transceiver: 1 Hold the transceiver so...
User Guide
Page 24
...administrator password IP Settings Allows you to configure the IP address settings of the Switch Port Configuration Allows you to configure the Switch's port settings VLANs Allows you to create VLAN groups, add port members, and specify how VLAN tagging is used Link Aggregation Allows you to... set up and restoring configuration, and enabling 802.11p prioritization. Menu Item Support Log Out Description Displays 3Com contact ...
...administrator password IP Settings Allows you to configure the IP address settings of the Switch Port Configuration Allows you to configure the Switch's port settings VLANs Allows you to create VLAN groups, add port members, and specify how VLAN tagging is used Link Aggregation Allows you to... set up and restoring configuration, and enabling 802.11p prioritization. Menu Item Support Log Out Description Displays 3Com contact ...

User Guide
Page 25
...on page 29. Accessing the Interface Without Using Discovery 25 For example, if the DHCP server assigned the IP address 192.168.0.123 to the Switch, start your Web browser, and then type http://192.168.0.123. ■ Enable or disable flow control ■ Configure the speed duplex settings... set the IP address mode to DHCP, check the DHCP server for the port Accessing the Interface Without Using Discovery The Discovery application works by automatically detecting the IP address that is assigned to the Switch, and then use that address to connect to "Automatic IP Configuration" on the...
...on page 29. Accessing the Interface Without Using Discovery 25 For example, if the DHCP server assigned the IP address 192.168.0.123 to the Switch, start your Web browser, and then type http://192.168.0.123. ■ Enable or disable flow control ■ Configure the speed duplex settings... set the IP address mode to DHCP, check the DHCP server for the port Accessing the Interface Without Using Discovery The Discovery application works by automatically detecting the IP address that is assigned to the Switch, and then use that address to connect to "Automatic IP Configuration" on the...
User Guide
Page 27
... access the Web interface if you want the Switch to function as a basic layer 2 switch, you log on how to configure the Switch's features. Topics include: ■ Configuration Overview ■ Viewing Switch Information ■ Changing the Admin Password ■ Modifying the IP Address Settings ■ Configuring Port Settings ■ Configuring VLANs ■ Configuring Link Aggregation...
... access the Web interface if you want the Switch to function as a basic layer 2 switch, you log on how to configure the Switch's features. Topics include: ■ Configuration Overview ■ Viewing Switch Information ■ Changing the Admin Password ■ Modifying the IP Address Settings ■ Configuring Port Settings ■ Configuring VLANs ■ Configuring Link Aggregation...
User Guide
Page 28
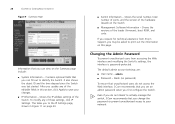
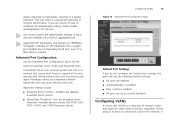
...serial number, total number of ports, and the version of the editable fields in Figure 11 on the Summary page include: ■ System Information - blank (no password) To ensure that unauthorized users do not intend to actively manage the switch, 3Com recommends that you change the password...; Management Software Information - admin ■ Password - Even if you do not access the Web interface, 3Com recommends that you can view on page 30. ■ Switch Information - To modify any of the hardware (board) on this section, click Apply to save your network. Shows ...
...serial number, total number of ports, and the version of the editable fields in Figure 11 on the Summary page include: ■ System Information - blank (no password) To ensure that unauthorized users do not intend to actively manage the switch, 3Com recommends that you change the password...; Management Software Information - admin ■ Password - Even if you do not access the Web interface, 3Com recommends that you can view on page 30. ■ Switch Information - To modify any of the hardware (board) on this section, click Apply to save your network. Shows ...

User Guide
Page 31
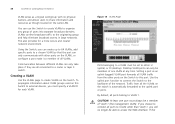
... computer that you want to assign to the Switch. By default, all ports belong to the Switch also becomes the IP address for VLAN 1. Select this option if you want to manually assign an IP address to the Switch IP Address Specify an IP address that you ... mask is set to save your changes. Select this Switch and management stations on the Port Configuration page: ■ Basic Port Configuration ■ Advanced Port Configuration Basic Port Configuration Use the Basic Port Configuration tab to enable and disable the port and its IP address. This option is only available...
... computer that you want to assign to the Switch. By default, all ports belong to the Switch also becomes the IP address for VLAN 1. Select this option if you want to manually assign an IP address to the Switch IP Address Specify an IP address that you ... mask is set to save your changes. Select this Switch and management stations on the Port Configuration page: ■ Basic Port Configuration ■ Advanced Port Configuration Basic Port Configuration Use the Basic Port Configuration tab to enable and disable the port and its IP address. This option is only available...

User Guide
Page 32
...on page 32. If flow control is enabled, the Switch will automatically connect at 1000Mbps, you identify the device connected to full-duplex, they will To run a port at 1000Mbps, providing the connected device also supports this switch to it as Access Point. ■ Status - CAUTION...: Before manually setting a port to full-duplex, verify that passes through this port, you modify any of high traffic. Set ...
...on page 32. If flow control is enabled, the Switch will automatically connect at 1000Mbps, you identify the device connected to full-duplex, they will To run a port at 1000Mbps, providing the connected device also supports this switch to it as Access Point. ■ Status - CAUTION...: Before manually setting a port to full-duplex, verify that passes through this port, you modify any of high traffic. Set ...
User Guide
Page 33
... to configure the speed/duplex setting, simply enable autonegotiation for the port. If you do not configure the Switch's port settings, the ports will use substantial network bandwidth and may cause network time-outs. Inserting an SFP transceiver into a gigabit port disables the corresponding RJ-45 port, even if no fiber cable is an incorrect packet sent...
... to configure the speed/duplex setting, simply enable autonegotiation for the port. If you do not configure the Switch's port settings, the ports will use substantial network bandwidth and may cause network time-outs. Inserting an SFP transceiver into a gigabit port disables the corresponding RJ-45 port, even if no fiber cable is an incorrect packet sent...
User Guide
Page 34
...on the VLAN), or configure a port make it a member of all ports to VLANs other ports on the switch is automatically forwarded to a router or layer 3 switch. Figure 14 VLANs Page Ports belonging to either U (uplink) or D (desktop). Setting a port as though located on the Switch. VLANs confine broadcast traffic to ...environment. By default, all connected to the uplink port or ports. Using the Switch, you can create up to 64 VLANs, add specific ports to a chosen VLAN (so that the port can only take place if they are all ports belong to the originating group and help eliminate ...
...on the VLAN), or configure a port make it a member of all ports to VLANs other ports on the switch is automatically forwarded to a router or layer 3 switch. Figure 14 VLANs Page Ports belonging to either U (uplink) or D (desktop). Setting a port as though located on the Switch. VLANs confine broadcast traffic to ...environment. By default, all connected to the uplink port or ports. Using the Switch, you can create up to 64 VLANs, add specific ports to a chosen VLAN (so that the port can only take place if they are all ports belong to the originating group and help eliminate ...

User Guide
Page 35
...cycle through the different states. To change states, click the icon under the port number repeatedly to create the VLAN. Available states include: ■ N - For examples on setting up a simple VLAN on the Switch using desktop connections. 4 Define the VLAN membership by setting the state of... each port. Sample VLAN Configurations To illustrate how you can set up VLANs, refer to "Sample VLAN Configurations" ...
...cycle through the different states. To change states, click the icon under the port number repeatedly to create the VLAN. Available states include: ■ N - For examples on setting up a simple VLAN on the Switch using desktop connections. 4 Define the VLAN membership by setting the state of... each port. Sample VLAN Configurations To illustrate how you can set up VLANs, refer to "Sample VLAN Configurations" ...
User Guide
Page 36
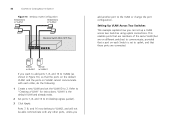
...set to D (desktop egress packet). 3 Click Apply. Ports 7, 8, and 16 now belong to VLAN2, and will not be able communicate with each Switch is the default VLAN and already exists. 2 Set ports 7, 8, and 16 to uplink, and that a port on VLAN2 cannot communicate with any other , do the...Figure 16), so that the ports on the default VLAN1 and the ports on each other ports, unless you Setting Up VLAN Across Two Switches This example explains how you want to add ports 7, 8, and 16 to VLAN2 (as shown in VLAN 2 Baseline Switch 2824-SFP Plus add another port to "Creating a VLAN" ...
...set to D (desktop egress packet). 3 Click Apply. Ports 7, 8, and 16 now belong to VLAN2, and will not be able communicate with each Switch is the default VLAN and already exists. 2 Set ports 7, 8, and 16 to uplink, and that a port on VLAN2 cannot communicate with any other , do the...Figure 16), so that the ports on the default VLAN1 and the ports on each other ports, unless you Setting Up VLAN Across Two Switches This example explains how you want to add ports 7, 8, and 16 to VLAN2 (as shown in VLAN 2 Baseline Switch 2824-SFP Plus add another port to "Creating a VLAN" ...

User Guide
Page 37
... you want to U (uplink egress packet). Figure 17 Uplink VLAN Configuration Endstation in VLAN 1 (Desktop) Server in VLAN 1 (Desktop) Endstation in VLAN 2 (Desktop) Switch 1 Switch 2 Port 16 in VLANs 1 and 2 (Uplink) Port 8 in VLANs 1 and 2 (Uplink) Endstation in VLAN 2 (Desktop) Server in VLAN 2 (Desktop) Endstation in VLAN 1 (Desktop) To set up the configuration shown...
... you want to U (uplink egress packet). Figure 17 Uplink VLAN Configuration Endstation in VLAN 1 (Desktop) Server in VLAN 1 (Desktop) Endstation in VLAN 2 (Desktop) Switch 1 Switch 2 Port 16 in VLANs 1 and 2 (Uplink) Port 8 in VLANs 1 and 2 (Uplink) Endstation in VLAN 2 (Desktop) Server in VLAN 2 (Desktop) Endstation in VLAN 1 (Desktop) To set up the configuration shown...


