Installation Guide
Page 5
... protect your existing investment to the Internet. They provide an uplink ADSL2+ interface and four downlink layer 2 (L2) switched 10/100BASE-T Ethernet interfaces that can be isolated. Product Overview Chapter 1 Product Overview 1.1 Introduction 3Com Router 3000 ADSL2+ Family are compliant with the products of other vendors at all layers of the network...
... protect your existing investment to the Internet. They provide an uplink ADSL2+ interface and four downlink layer 2 (L2) switched 10/100BASE-T Ethernet interfaces that can be isolated. Product Overview Chapter 1 Product Overview 1.1 Introduction 3Com Router 3000 ADSL2+ Family are compliant with the products of other vendors at all layers of the network...
Installation Guide
Page 6
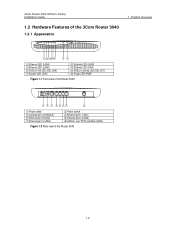
...) (7) System LED (SYS) (2) Ethernet LED (LAN3) (4) Ethernet LED (LAN1) (6) ADSL2+ activity LED (DSL ACT) (8) Power LED (PWR) Figure 1-1 Front view of the Router 3040 (1) Power switch (3) Console port (CONSOLE) (5) Ethernet port 2(LAN2) (7) Ethernet port 4 (LAN4) (2) Power socket (4) Ethernet port 1 (LAN1) (6) Ethernet port 3 (LAN3) (8) ADSL2+ over POTS interface (ADSL) Figure 1-2 Rear view...
...) (7) System LED (SYS) (2) Ethernet LED (LAN3) (4) Ethernet LED (LAN1) (6) ADSL2+ activity LED (DSL ACT) (8) Power LED (PWR) Figure 1-1 Front view of the Router 3040 (1) Power switch (3) Console port (CONSOLE) (5) Ethernet port 2(LAN2) (7) Ethernet port 4 (LAN4) (2) Power socket (4) Ethernet port 1 (LAN1) (6) Ethernet port 3 (LAN3) (8) ADSL2+ over POTS interface (ADSL) Figure 1-2 Rear view...

Installation Guide
Page 9
3Com Router 3000 ADSL2+ Family Installation Guide 1.2.4.2 Fast Ethernet (FE) interface Table 1-4 Attributes of the FE interface Attribute Connector Interface type Operating mode Description RJ-45 MDI/MDIX auto-crossover 10/100 Mbps auto-sensing Full/half duplex L2 switching within the scope of the four Ethernet ports 1.2.4.3 ADSL2+ over POTS interface Table...
3Com Router 3000 ADSL2+ Family Installation Guide 1.2.4.2 Fast Ethernet (FE) interface Table 1-4 Attributes of the FE interface Attribute Connector Interface type Operating mode Description RJ-45 MDI/MDIX auto-crossover 10/100 Mbps auto-sensing Full/half duplex L2 switching within the scope of the four Ethernet ports 1.2.4.3 ADSL2+ over POTS interface Table...
Installation Guide
Page 10
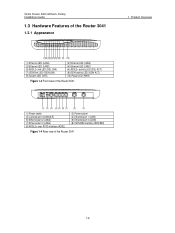
3Com Router 3000 ADSL2+ Family Installation Guide 1.3 Hardware Features of the Router 3041 1-6 Product Overview (1) Ethernet LED (LAN4) (3) Ethernet LED (LAN2) (5) ADSL2+ link LED (DSL LNK) (7) ...) (4) Ethernet LED (LAN1) (6) ADSL2+ activity LED (DSL ACT) (8) ISDN activity LED (ISDN ACT) (10) Power LED (PWR) Figure 1-3 Front view of the Router 3041 (1) Power switch (3) Console port (CONSOLE) (5) Ethernet port 2 (LAN2) (7) Ethernet port 4 (LAN4) (9) ADSL2+ over POTS interface (ADSL) (2) Power socket (4) Ethernet port 1 (LAN1) (6) Ethernet port 3 (LAN3) (8) ISDN BRI interface...
3Com Router 3000 ADSL2+ Family Installation Guide 1.3 Hardware Features of the Router 3041 1-6 Product Overview (1) Ethernet LED (LAN4) (3) Ethernet LED (LAN2) (5) ADSL2+ link LED (DSL LNK) (7) ...) (4) Ethernet LED (LAN1) (6) ADSL2+ activity LED (DSL ACT) (8) ISDN activity LED (ISDN ACT) (10) Power LED (PWR) Figure 1-3 Front view of the Router 3041 (1) Power switch (3) Console port (CONSOLE) (5) Ethernet port 2 (LAN2) (7) Ethernet port 4 (LAN4) (9) ADSL2+ over POTS interface (ADSL) (2) Power socket (4) Ethernet port 1 (LAN1) (6) Ethernet port 3 (LAN3) (8) ISDN BRI interface...
Installation Guide
Page 16
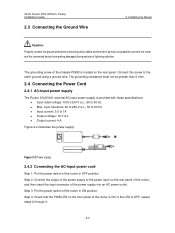
The grounding screw of the chassis PGND is located on the front panel of the router is ON. 3Com Router 3000 ADSL2+ Family Installation Guide 2.3 Connecting the Ground Wire 2. Installing the Router Caution: Properly connect the ground wire before connecting other ... a ground wire. z Output current: 4 A Figure 2-2 illustrates the power supply: Figure 2-2 Power supply 2.4.2 Connecting the AC-input power cord Step 1: Put the power switch of the router in OFF position. Connect this screw to prevent the router and the connected device from getting damaged during periods of the power...
The grounding screw of the chassis PGND is located on the front panel of the router is ON. 3Com Router 3000 ADSL2+ Family Installation Guide 2.3 Connecting the Ground Wire 2. Installing the Router Caution: Properly connect the ground wire before connecting other ... a ground wire. z Output current: 4 A Figure 2-2 illustrates the power supply: Figure 2-2 Power supply 2.4.2 Connecting the AC-input power cord Step 1: Put the power switch of the router in OFF position. Connect this screw to prevent the router and the connected device from getting damaged during periods of the power...
Installation Guide
Page 18
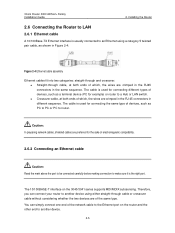
...cable without considering whether the two devices are of the same type. You can connect your router to router. The cable is the right port. 3Com Router 3000 ADSL2+ Family Installation Guide 2. z Crossover cable, at both ends of devices, such as a terminal device (PC for example) .... 2.6.2 Connecting an Ethernet cable Caution: Read the mark above the port to be connected carefully before making connection to a Hub or LAN switch. Caution: In preparing network cables, shielded cables are preferred for connecting different types of which , the wires are crimped in the RJ 45...
...cable without considering whether the two devices are of the same type. You can connect your router to router. The cable is the right port. 3Com Router 3000 ADSL2+ Family Installation Guide 2. z Crossover cable, at both ends of devices, such as a terminal device (PC for example) .... 2.6.2 Connecting an Ethernet cable Caution: Read the mark above the port to be connected carefully before making connection to a Hub or LAN switch. Caution: In preparing network cables, shielded cables are preferred for connecting different types of which , the wires are crimped in the RJ 45...
Installation Guide
Page 31
...normally after the router is correctly working. Step 2: Check the console cable and the terminal (such as the HyperTerminal) parameter settings. 4-1 3Com Router 3000 ADSL2+ Family Installation Guide 4. z The power cord of the router is connected correctly. If the configuration system has faults, ...it is being supplied. z The console cable is properly connected. Solution: Step 1: Check that : z The power switch of the power source is used. z The switch of the router is turned on . z The correct power source is turned on . Solution: Check that : z The power...
...normally after the router is correctly working. Step 2: Check the console cable and the terminal (such as the HyperTerminal) parameter settings. 4-1 3Com Router 3000 ADSL2+ Family Installation Guide 4. z The power cord of the router is connected correctly. If the configuration system has faults, ...it is being supplied. z The console cable is properly connected. Solution: Step 1: Check that : z The power switch of the power source is used. z The switch of the router is turned on . z The correct power source is turned on . Solution: Check that : z The power...