

Getting Started Guide
Page 4
... 31 3 SETTING UP FOR MANAGEMENT Setting Up Overview 34 IP Configuration 35 Preparing for Correct Operation of Managing a Switch 46 Command Line Interface Management 46 Web Interface Management 47 SNMP Management 47 Setting Up Command Line Interface Management 48 CLI Management via the Console Port 48 CLI Management over the Network 48 Setting Up Web Interface Management 49 Pre-requisites 49 Web Management Over the Network 50 Setting Up SNMP Management 51 Pre-requisites 51 Default Users and Passwords 51 Changing Default Passwords 52 4 PROBLEM SOLVING Solving Problems Indicated by LEDs 54
... 31 3 SETTING UP FOR MANAGEMENT Setting Up Overview 34 IP Configuration 35 Preparing for Correct Operation of Managing a Switch 46 Command Line Interface Management 46 Web Interface Management 47 SNMP Management 47 Setting Up Command Line Interface Management 48 CLI Management via the Console Port 48 CLI Management over the Network 48 Setting Up Web Interface Management 49 Pre-requisites 49 Web Management Over the Network 50 Setting Up SNMP Management 51 Pre-requisites 51 Default Users and Passwords 51 Changing Default Passwords 52 4 PROBLEM SOLVING Solving Problems Indicated by LEDs 54
Getting Started Guide
Page 7
... information you need to all the other Switches listed unless otherwise stated. For illustrative purposes all pictures and example screens show the 4900 model, however, all procedures apply to install and use the following Switches in their default state: ■ SuperStack® 3 Switch 4900 (3C17700) ■ SuperStack® 3 Switch 4900 SX (3C17702) ■ SuperStack® 3 Switch 4924 (3C17701) ■ SuperStack® 3 Switch 4950 (3C17706) This guide is intended for installing and setting up network equipment;
... information you need to all the other Switches listed unless otherwise stated. For illustrative purposes all pictures and example screens show the 4900 model, however, all procedures apply to install and use the following Switches in their default state: ■ SuperStack® 3 Switch 4900 (3C17700) ■ SuperStack® 3 Switch 4900 SX (3C17702) ■ SuperStack® 3 Switch 4924 (3C17701) ■ SuperStack® 3 Switch 4950 (3C17706) This guide is intended for installing and setting up network equipment;

Getting Started Guide
Page 13
... Ports Addresses Forwarding Modes Duplex Modes Flow Control Smart auto-sensing Traffic Prioritization Layer 3 Switching RPS Support XRN Support Mounting Switch 4900 Family Switch 4900: 12 Auto-negotiating 100BASE-TX/1000BASE-T ports Switch 4900 SX: 12 Auto-negotiating 1000BASE-SX ports Switch 4924: 24 Auto-negotiating 10BASE-T/100BASE-TX/1000BASE-T ports Switch 4950: 12 Auto-negotiating 10BASE-T/100BASE-TX/1000BASE-T, 6 1000BASE-SX and 6 GBIC ports ■ Up to 12,000 supported ■ Up to SuperStack 3 Advanced Redundant Power System (ARPS) (3C16071B) eXpandable Resilient Networking...
... Ports Addresses Forwarding Modes Duplex Modes Flow Control Smart auto-sensing Traffic Prioritization Layer 3 Switching RPS Support XRN Support Mounting Switch 4900 Family Switch 4900: 12 Auto-negotiating 100BASE-TX/1000BASE-T ports Switch 4900 SX: 12 Auto-negotiating 1000BASE-SX ports Switch 4924: 24 Auto-negotiating 10BASE-T/100BASE-TX/1000BASE-T ports Switch 4950: 12 Auto-negotiating 10BASE-T/100BASE-TX/1000BASE-T, 6 1000BASE-SX and 6 GBIC ports ■ Up to 12,000 supported ■ Up to SuperStack 3 Advanced Redundant Power System (ARPS) (3C16071B) eXpandable Resilient Networking...
Getting Started Guide
Page 16
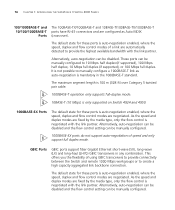
...-T link as Auto MDIX Ports (cross-over Category 5 twisted pair cable. 1000BASE-T operation only supports full-duplex mode. 10BASE-T (10 Mbps) is only supported on Switch 4924 and 4950. 1000BASE-SX Ports The default state for these ports is auto-negotiation enabled, where the speed, duplex and flow control modes are negotiated. Alternatively, auto-negotiation can be disabled and the flow control setting can be manually configured. 1000BASE-SX ports do not support auto-negotiation of speed and only support full duplex mode. GBIC Ports GBIC ports support fiber Gigabit Ethernet...
...-T link as Auto MDIX Ports (cross-over Category 5 twisted pair cable. 1000BASE-T operation only supports full-duplex mode. 10BASE-T (10 Mbps) is only supported on Switch 4924 and 4950. 1000BASE-SX Ports The default state for these ports is auto-negotiation enabled, where the speed, duplex and flow control modes are negotiated. Alternatively, auto-negotiation can be disabled and the flow control setting can be manually configured. 1000BASE-SX ports do not support auto-negotiation of speed and only support full duplex mode. GBIC Ports GBIC ports support fiber Gigabit Ethernet...

Getting Started Guide
Page 17
... 4900, 10/100 Mbps on 4924/4950) link is present, and the port is present. The Module is installed and supported. Table 4 LED behavior LED Color Port LEDs Packet Yellow Off Status Green Green flashing Yellow Yellow flashing Off Module LEDs Packet Yellow Off Status Green Yellow Yellow flashing Yellow flashing (fast) Off Unit LEDs 1-4 Green Off Power/Self Test LED Green Indicates Packets are being transmitted/received on using the LEDs for problem solving, see "Checking for a single port Module. The Module is enabled. Front View Detail 17 LEDs Table 4 lists...
... 4900, 10/100 Mbps on 4924/4950) link is present, and the port is present. The Module is installed and supported. Table 4 LED behavior LED Color Port LEDs Packet Yellow Off Status Green Green flashing Yellow Yellow flashing Off Module LEDs Packet Yellow Off Status Green Yellow Yellow flashing Yellow flashing (fast) Off Unit LEDs 1-4 Green Off Power/Self Test LED Green Indicates Packets are being transmitted/received on using the LEDs for problem solving, see "Checking for a single port Module. The Module is enabled. Front View Detail 17 LEDs Table 4 lists...
Getting Started Guide
Page 20
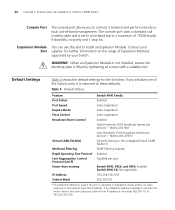
Table 5 Default Setting Feature Port Status Port Speed Duplex Mode Flow Control Broadcast Storm Control Virtual LANs (VLANs) Multicast Filtering Rapid Spanning Tree Protocol Link Aggregation Control Protocol (LACP) Smart Auto-sensing IP Address Subnet Mask Switch 4900 Family Enabled Auto-negotiated Auto-negotiated Auto-negotiated Enabled High threshold: 3000 broadcast frames per second - Notify and unfilter All ports belong to the untagged Default VLAN (VLAN 1) IGMP filtering enabled Enabled Disabled per port Switch 4900, 4924, and 4950: Enabled Switch 4900 SX: Not applicable 169.254.100...
Table 5 Default Setting Feature Port Status Port Speed Duplex Mode Flow Control Broadcast Storm Control Virtual LANs (VLANs) Multicast Filtering Rapid Spanning Tree Protocol Link Aggregation Control Protocol (LACP) Smart Auto-sensing IP Address Subnet Mask Switch 4900 Family Enabled Auto-negotiated Auto-negotiated Auto-negotiated Enabled High threshold: 3000 broadcast frames per second - Notify and unfilter All ports belong to the untagged Default VLAN (VLAN 1) IGMP filtering enabled Enabled Disabled per port Switch 4900, 4924, and 4950: Enabled Switch 4900 SX: Not applicable 169.254.100...

Getting Started Guide
Page 33
... methods of accessing the management software to improve the efficiency of the Switch and therefore the overall performance of Managing a Switch ■ Setting Up Command Line Interface Management ■ Setting Up Web Interface Management ■ Setting Up SNMP Management ■ Default Users and Passwords It covers the following topics: ■ Setting Up Overview ■ Manually Configuring IP Information ■ Viewing Automatically Configured IP Information ■ Methods of your network. This is , you to manage a Switch. 3 SETTING UP FOR MANAGEMENT Your Switch can...
... methods of accessing the management software to improve the efficiency of the Switch and therefore the overall performance of Managing a Switch ■ Setting Up Command Line Interface Management ■ Setting Up Web Interface Management ■ Setting Up SNMP Management ■ Default Users and Passwords It covers the following topics: ■ Setting Up Overview ■ Manually Configuring IP Information ■ Viewing Automatically Configured IP Information ■ Methods of your network. This is , you to manage a Switch. 3 SETTING UP FOR MANAGEMENT Your Switch can...

Getting Started Guide
Page 34
.... Connect to manually Yes configure the IP information? See page 50 CAUTION: To protect your Switch from unauthorized access, you must change all three default passwords as soon as possible, even if you do to the console port and use the Web Interface or Command Line Interface. See page 37 Connect to get your Switch set up and ready for your Switch? See page 48 Web Interface Connect over the network via the console port. See...
.... Connect to manually Yes configure the IP information? See page 50 CAUTION: To protect your Switch from unauthorized access, you must change all three default passwords as soon as possible, even if you do to the console port and use the Web Interface or Command Line Interface. See page 37 Connect to get your Switch set up and ready for your Switch? See page 48 Web Interface Connect over the network via the console port. See...

Getting Started Guide
Page 35
Manual IP Configuration You can use one of the IP address changing. If this default IP address is not dependent on page 37. Setting Up Overview 35 users and changing default passwords, see "Default Users and Passwords" on the network then the Switch detects this and configures itself with an IP address in the range 169.254.1.0 to 169.254.254.255. This makes management simpler and more reliable as Auto-IP...
Manual IP Configuration You can use one of the IP address changing. If this default IP address is not dependent on page 37. Setting Up Overview 35 users and changing default passwords, see "Default Users and Passwords" on the network then the Switch detects this and configures itself with an IP address in the range 169.254.1.0 to 169.254.254.255. This makes management simpler and more reliable as Auto-IP...

Getting Started Guide
Page 38
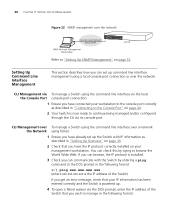
... offline unit. This is the default IP address that you can do this using an Ethernet cable as shown in the Location Address field. Figure 13 Connecting a workstation to the Switch via telnet. 38 CHAPTER 3: SETTING UP FOR MANAGEMENT Connecting the Workstation to the Switch 1 Connect the workstation to a front panel port using the Web interface or the command line interface (CLI) via a front panel port To connect the cable: a Attach an RJ-45 connector...
... offline unit. This is the default IP address that you can do this using an Ethernet cable as shown in the Location Address field. Figure 13 Connecting a workstation to the Switch via telnet. 38 CHAPTER 3: SETTING UP FOR MANAGEMENT Connecting the Workstation to the Switch 1 Connect the workstation to a front panel port using the Web interface or the command line interface (CLI) via a front panel port To connect the cable: a Attach an RJ-45 connector...

Getting Started Guide
Page 39
... Managing a Switch" on page 46. Using Command Line Interface via Telnet 1 To start a Telnet session to enter basic setup information for one minute then re-enter the default IP address. 3 At the login and password prompts, enter admin as your chosen management method. b In the dialogue box that appears type the default IP address of the unit, that you to the unit, click Start in Figure 14. Select Manual...
... Managing a Switch" on page 46. Using Command Line Interface via Telnet 1 To start a Telnet session to enter basic setup information for one minute then re-enter the default IP address. 3 At the login and password prompts, enter admin as your chosen management method. b In the dialogue box that appears type the default IP address of the unit, that you to the unit, click Start in Figure 14. Select Manual...

Getting Started Guide
Page 44
... console port, or ■ A standard modem cable - Connecting to the Console Port Alternatively, you are connecting directly to the Switch via a modem.) Pre-requisites ■ A workstation with the terminal emulation software. ■ A suitable cable: ■ A standard null modem cable - You can view the automatically configured IP information via the command line interface (CLI) through a modem. ■ Documentation supplied with terminal emulation software installed, such as Microsoft Hyperterminal. 44 CHAPTER 3: SETTING UP FOR MANAGEMENT If your network...
... console port, or ■ A standard modem cable - Connecting to the Console Port Alternatively, you are connecting directly to the Switch via a modem.) Pre-requisites ■ A workstation with the terminal emulation software. ■ A suitable cable: ■ A standard null modem cable - You can view the automatically configured IP information via the command line interface (CLI) through a modem. ■ Documentation supplied with terminal emulation software installed, such as Microsoft Hyperterminal. 44 CHAPTER 3: SETTING UP FOR MANAGEMENT If your network...

Getting Started Guide
Page 45
... hardware flow control Refer to its console port. If there is in Figure 18. The settings should be set to 255). 2 The command line interface login sequence begins as soon as a network connection is not available, it starts. 3 At the login and password prompts, enter admin as a COM port) on correctly, the top-level menu of the serial ports (also known as your Switch to one minute. c Connect the other end of the cable...
... hardware flow control Refer to its console port. If there is in Figure 18. The settings should be set to 255). 2 The command line interface login sequence begins as soon as a network connection is not available, it starts. 3 At the login and password prompts, enter admin as a COM port) on correctly, the top-level menu of the serial ports (also known as your Switch to one minute. c Connect the other end of the cable...
Getting Started Guide
Page 48
... in the following format: CLI Management over To manage a Switch using Telnet: 1 Ensure you can set up command line interface management using a local console port connection or over a network the Network using the command line interface over the network. CLI Management via To manage a Switch using the command line interface via the local the Console Port console port connection: 1 Ensure you have the IP protocol correctly installed on page 40. 2 Your Switch is powered up. 4 To open a Telnet session via its console port. Setting Up Command Line Interface Management This section...
... in the following format: CLI Management over To manage a Switch using Telnet: 1 Ensure you can set up command line interface management using a local console port connection or over a network the Network using the command line interface over the network. CLI Management via To manage a Switch using the command line interface via the local the Console Port console port connection: 1 Ensure you have the IP protocol correctly installed on page 40. 2 Your Switch is powered up. 4 To open a Telnet session via its console port. Setting Up Command Line Interface Management This section...

Getting Started Guide
Page 49
... for that software. 5 At the login and password prompts, enter admin as shown in "Setting Up Overview" on page 34. ■ Ensure that the Switch is connected to manage is displayed as your choice if you have already set up web interface management over the network. If the login prompt does not display immediately, press Return a few times until it starts. 6 If you have logged on...
... for that software. 5 At the login and password prompts, enter admin as shown in "Setting Up Overview" on page 34. ■ Ensure that the Switch is connected to manage is displayed as your choice if you have already set up web interface management over the network. If the login prompt does not display immediately, press Return a few times until it starts. 6 If you have logged on...

Getting Started Guide
Page 51
... your Switch to the Switch using the web interface or the command line interface, or to change all ports on the Switch are in with the SNMP network management application software. By default, all three default passwords as soon as possible, even if you intend to manage the Switch using a port in Table 9. refer to log in VLAN 1. Default Users and Passwords If you do this using an SNMP network management application, you need to actively manage your Switch To manage your Switch using the command line interface system management snmp community command - CAUTION...
... your Switch to the Switch using the web interface or the command line interface, or to change all ports on the Switch are in with the SNMP network management application software. By default, all three default passwords as soon as possible, even if you intend to manage the Switch using a port in Table 9. refer to log in VLAN 1. Default Users and Passwords If you do this using an SNMP network management application, you need to actively manage your Switch To manage your Switch using the command line interface system management snmp community command - CAUTION...

Getting Started Guide
Page 52
... admin default user name (no security - Changing Default Passwords You can access and change the default passwords using either: ■ The gettingStarted command on the CLI, or ■ The security device user modify command on the CLI, or ■ The Security > Device > User > Modify operation on the Switch CD-ROM. the user can view all manageable parameters, except special/security features, but not special/security features (no password) to the "Management Interface Reference Guide" on the web interface...
... admin default user name (no security - Changing Default Passwords You can access and change the default passwords using either: ■ The gettingStarted command on the CLI, or ■ The security device user modify command on the CLI, or ■ The Security > Device > User > Modify operation on the Switch CD-ROM. the user can view all manageable parameters, except special/security features, but not special/security features (no password) to the "Management Interface Reference Guide" on the web interface...
Getting Started Guide
Page 76
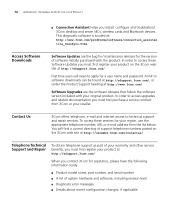
... model name, part number, and serial number ■ A list of system hardware and software, including revision level ■ Diagnostic error messages ■ Details about recent configuration changes, if applicable In order to access these services for a user name and password. A link to access upgrades and related documentation you must first purchase a service contract from 3Com or your region, use the appropriate telephone number, URL or e-mail address from the list below. In order to software downloads can...
... model name, part number, and serial number ■ A list of system hardware and software, including revision level ■ Diagnostic error messages ■ Details about recent configuration changes, if applicable In order to access these services for a user name and password. A link to access upgrades and related documentation you must first purchase a service contract from 3Com or your region, use the appropriate telephone number, URL or e-mail address from the list below. In order to software downloads can...

Getting Started Guide
Page 79
INDEX Numbers 3C number 19 A access levels of default users 51 approved GBIC transceivers 29 automatic setup 43 3Com Network Supervisor 43 console port 44 C cable 10/100/1000BASE-T 28 fiber 29 pin-outs 69 CD-ROM 9 command line interface management 46 conventions notice icons, About This Guide 8 text, About This Guide 8 cross-over configuration 28 D default settings 20 users 51 E Ethernet address of the Switch 19 F factory defaults 20 G GBIC ports 16 H hardware features 13 I installing the Switch 21 prerequisites 23...
INDEX Numbers 3C number 19 A access levels of default users 51 approved GBIC transceivers 29 automatic setup 43 3Com Network Supervisor 43 console port 44 C cable 10/100/1000BASE-T 28 fiber 29 pin-outs 69 CD-ROM 9 command line interface management 46 conventions notice icons, About This Guide 8 text, About This Guide 8 cross-over configuration 28 D default settings 20 users 51 E Ethernet address of the Switch 19 F factory defaults 20 G GBIC ports 16 H hardware features 13 I installing the Switch 21 prerequisites 23...

Getting Started Guide
Page 80
... 24 MAC address 19 power socket 19 powering-up 27 product name 19 rack mounting 23 RPS socket 19 serial number 19 size 73 unit information label 19 weight 73 XRN Distributed Fabric 24 system specifications 73 T troubleshooting 11, 53 U unit information label 19 W web interface management 47 setting up a Switch 27 problem solving 11, 53 communication problems 57 hardware problems 55 IP addressing 55 LEDs 54 product name 19 R rack mounting a Switch 23 Redundant Power...
... 24 MAC address 19 power socket 19 powering-up 27 product name 19 rack mounting 23 RPS socket 19 serial number 19 size 73 unit information label 19 weight 73 XRN Distributed Fabric 24 system specifications 73 T troubleshooting 11, 53 U unit information label 19 W web interface management 47 setting up a Switch 27 problem solving 11, 53 communication problems 57 hardware problems 55 IP addressing 55 LEDs 54 product name 19 R rack mounting a Switch 23 Redundant Power...


