
User Guide
Page 67
Figure 48 Client List Screen Click Refresh to the Router. WMM uses traffic priority based on the four ACs; Check the Enable WMM Function box, the WMM parameters table will appear. Voice, Video, Best Effort, and Background. The higher the AC priority, the higher the probability that are connected to update the list. Figure 49 WMM Screen Wireless Settings 65 Client List You can view the list of all wireless clients that data is transmitted. WMM Wireless Multimedia (WMM) mode, which supports devices that meet the 801.11e QBSS standard.
Figure 48 Client List Screen Click Refresh to the Router. WMM uses traffic priority based on the four ACs; Check the Enable WMM Function box, the WMM parameters table will appear. Voice, Video, Best Effort, and Background. The higher the AC priority, the higher the probability that are connected to update the list. Figure 49 WMM Screen Wireless Settings 65 Client List You can view the list of all wireless clients that data is transmitted. WMM Wireless Multimedia (WMM) mode, which supports devices that meet the 801.11e QBSS standard.

User Guide
Page 97
...administrators spend much of their time dealing with devices in a network, but they communicate as if they provide a network segmentation system that Wireless LAN is moved to a port in another for the Finance department, and another part of traditional network design. Advanced 95 VLAN A VLAN... is a flexible group of devices that can be updated manually. For example, you can only communicate directly with moves and changes. Note that is far more flexible than any traditional network...
...administrators spend much of their time dealing with devices in a network, but they communicate as if they provide a network segmentation system that Wireless LAN is moved to a port in another for the Finance department, and another part of traditional network design. Advanced 95 VLAN A VLAN... is a flexible group of devices that can be updated manually. For example, you can only communicate directly with moves and changes. Note that is far more flexible than any traditional network...

User Guide
Page 101
...existing RIP-enabled device on one RIP-enabled device (this Router), and send that information to other RIP-enabled devices. ■ Silent - RIP is enabled, however the Router only receives RIP update messages, it will transmit RIP update information to all other RIP-enabled devices rather than full ...Auto summary checkbox. RIP is enabled for the WAN or LAN interface. ■ Enable - The router will not transmit any messages itself. 4 In the Version field, select 1 or 2. 3Com recommends that does not support RIPv2. Figure 80 RIP Parameter Screen You can set up RIP independently...
...existing RIP-enabled device on one RIP-enabled device (this Router), and send that information to other RIP-enabled devices. ■ Silent - RIP is enabled, however the Router only receives RIP update messages, it will transmit RIP update information to all other RIP-enabled devices rather than full ...Auto summary checkbox. RIP is enabled for the WAN or LAN interface. ■ Enable - The router will not transmit any messages itself. 4 In the Version field, select 1 or 2. 3Com recommends that does not support RIPv2. Figure 80 RIP Parameter Screen You can set up RIP independently...
User Guide
Page 118
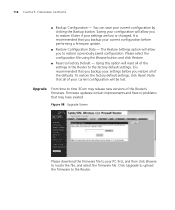
Saving your configuration will reset all of your settings before performing a firmware update. ■ Restore Configuration Data - Using this option will allow you restore all of the Router's firmware. To restore the factory default settings, click Reset. The Restore Settings option ...It is recommended that may release new versions of the settings in the Router to time 3Com may have existed. Click Upgrade to upload the firmware to Factory Default - Firmware updates contain improvements and fixes to your current configuration by clicking the Backup button...
Saving your configuration will reset all of your settings before performing a firmware update. ■ Restore Configuration Data - Using this option will allow you restore all of the Router's firmware. To restore the factory default settings, click Reset. The Restore Settings option ...It is recommended that may release new versions of the settings in the Router to time 3Com may have existed. Click Upgrade to upload the firmware to Factory Default - Firmware updates contain improvements and fixes to your current configuration by clicking the Backup button...

User Guide
Page 119
...a response. Select the time zone that observes Daylight Saving, then check the Enable Daylight Savings box. The system clock may not update immediately. This allows the Router to synchronize the system clock to a Network Time Protocol (NTP) server. You can set the clock yourself. System Tools 117 ...Time Zone You can specify which NTP servers the Router will use to update the system clock, although doing this screen. You cannot set the time settings for the Router to record the security log and control client filtering. If you reside in ...
...a response. Select the time zone that observes Daylight Saving, then check the Enable Daylight Savings box. The system clock may not update immediately. This allows the Router to synchronize the system clock to a Network Time Protocol (NTP) server. You can set the clock yourself. System Tools 117 ...Time Zone You can specify which NTP servers the Router will use to update the system clock, although doing this screen. You cannot set the time settings for the Router to record the security log and control client filtering. If you reside in ...

User Guide
Page 124
122 CHAPTER 5: CONFIGURING THE ROUTER Routing Table This screen displays details for a location to save the log to the hard disk as the system activities. Figure 106 Logs Screen ■ ... to, specify a filename and location, and then click OK. ■ Click Clear to clear the log (note that have been made to gain access to update the record. When prompted for the default routing used by your network as well as a text file. Figure 105 Routing Table Screen Logs This screen...
122 CHAPTER 5: CONFIGURING THE ROUTER Routing Table This screen displays details for a location to save the log to the hard disk as the system activities. Figure 106 Logs Screen ■ ... to, specify a filename and location, and then click OK. ■ Click Clear to clear the log (note that have been made to gain access to update the record. When prompted for the default routing used by your network as well as a text file. Figure 105 Routing Table Screen Logs This screen...

User Guide
Page 125
Figure 107 Traffic Statistics Screen Use the Refresh button to update the information. Note that the current implementation only shows traffic statistics per forwarding group. Hence if QoS is not enabled, this screen will always show zero values. Status and Logs 123 Traffic Statistics This screen shows the traffic statistics.
Figure 107 Traffic Statistics Screen Use the Refresh button to update the information. Note that the current implementation only shows traffic statistics per forwarding group. Hence if QoS is not enabled, this screen will always show zero values. Status and Logs 123 Traffic Statistics This screen shows the traffic statistics.


