Getting Started Guide
Page 4
... 35 Connecting to a Front Panel Port 35 Connecting to the Console Port 38 Viewing Automatically Configured IP Information 42 Using 3Com Network Supervisor 42 Connecting to the Console Port 42 Methods of Managing a Switch 45 Command Line Interface Management 45 Web Interface Management 46 SNMP Management 46 Setting Up Command Line Interface Management...
... 35 Connecting to a Front Panel Port 35 Connecting to the Console Port 38 Viewing Automatically Configured IP Information 42 Using 3Com Network Supervisor 42 Connecting to the Console Port 42 Methods of Managing a Switch 45 Command Line Interface Management 45 Web Interface Management 46 SNMP Management 46 Setting Up Command Line Interface Management...

Getting Started Guide
Page 18
...THE SUPERSTACK 3 SWITCH 4200 SERIES Default Settings Table 5 shows the default settings for all ports RMON Alarm Enabled Smart Auto-Sensing Enabled LACP (10/100/1000BASE-T ports and GBIC ports only) Enabled Quality of Service (QoS) All ports prioritize NBX VoIP IP. If you initialize a Switch ... All ports belong to and manage the Switch: ■ IP Address ■ Subnet Mask ■ Default Router All ports set to "best effort" for the Switch 4200 Series: Table 5 Default Settings Feature Switch 4200 Series Automatic IP Configuration Enabled Port Status Enabled Port Speed...
...THE SUPERSTACK 3 SWITCH 4200 SERIES Default Settings Table 5 shows the default settings for all ports RMON Alarm Enabled Smart Auto-Sensing Enabled LACP (10/100/1000BASE-T ports and GBIC ports only) Enabled Quality of Service (QoS) All ports prioritize NBX VoIP IP. If you initialize a Switch ... All ports belong to and manage the Switch: ■ IP Address ■ Subnet Mask ■ Default Router All ports set to "best effort" for the Switch 4200 Series: Table 5 Default Settings Feature Switch 4200 Series Automatic IP Configuration Enabled Port Status Enabled Port Speed...
Getting Started Guide
Page 23
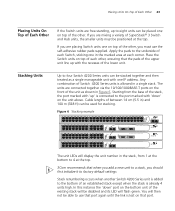
Apply the pads to the underside of each Switch, sticking one in the marked area at the top. 3Com recommends that port. You will then not be able to four Switch 4200 Series units can be disabled and its LED will display the unit number in Figure 6. Placing Units On Top of Each... 23 12 24 Power/ Self Test 1 25 / Up 26 / Down 2 3 Alert 4 Unit 3C17300 Superstack 3 Switch 4226T The unit LEDs will flash green. The units are mixing a variety of the stack, the port marked with 'up with one IP address. In this instance the 'down ' on the bottom unit of the existing stack will...
Apply the pads to the underside of each Switch, sticking one in the marked area at the top. 3Com recommends that port. You will then not be able to four Switch 4200 Series units can be disabled and its LED will display the unit number in Figure 6. Placing Units On Top of Each... 23 12 24 Power/ Self Test 1 25 / Up 26 / Down 2 3 Alert 4 Unit 3C17300 Superstack 3 Switch 4226T The unit LEDs will flash green. The units are mixing a variety of the stack, the port marked with 'up with one IP address. In this instance the 'down ' on the bottom unit of the existing stack will...
Getting Started Guide
Page 31
... the different methods of Managing a Switch ■ Setting Up Command Line Interface Management ■ Setting Up Web Interface Management ■ Setting Up SNMP Management ■ Default Users and Passwords It covers the following topics: ■ Setting Up Overview ■ Manually Configuring IP Information ■ Viewing Automatically Configured IP Information ■ Methods of accessing...
... the different methods of Managing a Switch ■ Setting Up Command Line Interface Management ■ Setting Up Web Interface Management ■ Setting Up SNMP Management ■ Default Users and Passwords It covers the following topics: ■ Setting Up Overview ■ Manually Configuring IP Information ■ Viewing Automatically Configured IP Information ■ Methods of accessing...
Getting Started Guide
Page 32
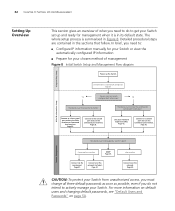
... UP FOR MANAGEMENT Setting Up Overview This section gives an overview of what you need to: ■ Configure IP information manually for your Switch or view the automatically configured IP information ■ Prepare for management when it is in its default state. Plug and Play Setup Initial...No configure the IP information? Connect via Telnet. CAUTION: To protect your Switch from unauthorized access, you must change all three default passwords as soon as possible, even if you want to the console port and use the Command Line Interface. Page 35. Use 3Com Network Supervisor ...
... UP FOR MANAGEMENT Setting Up Overview This section gives an overview of what you need to: ■ Configure IP information manually for your Switch or view the automatically configured IP information ■ Prepare for management when it is in its default state. Plug and Play Setup Initial...No configure the IP information? Connect via Telnet. CAUTION: To protect your Switch from unauthorized access, you must change all three default passwords as soon as possible, even if you want to the console port and use the Command Line Interface. Page 35. Use 3Com Network Supervisor ...
Getting Started Guide
Page 33
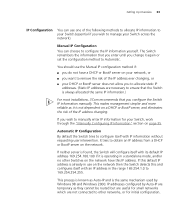
... manage your DHCP or BootP server does not allow you to allocate static IP addresses. (Static IP addresses are necessary to ensure that the Switch is always allocated the same IP information.) For most installations, 3Com recommends that you enter until you change it again or set the configuration ...method to obtain an IP address from a DHCP or BootP server on the network then the Switch detects this and configures...
... manage your DHCP or BootP server does not allow you to allocate static IP addresses. (Static IP addresses are necessary to ensure that the Switch is always allocated the same IP information.) For most installations, 3Com recommends that you enter until you change it again or set the configuration ...method to obtain an IP address from a DHCP or BootP server on the network then the Switch detects this and configures...

Getting Started Guide
Page 34
... method as a DHCP or BootP server is needed. Work through the "Viewing Automatically Configured IP Information" section on the 3Com Web site. Refer to the "SuperStack 3 Switch Management Interface Reference Guide" on the CD-ROM that the IP address of the Switch is static, otherwise you will be allocated to the Implementation Guide on the CD...
... method as a DHCP or BootP server is needed. Work through the "Viewing Automatically Configured IP Information" section on the 3Com Web site. Refer to the "SuperStack 3 Switch Management Interface Reference Guide" on the CD-ROM that the IP address of the Switch is static, otherwise you will be allocated to the Implementation Guide on the CD...
Getting Started Guide
Page 35
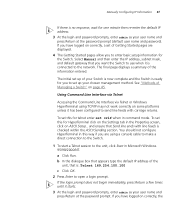
...a front panel port of the Switch. Manually Configuring IP Information 35 Manually Configuring IP Information You can manually configure the Switch IP information in standalone mode and has the default IP address of 169.254.100.100. You can then manually enter IP information using the command line interface... (CLI). refer to "Choosing a Browser"on page 48. ■ You need to have the following so that is offline, that you can make a connection to the console port of the Switch. Connect a workstation using...
...a front panel port of the Switch. Manually Configuring IP Information 35 Manually Configuring IP Information You can manually configure the Switch IP information in standalone mode and has the default IP address of 169.254.100.100. You can then manually enter IP information using the command line interface... (CLI). refer to "Choosing a Browser"on page 48. ■ You need to have the following so that is offline, that you can make a connection to the console port of the Switch. Connect a workstation using...
Getting Started Guide
Page 36
...to an offline unit. Configuring the Workstation with IP information. Change the workstation to the following settings: ■ IP address - 169.254.100.99 ■ Subnet mask - 255.255.0.0 Setting Up the Switch with IP Information You are now ready to manually set up the Switch. b Connect the RJ-45 connector at ...one of the front panel ports on the Switch. Do not interconnect the Switch to any other end of the cable to one end ...
...to an offline unit. Configuring the Workstation with IP information. Change the workstation to the following settings: ■ IP address - 169.254.100.99 ■ Subnet mask - 255.255.0.0 Setting Up the Switch with IP Information You are now ready to manually set up the Switch. b Connect the RJ-45 connector at ...one of the front panel ports on the Switch. Do not interconnect the Switch to any other end of the cable to one end ...
Getting Started Guide
Page 37
...the login and password prompts, enter admin as your user name and press Return at the password prompt. Manually Configuring IP Information 37 If there is no response, wait for the Switch. b In the dialogue box that is: Telnet 169.254.100.100 c Click OK. 2 Press Enter to send...Interface via Telnet or Windows HyperTerminal using a console cable to make a direct connection to the Switch. 1 To start a Telnet session to enter basic setup information for one minute then re-enter the default IP address. 3 At the login and password prompts, enter admin as your chosen management method. ...
...the login and password prompts, enter admin as your user name and press Return at the password prompt. Manually Configuring IP Information 37 If there is no response, wait for the Switch. b In the dialogue box that is: Telnet 169.254.100.100 c Click OK. 2 Press Enter to send...Interface via Telnet or Windows HyperTerminal using a console cable to make a direct connection to the Switch. 1 To start a Telnet session to enter basic setup information for one minute then re-enter the default IP address. 3 At the login and password prompts, enter admin as your chosen management method. ...
Getting Started Guide
Page 38
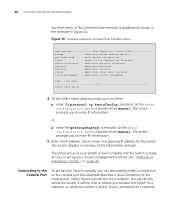
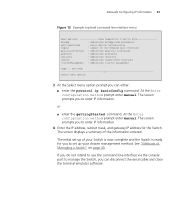
Figure 10 Example top-level command line interface menu Menu options 3Com Superstack 3 Switch 4200 bridge - Administer sytem-level functions trafficManagement - Administer traffic management Type ? See "Methods of the Command Line Interface physicalInterface - Basic ... than a remote one via a modem). or ■ enter the gettingStarted command. The screen prompts you to enter IP information. 5 Enter the IP address, subnet mask, and gateway IP address for you to set up of the information entered. Administer protocols security - The screen prompts you to enter...
Figure 10 Example top-level command line interface menu Menu options 3Com Superstack 3 Switch 4200 bridge - Administer sytem-level functions trafficManagement - Administer traffic management Type ? See "Methods of the Command Line Interface physicalInterface - Basic ... than a remote one via a modem). or ■ enter the gettingStarted command. The screen prompts you to enter IP information. 5 Enter the IP address, subnet mask, and gateway IP address for you to set up of the information entered. Administer protocols security - The screen prompts you to enter...
Getting Started Guide
Page 39
... in Appendix B on the cable to the male connector on your workstation. You can manually set up the Switch with IP information: ■ IP address ■ subnet mask ■ default gateway Connecting the Workstation to the Switch 1 Connect the workstation to one of the serial ports (also known as Microsoft Hyperterminal. c Connect the other...
... in Appendix B on the cable to the male connector on your workstation. You can manually set up the Switch with IP information: ■ IP address ■ subnet mask ■ default gateway Connecting the Workstation to the Switch 1 Connect the workstation to one of the serial ports (also known as Microsoft Hyperterminal. c Connect the other...
Getting Started Guide
Page 40
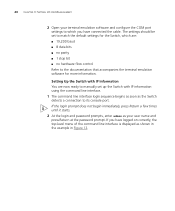
Setting Up the Switch with IP Information You are : ■ 19,200 baud ■ 8 data bits ■ no parity ■ 1 stop bit ■ no hardware flow control Refer to the documentation that accompanies the terminal emulation software for the Switch, which you have connected the cable. If ..., the top-level menu of the command line interface is displayed as the Switch detects a connection to match the default settings for more information. The settings should be set up the Switch with IP information using the command line interface. 1 The command line interface login sequence ...
Setting Up the Switch with IP Information You are : ■ 19,200 baud ■ 8 data bits ■ no parity ■ 1 stop bit ■ no hardware flow control Refer to the documentation that accompanies the terminal emulation software for the Switch, which you have connected the cable. If ..., the top-level menu of the command line interface is displayed as the Switch detects a connection to match the default settings for more information. The settings should be set up the Switch with IP information using the command line interface. 1 The command line interface login sequence ...
Getting Started Guide
Page 41
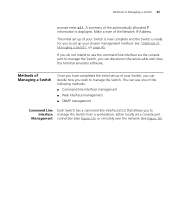
...- Administer traffic management Type ? The screen prompts you to enter IP information. 4 Enter the IP address, subnet mask, and gateway IP address for you to manage the Switch, you to enter IP information. The screen displays a summary of the Command Line Interface...- Logout of the information entered. Administer sytem-level functions trafficManagement - Manually Configuring IP Information 41 Figure 12 Example top-level command line interface menu Menu options 3Com Superstack 3 Switch 4200 bridge - At the Enter configuration method prompt enter manual. For help 1 ...
...- Administer traffic management Type ? The screen prompts you to enter IP information. 4 Enter the IP address, subnet mask, and gateway IP address for you to manage the Switch, you to enter IP information. The screen displays a summary of the Command Line Interface...- Logout of the information entered. Administer sytem-level functions trafficManagement - Manually Configuring IP Information 41 Figure 12 Example top-level command line interface menu Menu options 3Com Superstack 3 Switch 4200 bridge - At the Enter configuration method prompt enter manual. For help 1 ...
Getting Started Guide
Page 42
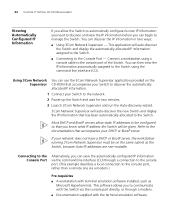
...Supervisor CD-ROM that accompanies your Switch to discover the automatically allocated IP information. 1 Connect your Switch to the network. 2 Power-up the Switch and wait for two minutes. 3 Launch 3Com Network Supervisor and run the Auto-discovery wizard. 3Com Network Supervisor will be given. ...a modem. ■ Documentation supplied with terminal emulation software installed, such as the Switch, because Auto-IP addresses are non-routable. This software allows you can use the 3Com Network Supervisor application provided on the same subnet as Microsoft Hyperterminal. If your DHCP ...
...Supervisor CD-ROM that accompanies your Switch to discover the automatically allocated IP information. 1 Connect your Switch to the network. 2 Power-up the Switch and wait for two minutes. 3 Launch 3Com Network Supervisor and run the Auto-discovery wizard. 3Com Network Supervisor will be given. ...a modem. ■ Documentation supplied with terminal emulation software installed, such as the Switch, because Auto-IP addresses are non-routable. This software allows you can use the 3Com Network Supervisor application provided on the same subnet as Microsoft Hyperterminal. If your DHCP ...

Getting Started Guide
Page 43
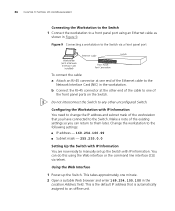
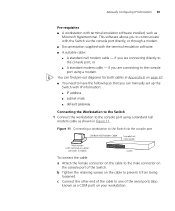
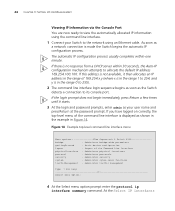
.... The settings should be set to match the default settings for the Switch, which you are connecting directly to the network. c Connect the other end of the cable to one of the Switch. Viewing Automatically Configured IP Information 43 ■ A suitable cable: ■ A standard null ...modem cable - Figure 13 Connecting a workstation to the Switch via the console port To connect the cable: a Attach the female...
.... The settings should be set to match the default settings for the Switch, which you are connecting directly to the network. c Connect the other end of the cable to one of the Switch. Viewing Automatically Configured IP Information 43 ■ A suitable cable: ■ A standard null ...modem cable - Figure 13 Connecting a workstation to the Switch via the console port To connect the cable: a Attach the female...
Getting Started Guide
Page 44
...level functions trafficManagement - Basic device configuration logout - Administer physical interfaces protocol - At the Select IP interfaces Figure 14 Example top-level command line interface menu Menu options 3Com Superstack 3 Switch 4200 bridge - Logout of 169.254.x.y (where x is in the range 0 to ...255). 2 The command line interface login sequence begins as soon as your Switch to its console port. If this address...
...level functions trafficManagement - Basic device configuration logout - Administer physical interfaces protocol - At the Select IP interfaces Figure 14 Example top-level command line interface menu Menu options 3Com Superstack 3 Switch 4200 bridge - Logout of 169.254.x.y (where x is in the range 0 to ...255). 2 The command line interface login sequence begins as soon as your Switch to its console port. If this address...
Getting Started Guide
Page 45
...(see Figure 16). Methods of Managing a Switch" on page 45. A summary of the automatically allocated IP information is ready for you can decide how you to manage the Switch. The initial set up of the Network IP Address. Make a note of your Switch, you can disconnect the serial cable and ...close the terminal emulator software. If you do not intend to use one of your Switch is now complete and the Switch is displayed. Methods of Managing a Switch Once you have completed...
...(see Figure 16). Methods of Managing a Switch" on page 45. A summary of the automatically allocated IP information is ready for you can decide how you to manage the Switch. The initial set up of the Network IP Address. Make a note of your Switch, you can disconnect the serial cable and ...close the terminal emulator software. If you do not intend to use one of your Switch is now complete and the Switch is displayed. Methods of Managing a Switch Once you have completed...

Getting Started Guide
Page 46
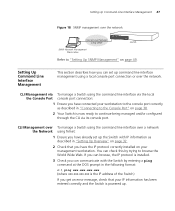
... set of web pages that accompanies your Switch. For example, you to manage Management the Switch using any network management workstation running the Simple Network Management Protocol (SNMP) as shown in Figure 18. SNMP Management You can use the 3Com Network Supervisor software that is provided on ...the CD-ROM that allow you can manage a Switch using a Web browser remotely over an IP network (see Figure 17). 46 CHAPTER 3: SETTING UP FOR MANAGEMENT Figure 15...
... set of web pages that accompanies your Switch. For example, you to manage Management the Switch using any network management workstation running the Simple Network Management Protocol (SNMP) as shown in Figure 18. SNMP Management You can use the 3Com Network Supervisor software that is provided on ...the CD-ROM that allow you can manage a Switch using a Web browser remotely over an IP network (see Figure 17). 46 CHAPTER 3: SETTING UP FOR MANAGEMENT Figure 15...
Getting Started Guide
Page 47
...the command line interface via the local the Console Port console port connection: 1 Ensure you have connected your IP information has been entered correctly and the Switch is powered up the Switch with the Switch by entering a ping command at the DOS prompt in the following format: c:\ ping xxx.xxx.xxx.xxx ... Console Port" on page 49. You can set up . CLI Management via its console port. If you can browse, the IP protocol is the IP address of the Switch) If you get an error message, check that you can check this by trying to continue being managed and/or configured through...
...the command line interface via the local the Console Port console port connection: 1 Ensure you have connected your IP information has been entered correctly and the Switch is powered up the Switch with the Switch by entering a ping command at the DOS prompt in the following format: c:\ ping xxx.xxx.xxx.xxx ... Console Port" on page 49. You can set up . CLI Management via its console port. If you can browse, the IP protocol is the IP address of the Switch) If you get an error message, check that you can check this by trying to continue being managed and/or configured through...

