
Getting Started Guide
Page 1
SuperStack® 3 Switch 4200 Series Getting Started Guide 3C17300 3C17302 3C17304 http://www.3com.com/ Part No. DUA1730-0AAA02 Published October 2002
SuperStack® 3 Switch 4200 Series Getting Started Guide 3C17300 3C17302 3C17304 http://www.3com.com/ Part No. DUA1730-0AAA02 Published October 2002

Getting Started Guide
Page 7
... the 3Com World Wide Web site: http://www.3com.com/ consequently, it assumes a basic working knowledge of LANs (Local Area Networks). This guide is intended for use with your product differ from the information in this guide apply to install and use a SuperStack® 3 Switch 4200 ... provides all the information you need to all Switch 4200 Series models: ■ Switch 4226T (3C17300) - 24 10BASE-T/100BASE-TX ports, 2 10/100/1000BASE-T ports ■ Switch 4250T (3C17302) - 48 10BASE-T/100BASE-TX ports, 2 10/100/1000BASE-T ports ■ Switch 4228G (3C17304) - 24 10BASE-T/100BASE-TX ...
... the 3Com World Wide Web site: http://www.3com.com/ consequently, it assumes a basic working knowledge of LANs (Local Area Networks). This guide is intended for use with your product differ from the information in this guide apply to install and use a SuperStack® 3 Switch 4200 ... provides all the information you need to all Switch 4200 Series models: ■ Switch 4226T (3C17300) - 24 10BASE-T/100BASE-TX ports, 2 10/100/1000BASE-T ports ■ Switch 4250T (3C17302) - 48 10BASE-T/100BASE-TX ports, 2 10/100/1000BASE-T ports ■ Switch 4228G (3C17304) - 24 10BASE-T/100BASE-TX ...
Getting Started Guide
Page 10
... Getting Started Guide Page 21 Product Registration You can register your SuperStack 3 Switch 4200 on the CD-ROM. They will help make our documentation more useful to 3Com at: pddtechpubs_comments@3com.com Please include the following online Documentation documentation: ■ SuperStack 3 Switch Implementation Guide (PDF format) ■ SuperStack 3 Switch Management Interface Reference Guide (HTML format) 1 To access the documentation...
... Getting Started Guide Page 21 Product Registration You can register your SuperStack 3 Switch 4200 on the CD-ROM. They will help make our documentation more useful to 3Com at: pddtechpubs_comments@3com.com Please include the following online Documentation documentation: ■ SuperStack 3 Switch Implementation Guide (PDF format) ■ SuperStack 3 Switch Management Interface Reference Guide (HTML format) 1 To access the documentation...
Getting Started Guide
Page 27
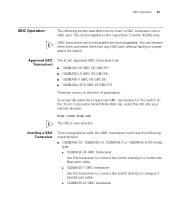
... remove them from and insert them into any GBIC port without having to insert a GBIC transceiver into your internet browser: http://www.3com.com The URL is case sensitive. To access the latest list of publication. This section applies to Category 5 twisted-pair cable. ■...swappable. GBIC transceivers are correct at the time of approved GBIC transceivers for the Switch on the 3Com Corporation World Wide Web site, enter this transceiver to connect the Switch directly to the SuperStack 3 Switch 4228G only. Inserting a GBIC Transceiver To be recognised as valid, the GBIC ...
... remove them from and insert them into any GBIC port without having to insert a GBIC transceiver into your internet browser: http://www.3com.com The URL is case sensitive. To access the latest list of publication. This section applies to Category 5 twisted-pair cable. ■...swappable. GBIC transceivers are correct at the time of approved GBIC transceivers for the Switch on the 3Com Corporation World Wide Web site, enter this transceiver to connect the Switch directly to the SuperStack 3 Switch 4228G only. Inserting a GBIC Transceiver To be recognised as valid, the GBIC ...
Getting Started Guide
Page 39
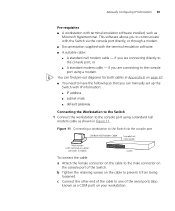
... IP information: ■ IP address ■ subnet mask ■ default gateway Connecting the Workstation to the Switch 1 Connect the workstation to communicate with the Switch via the console port To connect the cable: a Attach the female connector on the cable to the male connector on the ...cables in Figure 11. if you are connecting to one of the Switch. b Tighten the retaining screws on the console port of the serial ports (also known as a COM port) on your workstation. Figure 11 Connecting a workstation to the Switch via the console port directly, or through a modem. ■ ...
... IP information: ■ IP address ■ subnet mask ■ default gateway Connecting the Workstation to the Switch 1 Connect the workstation to communicate with the Switch via the console port To connect the cable: a Attach the female connector on the cable to the male connector on the ...cables in Figure 11. if you are connecting to one of the Switch. b Tighten the retaining screws on the console port of the serial ports (also known as a COM port) on your workstation. Figure 11 Connecting a workstation to the Switch via the console port directly, or through a modem. ■ ...
Getting Started Guide
Page 40
...level menu of the command line interface is displayed as your terminal emulation software and configure the COM port settings to which are now ready to manually set to match the default settings for the Switch, which you have connected the cable. If the login prompt does not begin immediately, press... Return a few times until it starts. 2 At the login and password prompts, enter admin as shown in the example in Figure 12. Setting Up the Switch with IP Information You are : ■ 19,200 baud ■ 8 data bits ■ no parity ■ 1 stop bit ■ no hardware flow control...
...level menu of the command line interface is displayed as your terminal emulation software and configure the COM port settings to which are now ready to manually set to match the default settings for the Switch, which you have connected the cable. If the login prompt does not begin immediately, press... Return a few times until it starts. 2 At the login and password prompts, enter admin as shown in the example in Figure 12. Setting Up the Switch with IP Information You are : ■ 19,200 baud ■ 8 data bits ■ no parity ■ 1 stop bit ■ no hardware flow control...

Getting Started Guide
Page 43
... for both cables in Figure 13. The settings should be set to match the default settings for the Switch, which are connecting to the console port using a standard null modem cable as a COM port) on page 67. ■ A Category 5 twisted pair Ethernet cable with RJ-45 connectors to... connect your terminal emulation software and configure the COM port settings to one of the serial ports (also known as shown in Appendix B on your workstation. 2 Open your Switch to prevent it from being loosened. c Connect the other end of the...
... for both cables in Figure 13. The settings should be set to match the default settings for the Switch, which are connecting to the console port using a standard null modem cable as a COM port) on page 67. ■ A Category 5 twisted pair Ethernet cable with RJ-45 connectors to... connect your terminal emulation software and configure the COM port settings to one of the serial ports (also known as shown in Appendix B on your workstation. 2 Open your Switch to prevent it from being loosened. c Connect the other end of the...


