
Getting Started Guide
Page 4
... Information 35 Connecting to a Front Panel Port 35 Connecting to the Console Port 38 Viewing Automatically Configured IP Information 42 Using 3Com Network Supervisor 42 Connecting to the Console Port 42 Methods of Managing a Switch 45 Command Line Interface Management 45 Web Interface Management 46 SNMP Management 46 Setting Up Command Line Interface...
... Information 35 Connecting to a Front Panel Port 35 Connecting to the Console Port 38 Viewing Automatically Configured IP Information 42 Using 3Com Network Supervisor 42 Connecting to the Console Port 42 Methods of Managing a Switch 45 Command Line Interface Management 45 Web Interface Management 46 SNMP Management 46 Setting Up Command Line Interface...
Getting Started Guide
Page 14
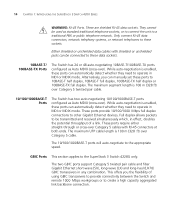
...1000BASE-T Ports The Switch has two auto-negotiating 10/100/1000BASE-T ports configured as Auto MDIX ...(cross-over ). The 10/100/1000BASE-T ports will auto-negotiate to these sockets. While auto-negotiation is enabled, these ports can manually set these data sockets. 10BASE-T/ 100BASE-TX Ports The Switch... has 24 or 48 auto-negotiating 10BASE-T/100BASE-TX ports configured...transceivers to provide connectivity between the Switch and remote 1000 Mbps workgroups or... connection. 14 CHAPTER 1: INTRODUCING THE SUPERSTACK 3 SWITCH 4200 SERIES WARNING: RJ-45 Ports....
...1000BASE-T Ports The Switch has two auto-negotiating 10/100/1000BASE-T ports configured as Auto MDIX ...(cross-over ). The 10/100/1000BASE-T ports will auto-negotiate to these sockets. While auto-negotiation is enabled, these ports can manually set these data sockets. 10BASE-T/ 100BASE-TX Ports The Switch... has 24 or 48 auto-negotiating 10BASE-T/100BASE-TX ports configured...transceivers to provide connectivity between the Switch and remote 1000 Mbps workgroups or... connection. 14 CHAPTER 1: INTRODUCING THE SUPERSTACK 3 SWITCH 4200 SERIES WARNING: RJ-45 Ports....

Getting Started Guide
Page 15
... and duplex modes are fixed by LEDs" on the front of the Switch, and how to read their status according to color. Alternatively, auto-negotiation can be disabled and the flow control setting can be manually configured. 1000BaseT GBIC's These ports will auto-negotiate to determine the duplex mode... Series 15 Fiber GBIC's. Although it is not possible to disable auto-negotiation it is possible to the "SuperStack 3 Switch Management Interface Reference Guide" on the port. For more detailed information, refer to change the advertised capabilities for problem solving, see "Solving Problems...
... and duplex modes are fixed by LEDs" on the front of the Switch, and how to read their status according to color. Alternatively, auto-negotiation can be disabled and the flow control setting can be manually configured. 1000BaseT GBIC's These ports will auto-negotiate to determine the duplex mode... Series 15 Fiber GBIC's. Although it is not possible to disable auto-negotiation it is possible to the "SuperStack 3 Switch Management Interface Reference Guide" on the port. For more detailed information, refer to change the advertised capabilities for problem solving, see "Solving Problems...

Getting Started Guide
Page 16
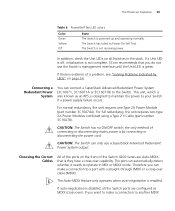
...SUPERSTACK 3 SWITCH 4200 SERIES LED Color Indicates Green flashing Packets are being transmitted/received on the port. Off The Switch initialization process is initializing (which includes running a Power On Self Test). Yellow flashing Packets are being transmitted/received on the port. Unit LEDs 1-4 Green When the Switch... Alert LED Green flashing The Switch Alert LED has been configured via the CLI or Web Interface to be off (Default state). Yellow The Switch has failed its Power On Self Test. Off The Switch Alert LED has been configured via the CLI or Web ...
...SUPERSTACK 3 SWITCH 4200 SERIES LED Color Indicates Green flashing Packets are being transmitted/received on the port. Off The Switch initialization process is initializing (which includes running a Power On Self Test). Yellow flashing Packets are being transmitted/received on the port. Unit LEDs 1-4 Green When the Switch... Alert LED Green flashing The Switch Alert LED has been configured via the CLI or Web Interface to be off (Default state). Yellow The Switch has failed its Power On Self Test. Off The Switch Alert LED has been configured via the CLI or Web ...

Getting Started Guide
Page 18
...; IP Address ■ Subnet Mask ■ Default Router 18 CHAPTER 1: INTRODUCING THE SUPERSTACK 3 SWITCH 4200 SERIES Default Settings Table 5 shows the default settings for all ports RMON Alarm Enabled Smart Auto-Sensing Enabled LACP (10/100/1000BASE-T ...Enabled Quality of Service (QoS) All ports prioritize NBX VoIP IP. All ports set to "best effort" for the Switch 4200 Series: Table 5 Default Settings Feature Switch 4200 Series Automatic IP Configuration Enabled Port Status Enabled Port Speed All ports are auto-negotiated Duplex Mode All ports are retained to allow you...
...; IP Address ■ Subnet Mask ■ Default Router 18 CHAPTER 1: INTRODUCING THE SUPERSTACK 3 SWITCH 4200 SERIES Default Settings Table 5 shows the default settings for all ports RMON Alarm Enabled Smart Auto-Sensing Enabled LACP (10/100/1000BASE-T ...Enabled Quality of Service (QoS) All ports prioritize NBX VoIP IP. All ports set to "best effort" for the Switch 4200 Series: Table 5 Default Settings Feature Switch 4200 Series Automatic IP Configuration Enabled Port Status Enabled Port Speed All ports are auto-negotiated Duplex Mode All ports are retained to allow you...
Getting Started Guide
Page 25
... operates when auto-negotiation is by LEDs" on the front of connecting or disconnecting mains power is enabled. CAUTION: The Switch can connect a SuperStack Advanced Redundant Power System (3C16071, 3C16071A or 3C16071B) to another MDIX If auto-negotiation is they have a cross-over ...3Com recommends that is disabled, all Switches in MDI or MDIX mode. Connecting a Redundant Power System You can only use the Switch's management interface until the Unit LED is also known as MDIX (cross-over cable (MDIX). the only method of the Switch 4200 Series are configured ...
... operates when auto-negotiation is by LEDs" on the front of connecting or disconnecting mains power is enabled. CAUTION: The Switch can connect a SuperStack Advanced Redundant Power System (3C16071, 3C16071A or 3C16071B) to another MDIX If auto-negotiation is they have a cross-over ...3Com recommends that is disabled, all Switches in MDI or MDIX mode. Connecting a Redundant Power System You can only use the Switch's management interface until the Unit LED is also known as MDIX (cross-over cable (MDIX). the only method of the Switch 4200 Series are configured ...
Getting Started Guide
Page 26
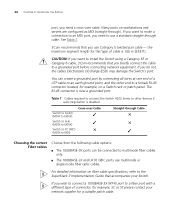
..., refer to the SuperStack 3 Implementation Guide that you use Category 5 twisted pair cable - Many ports on a Switch rack or patch panel. CAUTION: If you want to make a connection to an MDI port, you need a cross-over Cable Switch to Switch ✓ (MDIX to MDIX) Switch to Hub (MDIX ...maximum segment length for example, on workstations and servers are configured as MDI (straight-through cable. The RJ-45 connector is 100 m (328 ft). If you want to install the Switch using a Category 5E or Category 6 cable, 3Com recommends that you do not, the cables Electrostatic Discharge (...
..., refer to the SuperStack 3 Implementation Guide that you use Category 5 twisted pair cable - Many ports on a Switch rack or patch panel. CAUTION: If you want to make a connection to an MDI port, you need a cross-over Cable Switch to Switch ✓ (MDIX to MDIX) Switch to Hub (MDIX ...maximum segment length for example, on workstations and servers are configured as MDI (straight-through cable. The RJ-45 connector is 100 m (328 ft). If you want to install the Switch using a Category 5E or Category 6 cable, 3Com recommends that you do not, the cables Electrostatic Discharge (...
Getting Started Guide
Page 31
... However, to access the management software that is known as managing the Switch. It covers the following topics: ■ Setting Up Overview ■ Manually Configuring IP Information ■ Viewing Automatically Configured IP Information ■ Methods of the features offered by the Switch, and to change and monitor the way it will work straight away...
... However, to access the management software that is known as managing the Switch. It covers the following topics: ■ Setting Up Overview ■ Manually Configuring IP Information ■ Viewing Automatically Configured IP Information ■ Methods of the features offered by the Switch, and to change and monitor the way it will work straight away...
Getting Started Guide
Page 32
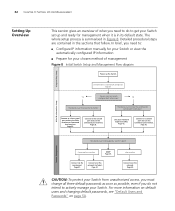
..., even if you need to: ■ Configure IP information manually for your Switch or view the automatically configured IP information ■ Prepare for your chosen method of what you do not intend to get your Switch set up the Switch. 32 CHAPTER 3: SETTING UP FOR MANAGEMENT Setting...Default Users and Passwords" on page 50. Page 33. Use 3Com Network Supervisor (3NS). Page 42. Connect over the network. How do you want to manually No configure the IP information? Page 42. Connect to the Switch? Page 49. Detailed procedural steps are contained in Figure 8. ...
..., even if you need to: ■ Configure IP information manually for your Switch or view the automatically configured IP information ■ Prepare for your chosen method of what you do not intend to get your Switch set up the Switch. 32 CHAPTER 3: SETTING UP FOR MANAGEMENT Setting...Default Users and Passwords" on page 50. Page 33. Use 3Com Network Supervisor (3NS). Page 42. Connect over the network. How do you want to manually No configure the IP information? Page 42. Connect to the Switch? Page 49. Detailed procedural steps are contained in Figure 8. ...
Getting Started Guide
Page 33
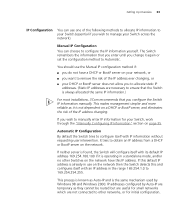
...IP addresses are temporary as Auto-IP and is always allocated the same IP information.) For most installations, 3Com recommends that you enter until you change it again or set the configuration method to Automatic. It tries to obtain an IP address from a DHCP or BootP server on page ...manually. This makes management simpler and more reliable as it is not dependent on the network then the Switch detects this IP address. Automatic IP Configuration By default the Switch tries to configure itself with its default IP address 169.254.100.100 if it is operating in a standalone mode,...
...IP addresses are temporary as Auto-IP and is always allocated the same IP information.) For most installations, 3Com recommends that you enter until you change it again or set the configuration method to Automatic. It tries to obtain an IP address from a DHCP or BootP server on page ...manually. This makes management simpler and more reliable as it is not dependent on the network then the Switch detects this IP address. Automatic IP Configuration By default the Switch tries to configure itself with its default IP address 169.254.100.100 if it is operating in a standalone mode,...

Getting Started Guide
Page 34
For a detailed description of how automatic IP configuration operates, please refer to the "SuperStack 3 Switch Management Interface Reference Guide" on the CD-ROM that accompanies your Switch or on the 3Com Web site. For detailed information about the specific web interface operations and command line interface commands and problem solving, refer to the Implementation Guide on...
For a detailed description of how automatic IP configuration operates, please refer to the "SuperStack 3 Switch Management Interface Reference Guide" on the CD-ROM that accompanies your Switch or on the 3Com Web site. For detailed information about the specific web interface operations and command line interface commands and problem solving, refer to the Implementation Guide on...
Getting Started Guide
Page 35
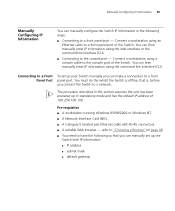
... address ■ subnet mask ■ default gateway Connect a workstation using the command line interface (CLI). You can manually configure the Switch IP information in standalone mode and has the default IP address of the Switch. Connecting to a network. You must do this section assumes the unit has been powered up in the following...
... address ■ subnet mask ■ default gateway Connect a workstation using the command line interface (CLI). You can manually configure the Switch IP information in standalone mode and has the default IP address of the Switch. Connecting to a network. You must do this section assumes the unit has been powered up in the following...
Getting Started Guide
Page 36
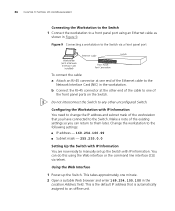
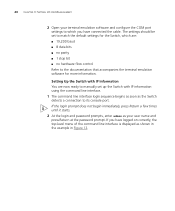
... or the command line interface (CLI) via a front panel port To connect the cable: a Attach an RJ-45 connector at the other unconfigured Switch. You can return to one minute. 2 Open a suitable Web browser and enter 169.254.100.100 in the Location Address field. This takes ... settings: ■ IP address - 169.254.100.99 ■ Subnet mask - 255.255.0.0 Setting Up the Switch with IP Information You are now ready to manually set up the Switch. Configuring the Workstation with IP information. Make a note of the existing settings so you have connected to the Network Interface...
... or the command line interface (CLI) via a front panel port To connect the cable: a Attach an RJ-45 connector at the other unconfigured Switch. You can return to one minute. 2 Open a suitable Web browser and enter 169.254.100.100 in the Location Address field. This takes ... settings: ■ IP address - 169.254.100.99 ■ Subnet mask - 255.255.0.0 Setting Up the Switch with IP Information You are now ready to manually set up the Switch. Configuring the Workstation with IP information. Make a note of the existing settings so you have connected to the Network Interface...
Getting Started Guide
Page 37
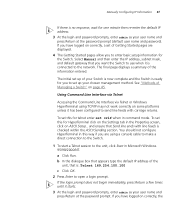
... Information 37 If there is checked within the ASCII Sending section. and ensure that you want the Switch to use when it has been configured to the unit, click Start in the Properties screen, click on page 45. If you have logged on some platforms unless it is ready for.... Using Command Line Interface via Telnet Accessing the Command Line Interface via Telnet or Windows HyperTerminal using a console cable to make a direct connection to the Switch. 1 To start a Telnet session to send line feeds with line feeds is no response, wait for you have logged on correctly, a set crlf when...
... Information 37 If there is checked within the ASCII Sending section. and ensure that you want the Switch to use when it has been configured to the unit, click Start in the Properties screen, click on page 45. If you have logged on some platforms unless it is ready for.... Using Command Line Interface via Telnet Accessing the Command Line Interface via Telnet or Windows HyperTerminal using a console cable to make a direct connection to the Switch. 1 To start a Telnet session to send line feeds with line feeds is no response, wait for you have logged on correctly, a set crlf when...
Getting Started Guide
Page 38
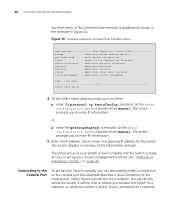
... your chosen management method. At the Enter configuration method prompt enter manual. See "Methods of the information entered. Administer security system - The initial set up of your Switch is now complete and the Switch is displayed as shown in the example in...one via a modem). Administer physical interfaces protocol - The screen displays a summary of Managing a Switch" on page 45. Figure 10 Example top-level command line interface menu Menu options 3Com Superstack 3 Switch 4200 bridge - The screen prompts you to enter IP information. 5 Enter the IP address, ...
... your chosen management method. At the Enter configuration method prompt enter manual. See "Methods of the information entered. Administer security system - The initial set up of your Switch is now complete and the Switch is displayed as shown in the example in...one via a modem). Administer physical interfaces protocol - The screen displays a summary of Managing a Switch" on page 45. Figure 10 Example top-level command line interface menu Menu options 3Com Superstack 3 Switch 4200 bridge - The screen prompts you to enter IP information. 5 Enter the IP address, ...
Getting Started Guide
Page 39
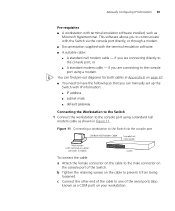
... you are connecting directly to the console port using a modem. if you can find pin-out diagrams for both cables in Figure 11. Manually Configuring IP Information 39 Pre-requisites ■ A workstation with the terminal emulation software. ■ A suitable cable: ■ A standard null modem ...a workstation to the male connector on your workstation. if you to communicate with the Switch via the console port To connect the cable: a Attach the female connector on the cable to the Switch via the console port directly, or through a modem. ■ Documentation supplied with ...
... you are connecting directly to the console port using a modem. if you can find pin-out diagrams for both cables in Figure 11. Manually Configuring IP Information 39 Pre-requisites ■ A workstation with the terminal emulation software. ■ A suitable cable: ■ A standard null modem ...a workstation to the male connector on your workstation. if you to communicate with the Switch via the console port To connect the cable: a Attach the female connector on the cable to the Switch via the console port directly, or through a modem. ■ Documentation supplied with ...
Getting Started Guide
Page 40
... CHAPTER 3: SETTING UP FOR MANAGEMENT 2 Open your user name and press Return at the password prompt. The settings should be set up the Switch with IP information using the command line interface. 1 The command line interface login sequence begins as soon as shown in the example in Figure ...not begin immediately, press Return a few times until it starts. 2 At the login and password prompts, enter admin as your terminal emulation software and configure the COM port settings to which are now ready to manually set to match the default settings for more information. If you have logged on...
... CHAPTER 3: SETTING UP FOR MANAGEMENT 2 Open your user name and press Return at the password prompt. The settings should be set up the Switch with IP information using the command line interface. 1 The command line interface login sequence begins as soon as shown in the example in Figure ...not begin immediately, press Return a few times until it starts. 2 At the login and password prompts, enter admin as your terminal emulation software and configure the COM port settings to which are now ready to manually set to match the default settings for more information. If you have logged on...
Getting Started Guide
Page 41
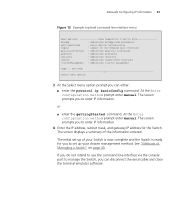
.... or ■ enter the gettingStarted command. At the Enter configuration method prompt enter manual. The initial set up of Managing a Switch" on page 45. Administer traffic management Type ? Manually Configuring IP Information 41 Figure 12 Example top-level command line interface menu Menu options 3Com Superstack 3 Switch 4200 bridge - Administer security system - For help 1 Select menu...
.... or ■ enter the gettingStarted command. At the Enter configuration method prompt enter manual. The initial set up of Managing a Switch" on page 45. Administer traffic management Type ? Manually Configuring IP Information 41 Figure 12 Example top-level command line interface menu Menu options 3Com Superstack 3 Switch 4200 bridge - Administer security system - For help 1 Select menu...
Getting Started Guide
Page 42
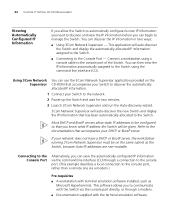
...interface (CLI). This application will auto-discover the Switch and display the automatically allocated IP information assigned to the Switch. ■ Connecting to the console port of the Switch. Using 3Com Network You can view the automatically configured IP information via the console port directly, or ... DHCP or BootP server, the workstation running 3Com Network Supervisor must be given. You can then view the IP information automatically assigned to the Switch. Most DHCP and BootP servers allow the Switch to automatically configure its own IP information you need to discover...
...interface (CLI). This application will auto-discover the Switch and display the automatically allocated IP information assigned to the Switch. ■ Connecting to the console port of the Switch. Using 3Com Network You can view the automatically configured IP information via the console port directly, or ... DHCP or BootP server, the workstation running 3Com Network Supervisor must be given. You can then view the IP information automatically assigned to the Switch. Most DHCP and BootP servers allow the Switch to automatically configure its own IP information you need to discover...

Getting Started Guide
Page 43
Viewing Automatically Configured IP Information 43 ■ A suitable cable: ■ A standard null modem cable - Connecting the Workstation to the Switch 1 Connect the workstation to the console port using a standard null modem cable as a COM port) on the cable to the console port using... in Appendix B on page 67. ■ A Category 5 twisted pair Ethernet cable with RJ-45 connectors to connect your terminal emulation software and configure the COM port settings to which are connecting directly to the console port, or ■ A standard modem cable - b Tighten the retaining screws ...
Viewing Automatically Configured IP Information 43 ■ A suitable cable: ■ A standard null modem cable - Connecting the Workstation to the Switch 1 Connect the workstation to the console port using a standard null modem cable as a COM port) on the cable to the console port using... in Appendix B on page 67. ■ A Category 5 twisted pair Ethernet cable with RJ-45 connectors to connect your terminal emulation software and configure the COM port settings to which are connecting directly to the console port, or ■ A standard modem cable - b Tighten the retaining screws ...


