
Operation Guide
Page 2
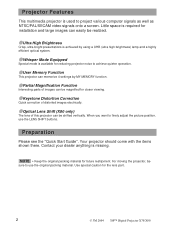
... • Keep the original packing material for the lens part. 2 © 3M 2004 3M™ Digital Projector X70/X80 Use special caution for future reshipment. Preparation Please see the "Quick Start Guide". Contact your dealer anything is used to project various computer signals as well as NTSC/PAL/SECAM video signals onto a screen. For moving the projector, be shifted vertically. Little space is required for installation and large images can...
... • Keep the original packing material for the lens part. 2 © 3M 2004 3M™ Digital Projector X70/X80 Use special caution for future reshipment. Preparation Please see the "Quick Start Guide". Contact your dealer anything is used to project various computer signals as well as NTSC/PAL/SECAM video signals onto a screen. For moving the projector, be shifted vertically. Little space is required for installation and large images can...
Operation Guide
Page 3
...;20 Displaying The Child Window ʜ21 Selecting An Audio Input ʜʜʜ21 © 3M 2004 3M™ Digital Projector X70/X80 Multifunctional Settings ʜʜʜʜ22 Using The Menu Functions ʜʜ22 MAIN Menu 23 PICTURE-1 Menu 24 PICTURE-2 Menu 26 INPUT Menu 27 AUTO Menu 29 SCREEN Menu 31 OPTION Menu 33 NETWORK Menu 35 Network Setting Up 36 Lamp 37 Replacing The Lamp ʜʜʜʜʜ38 Air Filter 39 Caring For The Air Filter...
...;20 Displaying The Child Window ʜ21 Selecting An Audio Input ʜʜʜ21 © 3M 2004 3M™ Digital Projector X70/X80 Multifunctional Settings ʜʜʜʜ22 Using The Menu Functions ʜʜ22 MAIN Menu 23 PICTURE-1 Menu 24 PICTURE-2 Menu 26 INPUT Menu 27 AUTO Menu 29 SCREEN Menu 31 OPTION Menu 33 NETWORK Menu 35 Network Setting Up 36 Lamp 37 Replacing The Lamp ʜʜʜʜʜ38 Air Filter 39 Caring For The Air Filter...

Operation Guide
Page 6
...(560) 6 © 3M 2004 3M™ Digital Projector X70/X80 Setting Up Arrangement WARNING • Before installation, make sure that the projector is turned off and the power cord is disconnected. • Do not set up and move the projector, while it is hot. • Install the projector in the table are calculated for a full size screen. (±10%) Reference for the 4:3 aspect ratio b C Screen Lens center Side View a Reference for...
...(560) 6 © 3M 2004 3M™ Digital Projector X70/X80 Setting Up Arrangement WARNING • Before installation, make sure that the projector is turned off and the power cord is disconnected. • Do not set up and move the projector, while it is hot. • Install the projector in the table are calculated for a full size screen. (±10%) Reference for the 4:3 aspect ratio b C Screen Lens center Side View a Reference for...
Operation Guide
Page 8
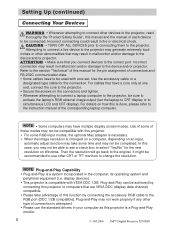
... data. • Some cables have to be sure to activate the laptop's RGB external image output (set . For details on Windows. For cables that have multiple display screen modes. Plug-and-Play can be recommended to use the standard drivers in your computer as this projector is a Plug-and-Play monitor. 8 © 3M 2004 3M™ Digital Projector X70/X80 Setting Up (continued) Connecting Your Devices WARNING • Whenever attempting to connect...
... data. • Some cables have to be sure to activate the laptop's RGB external image output (set . For details on Windows. For cables that have multiple display screen modes. Plug-and-Play can be recommended to use the standard drivers in your computer as this projector is a Plug-and-Play monitor. 8 © 3M 2004 3M™ Digital Projector X70/X80 Setting Up (continued) Connecting Your Devices WARNING • Whenever attempting to connect...

Operation Guide
Page 12
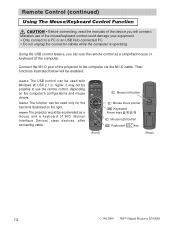
.... control). 12 © 3M 2004 3M™ Digital Projector X70/X80 AVOID EXPOSURE-LASER RADIATION IS EMITTED FROM THIS APERTURE CAUTION LASER RADIATION DO NOT STARE INTO BEAM WAVE LENGTH: 640-660nm MAX OUTPUT: 1mW CLASS 2 LASER PRODUCT Comples with environmental laws. 1 Remove the battery cover. LENS SHIFT FOCUS ASPECT LASER BLANK NEXT PREVIOUS MOUSE INTERLINK ELECTRONICS P S C MENU AUTO ESPCOSITMIOANGNOFNRYOESFEFPTinFPREKEEZYVESOTLOUNMMEEUTSEEARCH 1 2 3 ID CHANGE This remote control...
.... control). 12 © 3M 2004 3M™ Digital Projector X70/X80 AVOID EXPOSURE-LASER RADIATION IS EMITTED FROM THIS APERTURE CAUTION LASER RADIATION DO NOT STARE INTO BEAM WAVE LENGTH: 640-660nm MAX OUTPUT: 1mW CLASS 2 LASER PRODUCT Comples with environmental laws. 1 Remove the battery cover. LENS SHIFT FOCUS ASPECT LASER BLANK NEXT PREVIOUS MOUSE INTERLINK ELECTRONICS P S C MENU AUTO ESPCOSITMIOANGNOFNRYOESFEFPTinFPREKEEZYVESOTLOUNMMEEUTSEEARCH 1 2 3 ID CHANGE This remote control...
Operation Guide
Page 14
... MENU POSITION RESET AUTO MAGNFY PinP VOLUME ON FREEZE MUTE OFF KEYSTONE SEARCH 1 2 3 ID CHANGE (Front) Mouse left button Mouse move pointer Keyboard Arrow keys / / / Mouse right button Keyboard ESC key (Rear) 14 © 3M 2004 3M™ Digital Projector X70/X80 Connect the M1-D port of the projector to a PC or an USB Hub connected PC. • Do not unplug the connector cables while the computer is operating...
... MENU POSITION RESET AUTO MAGNFY PinP VOLUME ON FREEZE MUTE OFF KEYSTONE SEARCH 1 2 3 ID CHANGE (Front) Mouse left button Mouse move pointer Keyboard Arrow keys / / / Mouse right button Keyboard ESC key (Rear) 14 © 3M 2004 3M™ Digital Projector X70/X80 Connect the M1-D port of the projector to a PC or an USB Hub connected PC. • Do not unplug the connector cables while the computer is operating...

Operation Guide
Page 16
...OFF KEYSTONE SEARCH 1 2 3 ID CHANGE SEARCH button zoom focus component S-video video 2 Use the ZOOM buttons to adjust the screen size. 3 Use the FOCUS buttons to the search. SEARCH button M1-D rgb input BNC component S-video ENTER search reset menu video INPUT dial VIDEO button LASER INDICATOR STANDBY/ON VIDEO RGB ++ LENS SHIFT FOCUS -- + ZOOM - Operating Selecting An Input Signal 1 Select an input signal. ■ Using the INPUT dial Turn the INPUT dial of the projector or the remote control. M1-D rgb BNC video S-video component ■ Using RGB button Press...
...OFF KEYSTONE SEARCH 1 2 3 ID CHANGE SEARCH button zoom focus component S-video video 2 Use the ZOOM buttons to adjust the screen size. 3 Use the FOCUS buttons to the search. SEARCH button M1-D rgb input BNC component S-video ENTER search reset menu video INPUT dial VIDEO button LASER INDICATOR STANDBY/ON VIDEO RGB ++ LENS SHIFT FOCUS -- + ZOOM - Operating Selecting An Input Signal 1 Select an input signal. ■ Using the INPUT dial Turn the INPUT dial of the projector or the remote control. M1-D rgb BNC video S-video component ■ Using RGB button Press...

Operation Guide
Page 17
... adjusted. For a component video signal, the signal type is set to its maximum size prior to attempting to use this function. © 3M 2004 3M™ Digital Projector X70/X80 LASER INDICATOR STANDBY/ON VIDEO RGB ++ LENS SHIFT FOCUS -- + ZOOM - memo This function is available only when the AUTO is selected to the item VIDEO of this feature. Operating (continued) Selecting The Aspect Ratio 1 Press the Aspect button to toggle between the modes...
... adjusted. For a component video signal, the signal type is set to its maximum size prior to attempting to use this function. © 3M 2004 3M™ Digital Projector X70/X80 LASER INDICATOR STANDBY/ON VIDEO RGB ++ LENS SHIFT FOCUS -- + ZOOM - memo This function is available only when the AUTO is selected to the item VIDEO of this feature. Operating (continued) Selecting The Aspect Ratio 1 Press the Aspect button to toggle between the modes...

Operation Guide
Page 18
... for RGB signals. 1 Press the POSITION button. Operating (continued) Adjusting The Picture Position memo This function is excessive, certain degradation may not function correctly with some input. BLANK ASPECT LASER PREVIOUS NEXT MOUSE ESC MENU POSITION RESET AUTO MAGNFY PinP VOLUME ON FREEZE MUTE OFF KEYSTONE SEARCH 1 2 3 ID CHANGE Cursor buttons POSITION button RESET button Cursor buttons KEYSTONE button 18 © 3M 2004 3M™ Digital Projector X70/X80 KEYSTONE +0 +0 3 Use the cursor buttons / to correct...
... for RGB signals. 1 Press the POSITION button. Operating (continued) Adjusting The Picture Position memo This function is excessive, certain degradation may not function correctly with some input. BLANK ASPECT LASER PREVIOUS NEXT MOUSE ESC MENU POSITION RESET AUTO MAGNFY PinP VOLUME ON FREEZE MUTE OFF KEYSTONE SEARCH 1 2 3 ID CHANGE Cursor buttons POSITION button RESET button Cursor buttons KEYSTONE button 18 © 3M 2004 3M™ Digital Projector X70/X80 KEYSTONE +0 +0 3 Use the cursor buttons / to correct...
Operation Guide
Page 19
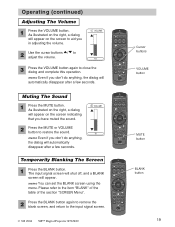
... NEXT MOUSE ESC MENU POSITION RESET AUTO MAGNFY PinP VOLUME ON FREEZE MUTE OFF KEYSTONE SEARCH 1 2 3 ID CHANGE Cursor buttons VOLUME button Muting The Sound 1 Press the MUTE button. VOLUME 16 LASER INDICATOR STANDBY/ON VIDEO RGB ++ LENS SHIFT FOCUS -- + ZOOM - BLANK ASPECT LASER PREVIOUS NEXT MOUSE ESC MENU POSITION RESET AUTO MAGNFY PinP VOLUME ON FREEZE MUTE OFF KEYSTONE SEARCH 1 2 3 ID CHANGE BLANK button © 3M 2004 3M™ Digital Projector X70/X80 19 memo...
... NEXT MOUSE ESC MENU POSITION RESET AUTO MAGNFY PinP VOLUME ON FREEZE MUTE OFF KEYSTONE SEARCH 1 2 3 ID CHANGE Cursor buttons VOLUME button Muting The Sound 1 Press the MUTE button. VOLUME 16 LASER INDICATOR STANDBY/ON VIDEO RGB ++ LENS SHIFT FOCUS -- + ZOOM - BLANK ASPECT LASER PREVIOUS NEXT MOUSE ESC MENU POSITION RESET AUTO MAGNFY PinP VOLUME ON FREEZE MUTE OFF KEYSTONE SEARCH 1 2 3 ID CHANGE BLANK button © 3M 2004 3M™ Digital Projector X70/X80 19 memo...

Operation Guide
Page 20
And after a couple of video or the signal input state is pressed. blanking the screen, displaying a dialog or a menu, adjusting the picture, changing the input signal) is pressed, or a button of projector is changed. © 3M 2004 3M™ Digital Projector X70/X80 you in FREEZE mode for a long time (i.e. Using The Magnify Feature 1 Press the MAGNIFY ON button. As illustrated on the right, a dialog will appear on the screen to aid MAGNIFY you forget...
And after a couple of video or the signal input state is pressed. blanking the screen, displaying a dialog or a menu, adjusting the picture, changing the input signal) is pressed, or a button of projector is changed. © 3M 2004 3M™ Digital Projector X70/X80 you in FREEZE mode for a long time (i.e. Using The Magnify Feature 1 Press the MAGNIFY ON button. As illustrated on the right, a dialog will appear on the screen to aid MAGNIFY you forget...
Operation Guide
Page 22
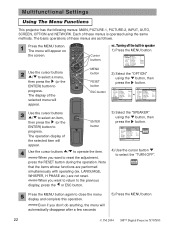
... is operated using the same methods. OPTION SPEAKER TURN ON TURN OFF 5 Press the MENU button again to reset the adjustment, press the RESET button during the operation. LASER INDICATOR STANDBY/ON VIDEO RGB ++ LENS SHIFT FOCUS -- + ZOOM - memo When you want to close the menu display and complete this operation. PREVIOUS NEXT MOUSE ESC MENU POSITION RESET AUTO MAGNFY PinP VOLUME ON FREEZE MUTE OFF KEYSTONE SEARCH 1 2 3 ID CHANGE Cursor buttons MENU button RESET button ESC button ex. MENU MAIN PICTURE-1 PICTURE-2 INPUT AUTO SCREEN OPTION NETWORK...
... is operated using the same methods. OPTION SPEAKER TURN ON TURN OFF 5 Press the MENU button again to reset the adjustment, press the RESET button during the operation. LASER INDICATOR STANDBY/ON VIDEO RGB ++ LENS SHIFT FOCUS -- + ZOOM - memo When you want to close the menu display and complete this operation. PREVIOUS NEXT MOUSE ESC MENU POSITION RESET AUTO MAGNFY PinP VOLUME ON FREEZE MUTE OFF KEYSTONE SEARCH 1 2 3 ID CHANGE Cursor buttons MENU button RESET button ESC button ex. MENU MAIN PICTURE-1 PICTURE-2 INPUT AUTO SCREEN OPTION NETWORK...

Operation Guide
Page 23
... each operation in accordance with the instructions in the table below . Select a mirror status using the button to reset the MAIN menu items. : EXECUTE CANCEL The items of 1125i or 750p, only the 16:9 can be selected. MENU MAIN PICTURE-1 PICTURE-2 INPUT AUTO SCREEN OPTION NETWORK : SELECT BRIGHT CONTRAST ASPECT WHISPER MIRROR LANGUAGE [Language] RESET +0 +0 4:3 NORMAL NORMAL ENGLISH Item BRIGHT CONTRAST ASPECT WHISPER MIRROR Description Adjust...
... each operation in accordance with the instructions in the table below . Select a mirror status using the button to reset the MAIN menu items. : EXECUTE CANCEL The items of 1125i or 750p, only the 16:9 can be selected. MENU MAIN PICTURE-1 PICTURE-2 INPUT AUTO SCREEN OPTION NETWORK : SELECT BRIGHT CONTRAST ASPECT WHISPER MIRROR LANGUAGE [Language] RESET +0 +0 4:3 NORMAL NORMAL ENGLISH Item BRIGHT CONTRAST ASPECT WHISPER MIRROR Description Adjust...

Operation Guide
Page 24
.... TINT Adjust the tint using the / buttons. : Green Red memo This item can be selected only when the : SELECT USER is continued to perform each operation in accordance with the instructions in the table below . COLOR Adjust the whole color using the / buttons. : Clear Soft memo This item can be selected only at a video signal. MENU MAIN PICTURE-1 PICTURE-2 INPUT AUTO SCREEN OPTION NETWORK : SELECT GAMMA COLOR BAL R COLOR BAL G COLOR BAL B SHARPNESS COLOR TINT MY...
.... TINT Adjust the tint using the / buttons. : Green Red memo This item can be selected only when the : SELECT USER is continued to perform each operation in accordance with the instructions in the table below . COLOR Adjust the whole color using the / buttons. : Clear Soft memo This item can be selected only at a video signal. MENU MAIN PICTURE-1 PICTURE-2 INPUT AUTO SCREEN OPTION NETWORK : SELECT GAMMA COLOR BAL R COLOR BAL G COLOR BAL B SHARPNESS COLOR TINT MY...

Operation Guide
Page 27
MENU MAIN PICTURE-1 PICTURE-2 INPUT AUTO SCREEN OPTION NETWORK : SELECT COLOR SPACE AUTO COMPONENT COMPONENT VIDEO AUTO 3D-YCS TURN OFF VIDEO NR LOW P. memo The AUTO operation may not work well at a video signal from the VIDEO port or the SVIDEO port. COMPONENT Select a function of COMPONENT port using the / buttons. : COMPONENT SCART RGB When the SCART RGB is selected, the COMPONENT port function as a port for a HDTV signal. memo This item is reduced according to the...
MENU MAIN PICTURE-1 PICTURE-2 INPUT AUTO SCREEN OPTION NETWORK : SELECT COLOR SPACE AUTO COMPONENT COMPONENT VIDEO AUTO 3D-YCS TURN OFF VIDEO NR LOW P. memo The AUTO operation may not work well at a video signal from the VIDEO port or the SVIDEO port. COMPONENT Select a function of COMPONENT port using the / buttons. : COMPONENT SCART RGB When the SCART RGB is selected, the COMPONENT port function as a port for a HDTV signal. memo This item is reduced according to the...

Operation Guide
Page 28
... LOCK INPUT-INFORMATION S-VIDEO SECAM AUTO INPUT-INFORMATION COMPONENT 575i @50 SCART RGB memo The "FRAME LOCK" message means the frame lock function is performs only at the last time. S2-ASPECT Select the TURN ON or the TURN OFF using the button to the section "Displaying the Child Window". POWERUP INPUT Select a signal input port for the child window using the / buttons. : memo About the child window, please refer to reset the INPUT menu items...
... LOCK INPUT-INFORMATION S-VIDEO SECAM AUTO INPUT-INFORMATION COMPONENT 575i @50 SCART RGB memo The "FRAME LOCK" message means the frame lock function is performs only at the last time. S2-ASPECT Select the TURN ON or the TURN OFF using the button to the section "Displaying the Child Window". POWERUP INPUT Select a signal input port for the child window using the / buttons. : memo About the child window, please refer to reset the INPUT menu items...

Operation Guide
Page 29
... horizontal size (H SIZE) will be incorrectly adjusted. Set the time using the / buttons.: TURN ON TURN OFF When the TURN ON is selected to the following page.) © 3M 2004 3M™ Digital Projector X70/X80 29 memo This operation may still be selected automatically. Please refer to the item "VIDEO" of the INPUT menu. For a component video signal, the signal type is displayed during the operation. a irregular picture, a color lack), please select the suitable mode to...
... horizontal size (H SIZE) will be incorrectly adjusted. Set the time using the / buttons.: TURN ON TURN OFF When the TURN ON is selected to the following page.) © 3M 2004 3M™ Digital Projector X70/X80 29 memo This operation may still be selected automatically. Please refer to the item "VIDEO" of the INPUT menu. For a component video signal, the signal type is displayed during the operation. a irregular picture, a color lack), please select the suitable mode to...
Operation Guide
Page 33
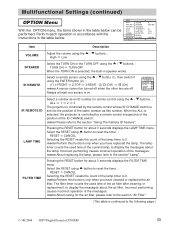
... operation of the messages. MENU MAIN PICTURE-1 PICTURE-2 INPUT AUTO SCREEN OPTION NETWORK : SELECT VOLUME SPEAKER IR REMOTE IR REMOTE ID LAMP TIME FILTER TIME SERVICE PIN LOCK 16 TURN ON ALL 1234 h 4321 h TURN ON Item Description VOLUME Adjust the volume using the / buttons. : High Low SPEAKER IR REMOTE Select the TURN ON or the TURN OFF using button to display the messages about the air filter. Select the RESET using the / buttons. : TURN ON TURN OFF When the TURN ON is set into the position of the air filter...
... operation of the messages. MENU MAIN PICTURE-1 PICTURE-2 INPUT AUTO SCREEN OPTION NETWORK : SELECT VOLUME SPEAKER IR REMOTE IR REMOTE ID LAMP TIME FILTER TIME SERVICE PIN LOCK 16 TURN ON ALL 1234 h 4321 h TURN ON Item Description VOLUME Adjust the volume using the / buttons. : High Low SPEAKER IR REMOTE Select the TURN ON or the TURN OFF using button to display the messages about the air filter. Select the RESET using the / buttons. : TURN ON TURN OFF When the TURN ON is set into the position of the air filter...

Operation Guide
Page 43
... lamp and lamp door, and then turn the power on again. • Is there blockage of the air passage aperture? • Is the air filter dirty? • Does the peripheral temperature exceed 35°C? Ordinary operations may also be performed. If the same indication is displayed after the treatment, or if an indication other than the following page.) © 3M 2004 3M™ Digital Projector X70/X80...
... lamp and lamp door, and then turn the power on again. • Is there blockage of the air passage aperture? • Is the air filter dirty? • Does the peripheral temperature exceed 35°C? Ordinary operations may also be performed. If the same indication is displayed after the treatment, or if an indication other than the following page.) © 3M 2004 3M™ Digital Projector X70/X80...
Safety Guide
Page 10
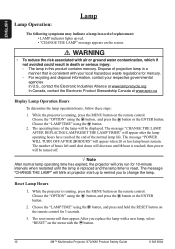
... red. • "CHANGE THE LAMP" message appears on the menu with the button. 10 3M™ Multimedia Projector X70/X80 Product Safety Guide © 3M 2004 Reset Lamp Hours 1. While the projector is running , press the MENU button on the remote control. While the projector is running , press the MENU button on the remote control. The reset menu will appear after the lamp operating hours have reached the end of hours left until shut down will decrease until the lamp is replaced and the lamp timer...
... red. • "CHANGE THE LAMP" message appears on the menu with the button. 10 3M™ Multimedia Projector X70/X80 Product Safety Guide © 3M 2004 Reset Lamp Hours 1. While the projector is running , press the MENU button on the remote control. While the projector is running , press the MENU button on the remote control. The reset menu will appear after the lamp operating hours have reached the end of hours left until shut down will decrease until the lamp is replaced and the lamp timer...


