
Operation Guide
Page 2
... projector's elevator . . . 12 Color space, Video format, Frame lock, Information Connecting your devices 13 SETUP menu 34 Connecting power supply 15 Zoom, Keystone, Whisper, Mirror, Power on/off 16 Volume Turning on the power 16 SCREEN menu 35 Turning off the power 17 Language, Menu position, OSD bright, Operating 18 Adjusting the volume 18 Temporarily muting the sound . . . . 18 Selecting an input signal 18 Searching an input signal 19 Blank, Start up, MyScreen, MyScreen lock, Message OPTION menu 38 Auto search, Auto off, Lamp time, Filter time, Service...
... projector's elevator . . . 12 Color space, Video format, Frame lock, Information Connecting your devices 13 SETUP menu 34 Connecting power supply 15 Zoom, Keystone, Whisper, Mirror, Power on/off 16 Volume Turning on the power 16 SCREEN menu 35 Turning off the power 17 Language, Menu position, OSD bright, Operating 18 Adjusting the volume 18 Temporarily muting the sound . . . . 18 Selecting an input signal 18 Searching an input signal 19 Blank, Start up, MyScreen, MyScreen lock, Message OPTION menu 38 Auto search, Auto off, Lamp time, Filter time, Service...

Operation Guide
Page 3
... 165W UHB (Ultra High Brightness) lamp gives you want. Use special caution for future reshipment. NOTE • Keep the original packing materials for the lens part. The image can be sure to realize quieter operation. Projector features / About contents of package Your projector should come with two AA batteries) S15/X15 VGA cable Power cord (US, UK, EUROPE) Operator's Guide Product SafetyGuide Quick Start Guide Warranty Filter cover (for bottom-up...
... 165W UHB (Ultra High Brightness) lamp gives you want. Use special caution for future reshipment. NOTE • Keep the original packing materials for the lens part. The image can be sure to realize quieter operation. Projector features / About contents of package Your projector should come with two AA batteries) S15/X15 VGA cable Power cord (US, UK, EUROPE) Operator's Guide Product SafetyGuide Quick Start Guide Warranty Filter cover (for bottom-up...

Operation Guide
Page 9
...;lter cover for bottom-up use. While the projector is facing up use. Claws Air filter (New or cleaned) Rail of air filter Filter cover for bottom-up , hold the projector. 2. Tabs Filter cover for bottom-up use WARNING ►Do not replace the filter cover and/or air filter during use or immediately after use. Before operating, make sure that the power switch is off, that the power cord is...
...;lter cover for bottom-up use. While the projector is facing up use. Claws Air filter (New or cleaned) Rail of air filter Filter cover for bottom-up , hold the projector. 2. Tabs Filter cover for bottom-up use WARNING ►Do not replace the filter cover and/or air filter during use or immediately after use. Before operating, make sure that the power switch is off, that the power cord is...
Operation Guide
Page 13
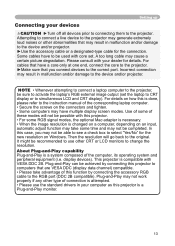
... 2B. Setting up Connecting your computer as this is done, please refer to the instruction manual of the corresponding laptop computer. • Secure the screws on the connectors and tighten. • Some computers may have multiple display screen modes. Incorrect connection may cause a certain picture degradation. This projector is a system composed of some RGB signal modes, the optional Mac adapter is necessary. • When the image resolution is...
... 2B. Setting up Connecting your computer as this is done, please refer to the instruction manual of the corresponding laptop computer. • Secure the screws on the connectors and tighten. • Some computers may have multiple display screen modes. Incorrect connection may cause a certain picture degradation. This projector is a system composed of some RGB signal modes, the optional Mac adapter is necessary. • When the image resolution is...

Operation Guide
Page 16
... light green. VIDEO STANDBY/ON RGB SEARCH ASPECT AUTO BLANK MAGNIFY ON OFF FREEZE POSITION VOLUME MUTE KEYSTONE ZOOM -+ MENU ESC ENTER RESET STANDBY/ON button LAMP TEMP POWER INPUT MENU STANDBY/ON POWER indicator Power switch 1. Then wait several seconds because buttons may not function for these several seconds. When the power is firmly and correctly connected to solid orange. Open the lens cover, and set the power switch to the section "Selecting an input signal" (18). 16 POWER (Blinking green) POWER (Solid green) To display...
... light green. VIDEO STANDBY/ON RGB SEARCH ASPECT AUTO BLANK MAGNIFY ON OFF FREEZE POSITION VOLUME MUTE KEYSTONE ZOOM -+ MENU ESC ENTER RESET STANDBY/ON button LAMP TEMP POWER INPUT MENU STANDBY/ON POWER indicator Power switch 1. Then wait several seconds because buttons may not function for these several seconds. When the power is firmly and correctly connected to solid orange. Open the lens cover, and set the power switch to the section "Selecting an input signal" (18). 16 POWER (Blinking green) POWER (Solid green) To display...

Operation Guide
Page 17
... the STANDBY/ON button on the projector or remote control again while the message is controlled by using a pin or similar. Power off ?" Close the lens cover. After making sure that the power indicator lights to solid orange, set the power switch to the OFF position. will go off the power", and do not disconnect the power cord until the procedure is completed. Make sure that the power indicator lights to solid orange, set the power switch to...
... the STANDBY/ON button on the projector or remote control again while the message is controlled by using a pin or similar. Power off ?" Close the lens cover. After making sure that the power indicator lights to solid orange, set the power switch to the OFF position. will go off the power", and do not disconnect the power cord until the procedure is completed. Make sure that the power indicator lights to solid orange, set the power switch to...
Operation Guide
Page 18
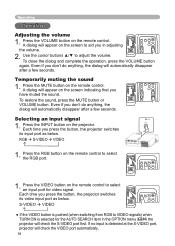
...the button, the projector switches its video input port as below . RGB S-VIDEO VIDEO VIDEO STANDBY/ON RGB SEARCH ASPECT AUTO BLANK MAGNIFY ON OFF FREEZE POSITION VOLUME MUTE KEYSTONE ZOOM -+ MENU ESC ENTER RESET VIDEO STANDBY/ON RGB SEARCH ASPECT AUTO BLANK MAGNIFY ON OFF FREEZE POSITION VOLUME MUTE KEYSTONE ZOOM -+ MENU ENTER ESC LAMP RESET TEMP POWER INPUT MENU STANDBY/ON 1. POSITION MENU ESC ENTER RESET ON MUTE OFF 2. A dialog will check the VIDEO port automatically. Operating Operating Adjusting the volume VIDEO STANDBY...
...the button, the projector switches its video input port as below . RGB S-VIDEO VIDEO VIDEO STANDBY/ON RGB SEARCH ASPECT AUTO BLANK MAGNIFY ON OFF FREEZE POSITION VOLUME MUTE KEYSTONE ZOOM -+ MENU ESC ENTER RESET VIDEO STANDBY/ON RGB SEARCH ASPECT AUTO BLANK MAGNIFY ON OFF FREEZE POSITION VOLUME MUTE KEYSTONE ZOOM -+ MENU ENTER ESC LAMP RESET TEMP POWER INPUT MENU STANDBY/ON 1. POSITION MENU ESC ENTER RESET ON MUTE OFF 2. A dialog will check the VIDEO port automatically. Operating Operating Adjusting the volume VIDEO STANDBY...
Operation Guide
Page 19
... check its input ports in turn. At a RGB signal NORMAL 4:3 16:9 At a video signal /no signal is found , the projector will appear on the remote control. Each time you in adjusting the zoom. 2. Press the ZOOM +/- Use the focus ring to the state selected before the operation. STANDBY/ON VIDEO RGB SEARCH ASPECT AUTO BLANK Adjusting the zoom (magnifying power) 1. A dialog will return to focus on the remote control. If no signal 4:3 16:9 VIDEO STANDBY...
... check its input ports in turn. At a RGB signal NORMAL 4:3 16:9 At a video signal /no signal is found , the projector will appear on the remote control. Each time you in adjusting the zoom. 2. Press the ZOOM +/- Use the focus ring to the state selected before the operation. STANDBY/ON VIDEO RGB SEARCH ASPECT AUTO BLANK Adjusting the zoom (magnifying power) 1. A dialog will return to focus on the remote control. If no signal 4:3 16:9 VIDEO STANDBY...
Operation Guide
Page 20
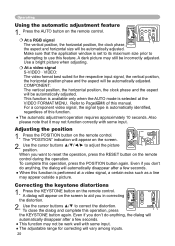
... video signal, the signal type is set to its maximum size prior POSITION t-o + MENU attempting to reset the operation, press the RESET button on the screen to correct the distortion. Press the AUTO button on the remote control. To close the dialog and complete this operation, press the POSITION button again. ZOOM Make sure that it may not be incorrectly adENTEjRusted. A dark picture may appear outside a picture. Use a bright picture when adjusting. ASPECT...
... video signal, the signal type is set to its maximum size prior POSITION t-o + MENU attempting to reset the operation, press the RESET button on the screen to correct the distortion. Press the AUTO button on the remote control. To close the dialog and complete this operation, press the POSITION button again. ZOOM Make sure that it may not be incorrectly adENTEjRusted. A dark picture may appear outside a picture. Use a bright picture when adjusting. ASPECT...
Operation Guide
Page 21
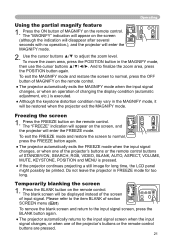
... FREEZE button on the remote control. Do not leave the projector in FREEZE mode for long time, the LCD panel might possibly be printed. Press the BLANK button on the remote control. The blank screen will be displayed instead of the screen VIDEO STANDBY/ON RGB SEARCH ASPECT AUTO BLANK MAGNIFY ON OFF FREEZE VOLUME MUTE KEYSTONE POSITION ZOOM -+ MENU VIDEO STANDBY/ON RGB SEARCH ASPECT AUTO BLANK of changing the display condition (automatic adjustment, etc...
... FREEZE button on the remote control. Do not leave the projector in FREEZE mode for long time, the LCD panel might possibly be printed. Press the BLANK button on the remote control. The blank screen will be displayed instead of the screen VIDEO STANDBY/ON RGB SEARCH ASPECT AUTO BLANK MAGNIFY ON OFF FREEZE VOLUME MUTE KEYSTONE POSITION ZOOM -+ MENU VIDEO STANDBY/ON RGB SEARCH ASPECT AUTO BLANK of changing the display condition (automatic adjustment, etc...

Operation Guide
Page 22
... FILTER TIME LANGUAGE 4:3 +0 +0 NORMAL +0 +0 +0 +0 +3 NORMAL NORMAL 0 ENGLISH Go To Advance Menu... ► / ENTER MENU [RGB] PICTURE IMAGE INPUT SETUP SCREEN OPTION EASY MENU :SELECT BRIGHT +0 CONTRAST +0 GAMMA DEFAULT 1 COLOR TEMP HIGH COLOR +0 TINT +0 SHARPNESS +0 PROGRESSIVE TURN OFF MY MEMORY SAVE 1 Advanced MENU EASY MENU EASY MENU 22 FREEZE KEYSTONE TEMP POWER VIDEO STANDBY/ON RGB SEARCH ASPECT AUTO BLANK MAGNIFY ON OFF FREEZE POSITION VOLUME MUTE KEYSTONE ZOOM -+ MENU ESC ENTER RESET POSITION ZOOM -+ MENU ESC ENTER RESET MENU button...
... FILTER TIME LANGUAGE 4:3 +0 +0 NORMAL +0 +0 +0 +0 +3 NORMAL NORMAL 0 ENGLISH Go To Advance Menu... ► / ENTER MENU [RGB] PICTURE IMAGE INPUT SETUP SCREEN OPTION EASY MENU :SELECT BRIGHT +0 CONTRAST +0 GAMMA DEFAULT 1 COLOR TEMP HIGH COLOR +0 TINT +0 SHARPNESS +0 PROGRESSIVE TURN OFF MY MEMORY SAVE 1 Advanced MENU EASY MENU EASY MENU 22 FREEZE KEYSTONE TEMP POWER VIDEO STANDBY/ON RGB SEARCH ASPECT AUTO BLANK MAGNIFY ON OFF FREEZE POSITION VOLUME MUTE KEYSTONE ZOOM -+ MENU ESC ENTER RESET POSITION ZOOM -+ MENU ESC ENTER RESET MENU button...
Operation Guide
Page 25
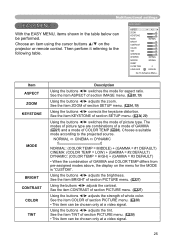
... only at a video signal. See the item ASPECT of GAMMA and COLOR TEMP differs from pre-assigned modes above, the display on the projector or remote control. Using the buttons ◄/► adjusts the brightness. See the item TINT of section PICTURE menu. (27) Using the buttons ◄/► adjusts the contrast. Item ASPECT ZOOM KEYSTONE MODE BRIGHT CONTRAST COLOR TINT Description Using the buttons ◄/► switches the mode for the MODE is "CUSTOM...
... only at a video signal. See the item ASPECT of GAMMA and COLOR TEMP differs from pre-assigned modes above, the display on the projector or remote control. Using the buttons ◄/► adjusts the brightness. See the item TINT of section PICTURE menu. (27) Using the buttons ◄/► adjusts the contrast. Item ASPECT ZOOM KEYSTONE MODE BRIGHT CONTRAST COLOR TINT Description Using the buttons ◄/► switches the mode for the MODE is "CUSTOM...
Operation Guide
Page 32
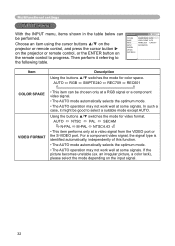
.... • The AUTO mode automatically selects the optimum mode. • The AUTO operation may not work well at some signals. Then perform it might be performed. an irregular picture, a color lack), please select the mode depending on the remote control to progress. MENU [RGB] PICTURE IMAGE INPUT SETUP SCREEN OPTION EASY MENU :SELECT COLOR SPACE AUTO VIDEO FORMAT AUTO FRAME LOCK TURN OFF INFORMATION Item Description Using the buttons ▲/▼ switches the mode for video format. AUTO NTSC ...
.... • The AUTO mode automatically selects the optimum mode. • The AUTO operation may not work well at some signals. Then perform it might be performed. an irregular picture, a color lack), please select the mode depending on the remote control to progress. MENU [RGB] PICTURE IMAGE INPUT SETUP SCREEN OPTION EASY MENU :SELECT COLOR SPACE AUTO VIDEO FORMAT AUTO FRAME LOCK TURN OFF INFORMATION Item Description Using the buttons ▲/▼ switches the mode for video format. AUTO NTSC ...
Operation Guide
Page 34
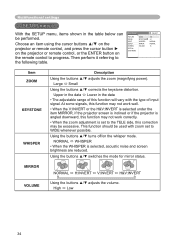
MENU [RGB] PICTURE IMAGE INPUT SETUP SCREEN OPTION EASY MENU ZOOM KEYSTONE WHISPER MIRROR VOLUME :SELECT 100 +0 NORMAL NORMAL 16 Item ZOOM KEYSTONE WHISPER Description Using the buttons ▲/▼ adjusts the zoom (magnifying power). High Low 34 Choose an item using the cursor buttons ▲/▼ on the projector or remote control, and press the cursor button ► on the projector or remote control, or the ENTER button on the whisper mode. Large Small Using the buttons ▲...
MENU [RGB] PICTURE IMAGE INPUT SETUP SCREEN OPTION EASY MENU ZOOM KEYSTONE WHISPER MIRROR VOLUME :SELECT 100 +0 NORMAL NORMAL 16 Item ZOOM KEYSTONE WHISPER Description Using the buttons ▲/▼ adjusts the zoom (magnifying power). High Low 34 Choose an item using the cursor buttons ▲/▼ on the projector or remote control, and press the cursor button ► on the projector or remote control, or the ENTER button on the whisper mode. Large Small Using the buttons ▲...

Operation Guide
Page 38
... table. When the time is found, the projector will go off and the power indicator begins blinking. RGB S-VIDEO VIDEO AUTO OFF Using the buttons ▲/▼ adjusts the time to count down to 0, the projector is set to 1 to the section "Turning off automatically. MENU [RGB] PICTURE IMAGE INPUT SETUP SCREEN OPTION EASY MENU :SELECT AUTO SEARCH AUTO OFF LAMP TIME FILTER TIME SERVICE TURN OFF 0 0 0 Item AUTO SEARCH Description Using the buttons ▲/▼ turns on the remote control to the following...
... table. When the time is found, the projector will go off and the power indicator begins blinking. RGB S-VIDEO VIDEO AUTO OFF Using the buttons ▲/▼ adjusts the time to count down to 0, the projector is set to 1 to the section "Turning off automatically. MENU [RGB] PICTURE IMAGE INPUT SETUP SCREEN OPTION EASY MENU :SELECT AUTO SEARCH AUTO OFF LAMP TIME FILTER TIME SERVICE TURN OFF 0 0 0 Item AUTO SEARCH Description Using the buttons ▲/▼ turns on the remote control to the following...

Operation Guide
Page 40
... AUTO ADJUST GHOST FACTORY RESET FAN SPEED: Using the buttons ▲/▼ switches the rotation speed of the cooling fans. ENABLE DISABLE AUTO ADJUST ENABLE DISABLE GHOST: 1. Choose a color element of ghost using the buttons GHOST ▲/▼ to disappear ghost. By this item displays the SERVICE menu. Depending on conditions, such as input image, signal cable to disable the automatic adjustment, and adjust manually. Note that the projector is noisier when the HIGH is the mode...
... AUTO ADJUST GHOST FACTORY RESET FAN SPEED: Using the buttons ▲/▼ switches the rotation speed of the cooling fans. ENABLE DISABLE AUTO ADJUST ENABLE DISABLE GHOST: 1. Choose a color element of ghost using the buttons GHOST ▲/▼ to disappear ghost. By this item displays the SERVICE menu. Depending on conditions, such as input image, signal cable to disable the automatic adjustment, and adjust manually. Note that the projector is noisier when the HIGH is the mode...

Operation Guide
Page 46
... time the lamp timer has counted has reached AFTER REPLACING LAMP, RESET THE LAMP TIMER. 2000 hours, the power will soon be displayed. Message Description CHANGE THE LAMP AFTER REPLACING LAMP, RESET THE LAMP TIMER. When lamp usage reaches 2000 hours, the power will be turned off . Although these messages will be automatically disappeared around several minutes, it will automatically be reappeared every time the power is turned on the screen, please respond as those shown below . recommended. SYNC...
... time the lamp timer has counted has reached AFTER REPLACING LAMP, RESET THE LAMP TIMER. 2000 hours, the power will soon be displayed. Message Description CHANGE THE LAMP AFTER REPLACING LAMP, RESET THE LAMP TIMER. When lamp usage reaches 2000 hours, the power will be turned off . Although these messages will be automatically disappeared around several minutes, it will automatically be reappeared every time the power is turned on the screen, please respond as those shown below . recommended. SYNC...

Operation Guide
Page 48
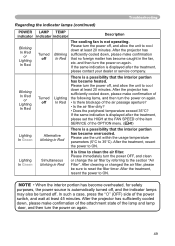
...). Please wait until the POWER indicator finishes blink, and then perform the proper response measure using the item descriptions below . If the same indication is in an on again. POWER LAMP TEMP indicator indicator indicator Description Lighting Turned Turned The projector is displayed after the treatment, please contact your dealer or service company. Blinking In Red (discretionary) (discretionary) The projector is displayed, please contact your dealer or service company. 48 After...
...). Please wait until the POWER indicator finishes blink, and then perform the proper response measure using the item descriptions below . If the same indication is in an on again. POWER LAMP TEMP indicator indicator indicator Description Lighting Turned Turned The projector is displayed after the treatment, please contact your dealer or service company. Blinking In Red (discretionary) (discretionary) The projector is displayed, please contact your dealer or service company. 48 After...
Operation Guide
Page 49
... the power to reset the filter timer. Troubleshooting Regarding the indicator lamps (continued) POWER LAMP TEMP indicator indicator indicator Description Blinking In Red or Lighting In Red Turned off . After the projector has sufficiently cooled down , please make confirmation of the following items, and then turn the power on again. • Is there blockage of the power switch, and wait at least 20 minutes. Please use the unit...
... the power to reset the filter timer. Troubleshooting Regarding the indicator lamps (continued) POWER LAMP TEMP indicator indicator indicator Description Blinking In Red or Lighting In Red Turned off . After the projector has sufficiently cooled down , please make confirmation of the following items, and then turn the power on again. • Is there blockage of the power switch, and wait at least 20 minutes. Please use the unit...

Operation Guide
Page 50
..., excessive sound, damaged casing or elements or cables, penetration of these has not been properly fixed. Troubleshooting Phenomena that the smoke or odor has stopped, contact your dealer or service company. The projector's microprocessor may be corrected, 2. Some setting may need to [ | ] (On). Then, if the problem is not set to factory default. Correctly connect the power cord. The power switch is not removed after...
..., excessive sound, damaged casing or elements or cables, penetration of these has not been properly fixed. Troubleshooting Phenomena that the smoke or odor has stopped, contact your dealer or service company. The projector's microprocessor may be corrected, 2. Some setting may need to [ | ] (On). Then, if the problem is not set to factory default. Correctly connect the power cord. The power switch is not removed after...


