
Operating Guide
Page 1
...; Windows is a registered trademark of Microsoft Corporation. • Internet Explorer is a trademark of their respective owners. 1 X70/X80 Multimedia Projector Operator's Guide Thank you for purchasing this document or contents is not permitted without notice. • The manufacturer assumes no responsibility... for any errors that may appear in this manual. • The reproduction, transmission or use of this projector. After reading, store them in a safe place for future reference. TRADEMARK ACKNOWLEDGMENT : • VGA and XGA are registered ...
...; Windows is a registered trademark of Microsoft Corporation. • Internet Explorer is a trademark of their respective owners. 1 X70/X80 Multimedia Projector Operator's Guide Thank you for purchasing this document or contents is not permitted without notice. • The manufacturer assumes no responsibility... for any errors that may appear in this manual. • The reproduction, transmission or use of this projector. After reading, store them in a safe place for future reference. TRADEMARK ACKNOWLEDGMENT : • VGA and XGA are registered ...

Operating Guide
Page 2
...of images can easily be magnified for future reshipment. Preparation Please see the "Quick Start Guide". GOptical Lens Shift (X80 only) The lens of this projector can memorize 4 settings by using a UHB (ultra high brightness) lamp and a highly efficient optical system. Use special...Magnification Function Interesting parts of distorted images electrically. GUser Memory Function This projector can be sure to finely adjust the picture position, use the original packing material. For moving the projector, be shifted vertically. When you want to use the LENS SHIFT ...
...of images can easily be magnified for future reshipment. Preparation Please see the "Quick Start Guide". GOptical Lens Shift (X80 only) The lens of this projector can memorize 4 settings by using a UHB (ultra high brightness) lamp and a highly efficient optical system. Use special...Magnification Function Interesting parts of distorted images electrically. GUser Memory Function This projector can be sure to finely adjust the picture position, use the original packing material. For moving the projector, be shifted vertically. When you want to use the LENS SHIFT ...

Operating Guide
Page 3
... Buttons 5 Remote control 5 Setting Up 6 Arrangement 6 Adjusting The Projector's Elevator 7 Using The Lens shift Buttons (X80 only) ʜ7 Connecting Your Devicesʜʜʜʜ8 Connecting The Power Supply ʜ11 Remote Control 12 About The Laser Pointer ʜʜʜ...;ʜʜ38 Air Filter 39 Caring For The Air Filterʜʜʜʜ39 Other Care 40 Caring For The Inside Of The Projector 40 Caring For The Lens ʜʜʜʜʜ40 Caring For The Cabinet And Remote Control 40 Troubleshooting 41 Related Messages 41 Regarding...
... Buttons 5 Remote control 5 Setting Up 6 Arrangement 6 Adjusting The Projector's Elevator 7 Using The Lens shift Buttons (X80 only) ʜ7 Connecting Your Devicesʜʜʜʜ8 Connecting The Power Supply ʜ11 Remote Control 12 About The Laser Pointer ʜʜʜ...;ʜʜ38 Air Filter 39 Caring For The Air Filterʜʜʜʜ39 Other Care 40 Caring For The Inside Of The Projector 40 Caring For The Lens ʜʜʜʜʜ40 Caring For The Cabinet And Remote Control 40 Troubleshooting 41 Related Messages 41 Regarding...
Operating Guide
Page 4
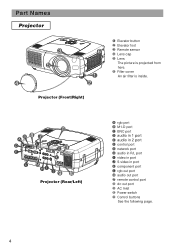
AB 8 7 D LF E G3 K C M HI J 9 0 Projector (Rear/Left) A rgb port B M1-D port C BNC port D audio in 1 port E audio in 2 port F control port G network port H audio in R/L port I video in port J S-video in port K component port L rgb out port M audio out port 7 remote control port 8 dc out port 9 AC Inlet 0 Power switch - Control buttons See the following page. 4 Part Names Projector 3 5 6 1 1 Elevator button 2 Elevator foot 3 Remote sensor 4 Lens cap 5 Lens The picture is projected from here. 6 Filter cover An air filter is inside. 4 2 Projector (Front/Right) -
AB 8 7 D LF E G3 K C M HI J 9 0 Projector (Rear/Left) A rgb port B M1-D port C BNC port D audio in 1 port E audio in 2 port F control port G network port H audio in R/L port I video in port J S-video in port K component port L rgb out port M audio out port 7 remote control port 8 dc out port 9 AC Inlet 0 Power switch - Control buttons See the following page. 4 Part Names Projector 3 5 6 1 1 Elevator button 2 Elevator foot 3 Remote sensor 4 Lens cap 5 Lens The picture is projected from here. 6 Filter cover An air filter is inside. 4 2 Projector (Front/Right) -

Operating Guide
Page 5
... ; Part Names (continued) Control Buttons e keystone X70 volume X80 lens shift 7M1-D 8 rgb input 9 BNC 4 component 0 ENTER S-video - 6 search 5 t reset y r menu u video = standby/on 1 23 temp lamp focus w zoom q Control Panel on the Projector Remote Control 1 STANDBY/ON button 4 LENS SHIFT buttons (X70...p [ \ ] a d t g l ; 6 ' Remote Control 1 STANDBY/ON button and STANDBY/ON indicator 2 TEMP indicator 3 LAMP indicator 4 X70 VOLUME buttons 4 X80 LENS SHIFT buttons 5 INPUT dial 6 SEARCH button 7 M1-D indicator 8 RGB indicator 9 BNC indicator 0 COMPONENT indicator -
... ; Part Names (continued) Control Buttons e keystone X70 volume X80 lens shift 7M1-D 8 rgb input 9 BNC 4 component 0 ENTER S-video - 6 search 5 t reset y r menu u video = standby/on 1 23 temp lamp focus w zoom q Control Panel on the Projector Remote Control 1 STANDBY/ON button 4 LENS SHIFT buttons (X70...p [ \ ] a d t g l ; 6 ' Remote Control 1 STANDBY/ON button and STANDBY/ON indicator 2 TEMP indicator 3 LAMP indicator 4 X70 VOLUME buttons 4 X80 LENS SHIFT buttons 5 INPUT dial 6 SEARCH button 7 M1-D indicator 8 RGB indicator 9 BNC indicator 0 COMPONENT indicator -

Operating Guide
Page 6
...(6.4) 300 (7.6) 350 (8.9) 400 (10.2) 500 (12.7) a [inch (m)] Min. Refer to the illustrations and tables below to the projector and easily accessible. Max. Max. 46(1.2) 71(1.8) b [inch (cm)] C X80 :min X80 :max [inch (cm)] X70 12(30) 24(61) 24(61) 71(1.8) 107(2.7) 18(46) 36(91) 36(91) 83... 60 (1.5) 70 (1.8) 80 (2.0) 100 (2.5) 120 (3.0) 150 (3.8) 200 (5.1) 250 (6.4) 300 (7.6) 350 (8.9) 400 (10.2) 450 (11.4) a [inch (m)] Min. b [inch (cm)] C X80 :max [inch (cm)] X80 :min X70 50(1.3) 77(2.0) 10(25) 23(58) 20(50) 77(2.0) 117(3.0) 15(37) 34(87) 29(75) 91(2.3) 137(3.5) 17(44) 40(102...
...(6.4) 300 (7.6) 350 (8.9) 400 (10.2) 500 (12.7) a [inch (m)] Min. Refer to the illustrations and tables below to the projector and easily accessible. Max. Max. 46(1.2) 71(1.8) b [inch (cm)] C X80 :min X80 :max [inch (cm)] X70 12(30) 24(61) 24(61) 71(1.8) 107(2.7) 18(46) 36(91) 36(91) 83... 60 (1.5) 70 (1.8) 80 (2.0) 100 (2.5) 120 (3.0) 150 (3.8) 200 (5.1) 250 (6.4) 300 (7.6) 350 (8.9) 400 (10.2) 450 (11.4) a [inch (m)] Min. b [inch (cm)] C X80 :max [inch (cm)] X80 :min X70 50(1.3) 77(2.0) 10(25) 23(58) 20(50) 77(2.0) 117(3.0) 15(37) 34(87) 29(75) 91(2.3) 137(3.5) 17(44) 40(102...

Operating Guide
Page 7
...Lens Shift Buttons (X80 only) NOTE • Generally, better quality of this projector can be shifted vertically. The lens of a picture is available when the lens shift is set the projector is 0 to adjust the angle of the projector. BLANK ASPECT LASER 10:0 (max) 1 :1(min) Projector Remote control 7 ...lock into position. 3 As necessary, you can use the LENS SHIFT buttons of projection. Elevator buttons 2 Raise or lower the projector to prevent a burn. When you otherwise need to set to adjust the elevator feet. lens shift LENS SHIFT buttons LASER INDICATOR STANDBY...
...Lens Shift Buttons (X80 only) NOTE • Generally, better quality of this projector can be shifted vertically. The lens of a picture is available when the lens shift is set the projector is 0 to adjust the angle of the projector. BLANK ASPECT LASER 10:0 (max) 1 :1(min) Projector Remote control 7 ...lock into position. 3 As necessary, you can use the LENS SHIFT buttons of projection. Elevator buttons 2 Raise or lower the projector to prevent a burn. When you otherwise need to set to adjust the elevator feet. lens shift LENS SHIFT buttons LASER INDICATOR STANDBY...

Operating Guide
Page 8
...and may generate extremely loud noises or other abnormalities that are VESA DDC (display data channel) compatible. • Please take some of this projector is a system incorporated in fire or electrical shock. CAUTION • TURN OFF ALL DEVICES prior to connecting them to the original. display devices...how this manual and the manual of each device to be sure to the section "Technical" of these modes may take advantage of this projector. • For some RGB input modes, the optional Mac adapter is necessary. • When the image resolution is changed on a ...
...and may generate extremely loud noises or other abnormalities that are VESA DDC (display data channel) compatible. • Please take some of this projector is a system incorporated in fire or electrical shock. CAUTION • TURN OFF ALL DEVICES prior to connecting them to the original. display devices...how this manual and the manual of each device to be sure to the section "Technical" of these modes may take advantage of this projector. • For some RGB input modes, the optional Mac adapter is necessary. • When the image resolution is changed on a ...
Operating Guide
Page 9
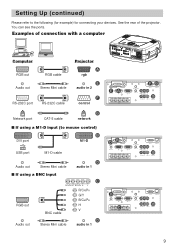
Examples of the projector. You can see the ports. Setting Up (continued) Please refer to mouse control) DVI port B M1-D USB port M1-D cable Audio out Stereo Mini cable D ... the following (for example) for connecting your devices. See the rear of connection with a computer Computer RGB out RGB cable Audio out Stereo Mini cable Projector A rgb E audio in 9
Examples of the projector. You can see the ports. Setting Up (continued) Please refer to mouse control) DVI port B M1-D USB port M1-D cable Audio out Stereo Mini cable D ... the following (for example) for connecting your devices. See the rear of connection with a computer Computer RGB out RGB cable Audio out Stereo Mini cable Projector A rgb E audio in 9

Operating Guide
Page 10
Setting Up (continued) Examples of connection with a VCR/DVD Player VCR/DVD Player Projector Audio out (R) Audio out (L) Video out R-audio in-L video in R-audio in audio in-L H video in I I If using a s-video signal S-video out S-video cable J S -video ...
Setting Up (continued) Examples of connection with a VCR/DVD Player VCR/DVD Player Projector Audio out (R) Audio out (L) Video out R-audio in-L video in R-audio in audio in-L H video in I I If using a s-video signal S-video out S-video cable J S -video ...

Operating Guide
Page 11
...Supply WARNING • Use extra caution when connecting the power cord as incorrect or faulty connections may result in Connecting to a speaker (with the projector. If it is damaged, contact your dealer to newly get correct one. • Never modify the power cord. Please adhere to the "Product...; Only plug the power cord into the outlet. AC Inlet Connector Outlet Plug 11 Setting Up (continued) Connecting to a monitor Monitor RGB in RGB cable Projector L rgb out audio in1 audio in2 rgb L rgb out remote control control audio out CR/PR Ca/Pa Y network R/CR/PR G/Y B/CB/PB H...
...Supply WARNING • Use extra caution when connecting the power cord as incorrect or faulty connections may result in Connecting to a speaker (with the projector. If it is damaged, contact your dealer to newly get correct one. • Never modify the power cord. Please adhere to the "Product...; Only plug the power cord into the outlet. AC Inlet Connector Outlet Plug 11 Setting Up (continued) Connecting to a monitor Monitor RGB in RGB cable Projector L rgb out audio in1 audio in2 rgb L rgb out remote control control audio out CR/PR Ca/Pa Y network R/CR/PR G/Y B/CB/PB H...

Operating Guide
Page 13
...sensor is 3 meters with a 40 degree range (20 degrees to the left and 20 degrees 20 degrees 20 degrees 20 degrees right of the projector to keep light from the remote control and store them in the screen etc. stereo mini cable with plugs). Remote Control (continued) Operating The... Remote Control CAUTION • Do not disassemble the remote control. • Do not place the remote control near the projector's lens, fan, or vents. • Do not drop or otherwise expose the remote control to physical impact. • Do not get the remote control...
...sensor is 3 meters with a 40 degree range (20 degrees to the left and 20 degrees 20 degrees 20 degrees 20 degrees right of the projector to keep light from the remote control and store them in the screen etc. stereo mini cable with plugs). Remote Control (continued) Operating The... Remote Control CAUTION • Do not disassemble the remote control. • Do not place the remote control near the projector's lens, fan, or vents. • Do not drop or otherwise expose the remote control to physical impact. • Do not get the remote control...

Operating Guide
Page 14
Using the USB control feature, you will be used with Windows 95 OSR 2.1 or higher. memo The projector would be used only for the functions illustrated on the computer's configurations and mouse drivers. memo The USB control can be enumerated as a simplified mouse ... Mouse/Keyboard Control Function CAUTION • Before connecting, read the manuals of the device you can be enabled. memo The function can use of the projector to use the remote control, depending on the right.
Using the USB control feature, you will be used with Windows 95 OSR 2.1 or higher. memo The projector would be used only for the functions illustrated on the computer's configurations and mouse drivers. memo The USB control can be enumerated as a simplified mouse ... Mouse/Keyboard Control Function CAUTION • Before connecting, read the manuals of the device you can be enabled. memo The function can use of the projector to use the remote control, depending on the right.

Operating Guide
Page 15
...light up and the standby/on indicator will begin blanking orange. Power off ?" X70 has the volume buttons instead of the projector. The message "Power off the projector after the connected devices. S STANDBY/ON button complete. Do not look into the lens or vents of the lens shift ...STANDBY/ON ++ LENS SHIFT FOCUS -- The projector lamp will go off in right order. Turning Off The Power 1 Press the STANDBY/ON button. standby/on standby/on indicator will stop blinking and light to shift the picture upward or downward. (X80 only) memo X70 does not have the ...
...light up and the standby/on indicator will begin blanking orange. Power off ?" X70 has the volume buttons instead of the projector. The message "Power off the projector after the connected devices. S STANDBY/ON button complete. Do not look into the lens or vents of the lens shift ...STANDBY/ON ++ LENS SHIFT FOCUS -- The projector lamp will go off in right order. Turning Off The Power 1 Press the STANDBY/ON button. standby/on standby/on indicator will stop blinking and light to shift the picture upward or downward. (X80 only) memo X70 does not have the ...
Operating Guide
Page 16
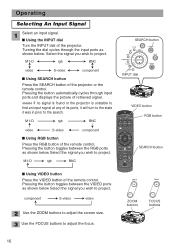
...Select an input signal. ZOOM buttons FOCUS buttons 16 M1-D rgb BNC video S-video component I Using RGB button Press the RGB button of the projector or the remote control. M1-D rgb BNC video S-video component I Using SEARCH button Press the SEARCH button of the remote control. Pressing the ... the RGB ports as shown below Select the signal you wish to the search. I Using VIDEO button Press the VIDEO button of the projector. M1-D rgb BNC I Using the INPUT dial Turn the INPUT dial of the remote control. Turning the dial cycles through input ports ...
...Select an input signal. ZOOM buttons FOCUS buttons 16 M1-D rgb BNC video S-video component I Using RGB button Press the RGB button of the projector or the remote control. M1-D rgb BNC video S-video component I Using SEARCH button Press the SEARCH button of the remote control. Pressing the ... the RGB ports as shown below Select the signal you wish to the search. I Using VIDEO button Press the VIDEO button of the projector. M1-D rgb BNC I Using the INPUT dial Turn the INPUT dial of the remote control. Turning the dial cycles through input ports ...
Operating Guide
Page 20
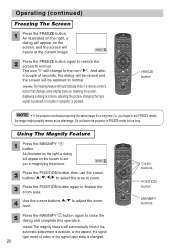
... FREEZE button again to restore the screen to exit FREEZE mode), the image might possibly remain as an afterimage. And after a couple of projector is pressed. memo The freezing feature will be restored to the icon " ". BLANK ASPECT LASER PREVIOUS NEXT MOUSE ESC MENU POSITION RESET AUTO... MENU POSITION RESET AUTO MAGNFY PinP VOLUME ON FREEZE MUTE OFF KEYSTONE SEARCH 1 2 3 ID CHANGE FREEZE button NOTE • If the projector continues projecting the same image for too long. memo The magnify feature will automatically finish if the automatic adjustment is execute, or the aspect,...
... FREEZE button again to restore the screen to exit FREEZE mode), the image might possibly remain as an afterimage. And after a couple of projector is pressed. memo The freezing feature will be restored to the icon " ". BLANK ASPECT LASER PREVIOUS NEXT MOUSE ESC MENU POSITION RESET AUTO... MENU POSITION RESET AUTO MAGNFY PinP VOLUME ON FREEZE MUTE OFF KEYSTONE SEARCH 1 2 3 ID CHANGE FREEZE button NOTE • If the projector continues projecting the same image for too long. memo The magnify feature will automatically finish if the automatic adjustment is execute, or the aspect,...

Operating Guide
Page 22
... button. 22 memo Even if you want to return to close the menu display and complete this operation. Multifunctional Settings Using The Menu Functions This projector has the following menus: MAIN, PICTURE-1, PICTURE-2, INPUT, AUTO, SCREEN, OPTION and NETWORK. Each of these menus is operated using the button, then press the...
... button. 22 memo Even if you want to return to close the menu display and complete this operation. Multifunctional Settings Using The Menu Functions This projector has the following menus: MAIN, PICTURE-1, PICTURE-2, INPUT, AUTO, SCREEN, OPTION and NETWORK. Each of these menus is operated using the button, then press the...

Operating Guide
Page 25
... the / buttons, and then press the (or the ENTER) button to perform the function.: LOAD1 LOAD2 LOAD3 LOAD4 MY MEMORY SAVE1 SAVE2 SAVE3 SAVE4 This projector has 4 numbered memories for adjustment data.
... the / buttons, and then press the (or the ENTER) button to perform the function.: LOAD1 LOAD2 LOAD3 LOAD4 MY MEMORY SAVE1 SAVE2 SAVE3 SAVE4 This projector has 4 numbered memories for adjustment data.

Operating Guide
Page 28
... is operated, the TURN OFF will be identified and the optimum aspect ratio is used at a S-VIDEO signal. Please refer to display just when the projector is turned on, using the / buttons. : LAST INPUT M1-D rgb BNC component S-video video Selecting the LAST INPUT selects the port that the item "INFORMATION...
... is operated, the TURN OFF will be identified and the optimum aspect ratio is used at a S-VIDEO signal. Please refer to display just when the projector is turned on, using the / buttons. : LAST INPUT M1-D rgb BNC component S-video video Selecting the LAST INPUT selects the port that the item "INFORMATION...

Operating Guide
Page 29
...the AUTO is set time. memo This operation requires approximately 10 seconds, and the message "AUTO IN PROGRESS" is continued to 99, the projector lamp will be incorrectly adjusted. Please refer to use this function. Perform each operation in accordance with a proper signal (without pressing the ...) will go off and the STANDBY/ON indicator begins blinking when the passed time with the instructions in the table below can turn the projector on without no-signal and an unsuitable signal) reaches at some signals. Please refer to the item "VIDEO" of the INPUT menu. ...
...the AUTO is set time. memo This operation requires approximately 10 seconds, and the message "AUTO IN PROGRESS" is continued to 99, the projector lamp will be incorrectly adjusted. Please refer to use this function. Perform each operation in accordance with a proper signal (without pressing the ...) will go off and the STANDBY/ON indicator begins blinking when the passed time with the instructions in the table below can turn the projector on without no-signal and an unsuitable signal) reaches at some signals. Please refer to the item "VIDEO" of the INPUT menu. ...


