Product Manual
Page 2
...Products - HELPFUL HINTS AND TIPS 15 HOB - CARE AND CLEANING 16 OVEN - CARE AND CLEANING 35 WHAT TO DO IF... 37 INSTALLATION ENVIRONMENT CONCERNS Recycle the materials with the household waste. Put the packaging in applicable containers to change without notice. Trouble shooter - CONTROL PANEL... 18 OVEN - CLOCK FUNCTIONS 21 OVEN - HELPFUL HINTS AND TIPS 32 OVEN - USING THE ACCESSORIES 24 OVEN - Service information www.aeg.com LEGEND Warning - General information and tips Environmental information Subject to recycle it. DAILY USE 20 OVEN - VISIT OUR WEBSITE FOR: - ...
...Products - HELPFUL HINTS AND TIPS 15 HOB - CARE AND CLEANING 16 OVEN - CARE AND CLEANING 35 WHAT TO DO IF... 37 INSTALLATION ENVIRONMENT CONCERNS Recycle the materials with the household waste. Put the packaging in applicable containers to change without notice. Trouble shooter - CONTROL PANEL... 18 OVEN - CLOCK FUNCTIONS 21 OVEN - HELPFUL HINTS AND TIPS 32 OVEN - USING THE ACCESSORIES 24 OVEN - Service information www.aeg.com LEGEND Warning - General information and tips Environmental information Subject to recycle it. DAILY USE 20 OVEN - VISIT OUR WEBSITE FOR: - ...
Product Manual
Page 4
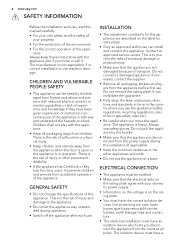
... appliance has Child lock or Key lock function, use it . ELECTRICAL CONNECTION • The appliance must have a 4 www.aeg.com SAFETY INFORMATION Before the installation and use, read this appliance. Children shall not play with your property • For the protection of the environment •... For the correct operation of suffocation or physical injury. • Keep children and animals away from the appliance before first use. INSTALLATION • The adjustment conditions for this appliance are described on the rating plate. • You must have the correct isolation devices...
... appliance has Child lock or Key lock function, use it . ELECTRICAL CONNECTION • The appliance must have a 4 www.aeg.com SAFETY INFORMATION Before the installation and use, read this appliance. Children shall not play with your property • For the protection of the environment •... For the correct operation of suffocation or physical injury. • Keep children and animals away from the appliance before first use. INSTALLATION • The adjustment conditions for this appliance are described on the rating plate. • You must have the correct isolation devices...
Product Manual
Page 5
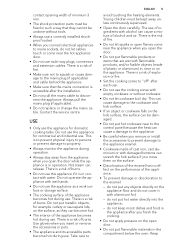
... behind the appliance. • Make sure that they can cause a damage to the appliance. • Be careful when you remove or install the accessories to prevent damage to ENGLISH 5 avoid touching the heating elements. Do not put flammable materials in contact with water. do not ...cover it is accessible after each use. • Do not use of ingredients with empty cookware or without tools. • Always use a correctly installed shockproof socket. • When you finish the cooking. • Do not apply pressure on the performance of the appliance. • To prevent...
... behind the appliance. • Make sure that they can cause a damage to the appliance. • Be careful when you remove or install the accessories to prevent damage to ENGLISH 5 avoid touching the heating elements. Do not put flammable materials in contact with water. do not ...cover it is accessible after each use. • Do not use of ingredients with empty cookware or without tools. • Always use a correctly installed shockproof socket. • When you finish the cooking. • Do not apply pressure on the performance of the appliance. • To prevent...
Product Manual
Page 22
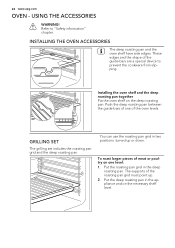
...roasting pan between the guide-bars of the oven levels. USING THE ACCESSORIES WARNING! Installing the oven shelf and the deep roasting pan together Put the oven shelf on the necessary shelf level. INSTALLING THE OVEN ACCESSORIES The deep roasting pan and the oven shelf have side edges.... The supports of the guide-bars are a special device to "Safety information" chapter. To roast larger pieces of meat or poultry on one of one level: 1. 22 www.aeg.com OVEN -...
...roasting pan between the guide-bars of the oven levels. USING THE ACCESSORIES WARNING! Installing the oven shelf and the deep roasting pan together Put the oven shelf on the necessary shelf level. INSTALLING THE OVEN ACCESSORIES The deep roasting pan and the oven shelf have side edges.... The supports of the guide-bars are a special device to "Safety information" chapter. To roast larger pieces of meat or poultry on one of one level: 1. 22 www.aeg.com OVEN -...
Product Manual
Page 33
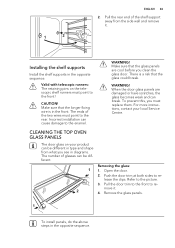
... clean the glass door. CLEANING THE TOP OVEN GLASS PANELS The door glass on the telescopic shelf runners must replace them. WARNING! Installing the shelf supports Install the shelf supports in the opposite sequence. Open the door. 2. There is in diagrams. The number of the shelf support away ...from what you must point to release the clips. Remove the glass panels. 1 To install panels, do the above steps in the opposite sequence. To prevent this, you see in the front. Refer to the rear. Pull the rear ...
... clean the glass door. CLEANING THE TOP OVEN GLASS PANELS The door glass on the telescopic shelf runners must replace them. WARNING! Installing the shelf supports Install the shelf supports in the opposite sequence. Open the door. 2. There is in diagrams. The number of the shelf support away ...from what you must point to release the clips. Remove the glass panels. 1 To install panels, do the above steps in the opposite sequence. To prevent this, you see in the front. Refer to the rear. Pull the rear ...
Product Manual
Page 34
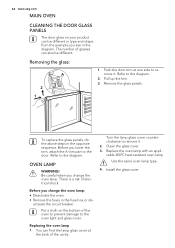
... see in the diagram. You can find the lamp glass cover at one side to the door. Use the same oven lamp type. 4. 34 www.aeg.com MAIN OVEN CLEANING THE DOOR GLASS PANELS The door glass on the bottom of the oven to prevent damage to the diagram. 2. Refer to.... There is a risk of glasses can also be different in type and shape from the example you change the oven lamp. Replacing the oven lamp 1. Install the glass cover.
... see in the diagram. You can find the lamp glass cover at one side to the door. Use the same oven lamp type. 4. 34 www.aeg.com MAIN OVEN CLEANING THE DOOR GLASS PANELS The door glass on the bottom of the oven to prevent damage to the diagram. 2. Refer to.... There is a risk of glasses can also be different in type and shape from the example you change the oven lamp. Replacing the oven lamp 1. Install the glass cover.
Product Manual
Page 37
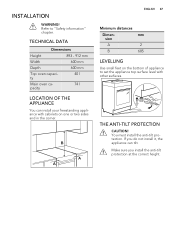
... two sides and in the corner. THE ANTI-TILT PROTECTION CAUTION! B A A ENGLISH 37 Minimum distances Dimen- You must install the anti-tilt protection. Make sure you do not install it, the appliance can install your freestanding appliance with other surfaces. TECHNICAL DATA Dimensions Height 893 - 912 mm Width 600 mm Depth 600 mm...
... two sides and in the corner. THE ANTI-TILT PROTECTION CAUTION! B A A ENGLISH 37 Minimum distances Dimen- You must install the anti-tilt protection. Make sure you do not install it, the appliance can install your freestanding appliance with other surfaces. TECHNICAL DATA Dimensions Height 893 - 912 mm Width 600 mm Depth 600 mm...
Product Manual
Page 38
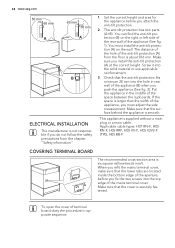
Screw it into the hole in rear wall of the appliance (B) when you must install the anti-tilt protection (A) on the right or left side of the rear wall of the space between the cupboards. Applicable cable types: H07 RN-F, ... must adjust the side measurement. The distance of the hole of the aperture, before you install the anti-tilt protection (A) at the correct height. 38 www.aeg.com 50 mm 60 mm A 60 mm 50 mm A B ELECTRICAL INSTALLATION The manufacturer is about 816 mm. COVERING TERMINAL BOARD The recommended cross-section area is...
Screw it into the hole in rear wall of the appliance (B) when you must install the anti-tilt protection (A) on the right or left side of the rear wall of the space between the cupboards. Applicable cable types: H07 RN-F, ... must adjust the side measurement. The distance of the hole of the aperture, before you install the anti-tilt protection (A) at the correct height. 38 www.aeg.com 50 mm 60 mm A 60 mm 50 mm A B ELECTRICAL INSTALLATION The manufacturer is about 816 mm. COVERING TERMINAL BOARD The recommended cross-section area is...
Product Manual
Page 39
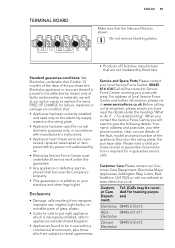
...we will, at www.electrolux.co.uk Customer Care Department, Tel: (Calls may be recorded for training purposes) Electrolux 08445 613 613 AEG- 08445 611 611 Electrolux Zanussi- 08445 612 612 Electrolux Do not remove blanking plates. Standard guarantee conditions: We, Electrolux, undertake that if...by us. • Electrolux Service Force Centre must undertake all service work under this Electrolux appliance or any part thereof is improperly installed, calls to appliances outside United Kingdom. • Appliances found to be in addition to Service Force Centre covering your postcode area...
...we will, at www.electrolux.co.uk Customer Care Department, Tel: (Calls may be recorded for training purposes) Electrolux 08445 613 613 AEG- 08445 611 611 Electrolux Zanussi- 08445 612 612 Electrolux Do not remove blanking plates. Standard guarantee conditions: We, Electrolux, undertake that if...by us. • Electrolux Service Force Centre must undertake all service work under this Electrolux appliance or any part thereof is improperly installed, calls to appliances outside United Kingdom. • Appliances found to be in addition to Service Force Centre covering your postcode area...
Product Manual
Page 40
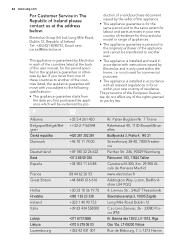
...the appliance which will be transferred to another user. • The appliance is installed and used in accordance with all relevant regulations in the appliance guarantee or otherwise by law. 40 www.aeg.com For Customer Service in The Republic of Ireland please contact us at the ... the period specified in force within the home, i.e. The provisions of this user manual, for commercial purposes. • The appliance is installed in accordance with instructions issued by Electrolux and is guaranteed by Electrolux in each of the countries listed at the address below: Electrolux Group ...
...the appliance which will be transferred to another user. • The appliance is installed and used in accordance with all relevant regulations in the appliance guarantee or otherwise by law. 40 www.aeg.com For Customer Service in The Republic of Ireland please contact us at the ... the period specified in force within the home, i.e. The provisions of this user manual, for commercial purposes. • The appliance is installed in accordance with instructions issued by Electrolux and is guaranteed by Electrolux in each of the countries listed at the address below: Electrolux Group ...