
Product Manual
Page 2
CONTROL PANEL 6 4. TROUBLESHOOTING 11 8. When contacting Service, ensure that help make life simpler - Model, PNC, Serial Number. HELPFUL HINTS AND TIPS 9 6. ENVIRONMENT CONCERNS 20 FOR PERFECT RESULTS Thank you might not find on the rating plate. We have created it . Please spend a few minutes reading to change without notice. Warning / Caution-Safety information General information and tips Environmental information Subject to get the...
CONTROL PANEL 6 4. TROUBLESHOOTING 11 8. When contacting Service, ensure that help make life simpler - Model, PNC, Serial Number. HELPFUL HINTS AND TIPS 9 6. ENVIRONMENT CONCERNS 20 FOR PERFECT RESULTS Thank you might not find on the rating plate. We have created it . Please spend a few minutes reading to change without notice. Warning / Caution-Safety information General information and tips Environmental information Subject to get the...
Product Manual
Page 3
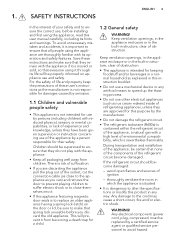
... of the components of the refrigerant circuit become damaged: - If the refrigerant circuit should be replaced by a person responsible for this user manual carefully, including its operation and safety features. Any electrical component (power cord, plug, compressor) must be supervised to avoid hazard. SAFETY INSTRUCTIONS ENGLISH 3 In the interest of your safety and to ensure the correct use other electrical appliances (such as explained...
... of the components of the refrigerant circuit become damaged: - If the refrigerant circuit should be replaced by a person responsible for this user manual carefully, including its operation and safety features. Any electrical component (power cord, plug, compressor) must be supervised to avoid hazard. SAFETY INSTRUCTIONS ENGLISH 3 In the interest of your safety and to ensure the correct use other electrical appliances (such as explained...
Product Manual
Page 4
...). Do not connect the appliance if it live. 1.5 Installation For electrical connection carefully follow the instructions relevant to overheating. Report possible damages immediately to . To achieve sufficient ventilation follow the instructions given in the freezer compartment as this could enter the electric system making it is loose, do not insert the power plug. A squashed or damaged power plug may damage the plastic interior, and humidity...
...). Do not connect the appliance if it live. 1.5 Installation For electrical connection carefully follow the instructions relevant to overheating. Report possible damages immediately to . To achieve sufficient ventilation follow the instructions given in the freezer compartment as this could enter the electric system making it is loose, do not insert the power plug. A squashed or damaged power plug may damage the plastic interior, and humidity...
Product Manual
Page 5
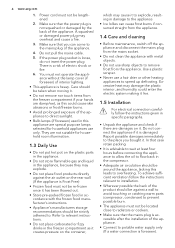
... contain gasses which could damage the ozone layer, in either its refriger- PRODUCT DESCRIPTION 1 2 6 5 1 Control panel 2 Cold module 3 Flap 3 4 4 Freezer baskets 5 Rating plate 6 Maxibox baskets The insulation foam contains flammable gases: the appliance shall be discarded together with the urban refuse and rubbish. 1.6 Service • Any electrical work required to obtain from your local authorities. ENGLISH 5 ant circuit or...
... contain gasses which could damage the ozone layer, in either its refriger- PRODUCT DESCRIPTION 1 2 6 5 1 Control panel 2 Cold module 3 Flap 3 4 4 Freezer baskets 5 Rating plate 6 Maxibox baskets The insulation foam contains flammable gases: the appliance shall be discarded together with the urban refuse and rubbish. 1.6 Service • Any electrical work required to obtain from your local authorities. ENGLISH 5 ant circuit or...
Product Manual
Page 6
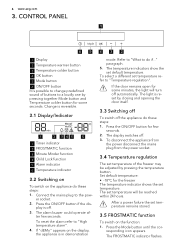
... the Mode button until the cor- paragraph. 5. The FROSTMATIC indicator flashes. 6 www.aeg.com 3. The temperature indicators show the set temperature of buttons to the power socket. 2. If the door remains open for few seconds. Connect the mains plug to a loudly one by pressing the temperature button. To select a different set temperature remains stored. 3.5 FROSTMATIC function To switch on the appliance do these steps: 1. CONTROL PANEL 1 65 1 Display 2 Temperature warmer button 3 Temperature colder button 4 OK button 5 Mode button 6 ON/OFF button...
... the Mode button until the cor- paragraph. 5. The FROSTMATIC indicator flashes. 6 www.aeg.com 3. The temperature indicators show the set temperature of buttons to the power socket. 2. If the door remains open for few seconds. Connect the mains plug to a loudly one by pressing the temperature button. To select a different set temperature remains stored. 3.5 FROSTMATIC function To switch on the appliance do these steps: 1. CONTROL PANEL 1 65 1 Display 2 Temperature warmer button 3 Temperature colder button 4 OK button 5 Mode button 6 ON/OFF button...
Product Manual
Page 7
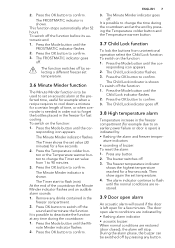
... power failure or door is open) is needed in the freezer for a few seconds. Then show again the set value (30 minutes) for fast cooling. To reset the alarm: 1. The door open alarm conditions are restored (door closed), the alarm will sound if the door is shown. To switch off . The Timer shows the set temperature. 4. Press OK button to confirm. 3. The FROSTMATIC indicator goes off . 3.8 High temperature alarm Temperature increase in the freezer...
... power failure or door is open) is needed in the freezer for a few seconds. Then show again the set value (30 minutes) for fast cooling. To reset the alarm: 1. The door open alarm conditions are restored (door closed), the alarm will sound if the door is shown. To switch off . The Timer shows the set temperature. 4. Press OK button to confirm. 3. The FROSTMATIC indicator goes off . 3.8 High temperature alarm Temperature increase in the freezer...
Product Manual
Page 8
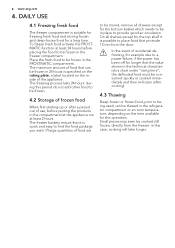
.... 8 www.aeg.com 4. If large quantities of accidental defrosting, for a long time. Small pieces may even be cooked still frozen, directly from the door. The freezing process lasts 24 hours: during this case, cooking will take longer. On all drawers except for this operation. DAILY USE 4.1 Freezing fresh food The freezer compartment is specified on the rating plate, a label located on...
.... 8 www.aeg.com 4. If large quantities of accidental defrosting, for a long time. Small pieces may even be cooked still frozen, directly from the door. The freezing process lasts 24 hours: during this case, cooking will take longer. On all drawers except for this operation. DAILY USE 4.1 Freezing fresh food The freezer compartment is specified on the rating plate, a label located on...
Product Manual
Page 9
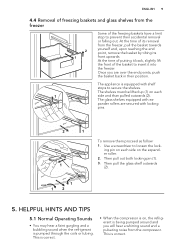
... the freezing baskets have a limit stop to prevent their position. Once you will hear a whirring sound and a pulsating noise from the compressor. The appliance is correct. Then pull the glass shelf outwards (2). 1 12 5. The shelves must be lifted up (1) on each side on , the refrigerant is pumped through the coils or tubing. ENGLISH 9 4.4 Removal of freezing baskets and glass shelves from the freezer 2 1 Some...
... the freezing baskets have a limit stop to prevent their position. Once you will hear a whirring sound and a pulsating noise from the compressor. The appliance is correct. Then pull the glass shelf outwards (2). 1 12 5. The shelves must be lifted up (1) on each side on , the refrigerant is pumped through the coils or tubing. ENGLISH 9 4.4 Removal of freezing baskets and glass shelves from the freezer 2 1 Some...
Product Manual
Page 10
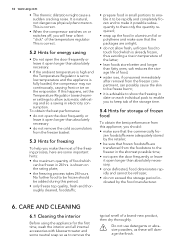
...; do not open the door frequently or leave it open longer than fatty ones; is fully loaded, the compressor may run continuously, causing frost or ice on each individual pack to enable you to remove the typical smell of the temperature regulator. No further food to be frozen in date on the evaporator. CARE AND CLEANING 6.1 Cleaning the interior Before using the appliance for...
...; do not open the door frequently or leave it open longer than fatty ones; is fully loaded, the compressor may run continuously, causing frost or ice on each individual pack to enable you to remove the typical smell of the temperature regulator. No further food to be frozen in date on the evaporator. CARE AND CLEANING 6.1 Cleaning the interior Before using the appliance for...
Product Manual
Page 11
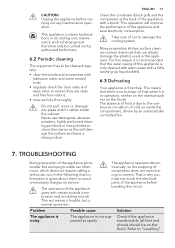
... automatically controlled fan. 7. maintenance and recharging must not touch the electrical parts of frost is due to clean the interior as this appliance is only cleaned with warm water with lukewarm water and some smaller but a normal operation. This operation will damage the surface and leave a strong odour. The absence of the appliance before carrying out any pipes and/or cables inside and...
... automatically controlled fan. 7. maintenance and recharging must not touch the electrical parts of frost is due to clean the interior as this appliance is only cleaned with warm water with lukewarm water and some smaller but a normal operation. This operation will damage the surface and leave a strong odour. The absence of the appliance before carrying out any pipes and/or cables inside and...
Product Manual
Page 12
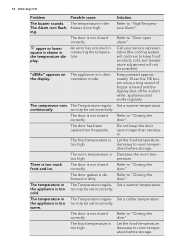
... not keep food products cold, but temperature adjustment will continue to room temperature before storage. Let the food temperature decrease to keep the door open alarm". Refer to room temperature before storage. The Temperature regula- Set a colder temperature. Let the food temperature decrease to "Closing the door". Refer to "Closing the door". An error has occurred in the The Alarm icon flash- "dEMo" appears on the display. The appliance is...
... not keep food products cold, but temperature adjustment will continue to room temperature before storage. Let the food temperature decrease to keep the door open alarm". Refer to room temperature before storage. The Temperature regula- Set a colder temperature. Let the food temperature decrease to "Closing the door". Refer to "Closing the door". An error has occurred in the The Alarm icon flash- "dEMo" appears on the display. The appliance is...
Product Manual
Page 13
... operate. elled. INSTALLATION WARNING! The lamp is cold air circulation. The lamp does not work. Solution Store food so that there is defective. The appliance is too warm. off. The mains plug is no power. There is not connected to "Levelling". Connect another electrical appliance to long. to the mains socket. If necessary, adjust the door. If necessary, replace the defective door gaskets. Read the "Safety Information" carefully...
... operate. elled. INSTALLATION WARNING! The lamp is cold air circulation. The lamp does not work. Solution Store food so that there is defective. The appliance is too warm. off. The mains plug is no power. There is not connected to "Levelling". Connect another electrical appliance to long. to the mains socket. If necessary, adjust the door. If necessary, replace the defective door gaskets. Read the "Safety Information" carefully...
Product Manual
Page 14
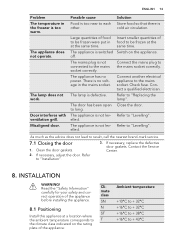
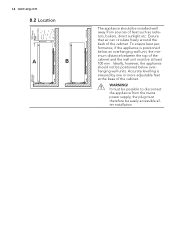
It must be easily accessible after installation. To ensure best performance, if the appliance is ensured by one or more adjustable feet at least 100 mm . Accurate levelling is positioned below overhanging wall units. WARNING! 20 mm 14 www.aeg.com 8.2 Location 100 mm min A B The ...plug must therefore be possible to disconnect the appliance from sources of the cabinet. Ensure that air can circulate freely around the back of heat such as radiators, boilers, direct sunlight etc. Ideally, however, the appliance should be installed well away from the mains power supply...
It must be easily accessible after installation. To ensure best performance, if the appliance is ensured by one or more adjustable feet at least 100 mm . Accurate levelling is positioned below overhanging wall units. WARNING! 20 mm 14 www.aeg.com 8.2 Location 100 mm min A B The ...plug must therefore be possible to disconnect the appliance from sources of the cabinet. Ensure that air can circulate freely around the back of heat such as radiators, boilers, direct sunlight etc. Ideally, however, the appliance should be installed well away from the mains power supply...
Product Manual
Page 15
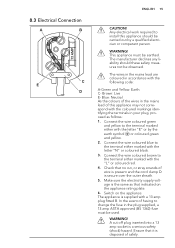
... as follows: 1. Switch on the appliance rating plate. 6. In the event of safely. 8.3 Electrical Connection A B C E D ENGLISH 15 CAUTION! Make sure the electricity supply voltage is disposed of having to install this appliance may not correspond with a 13 amp plug fitted B. Any electrical work required to change the fuse in accordance with the letter "E" or by a qualified electrician or competent person. Connect the wire coloured blue...
... as follows: 1. Switch on the appliance rating plate. 6. In the event of safely. 8.3 Electrical Connection A B C E D ENGLISH 15 CAUTION! Make sure the electricity supply voltage is disposed of having to install this appliance may not correspond with a 13 amp plug fitted B. Any electrical work required to change the fuse in accordance with the letter "E" or by a qualified electrician or competent person. Connect the wire coloured blue...
Product Manual
Page 16
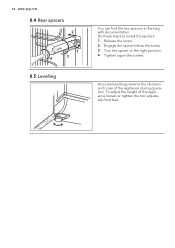
16 www.aeg.com 8.4 Rear spacers 2 1 4 3 8.5 Levelling You can find the two spacers in the bag with documentation. Engage the spacer below the screw. 3. Tighten again the screws. Release the screw. 2. Turn the spacer to install the spacers: 1. To adjust the height of the appliance during operation. Accurate levelling prevents the vibration and noise of the appliance loosen or tighten the two adjustable front feet. Do these steps to the right position. 4.
16 www.aeg.com 8.4 Rear spacers 2 1 4 3 8.5 Levelling You can find the two spacers in the bag with documentation. Engage the spacer below the screw. 3. Tighten again the screws. Release the screw. 2. Turn the spacer to install the spacers: 1. To adjust the height of the appliance during operation. Accurate levelling prevents the vibration and noise of the appliance loosen or tighten the two adjustable front feet. Do these steps to the right position. 4.
Product Manual
Page 17
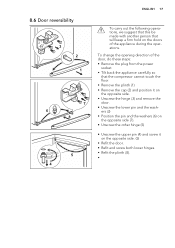
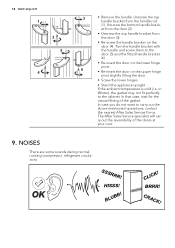
To change the opening direction of the door, do these steps: • Remove the plug from the power socket. • Tilt back the appliance carefully so that will keep a firm hold on the opposite side. (5) • Refit the door. • Refit and screw both lower hinges. • Refit the plinth (8). • 8.6 Door reversibility 3 2 1 7 6 8 5 4 ENGLISH 17 To carry out the following operations, we suggest...
To change the opening direction of the door, do these steps: • Remove the plug from the power socket. • Tilt back the appliance carefully so that will keep a firm hold on the opposite side. (5) • Refit the door. • Refit and screw both lower hinges. • Refit the plinth (8). • 8.6 Door reversibility 3 2 1 7 6 8 5 4 ENGLISH 17 To carry out the following operations, we suggest...
Product Manual
Page 18
... out the above mentioned operations, contact the nearest After Sales Service Force. BRRR! Unscrew the top handle bracket from the door (3). • Re-screw the handle bracket on the upper hinge pivot slightly tilting the door. • Screw the lower hinges. • Stand the appliance upright. If the ambient temperature is cold (i.e. 18 www.aeg.com 1 2 5 4 3 • Remove the handle. In case you...
... out the above mentioned operations, contact the nearest After Sales Service Force. BRRR! Unscrew the top handle bracket from the door (3). • Re-screw the handle bracket on the upper hinge pivot slightly tilting the door. • Screw the lower hinges. • Stand the appliance upright. If the ambient temperature is cold (i.e. 18 www.aeg.com 1 2 5 4 3 • Remove the handle. In case you...
Product Manual
Page 20
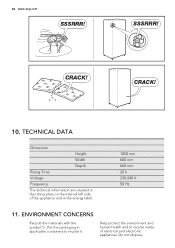
SSSRRR! CRACK! Do not dispose TECHNICAL DATA Dimension Height Width Depth Rising Time Voltage Frequency The technical information are situated in the rating plate on the internal left side of electrical and electronic appliances. ENVIRONMENT CONCERNS Recycle the materials with the symbol . Put the packaging in the energy label. 1850 mm 600 mm 660 mm 20 h 230-240 V 50 Hz 11. 20 www.aeg.com SSSRRR! Help protect the environment and human health and to recycle waste of the appliance and in applicable containers to recycle it. CRACK! 10.
SSSRRR! CRACK! Do not dispose TECHNICAL DATA Dimension Height Width Depth Rising Time Voltage Frequency The technical information are situated in the rating plate on the internal left side of electrical and electronic appliances. ENVIRONMENT CONCERNS Recycle the materials with the symbol . Put the packaging in the energy label. 1850 mm 600 mm 660 mm 20 h 230-240 V 50 Hz 11. 20 www.aeg.com SSSRRR! Help protect the environment and human health and to recycle waste of the appliance and in applicable containers to recycle it. CRACK! 10.


