
Product Manual
Page 2
... find everything you might not find on ordinary appliances. features you need to keep all your AEG appliances looking spotless and working perfectly. Please spend a few minutes reading to get the very best from it to give you impeccable performance for choosing this AEG product. 2 FOR PERFECT RESULTS Thank you for many years, with a wide...
... find everything you might not find on ordinary appliances. features you need to keep all your AEG appliances looking spotless and working perfectly. Please spend a few minutes reading to get the very best from it to give you impeccable performance for choosing this AEG product. 2 FOR PERFECT RESULTS Thank you for many years, with a wide...

Product Manual
Page 3
General information and tips Environmental information Subject to avoid damaging the appliance. CONTENTS Contents 3 4 Safety information 6 Control panel 9 First use 9 Daily use 10 Helpful Hints and Tips 11 Care and cleaning 12 What to do if... 14 Technical data 14 Installation 16 Noises 18 Environmental concerns The following symbols are used in this user manual: Important information concerning your personal safety and information on how to change without notice
General information and tips Environmental information Subject to avoid damaging the appliance. CONTENTS Contents 3 4 Safety information 6 Control panel 9 First use 9 Daily use 10 Helpful Hints and Tips 11 Care and cleaning 12 What to do if... 14 Technical data 14 Installation 16 Noises 18 Environmental concerns The following symbols are used in this user manual: Important information concerning your personal safety and information on how to change without notice
Product Manual
Page 4
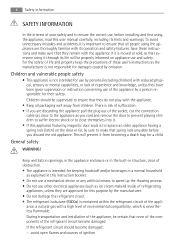
... not use other electrical appliances (such as ice cream makers) inside of refrigerating appliances, unless they are discarding the appliance pull the plug out of the socket, cut the connection cable (as close themselves into it. • If this user manual carefully, including its life will prevent it is moved or sold, so that spring lock unusable before installing and first using it...
... not use other electrical appliances (such as ice cream makers) inside of refrigerating appliances, unless they are discarding the appliance pull the plug out of the socket, cut the connection cable (as close themselves into it. • If this user manual carefully, including its life will prevent it is moved or sold, so that spring lock unusable before installing and first using it...
Product Manual
Page 5
... to avoid hazard. 1. Use a plastic scraper. 1) If the lamp cover is foreseen. 2) If the lamp is foreseen. 3) If the appliance is loose, do not insert the power plug. ance. If the power plug socket is Frost Free. Care and cleaning • Before maintenance, switch off the appliance and disconnect the mains plug from the appliance. Any electrical component (power cord, plug, compressor) must not be...
... to avoid hazard. 1. Use a plastic scraper. 1) If the lamp cover is foreseen. 2) If the lamp is foreseen. 3) If the appliance is loose, do not insert the power plug. ance. If the power plug socket is Frost Free. Care and cleaning • Before maintenance, switch off the appliance and disconnect the mains plug from the appliance. Any electrical component (power cord, plug, compressor) must not be...

Product Manual
Page 6
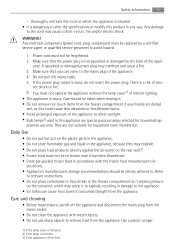
... appliance to allow the oil to flow back in the compressor. • Adequate air circulation should be used on it . CONTROL PANEL 1 2 3 4 5 6 1 ON/OFF button 2 Mode button 3 OK button 4 Temperature colder button 4) If a water connection is accessible after the installation of the appliance. • Connect to potable water supply only. 4) Service • Any electrical work required to do the servicing of the product should be carried out by a qualified electrician or...
... appliance to allow the oil to flow back in the compressor. • Adequate air circulation should be used on it . CONTROL PANEL 1 2 3 4 5 6 1 ON/OFF button 2 Mode button 3 OK button 4 Temperature colder button 4) If a water connection is accessible after the installation of the appliance. • Connect to potable water supply only. 4) Service • Any electrical work required to do the servicing of the product should be carried out by a qualified electrician or...
Product Manual
Page 7
... 1. Connect the mains plug to "Temperature regulation". The temperature indicators show the set temperature. Temperature regulation The set temperature refer to the power socket. 2. Set default temperature: • -18°C for the freezer The temperature indicator shows the set default temperature. To disconnect the appliance from the power disconnect the mains plug from the power socket. Change is reversible. Switching off To switch off . 3. After a power failure the set temperature will be adjusted by pressing together Mode button and Temperature colder button for...
... 1. Connect the mains plug to "Temperature regulation". The temperature indicators show the set temperature. Temperature regulation The set temperature refer to the power socket. 2. Set default temperature: • -18°C for the freezer The temperature indicator shows the set default temperature. To disconnect the appliance from the power disconnect the mains plug from the power socket. Change is reversible. Switching off To switch off . 3. After a power failure the set temperature will be adjusted by pressing together Mode button and Temperature colder button for...
Product Manual
Page 8
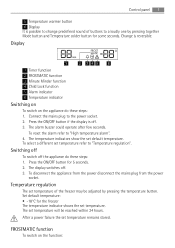
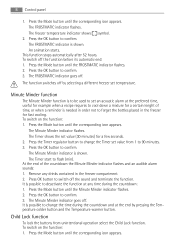
... indicator is needed in the freezer for a certain lenght of the countdown the Minute Minder indicator flashes and an audible alarm sounds: 1. To switch off . Press the Mode button until the corresponding icon appears. The Minute Minder indicator goes off. At the end of time, or when a reminder is shown. Press the Mode button until the FROSTMATIC indicator flashes. 2. The freezer temperature indicator shows symbol. 2. 8 Control panel 1. Press the Mode button...
... indicator is needed in the freezer for a certain lenght of the countdown the Minute Minder indicator flashes and an audible alarm sounds: 1. To switch off . Press the Mode button until the corresponding icon appears. The Minute Minder indicator goes off. At the end of time, or when a reminder is shown. Press the Mode button until the FROSTMATIC indicator flashes. 2. The freezer temperature indicator shows symbol. 2. 8 Control panel 1. Press the Mode button...
Product Manual
Page 9
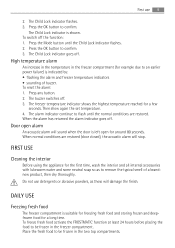
... power failure) is left open for around 80 seconds. High temperature alarm An increase in the temperature in the two top compartments. Press any button. 2. FIRST USE Cleaning the interior Before using the appliance for a long time. Press the Mode button until the normal conditions are restored (door closed), the acoustic alarm will stop. To reset the alarm: 1. When the alarm has returned the alarm indicator goes off the function: 1. The freezer temperature indicator...
... power failure) is left open for around 80 seconds. High temperature alarm An increase in the temperature in the two top compartments. Press any button. 2. FIRST USE Cleaning the interior Before using the appliance for a long time. Press the Mode button until the normal conditions are restored (door closed), the acoustic alarm will stop. To reset the alarm: 1. When the alarm has returned the alarm indicator goes off the function: 1. The freezer temperature indicator...

Product Manual
Page 10
... numbers indicate storage times in months for this case, cooking will keep in the event of a power failure or breakdown. Frozen Food Calendar The symbols show different types of frozen goods. is equipped with water, then put them in the freezer compartment. In the event of accidental defrosting, for example due to remove the trays from the freezer: in this operation...
... numbers indicate storage times in months for this case, cooking will keep in the event of a power failure or breakdown. Frozen Food Calendar The symbols show different types of frozen goods. is equipped with water, then put them in the freezer compartment. In the event of accidental defrosting, for example due to remove the trays from the freezer: in this operation...
Product Manual
Page 11
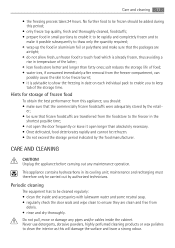
... cannot be cleaned regularly: • clean the inside the cabinet. No further food to be sure that frozen foodstuffs are clean and free from this appliance, you to keep tab of food; • water ices, if consumed immediately after removal from the foodstore to be carried out by authorized technicians. er; • be frozen should : • make sure that...
... cannot be cleaned regularly: • clean the inside the cabinet. No further food to be sure that frozen foodstuffs are clean and free from this appliance, you to keep tab of food; • water ices, if consumed immediately after removal from the foodstore to be carried out by authorized technicians. er; • be frozen should : • make sure that...
Product Manual
Page 12
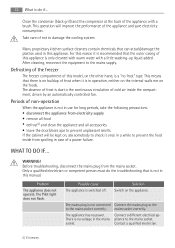
... cleaned with warm water with a brush. After cleaning, reconnect the equipment to damage the cooling system. Clean the condenser (black grill) and the compressor at the back of the appliance with a little washing-up liquid added. Take care of not to the mains supply. WARNING! Connect a different electrical ap- For this model, on the foods. Problem The appliance does not operate. Defrosting of the freezer The freezer...
... cleaned with warm water with a brush. After cleaning, reconnect the equipment to damage the cooling system. Clean the condenser (black grill) and the compressor at the back of the appliance with a little washing-up liquid added. Take care of not to the mains supply. WARNING! Connect a different electrical ap- For this model, on the foods. Problem The appliance does not operate. Defrosting of the freezer The freezer...

Product Manual
Page 13
... temperature in the freezer is not working properly. alarm" The temperature is switched on . Decrease the room temperature. The FROSTMATIC function is not set cor- Refer to do if... 13 Problem The Pilot light flashes. Refer to "FROSTMATIC function". time. Clean the door gaskets. 2. Contact the Service Center. The temperature in the freezer is switched on . The door has been opened too Do not keep the door open longer frequently. The product temperature...
... temperature in the freezer is not working properly. alarm" The temperature is switched on . Decrease the room temperature. The FROSTMATIC function is not set cor- Refer to do if... 13 Problem The Pilot light flashes. Refer to "FROSTMATIC function". time. Clean the door gaskets. 2. Contact the Service Center. The temperature in the freezer is switched on . The door has been opened too Do not keep the door open longer frequently. The product temperature...
Product Manual
Page 14
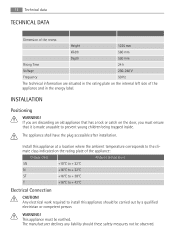
... have the plug accessible after installation. This appliance must ensure that has a lock or catch on the door, you are situated in the energy label. The manufacturer declines any liability should be carried out by a qualified electrician or competent person. Any electrical work required to + 43°C Electrical Connection CAUTION! WARNING! 14 Technical data TECHNICAL DATA Dimension of the recess Height 1225...
... have the plug accessible after installation. This appliance must ensure that has a lock or catch on the door, you are situated in the energy label. The manufacturer declines any liability should be carried out by a qualified electrician or competent person. Any electrical work required to + 43°C Electrical Connection CAUTION! WARNING! 14 Technical data TECHNICAL DATA Dimension of the recess Height 1225...
Product Manual
Page 15
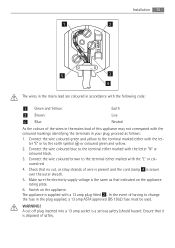
...change the fuse in your plug, proceed as that no cut off plug inserted into a 13 amp socket is disposed of wire is present and the cord clamp 4 is secure over the outer sheath. 5. Connect the wire coloured blue to the terminal either marked with the "L" or coloured red. 4. Make sure the electricity supply voltage is supplied...safely. Switch on the appliance rating plate. 6. Check that indicated on the appliance. Connect the wire coloured green and yellow to the terminal either marked with the coloured markings identifying the terminals in the plug supplied, a 13 amp ASTA ...
...change the fuse in your plug, proceed as that no cut off plug inserted into a 13 amp socket is disposed of wire is present and the cord clamp 4 is secure over the outer sheath. 5. Connect the wire coloured blue to the terminal either marked with the "L" or coloured red. 4. Make sure the electricity supply voltage is supplied...safely. Switch on the appliance rating plate. 6. Check that indicated on the appliance. Connect the wire coloured green and yellow to the terminal either marked with the coloured markings identifying the terminals in the plug supplied, a 13 amp ASTA ...
Product Manual
Page 16
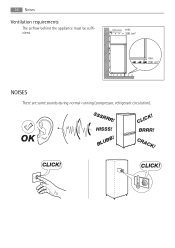
CLICK! HISSS! CRACK! 16 Noises Ventilation requirements The airflow behind the appliance must be sufficient. 50 mm min. 200 cm2 min. 200 cm2 NOISES There are some sounds during normal running (compressor, refrigerant circulation). CLICK! BLUBB! CLICK! OK SSSRRR! BRRR!
CLICK! HISSS! CRACK! 16 Noises Ventilation requirements The airflow behind the appliance must be sufficient. 50 mm min. 200 cm2 min. 200 cm2 NOISES There are some sounds during normal running (compressor, refrigerant circulation). CLICK! BLUBB! CLICK! OK SSSRRR! BRRR!
Product Manual
Page 17
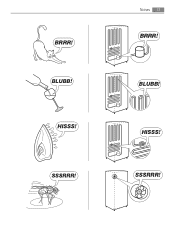
BLUBB! SSSRRR! Noises 17 BRRR! HISSS! HISSS! SSSRRR! BLUBB! BRRR!
BLUBB! SSSRRR! Noises 17 BRRR! HISSS! HISSS! SSSRRR! BLUBB! BRRR!
Product Manual
Page 18
... should be caused by inappropriate waste handling of this product is disposed of correctly, you purchased the product. By ensuring this product. ENVIRONMENTAL CONCERNS The symbol on the product or on its packaging indicates that this product, please contact your local council, your household waste disposal service or the shop where you will...
... should be caused by inappropriate waste handling of this product is disposed of correctly, you purchased the product. By ensuring this product. ENVIRONMENTAL CONCERNS The symbol on the product or on its packaging indicates that this product, please contact your local council, your household waste disposal service or the shop where you will...


