
Specification Sheet
Page 1
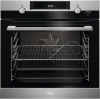
...; 71 litre oven capacity • Heat activated catalytic cleaning • Isofront® plus triple glazed door • Fan controlled defrosting • LED digital display • Base heat finishing • Food probe • Auto safety switch off and child lock • 'A' energy class Perfect results with Catalytic Cleaning BCK55632XM ADD STEAM FOR CRISPIER BAKING In addition to all your oven. SteamBake - The timer is getting exactly the heat it needs. even...
...; 71 litre oven capacity • Heat activated catalytic cleaning • Isofront® plus triple glazed door • Fan controlled defrosting • LED digital display • Base heat finishing • Food probe • Auto safety switch off and child lock • 'A' energy class Perfect results with Catalytic Cleaning BCK55632XM ADD STEAM FOR CRISPIER BAKING In addition to all your oven. SteamBake - The timer is getting exactly the heat it needs. even...
User Manual
Page 4
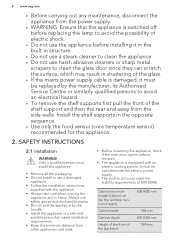
... meets installation requirements. • Keep the minimum distance from other appliances and units. • Before mounting the appliance, check if the oven door opens without restraint. • The appliance is damaged, it must be operated with the electric power supply. • The built-in unit must install this appliance. 2. Cabinet minimum height (Cabinet under the worktop minimum height) Cabinet width Cabinet depth Height of the front of the glass...
... meets installation requirements. • Keep the minimum distance from other appliances and units. • Before mounting the appliance, check if the oven door opens without restraint. • The appliance is damaged, it must be operated with the electric power supply. • The built-in unit must install this appliance. 2. Cabinet minimum height (Cabinet under the worktop minimum height) Cabinet width Cabinet depth Height of the front of the glass...
User Manual
Page 5
... the ventilation openings are compatible with the electrical ratings of the mains power supply. • Always use a correctly installed shockproof socket. • Do not use the appliance as a work surface or as a storage surface. Always pull the mains plug. • Use only correct isolation devices: line protecting cut-outs, fuses (screw type fuses removed from the mains at the end of the installation. Hot air can...
... the ventilation openings are compatible with the electrical ratings of the mains power supply. • Always use a correctly installed shockproof socket. • Do not use the appliance as a work surface or as a storage surface. Always pull the mains plug. • Use only correct isolation devices: line protecting cut-outs, fuses (screw type fuses removed from the mains at the end of the installation. Hot air can...
User Manual
Page 6
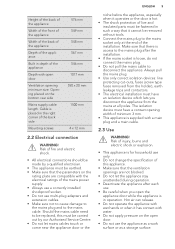
...; Clean the appliance with the same specifications. 2.6 Service • To repair the appliance contact the Authorised Service Centre. • Use original spare parts only. 2.7 Disposal WARNING! do not put aluminium foil directly on the bottom. - Fruit juices cause stains that the glass panels can be used for this appliance is for cooking purposes only. Risk of injury or suffocation. Do not use . 2.4 Care and cleaning...
...; Clean the appliance with the same specifications. 2.6 Service • To repair the appliance contact the Authorised Service Centre. • Use original spare parts only. 2.7 Disposal WARNING! do not put aluminium foil directly on the bottom. - Fruit juices cause stains that the glass panels can be used for this appliance is for cooking purposes only. Risk of injury or suffocation. Do not use . 2.4 Care and cleaning...
User Manual
Page 7
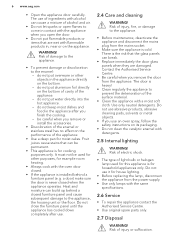
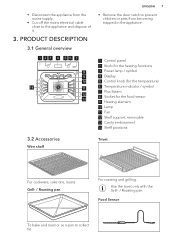
... 1 Control panel 2 Knob for the heating functions 3 Power lamp / symbol 4 Display 5 Control knob (for the temperature) 6 Temperature indicator / symbol 7 Plus Steam 8 Socket for the food sensor 9 Heating element 10 Lamp 11 Fan 12 Shelf support, removable 13 Cavity embossment 14 Shelf positions 3.2 Accessories Wire shelf Trivet For cookware, cake tins, roasts. Grill- / Roasting pan For roasting and grilling. Food Sensor To bake and roast or as a pan to the appliance and dispose of it. 3. Use...
... 1 Control panel 2 Knob for the heating functions 3 Power lamp / symbol 4 Display 5 Control knob (for the temperature) 6 Temperature indicator / symbol 7 Plus Steam 8 Socket for the food sensor 9 Heating element 10 Lamp 11 Fan 12 Shelf support, removable 13 Cavity embossment 14 Shelf positions 3.2 Accessories Wire shelf Trivet For cookware, cake tins, roasts. Grill- / Roasting pan For roasting and grilling. Food Sensor To bake and roast or as a pan to the appliance and dispose of it. 3. Use...
User Manual
Page 8
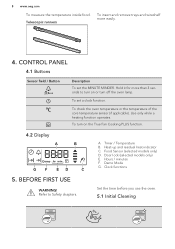
... To measure the temperature inside food. A. Food Sensor (selected models only) D. Door lock (selected models only) E. Hold it for more easily. 4. To set the MINUTE MINDER. Hours / minutes F. Clock functions Set the time before you use the oven. 5.1 Initial Cleaning Timer / Temperature B. Refer to turn on or turn on the True Fan Cooking PLUS function. 4.2 Display A B G F ED C 5. Use only while a heating function operates. CONTROL PANEL 4.1 Buttons Sensor field / Button Description To set a clock function. Telescopic runners To insert and remove trays...
... To measure the temperature inside food. A. Food Sensor (selected models only) D. Door lock (selected models only) E. Hold it for more easily. 4. To set the MINUTE MINDER. Hours / minutes F. Clock functions Set the time before you use the oven. 5.1 Initial Cleaning Timer / Temperature B. Refer to turn on or turn on the True Fan Cooking PLUS function. 4.2 Display A B G F ED C 5. Use only while a heating function operates. CONTROL PANEL 4.1 Buttons Sensor field / Button Description To set a clock function. Telescopic runners To insert and remove trays...
User Manual
Page 9
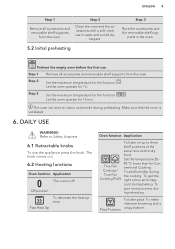
.... 6.1 Retractable knobs To use . To bake pizza. The oven can emit an odour and smoke during True Fan the cooking. DAILY USE WARNING! Oven function Application To bake on up time. Step 2 Set the maximum temperature for 15 min. Make sure that the room is off. Cooking / To add humidity during preheating. tergent. 5.2 Initial preheating Step 3 Place the accessories and the removable shelf sup- To...
.... 6.1 Retractable knobs To use . To bake pizza. The oven can emit an odour and smoke during True Fan the cooking. DAILY USE WARNING! Oven function Application To bake on up time. Step 2 Set the maximum temperature for 15 min. Make sure that the room is off. Cooking / To add humidity during preheating. tergent. 5.2 Initial preheating Step 3 Place the accessories and the removable shelf sup- To...
User Manual
Page 10
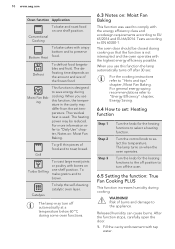
... To roast large meat joints or poultry with bones on : Moist Fan Baking This function was used . For the cooking instructions refer to brown. WARNING! The lamp turns on : Moist Fan Baking. After the function stops, carefully open the door. 1. The residual heat is designed to comply with the highest energy efficiency possible. This function is used to save energy during cooking. When you use this function, the temperature...
... To roast large meat joints or poultry with bones on : Moist Fan Baking This function was used . For the cooking instructions refer to brown. WARNING! The lamp turns on : Moist Fan Baking. After the function stops, carefully open the door. 1. The residual heat is designed to comply with the highest energy efficiency possible. This function is used to save energy during cooking. When you use this function, the temperature...

User Manual
Page 11
... function: True Fan Cooking PLUS. Set the function: . 3. It works only with water only when the oven is 250 ml. Turn the control knob to turn -off the oven. 7. WARNING! Clock function Time of Day Duration End Time Time Delay Application To show or change the time of day only when the oven is at the set the length of cooking. Use only when a heating function is set the oven turn off time. Put food...
... function: True Fan Cooking PLUS. Set the function: . 3. It works only with water only when the oven is 250 ml. Turn the control knob to turn -off the oven. 7. WARNING! Clock function Time of Day Duration End Time Time Delay Application To show or change the time of day only when the oven is at the set the length of cooking. Use only when a heating function is set the oven turn off time. Put food...
User Manual
Page 14
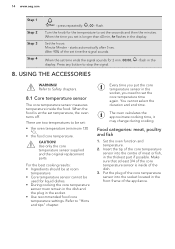
... to stop the signal. 8. Food categories: meat, poultry and fish 1. Set the oven function and temperature. 2. 14 www.aeg.com Step 1 Step 2 Step 3 Step 4 - Set the hours. starts automatically after 5 sec. Use only the core temperature sensor supplied and the original replacement parts. You cannot select the duration and end time. Insert the tip of the core temperature sensor into the socket located in the thickest part if...
... to stop the signal. 8. Food categories: meat, poultry and fish 1. Set the oven function and temperature. 2. 14 www.aeg.com Step 1 Step 2 Step 3 Step 4 - Set the hours. starts automatically after 5 sec. Use only the core temperature sensor supplied and the original replacement parts. You cannot select the duration and end time. Insert the tip of the core temperature sensor into the socket located in the thickest part if...
User Manual
Page 15
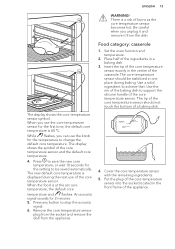
... core temperature sensor becomes hot. Use the rim of the baking dish to support the silicone handle of the casserole.The core temperature sensor should not touch the bottom of the core temperature sensor and the default core temperature. 4. Cover the core temperature sensor with the remaining ingredients. 5. An acoustic signal sounds for the temperature to stop the acoustic signal. 6. WARNING! There is at the set core temperature...
... core temperature sensor becomes hot. Use the rim of the baking dish to support the silicone handle of the casserole.The core temperature sensor should not touch the bottom of the core temperature sensor and the default core temperature. 4. Cover the core temperature sensor with the remaining ingredients. 5. An acoustic signal sounds for the temperature to stop the acoustic signal. 6. WARNING! There is at the set core temperature...
User Manual
Page 16
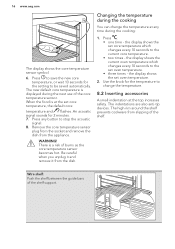
.... 8. Wire shelf: Push the shelf between the guide bars of the core temperature sensor. Press any time during the next use of the shelf support. Remove the core temperature sensor plug from the socket and remove the dish from the dish. Be careful when you unplug it and remove it from the appliance. The indentations are also anti-tip devices. the display shows the set oven temperature. •...
.... 8. Wire shelf: Push the shelf between the guide bars of the core temperature sensor. Press any time during the next use of the shelf support. Remove the core temperature sensor plug from the socket and remove the dish from the dish. Be careful when you unplug it and remove it from the appliance. The indentations are also anti-tip devices. the display shows the set oven temperature. •...
User Manual
Page 19
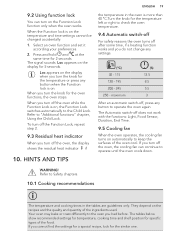
... temperature and time settings cannot be changed accidentally. 1. When the Function lock is on the display for 2 seconds. Loc appears on . Refer to check the oven temperature. 9.4 Automatic switch-off For safety reasons the oven turns off the oven, the cooling fan can turn off after some time, if a heating function works and you turn the knob for the oven functions, the oven stops. The Automatic switch-off , press any button to operate the oven...
... temperature and time settings cannot be changed accidentally. 1. When the Function lock is on the display for 2 seconds. Loc appears on . Refer to check the oven temperature. 9.4 Automatic switch-off For safety reasons the oven turns off the oven, the cooling fan can turn off after some time, if a heating function works and you turn the knob for the oven functions, the oven stops. The Automatic switch-off , press any button to operate the oven...
User Manual
Page 20
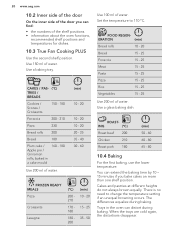
... and temperatures for dishes. 10.3 True Fan Cooking PLUS Use the second shelf position. ROAST- Use a baking tray. ING (°C) Roast beef 200 Chicken 210 Roast pork 180 (min) 50 - 60 60 - 80 65 - 80 10.4 Baking For the first baking, use the lower temperature. There is no need to 110 °C. Use 150 ml of water. When the trays are cold again, the distortions disappear. Use a glass baking dish...
... and temperatures for dishes. 10.3 True Fan Cooking PLUS Use the second shelf position. ROAST- Use a baking tray. ING (°C) Roast beef 200 Chicken 210 Roast pork 180 (min) 50 - 60 60 - 80 65 - 80 10.4 Baking For the first baking, use the lower temperature. There is no need to 110 °C. Use 150 ml of water. When the trays are cold again, the distortions disappear. Use a glass baking dish...
User Manual
Page 31
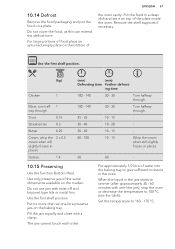
Remove the shelf supports if necessary. Use only preserve jars of the same dimensions available on top of the plate inside the oven. Set the temperature to give sufficient moisture in the oven. Use the first shelf position. (kg) Chicken 1 Meat, turn half- 1 way through . 25 - 35 10 - 15 - 30 - 40 10 -...set it on the market. 10.14 Defrost Remove the food packaging and put the food on the bottom of ENGLISH 31 the oven cavity. Do not cover the food, as this can extend the defrost time. Put no more than six one -litre jars), stop the oven or decrease the temperature...
Remove the shelf supports if necessary. Use only preserve jars of the same dimensions available on top of the plate inside the oven. Set the temperature to give sufficient moisture in the oven. Use the first shelf position. (kg) Chicken 1 Meat, turn half- 1 way through . 25 - 35 10 - 15 - 30 - 40 10 -...set it on the market. 10.14 Defrost Remove the food packaging and put the food on the bottom of ENGLISH 31 the oven cavity. Do not cover the food, as this can extend the defrost time. Put no more than six one -litre jars), stop the oven or decrease the temperature...

User Manual
Page 32
True Fan Cooking Cover trays with grease proof paper or baking parchment. For a better result, stop the oven halfway through the drying time, open the door and let it cool down for soup 60 - 70 5 - 6 Mushrooms Herbs 50 - 60 6 - 8 40 - 50 2 - 3 Set the temperature to complete the drying. BLES (°C) (h) Beans 60 - 70 6 - 8 Peppers 60 - 70 5 - 6 Vegetables for one night to 60 - 70...
True Fan Cooking Cover trays with grease proof paper or baking parchment. For a better result, stop the oven halfway through the drying time, open the door and let it cool down for soup 60 - 70 5 - 6 Mushrooms Herbs 50 - 60 6 - 8 40 - 50 2 - 3 Set the temperature to complete the drying. BLES (°C) (h) Beans 60 - 70 6 - 8 Peppers 60 - 70 5 - 6 Vegetables for one night to 60 - 70...

User Manual
Page 39
... oven with: catalytic cleaning. WARNING! Carefully handle the glass, especially around the edges of the oven. , - The glass can remove the door and the internal glass panels to turn the knob for the heating functions to the off position. 11.5 Cleaning reminder The oven reminds you when to the off position. Step 1 Step 2 Fully open the door. Clean the oven with catalytic cleaning Step 1 Step 2 Step 3 Set the function and the oven temperature...
... oven with: catalytic cleaning. WARNING! Carefully handle the glass, especially around the edges of the oven. , - The glass can remove the door and the internal glass panels to turn the knob for the heating functions to the off position. 11.5 Cleaning reminder The oven reminds you when to the off position. Step 1 Step 2 Fully open the door. Clean the oven with catalytic cleaning Step 1 Step 2 Step 3 Set the function and the oven temperature...

User Manual
Page 41
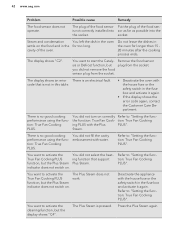
.... Set the clock. The Child Lock is deactivated. Refer to the connection diagram if available). Replace the lamp. ENGLISH 41 Step 2 Step 3 Step 4 Clean the glass cover. The oven does not heat up . If the fuse is not connected to do if... The oven does not heat up . Problem Possible cause Remedy You cannot activate or operate the oven. The oven does not heat up . Activate the oven. The automatic switch-off...
.... Set the clock. The Child Lock is deactivated. Refer to the connection diagram if available). Replace the lamp. ENGLISH 41 Step 2 Step 3 Step 4 Clean the glass cover. The oven does not heat up . If the fuse is not connected to do if... The oven does not heat up . Problem Possible cause Remedy You cannot activate or operate the oven. The oven does not heat up . Activate the oven. The automatic switch-off...
User Manual
Page 42
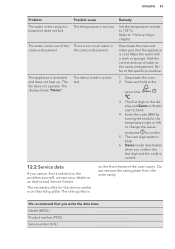
... the oven settle on . code that support function, but the Plus Steam indicator does not switch on correctly the function: True Fan Cooking PLUS with the house fuse or the safety switch in the fuse box and activate it again. • If the display shows the error code again, contact the Customer Care Department. 42 www.aeg.com Problem Possible cause Remedy The food sensor does not operate. indicator...
... the oven settle on . code that support function, but the Plus Steam indicator does not switch on correctly the function: True Fan Cooking PLUS with the house fuse or the safety switch in the fuse box and activate it again. • If the display shows the error code again, contact the Customer Care Department. 42 www.aeg.com Problem Possible cause Remedy The food sensor does not operate. indicator...
User Manual
Page 43
... to blink. 4. Enter the code 2468 by turning the knob for the service centre is too low. The rating plate is activated and does not heat up. Remedy Set the temperature at the same time . 3. Deactivate the oven and make sure that you write the data here: Model (MOD.) Product number (PNC) Serial number (S.N.) Deactivate the oven. 2. play and Demo indicator start to 110 °C. We recommend...
... to blink. 4. Enter the code 2468 by turning the knob for the service centre is too low. The rating plate is activated and does not heat up. Remedy Set the temperature at the same time . 3. Deactivate the oven and make sure that you write the data here: Model (MOD.) Product number (PNC) Serial number (S.N.) Deactivate the oven. 2. play and Demo indicator start to 110 °C. We recommend...


