
Product Manual
Page 2
... following data available: Model, PNC, Serial Number. Please spend a few minutes reading to change without notice. Visit our website for: Get usage advice, brochures, trouble shooter, service information: www.aeg.com Register your appliance: www.aeg.com/shop CUSTOMER CARE AND SERVICE Always use original spare parts. 2 www.aeg.com CONTENTS 1. SAFETY INFORMATION 3 2. CARE AND CLEANING 25 11. SAFETY INSTRUCTIONS 4 3. USING THE ACCESSORIES 11 8. TROUBLESHOOTING 27 12. ENERGY...
... following data available: Model, PNC, Serial Number. Please spend a few minutes reading to change without notice. Visit our website for: Get usage advice, brochures, trouble shooter, service information: www.aeg.com Register your appliance: www.aeg.com/shop CUSTOMER CARE AND SERVICE Always use original spare parts. 2 www.aeg.com CONTENTS 1. SAFETY INFORMATION 3 2. CARE AND CLEANING 25 11. SAFETY INSTRUCTIONS 4 3. USING THE ACCESSORIES 11 8. TROUBLESHOOTING 27 12. ENERGY...
Product Manual
Page 3
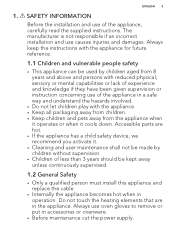
... from the appliance when it operates or when it . • Cleaning and user maintenance shall not be made by children without supervision. • Children of less than 3 years should be used by children aged from 8 years...cut the power supply. Do not touch the heating elements that are hot. • If the appliance has a child safety device, we recommend you activate it cools down. Always use of experience and knowledge if they have been given supervision or instruction concerning use causes injuries and damages. SAFETY INFORMATION Before the installation and use oven gloves to remove...
... from the appliance when it operates or when it . • Cleaning and user maintenance shall not be made by children without supervision. • Children of less than 3 years should be used by children aged from 8 years...cut the power supply. Do not touch the heating elements that are hot. • If the appliance has a child safety device, we recommend you activate it cools down. Always use of experience and knowledge if they have been given supervision or instruction concerning use causes injuries and damages. SAFETY INFORMATION Before the installation and use oven gloves to remove...
Product Manual
Page 4
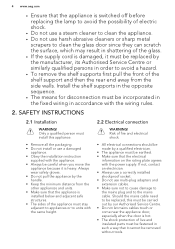
... be earthed. • Make sure that the electrical information on the rating plate agrees with the wiring rules. 2. Should the mains cable need to be replaced, this appliance. • Remove all the packaging. • Do not install or use a damaged appliance. • Obey the installation instruction supplied with the appliance. • Always be careful when you move the appliance because it is...
... be earthed. • Make sure that the electrical information on the rating plate agrees with the wiring rules. 2. Should the mains cable need to be replaced, this appliance. • Remove all the packaging. • Do not install or use a damaged appliance. • Obey the installation instruction supplied with the appliance. • Always be careful when you move the appliance because it is...
Product Manual
Page 5
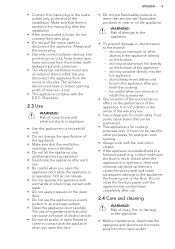
.... - Heat and moisture can be used for other objects in the sense of the installation. Always pull the mains plug. • Use only correct isolation devices: line protecting cut-outs, fuses (screw type fuses removed from the holder), earth leakage trips and contactors. • The electrical installation must have an isolation device which lets you open the door. WARNING! do not connect the mains plug...
.... - Heat and moisture can be used for other objects in the sense of the installation. Always pull the mains plug. • Use only correct isolation devices: line protecting cut-outs, fuses (screw type fuses removed from the holder), earth leakage trips and contactors. • The electrical installation must have an isolation device which lets you open the door. WARNING! do not connect the mains plug...

Product Manual
Page 6
.... The door is cold. Only use lamps with the same specifications. 2.6 Disposal WARNING! 6 www.aeg.com • Make sure the appliance is heavy! • Clean regularly the appliance to get closed in the appliance can break. • Replace immediately the door glass panels when they are damaged. PRODUCT DESCRIPTION 3.1 General overview for the temperature 6 Temperature lamp / symbol / indicator 7 Heating element 8 Lamp 9 Fan 10 Shelf support, removable 11 Shelf...
.... The door is cold. Only use lamps with the same specifications. 2.6 Disposal WARNING! 6 www.aeg.com • Make sure the appliance is heavy! • Clean regularly the appliance to get closed in the appliance can break. • Replace immediately the door glass panels when they are damaged. PRODUCT DESCRIPTION 3.1 General overview for the temperature 6 Temperature lamp / symbol / indicator 7 Heating element 8 Lamp 9 Fan 10 Shelf support, removable 11 Shelf...

Product Manual
Page 7
... the removable shelf supports back to their initial position. 4.2 Setting the time After the first connection to "Setting the time". and "12:00". The display shows the new time. 4.3 Changing the time You can change the time of day flashes in the display are on for the first time. 3.2 Accessories Nonstick wire shelf ENGLISH 7 To bake and roast or as a pan to confirm. Use the trivet only with the Grill- / Roasting pan...
... the removable shelf supports back to their initial position. 4.2 Setting the time After the first connection to "Setting the time". and "12:00". The display shows the new time. 4.3 Changing the time You can change the time of day flashes in the display are on for the first time. 3.2 Accessories Nonstick wire shelf ENGLISH 7 To bake and roast or as a pan to confirm. Use the trivet only with the Grill- / Roasting pan...
Product Manual
Page 8
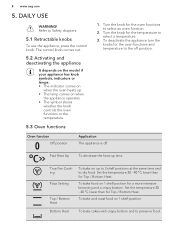
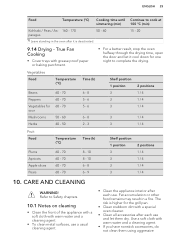
... position. True Fan Cooking Pizza Setting Top / Bottom Heat To bake on 1 shelf position for Top / Bottom Heat. To bake and roast food on when the appliance operates. • The symbol shows whether the knob controls the oven functions or the temperature. 5.3 Oven functions 1. Set the temperature 20 - 40 °C lower than for the oven functions and temperature to select a temperature. 3. Turn the knob for the temperature to the off...
... position. True Fan Cooking Pizza Setting Top / Bottom Heat To bake on 1 shelf position for Top / Bottom Heat. To bake and roast food on when the appliance operates. • The symbol shows whether the knob controls the oven functions or the temperature. 5.3 Oven functions 1. Set the temperature 20 - 40 °C lower than for the oven functions and temperature to select a temperature. 3. Turn the knob for the temperature to the off...

Product Manual
Page 9
... manually. 3. ENGLISH 9 Oven function Defrost Application To defrost frozen food. Grilling To grill flat food and to brown. 5.4 Fast heat up function The fast heat up function decreases the heat up and residual heat indicator C) Water drawer (selected models only) D) Core temperature sensor (selected models only) E) Door lock (selected models only) F) Hours / minutes G) Clock functions 5.6 Buttons Button Function CLOCK MINUS MINUTE MINDER PLUS Description To set the time. Set the fast heat...
... manually. 3. ENGLISH 9 Oven function Defrost Application To defrost frozen food. Grilling To grill flat food and to brown. 5.4 Fast heat up function The fast heat up function decreases the heat up and residual heat indicator C) Water drawer (selected models only) D) Core temperature sensor (selected models only) E) Door lock (selected models only) F) Hours / minutes G) Clock functions 5.6 Buttons Button Function CLOCK MINUS MINUTE MINDER PLUS Description To set the time. Set the fast heat...
Product Manual
Page 10
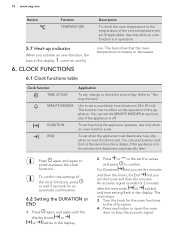
....aeg.com Button Function TEMPERATURE Description To check the oven temperature or the temperature of day. or flashes in the display. Turn the knob for an automatic confirmation. 6.2 Setting the DURATION or END 1. Press any time, also if the appliance is in the display come on the operation of the clock functions, press or wait 5 seconds for the oven functions to switch between the clock functions. Clock...
....aeg.com Button Function TEMPERATURE Description To check the oven temperature or the temperature of day. or flashes in the display. Turn the knob for an automatic confirmation. 6.2 Setting the DURATION or END 1. Press any time, also if the appliance is in the display come on the operation of the clock functions, press or wait 5 seconds for the oven functions to switch between the clock functions. Clock...

Product Manual
Page 11
..., the time is calculated in the display. Refer to setting of the END function. 6.3 Setting the MINUTE MINDER 1. ENGLISH 11 4. It is on immediately when the oven starts to count up again. "00:00" and flash in minutes and seconds. The timer starts to heat. USING THE ACCESSORIES WARNING! Deep pan: Push the deep pan between the guide bars of the shelf support and...
..., the time is calculated in the display. Refer to setting of the END function. 6.3 Setting the MINUTE MINDER 1. ENGLISH 11 4. It is on immediately when the oven starts to count up again. "00:00" and flash in minutes and seconds. The timer starts to heat. USING THE ACCESSORIES WARNING! Deep pan: Push the deep pan between the guide bars of the shelf support and...

Product Manual
Page 12
... appliance deactivates automatically after some time if an oven function operates and you remove the accessories from slipping. 7.2 Trivet and Grill- / Roasting pan WARNING! An acoustic signal sounds. Put the trivet into the deep pan so that the supports of the right and left or right to toast. 1. Be careful when you do not change any settings. Ensure the knob for...
... appliance deactivates automatically after some time if an oven function operates and you remove the accessories from slipping. 7.2 Trivet and Grill- / Roasting pan WARNING! An acoustic signal sounds. Put the trivet into the deep pan so that the supports of the right and left or right to toast. 1. Be careful when you do not change any settings. Ensure the knob for...

Product Manual
Page 13
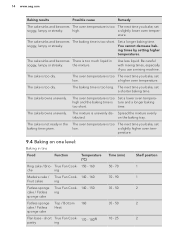
... cannot find : • the numbers of the baking time and then use the residual heat. shelf positions to keep the surfaces of the cake is incorrect. If this occurs, do not always brown equally at different heights do not change the temperature setting. maximum Switch-off time (h) 12.5 8.5 5.5 1.5 After an automatic switch-off does not work with the functions: Light, Duration, End. 9. Possible cause...
... cannot find : • the numbers of the baking time and then use the residual heat. shelf positions to keep the surfaces of the cake is incorrect. If this occurs, do not always brown equally at different heights do not change the temperature setting. maximum Switch-off time (h) 12.5 8.5 5.5 1.5 After an automatic switch-off does not work with the functions: Light, Duration, End. 9. Possible cause...
Product Manual
Page 14
... unevenly. pastry ing 170 - 1801) Time (min) 50 - 70 70 - 90 35 - 50 35 - 50 10 - 25 Shelf position 1 1 2 2 2 The cake is too dry. The cake browns unevenly. Set a longer baking time. Be careful with mixing times, especially if you bake, set low. The mixture is too The next time you use a mixing machine. The oven temperature is unevenly dis- short True Fan Cook-
... unevenly. pastry ing 170 - 1801) Time (min) 50 - 70 70 - 90 35 - 50 35 - 50 10 - 25 Shelf position 1 1 2 2 2 The cake is too dry. The cake browns unevenly. Set a longer baking time. Be careful with mixing times, especially if you bake, set low. The mixture is too The next time you use a mixing machine. The oven temperature is unevenly dis- short True Fan Cook-

Product Manual
Page 19
... calzone) 180 - 2001) 15 - 25 2 1) Preheat the oven. 2) Use a deep pan. 9.8 Roasting • Use heat-resistant ovenware to roast (refer to the instructions of the manufacturer). • You can roast large roasting joints directly in the deep pan (if present) or on the wire shelf above in the roasting tin with their juices several times during roasting. ENGLISH 19 Food Temperature (°C) Time (min) Shelf position Tarts 180 - 200...
... calzone) 180 - 2001) 15 - 25 2 1) Preheat the oven. 2) Use a deep pan. 9.8 Roasting • Use heat-resistant ovenware to roast (refer to the instructions of the manufacturer). • You can roast large roasting joints directly in the deep pan (if present) or on the wire shelf above in the roasting tin with their juices several times during roasting. ENGLISH 19 Food Temperature (°C) Time (min) Shelf position Tarts 180 - 200...
Product Manual
Page 23
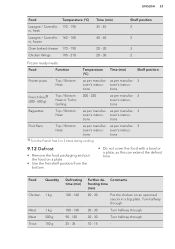
...- 3 turer's instructions Baguettes Top / Bottom Heat as per manufac- 3 turer's instruc- as per manufac- Comments frosting time (min) 20 - 30 Put the chicken on a plate. • Use the first shelf position from the bottom. • Do not cover the food with a bowl or a plate, as this can extend the defrost time. turer's instruc- ENGLISH 23 Food Temperature (°C) Lasagne...
...- 3 turer's instructions Baguettes Top / Bottom Heat as per manufac- 3 turer's instruc- as per manufac- Comments frosting time (min) 20 - 30 Put the chicken on a plate. • Use the first shelf position from the bottom. • Do not cover the food with a bowl or a plate, as this can extend the defrost time. turer's instruc- ENGLISH 23 Food Temperature (°C) Lasagne...
Product Manual
Page 25
... result, stop the oven halfway through the drying time, open the door and let it is higher for the grill pan. • Clean stubborn dirt with warm water and a cleaning agent. • If you have nonstick accessories, do not clean them dry. True Fan Cooking • Cover trays with warm water and a cleaning agent. • To clean metal surfaces, use a usual cleaning agent. • Clean the appliance interior after each use and...
... result, stop the oven halfway through the drying time, open the door and let it is higher for the grill pan. • Clean stubborn dirt with warm water and a cleaning agent. • If you have nonstick accessories, do not clean them dry. True Fan Cooking • Cover trays with warm water and a cleaning agent. • To clean metal surfaces, use a usual cleaning agent. • Clean the appliance interior after each use and...

Product Manual
Page 26
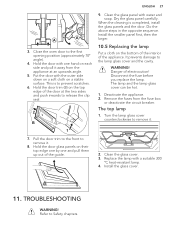
... supports. Install the heating element correctly above the supports on the inner walls of the shelf support away from the side wall. 2. The number of glass panels is heavy. 1. Open the door fully. 2. Fully press the clamping levers (A) on the two sides. 2. Pull it . Clean the oven ceiling. 4. Install the shelf supports. 10.4 Removing and installing the door You can cause damage to the nonstick coating. 10.2 Removing the shelf supports To clean...
... supports. Install the heating element correctly above the supports on the inner walls of the shelf support away from the side wall. 2. The number of glass panels is heavy. 1. Open the door fully. 2. Fully press the clamping levers (A) on the two sides. 2. Pull it . Clean the oven ceiling. 4. Install the shelf supports. 10.4 Removing and installing the door You can cause damage to the nonstick coating. 10.2 Removing the shelf supports To clean...
Product Manual
Page 27
.... Clean the glass panel with a suitable 300 °C heat-resistant lamp. 4. Remove the fuses from the appliance at the two sides and push inwards to Safety chapters. A A 3. ENGLISH 27 9. When the cleaning is to prevent scratches. 6. WARNING! Danger of the appliance. Install the glass cover. 11. This is completed, install the glass panels and the door. Pull the door trim to the front to the first opening...
.... Clean the glass panel with a suitable 300 °C heat-resistant lamp. 4. Remove the fuses from the appliance at the two sides and push inwards to Safety chapters. A A 3. ENGLISH 27 9. When the cleaning is to prevent scratches. 6. WARNING! Danger of the appliance. Install the glass cover. 11. This is completed, install the glass panels and the door. Pull the door trim to the front to the first opening...

Product Manual
Page 28
.... Problem Possible cause Remedy The oven does not heat up . The clock is deactivated. We recommend that the fuse is on the food and in the fuse box and activate it again. • If the display shows the error code again, contact the Customer Care Department. 11.2 Service data If you write the data here: Model (MOD.) 28 www.aeg.com 11.1 What to cook...
.... Problem Possible cause Remedy The oven does not heat up . The clock is deactivated. We recommend that the fuse is on the food and in the fuse box and activate it again. • If the display shows the error code again, contact the Customer Care Department. 11.2 Service data If you write the data here: Model (MOD.) 28 www.aeg.com 11.1 What to cook...

Product Manual
Page 29
...: Product number (PNC) Serial number (S.N.) 12. Household electric cooking appliances - Part 1: Ranges, ovens, steam ovens and grills - when possible, use the cooking functions with fan - In some oven functions if a programme with a standard load, fan-forced 0.88 kWh/cycle mode Number of cavities 1 Heat source Electricity Volume 71 l Type of the cooking. ENGLISH 29 We recommend that the oven door is closed as much as possible during everyday cooking. • General hints - The residual heat inside the oven...
...: Product number (PNC) Serial number (S.N.) 12. Household electric cooking appliances - Part 1: Ranges, ovens, steam ovens and grills - when possible, use the cooking functions with fan - In some oven functions if a programme with a standard load, fan-forced 0.88 kWh/cycle mode Number of cavities 1 Heat source Electricity Volume 71 l Type of the cooking. ENGLISH 29 We recommend that the oven door is closed as much as possible during everyday cooking. • General hints - The residual heat inside the oven...


