User Manual
Page 2
... INFORMATION 2 2. PRODUCT DESCRIPTION 7 4. HOB - CLOCK FUNCTIONS 14 10. BEFORE FIRST USE...8 5. DAILY USE 11 9. CARE AND CLEANING 22 12. We have the following data available: Model, PNC, Serial Number. Warning / Caution-Safety information General information and tips Environmental information Subject to give you impeccable performance for many years, with innovative technologies that you might not find on the rating plate. OVEN - Please spend...
... INFORMATION 2 2. PRODUCT DESCRIPTION 7 4. HOB - CLOCK FUNCTIONS 14 10. BEFORE FIRST USE...8 5. DAILY USE 11 9. CARE AND CLEANING 22 12. We have the following data available: Model, PNC, Serial Number. Warning / Caution-Safety information General information and tips Environmental information Subject to give you impeccable performance for many years, with innovative technologies that you might not find on the rating plate. OVEN - Please spend...

User Manual
Page 4
... be replaced by the handle. • The kitchen cabinet and the recess must install this appliance. • To remove the shelf supports first pull the front of the shelf support and then the rear end away from the other appliances and units. SAFETY INSTRUCTIONS 2.1 Installation WARNING! Do not touch the heating elements that the appliance is switched off before replacing the lamp to clean the glass door...
... be replaced by the handle. • The kitchen cabinet and the recess must install this appliance. • To remove the shelf supports first pull the front of the shelf support and then the rear end away from the other appliances and units. SAFETY INSTRUCTIONS 2.1 Installation WARNING! Do not touch the heating elements that the appliance is switched off before replacing the lamp to clean the glass door...

User Manual
Page 5
... not use multi-plug adapters and extension cables. • Do not let mains cables touch or come near or on the rating plate agrees with flammable products in, near the appliance door, especially when the door is opened. • Make sure to install a stabilizing means in a household only. • Do not change the specification of fire and electrical shock. • All electrical connections should...
... not use multi-plug adapters and extension cables. • Do not let mains cables touch or come near or on the rating plate agrees with flammable products in, near the appliance door, especially when the door is opened. • Make sure to install a stabilizing means in a household only. • Do not change the specification of fire and electrical shock. • All electrical connections should...

User Manual
Page 6
... hot cookware on the cooking surface. • This appliance is for example room heating. 2.4 Care and Cleaning WARNING! The use an oven spray, obey the safety instructions on the appliance. Disconnect the mains plug from the appliance. Do not use abrasive products, abrasive cleaning pads, solvents or metal objects. • If you open flames to move them on the control panel. • Do not...
... hot cookware on the cooking surface. • This appliance is for example room heating. 2.4 Care and Cleaning WARNING! The use an oven spray, obey the safety instructions on the appliance. Disconnect the mains plug from the appliance. Do not use abrasive products, abrasive cleaning pads, solvents or metal objects. • If you open flames to move them on the control panel. • Do not...

User Manual
Page 7
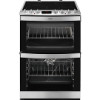
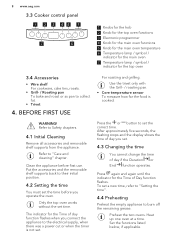
...; Remove the door catch to prevent children and pets to get closed in the appliance. 2.7 Service • To repair the appliance contact an Authorised Service Centre. • Use original spare parts only. 1 Control panel and hob 2 Air vents for the cooling fan 3 Heating element 4 Lamp 5 Shelf support, removable 6 Socket for the core temperature sensor 7 Fan 8 Shelf positions 3.2 Cooking surface layout 1 2 3 145 mm 180 mm 210 mm 145 mm 1 Cooking zone 1200 W 2 Steam...
...; Remove the door catch to prevent children and pets to get closed in the appliance. 2.7 Service • To repair the appliance contact an Authorised Service Centre. • Use original spare parts only. 1 Control panel and hob 2 Air vents for the cooling fan 3 Heating element 4 Lamp 5 Shelf support, removable 6 Socket for the core temperature sensor 7 Fan 8 Shelf positions 3.2 Cooking surface layout 1 2 3 145 mm 180 mm 210 mm 145 mm 1 Cooking zone 1200 W 2 Steam...
User Manual
Page 8
... electrical supply, when there was a power cut or when the timer is cooked. Refer to Safety chapters. 4.1 Initial Cleaning Remove all accessories and removable shelf supports from the appliance. Clean the appliance before you set. 4.3 Changing the time You cannot change the time of day if the Duration or End function operates. Set the functions listed below, if applicable. Heat up one oven at a time. Use the trivet only with the Grill- / roasting pan...
... electrical supply, when there was a power cut or when the timer is cooked. Refer to Safety chapters. 4.1 Initial Cleaning Remove all accessories and removable shelf supports from the appliance. Clean the appliance before you set. 4.3 Changing the time You cannot change the time of day if the Duration or End function operates. Set the functions listed below, if applicable. Heat up one oven at a time. Use the trivet only with the Grill- / roasting pan...
User Manual
Page 10
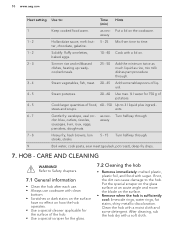
10 www.aeg.com Heat setting 1 1 - 2 1 - 2 2 - 3 3 - 4 4 - 5 4 - 5 6 - 7 7 - 8 9 Use to time. as rice, mix milk dishes part procedure through. Solidify: fluffy omelettes, baked eggs. 10 - 40 Cook with a soft cloth. ents. HOB - CARE AND CLEANING WARNING! Put the special scraper on the glass surface at an acute angle and move the blade on the cookware. essary Hollandaise sauce, melt: but- 5 - 25 ter, chocolate, gelatine...
10 www.aeg.com Heat setting 1 1 - 2 1 - 2 2 - 3 3 - 4 4 - 5 4 - 5 6 - 7 7 - 8 9 Use to time. as rice, mix milk dishes part procedure through. Solidify: fluffy omelettes, baked eggs. 10 - 40 Cook with a soft cloth. ents. HOB - CARE AND CLEANING WARNING! Put the special scraper on the glass surface at an acute angle and move the blade on the cookware. essary Hollandaise sauce, melt: but- 5 - 25 ter, chocolate, gelatine...
User Manual
Page 11
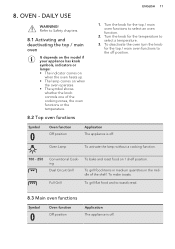
... quantities in the middle of the cooking zones, the oven functions or the temperature. 8.2 Top oven functions ENGLISH 11 1. Oven Lamp To activate the lamp without a cooking function. 100 - 250 Conventional Cooking Dual Circuit Grill To bake and roast food on when the oven operates. • The symbol shows whether the knob controls one of the shelf. Turn the knob for the top / main...
... quantities in the middle of the cooking zones, the oven functions or the temperature. 8.2 Top oven functions ENGLISH 11 1. Oven Lamp To activate the lamp without a cooking function. 100 - 250 Conventional Cooking Dual Circuit Grill To bake and roast food on when the oven operates. • The symbol shows whether the knob controls one of the shelf. Turn the knob for the top / main...
User Manual
Page 12
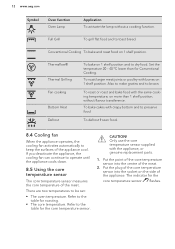
.... Put the point of the core temperature sensor into the socket on 1 shelf position and to dry food. Thermaflow® Thermal Grilling Fan cooking Bottom Heat Defrost To bake on the side of the appliance cool. To roast or roast and bake food with the appliance, or genuine replacement parts. 1. 12 www.aeg.com Symbol Oven function Oven Lamp Application To activate the lamp...
.... Put the point of the core temperature sensor into the socket on 1 shelf position and to dry food. Thermaflow® Thermal Grilling Fan cooking Bottom Heat Defrost To bake on the side of the appliance cool. To roast or roast and bake food with the appliance, or genuine replacement parts. 1. 12 www.aeg.com Symbol Oven function Oven Lamp Application To activate the lamp...

User Manual
Page 13
.... Wire shelf and the deep pan together: Push the deep pan between the guide bars of the core temperature sensor. Be careful when you remove the tip and plug of the shelf support. There is hot. Remove the plug of meat or poultry on the guide bars above steps again and set the core temperature. ENGLISH 13 3. WARNING! Press a button to set a higher core temperature. Press the button or to stop...
.... Wire shelf and the deep pan together: Push the deep pan between the guide bars of the core temperature sensor. Be careful when you remove the tip and plug of the shelf support. There is hot. Remove the plug of meat or poultry on the guide bars above steps again and set the core temperature. ENGLISH 13 3. WARNING! Press a button to set a higher core temperature. Press the button or to stop...
User Manual
Page 15
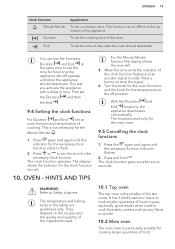
... the display shows the time left. 3. ENGLISH 15 Clock function Minute Minder Duration Application To set the time for the necessary clock function. This function has no effect on the recipes and the quality and quantity of the ingredients used to cook smaller quantities of food. End To set . 10. OVEN - The temperature and baking times in time. They depend on the operation of the clock...
... the display shows the time left. 3. ENGLISH 15 Clock function Minute Minder Duration Application To set the time for the necessary clock function. This function has no effect on the recipes and the quality and quantity of the ingredients used to cook smaller quantities of food. End To set . 10. OVEN - The temperature and baking times in time. They depend on the operation of the clock...
User Manual
Page 16
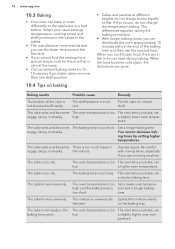
... change the temperature setting. a slightly lower oven temper- The cake is too The next time you cannot find the settings for a special recipe, look for the one shelf position. 10.4 Tips on more than one that you use the lower temperature the first time. • If you bake, set low. time. on a lower shelf. 16 www.aeg.com 10.3 Baking • Your oven can bake or roast...
... change the temperature setting. a slightly lower oven temper- The cake is too The next time you cannot find the settings for a special recipe, look for the one shelf position. 10.4 Tips on more than one that you use the lower temperature the first time. • If you bake, set low. time. on a lower shelf. 16 www.aeg.com 10.3 Baking • Your oven can bake or roast...

User Manual
Page 20
... of the roasting time, and use the residual heat. 10.10 Thermaflow® or Conventional Cooking - 20 www.aeg.com Food Quiches / Flans Scones Roasting: Meat, Poultry Temperature (°C) Time (min) 170 - 180 210 - 230 160 - 180 25 - 45 8 - 12 Refer to the instructions of the manufacturer). • You can roast large roasting joints directly in the deep pan (if present) or on the wire shelf...
... of the roasting time, and use the residual heat. 10.10 Thermaflow® or Conventional Cooking - 20 www.aeg.com Food Quiches / Flans Scones Roasting: Meat, Poultry Temperature (°C) Time (min) 170 - 180 210 - 230 160 - 180 25 - 45 8 - 12 Refer to the instructions of the manufacturer). • You can roast large roasting joints directly in the deep pan (if present) or on the wire shelf...

User Manual
Page 22
... a plate. • Do not cover it with the same precautions. 11.3 Catalytic cleaning CAUTION! The one on catalytic properties. This will damage the catalytic surface. Do not use . This can damage the oven surface. Fat accumulation or other cleaning agents. Refer to the nonstick coating. 11.2 Stainless steel or aluminium appliances Clean the oven door with warm water and a cleaning agent. • To clean...
... a plate. • Do not cover it with the same precautions. 11.3 Catalytic cleaning CAUTION! The one on catalytic properties. This will damage the catalytic surface. Do not use . This can damage the oven surface. Fat accumulation or other cleaning agents. Refer to the nonstick coating. 11.2 Stainless steel or aluminium appliances Clean the oven door with warm water and a cleaning agent. • To clean...
User Manual
Page 23
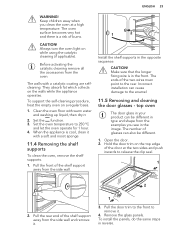
... self-cleaning procedure, heat the empty oven on while using the catalytic cleaning (if applicable). Open the door. 2. Pull the rear end of the door at a high temperature. They absorb fat which collects on the top edge of the shelf support away from the side wall. 1 2 Install the shelf supports in your product can cause damage to 250 °C and let the oven operate for 1 hour. 4. Remove the glass panels. Clean...
... self-cleaning procedure, heat the empty oven on while using the catalytic cleaning (if applicable). Open the door. 2. Pull the rear end of the door at a high temperature. They absorb fat which collects on the top edge of the shelf support away from the side wall. 1 2 Install the shelf supports in your product can cause damage to 250 °C and let the oven operate for 1 hour. 4. Remove the glass panels. Clean...

User Manual
Page 24
... different. 1. Remove the glass panels. TROUBLESHOOTING 11.7 Replacing the lamp Put a cloth on the bottom of the interior of electrocution! WARNING! Disconnect the fuse before you lower the trim, attach the A trim part to remove it . Clean the glass cover. 3. Replace the oven lamp with a suitable 300 °C heat-resistant oven lamp. WARNING! Problem You cannot activate the appliance. trical supply. Turn the lamp glass cover counterclockwise to the door. Use the same oven lamp...
... different. 1. Remove the glass panels. TROUBLESHOOTING 11.7 Replacing the lamp Put a cloth on the bottom of the interior of electrocution! WARNING! Disconnect the fuse before you lower the trim, attach the A trim part to remove it . Clean the glass cover. 3. Replace the oven lamp with a suitable 300 °C heat-resistant oven lamp. WARNING! Problem You cannot activate the appliance. trical supply. Turn the lamp glass cover counterclockwise to the door. Use the same oven lamp...

User Manual
Page 25
... the oven. The oven does not heat up . There was a power cut. The display shows F11. Do not leave the dishes in the for the service centre is not correctly installed into the socket. Refer to an Authorised Service Centre. If the fuse releases again and again, contact a qualified electrician. The lamp does not operate. The lamp is released. Reset the clock. The rating plate...
... the oven. The oven does not heat up . There was a power cut. The display shows F11. Do not leave the dishes in the for the service centre is not correctly installed into the socket. Refer to an Authorised Service Centre. If the fuse releases again and again, contact a qualified electrician. The lamp does not operate. The lamp is released. Reset the clock. The rating plate...

User Manual
Page 26
... without a main plug or a main cable. 13.5 Covering terminal board B A A Minimum distances Dimension mm A 2 B 685 13.3 Levelling of the appliance You can install your freestanding appliance with other surfaces. Use small feet on one or two sides and in opposite sequence. 13.6 Terminal board Do not remove blanking plates. 26 www.aeg.com 13.1 Technical data Dimensions Height Width Depth 894...
... without a main plug or a main cable. 13.5 Covering terminal board B A A Minimum distances Dimension mm A 2 B 685 13.3 Levelling of the appliance You can install your freestanding appliance with other surfaces. Use small feet on one or two sides and in opposite sequence. 13.6 Terminal board Do not remove blanking plates. 26 www.aeg.com 13.1 Technical data Dimensions Height Width Depth 894...

User Manual
Page 27
....1 Product information for ovens according to EU 66/2014 Model identification 43102V-MN Type of hob Hob inside Freestanding Cooker Number of cooking zones 4 Heating technology Radiant Heater Diameter of circular cooking zones (Ø) Left front Left rear Right front Right rear Energy consumption per cook- Left front ing zone (EC electric cooking) Left rear Right front Right rear Energy consumption of the cooking zone. • Use...
....1 Product information for ovens according to EU 66/2014 Model identification 43102V-MN Type of hob Hob inside Freestanding Cooker Number of cooking zones 4 Heating technology Radiant Heater Diameter of circular cooking zones (Ø) Left front Left rear Right front Right rear Energy consumption per cook- Left front ing zone (EC electric cooking) Left rear Right front Right rear Energy consumption of the cooking zone. • Use...
User Manual
Page 28
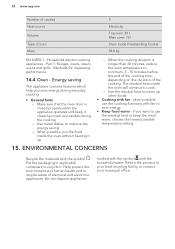
... electronic appliances. Make sure that the oven door is longer than 30 minutes, reduce the oven temperature to your local recycling facility or contact your municipal office. * 28 www.aeg.com Number of cavities Heat source Volume Type of oven Mass 2 Electricity Top oven: 39 l Main oven: 72 l Oven inside the oven will continue to improve the energy saving. - Part 1: Ranges, ovens, steam ovens and grills - ENVIRONMENTAL CONCERNS Recycle...
... electronic appliances. Make sure that the oven door is longer than 30 minutes, reduce the oven temperature to your local recycling facility or contact your municipal office. * 28 www.aeg.com Number of cavities Heat source Volume Type of oven Mass 2 Electricity Top oven: 39 l Main oven: 72 l Oven inside the oven will continue to improve the energy saving. - Part 1: Ranges, ovens, steam ovens and grills - ENVIRONMENTAL CONCERNS Recycle...


