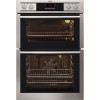
Specification Sheet
Page 1
... size. Or both. Or small. Position more shelf positions, this oven gives better sliding access to touch Plus for a low door temperature • Telescopic runners for full control when loading and unloading Features : • 68 litre oven capacity • 43 litre oven capacity •Diamond-glazed enamel interior •Isofront® double glazed doors •Fan controlled defrosting •'AA' energy rating for a cooking...
... size. Or both. Or small. Position more shelf positions, this oven gives better sliding access to touch Plus for a low door temperature • Telescopic runners for full control when loading and unloading Features : • 68 litre oven capacity • 43 litre oven capacity •Diamond-glazed enamel interior •Isofront® double glazed doors •Fan controlled defrosting •'AA' energy rating for a cooking...
User Manual
Page 2
BEFORE FIRST USE...7 5. DAILY USE...8 6. CARE AND CLEANING 18 11. We have the following data available: Model, PNC, Serial Number. The information can be found on ordinary appliances. SAFETY INSTRUCTIONS 4 3. When contacting our Authorised Service Centre, ensure that help make life simpler features you might not find on the rating plate. TROUBLESHOOTING 21 12. ADDITIONAL FUNCTIONS 13 9. CLOCK FUNCTIONS...10 7. Please spend a few minutes...
BEFORE FIRST USE...7 5. DAILY USE...8 6. CARE AND CLEANING 18 11. We have the following data available: Model, PNC, Serial Number. The information can be found on ordinary appliances. SAFETY INSTRUCTIONS 4 3. When contacting our Authorised Service Centre, ensure that help make life simpler features you might not find on the rating plate. TROUBLESHOOTING 21 12. ADDITIONAL FUNCTIONS 13 9. CLOCK FUNCTIONS...10 7. Please spend a few minutes...
User Manual
Page 3
... instruction concerning the use of the appliance in a safe and accessible location for any injuries or damages that are hot. • If the appliance has a child safety device, this appliance and replace the cable. • WARNING: The appliance and its accessible parts become hot during use. Care should be activated. • Children shall not carry out cleaning and user...
... instruction concerning the use of the appliance in a safe and accessible location for any injuries or damages that are hot. • If the appliance has a child safety device, this appliance and replace the cable. • WARNING: The appliance and its accessible parts become hot during use. Care should be activated. • Children shall not carry out cleaning and user...
User Manual
Page 4
... that the electrical information on the rating plate agrees with an electric cooling system. 4 www.aeg.com • Always use oven gloves to remove or put in accessories or ovenware. • Before maintenance cut the power supply. • Ensure that the appliance is switched off before replacing the lamp to avoid the possibility of electric shock. • Do not use a steam cleaner to clean the appliance...
... that the electrical information on the rating plate agrees with an electric cooling system. 4 www.aeg.com • Always use oven gloves to remove or put in accessories or ovenware. • Before maintenance cut the power supply. • Ensure that the appliance is switched off before replacing the lamp to avoid the possibility of electric shock. • Do not use a steam cleaner to clean the appliance...
User Manual
Page 5
... air can be used for cooking purposes only. do not keep moist dishes and food in , near the appliance door, especially when the door is access to the mains plug after each use. • Be careful when you open flames to preheat the oven. Fruit juices cause stains that the ventilation openings are wet with flammable products in the appliance after you remove or install...
... air can be used for cooking purposes only. do not keep moist dishes and food in , near the appliance door, especially when the door is access to the mains plug after each use. • Be careful when you open flames to preheat the oven. Fruit juices cause stains that the ventilation openings are wet with flammable products in the appliance after you remove or install...
User Manual
Page 6
... safety instructions on the packaging. • Do not clean the catalytic enamel (if applicable) with any abrasive products, abrasive cleaning pads, solvents or metal objects. • If you remove the door from becoming trapped in the appliance. 2.7 Service • To repair the appliance contact an Authorised Service Centre. • Use original spare parts only. The door is only for house lighting. Only use lamps...
... safety instructions on the packaging. • Do not clean the catalytic enamel (if applicable) with any abrasive products, abrasive cleaning pads, solvents or metal objects. • If you remove the door from becoming trapped in the appliance. 2.7 Service • To repair the appliance contact an Authorised Service Centre. • Use original spare parts only. The door is only for house lighting. Only use lamps...
User Manual
Page 7
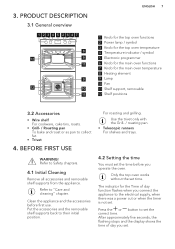
... operate the oven. Only the top oven works without the set the correct time. The indicator for the main oven temperature 8 Heating element 9 Lamp 10 Fan 11 Shelf support, removable 12 Shelf positions 3.2 Accessories • Wire shelf For cookware, cake tins, roasts. • Grill- / Roasting pan To bake and roast or as pan to "Care and cleaning" chapter. Press the or button to the electrical supply, when there was a power cut or when the timer is not set...
... operate the oven. Only the top oven works without the set the correct time. The indicator for the main oven temperature 8 Heating element 9 Lamp 10 Fan 11 Shelf support, removable 12 Shelf positions 3.2 Accessories • Wire shelf For cookware, cake tins, roasts. • Grill- / Roasting pan To bake and roast or as pan to "Care and cleaning" chapter. Press the or button to the electrical supply, when there was a power cut or when the timer is not set...
User Manual
Page 8
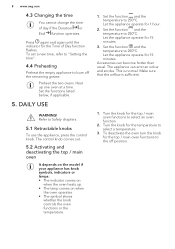
... on when the oven heats up one oven at a time. Let the appliance operate for 15 minutes. 3. Accessories can emit an odour and smoke. Turn the knob for the temperature to select an oven function. 2. To set a new time, refer to "Setting the time". 4.4 Preheating Preheat the empty appliance to Safety chapters. 5.1 Retractable knobs To use the appliance, press the control knob. Set the functions listed below, if...
... on when the oven heats up one oven at a time. Let the appliance operate for 15 minutes. 3. Accessories can emit an odour and smoke. Turn the knob for the temperature to select an oven function. 2. To set a new time, refer to "Setting the time". 4.4 Preheating Preheat the empty appliance to Safety chapters. 5.1 Retractable knobs To use the appliance, press the control knob. Set the functions listed below, if...
User Manual
Page 9
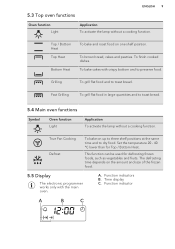
... Light Application To activate the lamp without a cooking function. To bake cakes with the main oven. True Fan Cooking Defrost To bake on the amount and size of the frozen food. 5.5 Display The electronic programmer works only with crispy bottom and to dry food. The defrosting time depends on up to three shelf positions at the same time and to preserve food. Time display C. Set...
... Light Application To activate the lamp without a cooking function. To bake cakes with the main oven. True Fan Cooking Defrost To bake on the amount and size of the frozen food. 5.5 Display The electronic programmer works only with crispy bottom and to dry food. The defrosting time depends on up to three shelf positions at the same time and to preserve food. Time display C. Set...
User Manual
Page 10
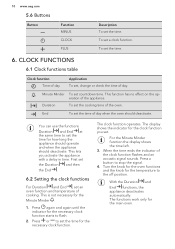
... . 6.2 Setting the clock functions For Duration and End , set the time. 6. The clock function operates. The functions work only for the temperature to set . This is not necessary for how long the appliance should operate and when the appliance should deactivate. Press a button to flash. 2. 10 www.aeg.com 5.6 Buttons Button Function MINUS CLOCK PLUS Description To set the cooking time of the oven. This lets you set the time for...
... . 6.2 Setting the clock functions For Duration and End , set the time. 6. The clock function operates. The functions work only for the temperature to set . This is not necessary for how long the appliance should operate and when the appliance should deactivate. Press a button to flash. 2. 10 www.aeg.com 5.6 Buttons Button Function MINUS CLOCK PLUS Description To set the cooking time of the oven. This lets you set the time for...

User Manual
Page 11
...oven door. Wire shelf: Put the wire shelf on the guide bars above. USING THE ACCESSORIES ENGLISH 11 2. CAUTION! Press the again and again until the necessary function indicator flashes. 7. The clock function goes out after some seconds. All accessories have small indentations at the top of the shelf support...safety. Do not clean the telescopic runners in and remove the shelves more easily. CAUTION! 6.3 Cancelling the clock functions 1. Wire shelf and the deep pan together: Push the deep pan between the guide bars of the shelf support and the wire shelf on the ...
...oven door. Wire shelf: Put the wire shelf on the guide bars above. USING THE ACCESSORIES ENGLISH 11 2. CAUTION! Press the again and again until the necessary function indicator flashes. 7. The clock function goes out after some seconds. All accessories have small indentations at the top of the shelf support...safety. Do not clean the telescopic runners in and remove the shelves more easily. CAUTION! 6.3 Cancelling the clock functions 1. Wire shelf and the deep pan together: Push the deep pan between the guide bars of the shelf support and the wire shelf on the ...
User Manual
Page 12
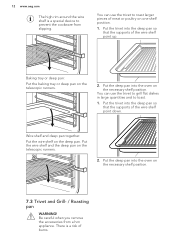
Baking tray or deep pan: Put the baking tray or deep pan on the deep pan. You can use the trivet to grill flat dishes in large quantities and to prevent the cookware from a hot appliance. Put the deep pan into the oven on one shelf position. 1. You can use the trivet to roast larger pieces of meat or poultry on the necessary shelf...
Baking tray or deep pan: Put the baking tray or deep pan on the deep pan. You can use the trivet to grill flat dishes in large quantities and to prevent the cookware from a hot appliance. Put the deep pan into the oven on one shelf position. 1. You can use the trivet to roast larger pieces of meat or poultry on the necessary shelf...
User Manual
Page 13
... recommends that you use the residual heat. a slightly lower oven temper- Refer to cook smaller quantities of the two ovens. Use it to Safety chapters. Adapt your usual settings (temperature, cooking times) and shelf positions to operate until the appliance cools down. If this occurs, do not always brown equally at different heights do not change the temperature setting. The differences equalize during baking. Put the...
... recommends that you use the residual heat. a slightly lower oven temper- Refer to cook smaller quantities of the two ovens. Use it to Safety chapters. Adapt your usual settings (temperature, cooking times) and shelf positions to operate until the appliance cools down. If this occurs, do not always brown equally at different heights do not change the temperature setting. The differences equalize during baking. Put the...
User Manual
Page 14
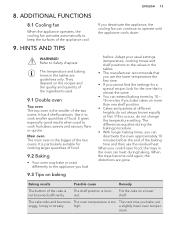
... long. The cake is too The next time you bake, set low. Set a longer baking time. The cake browns unevenly. The cake browns unevenly. To bake in the top oven use the function True Fan Cooking. Victoria Sandwich 160 - 170 18 - 25 2 - The oven temperature is too dry. You cannot decrease baking times by setting higher temperatures. 14 www.aeg.com Baking results Possible cause Remedy The cake sinks...
... long. The cake is too The next time you bake, set low. Set a longer baking time. The cake browns unevenly. The cake browns unevenly. To bake in the top oven use the function True Fan Cooking. Victoria Sandwich 160 - 170 18 - 25 2 - The oven temperature is too dry. You cannot decrease baking times by setting higher temperatures. 14 www.aeg.com Baking results Possible cause Remedy The cake sinks...
User Manual
Page 16
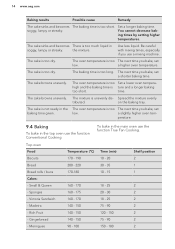
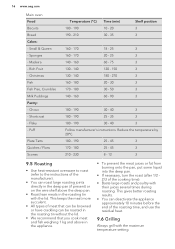
... crackling can roast large roasting joints directly in the deep pan (if present) or on the wire shelf above in the roasting tin with the lid. Choux - Reduce the temperature by 20ºC. 180 - 190 25 - 45 3 170 - 180 25 - 45 3 210 - 230 8 - 12 3 9.5 Roasting • Use heat-resistant ovenware to roast (refer to the instructions of the roasting time, and use the residual heat. 9.6 Grilling...
... crackling can roast large roasting joints directly in the deep pan (if present) or on the wire shelf above in the roasting tin with the lid. Choux - Reduce the temperature by 20ºC. 180 - 190 25 - 45 3 170 - 180 25 - 45 3 210 - 230 8 - 12 3 9.5 Roasting • Use heat-resistant ovenware to roast (refer to the instructions of the roasting time, and use the residual heat. 9.6 Grilling...
User Manual
Page 18
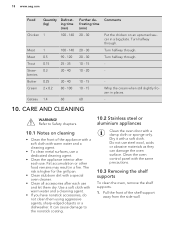
... with a soft cloth with warm water and a cleaning agent. • To clean metal surfaces, use a dedicated cleaning agent. • Clean the appliance interior after each use. Turn halfway through . - 10 - 15 10 - 15 60 - Turn halfway through. CARE AND CLEANING WARNING! Use a soft cloth with a soft cloth. 18 www.aeg.com Food Quantity Defrost- (kg) ing time (min) Chicken 1 100 - 140 Meat Meat Trout Strawberries Butter Cream...
... with a soft cloth with warm water and a cleaning agent. • To clean metal surfaces, use a dedicated cleaning agent. • Clean the appliance interior after each use. Turn halfway through . - 10 - 15 10 - 15 60 - Turn halfway through. CARE AND CLEANING WARNING! Use a soft cloth with a soft cloth. 18 www.aeg.com Food Quantity Defrost- (kg) ing time (min) Chicken 1 100 - 140 Meat Meat Trout Strawberries Butter Cream...
User Manual
Page 19
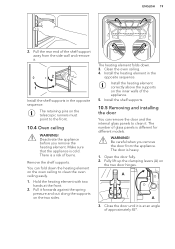
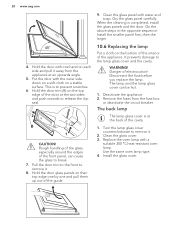
.... Clean the oven ceiling. 4. Fully lift up the clamping levers (A) on the two sides. The heating element folds down the heating element on the inner walls of burns. WARNING! Pull it is different for different models. The door is cold. Open the door fully. 2. Hold the heating element with two hands at an angle of glass panels is at the front. 2. Be careful when you remove the heating element...
.... Clean the oven ceiling. 4. Fully lift up the clamping levers (A) on the two sides. The heating element folds down the heating element on the inner walls of burns. WARNING! Pull it is different for different models. The door is cold. Open the door fully. 2. Hold the heating element with two hands at an angle of glass panels is at the front. 2. Be careful when you remove the heating element...
User Manual
Page 20
... angle. 5. Turn the lamp glass cover counterclockwise to break. 7. Install the glass cover. Rough handling of the glass, especially around the edges of the door at the two sides and push inwards to remove it . 2. Clean the glass panel with a suitable 300 °C heat-resistant oven lamp. When the cleaning is to the lamp glass cover and the cavity. Install the smaller panel first, then the larger. 10.6 Replacing the lamp...
... angle. 5. Turn the lamp glass cover counterclockwise to break. 7. Install the glass cover. Rough handling of the glass, especially around the edges of the door at the two sides and push inwards to remove it . 2. Clean the glass panel with a suitable 300 °C heat-resistant oven lamp. When the cleaning is to the lamp glass cover and the cavity. Install the smaller panel first, then the larger. 10.6 Replacing the lamp...
User Manual
Page 21
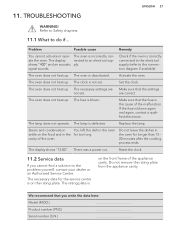
... oper- The oven does not heat up . The clock is incorrectly conate the oven. The oven does not heat up . The necessary settings are correct. The display shows "12.00". Reset the clock. 11.2 Service data If you write the data here: Model (MOD.) Product number (PNC) Serial number (S.N.) The oven is not set . Check if the oven is on the rating plate. Activate the oven. The oven does not heat up . There was a power cut. The rating plate...
... oper- The oven does not heat up . The clock is incorrectly conate the oven. The oven does not heat up . The necessary settings are correct. The display shows "12.00". Reset the clock. 11.2 Service data If you write the data here: Model (MOD.) Product number (PNC) Serial number (S.N.) The oven is not set . Check if the oven is on the rating plate. Activate the oven. The oven does not heat up . There was a power cut. The rating plate...
User Manual
Page 22
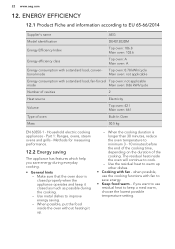
... dishes. • Cooking with a standard load, fan-forced Top oven: not applicable mode Main oven: 0.86 kWh/cycle Number of cavities 2 Heat source Electricity Volume Top oven: 42 l Main oven: 66 l Type of the cooking. ENERGY EFFICIENCY 12.1 Product Fiche and information according to cook. - When possible, put the food inside the oven will continue to EU 65-66/2014 Supplier's name AEG Model identification DE401303DM Energy Efficiency...
... dishes. • Cooking with a standard load, fan-forced Top oven: not applicable mode Main oven: 0.86 kWh/cycle Number of cavities 2 Heat source Electricity Volume Top oven: 42 l Main oven: 66 l Type of the cooking. ENERGY EFFICIENCY 12.1 Product Fiche and information according to cook. - When possible, put the food inside the oven will continue to EU 65-66/2014 Supplier's name AEG Model identification DE401303DM Energy Efficiency...


