
Product Manual
Page 2
... 1. FIRST USE 5 4. When contacting Service, ensure that help make life simpler - Warning / Caution-Safety information General information and tips Environmental information Subject to get the very best from it to give you impeccable performance for your appliance: www.aeg.com/shop CUSTOMER CARE AND SERVICE We recommend the use of original spare parts. DAILY USE 6 5. We have the following data available. OPERATION 5 3. CARE AND CLEANING 7 7.
... 1. FIRST USE 5 4. When contacting Service, ensure that help make life simpler - Warning / Caution-Safety information General information and tips Environmental information Subject to get the very best from it to give you impeccable performance for your appliance: www.aeg.com/shop CUSTOMER CARE AND SERVICE We recommend the use of original spare parts. DAILY USE 6 5. We have the following data available. OPERATION 5 3. CARE AND CLEANING 7 7.

Product Manual
Page 3
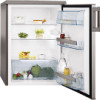
... featuring magnetic door seals is intended for this product in hotels, motels and other electrical appliances (such as the manufacturer is not responsible for damages caused by a person responsible for a child. 1.2 General safety WARNING! thoroughly ventilate the room in which is not intended for use other residential type environments; - Save these user's instructions as ice cream makers) inside of refrigerating appliances...
... featuring magnetic door seals is intended for this product in hotels, motels and other electrical appliances (such as the manufacturer is not responsible for damages caused by a person responsible for a child. 1.2 General safety WARNING! thoroughly ventilate the room in which is not intended for use other residential type environments; - Save these user's instructions as ice cream makers) inside of refrigerating appliances...
Product Manual
Page 4
... overheating. Power cord must not operate the appliance without the lamp cover (if foreseen) of the product should be against a wall to avoid touching or catching warm parts (compressor, condenser) to relevant instructions. 1.4 Care and cleaning • Before maintenance, switch off the appliance and disconnect the mains plug from the freezer compartment if your hands are special purpose lamps selected for defrosted water. There...
... overheating. Power cord must not operate the appliance without the lamp cover (if foreseen) of the product should be against a wall to avoid touching or catching warm parts (compressor, condenser) to relevant instructions. 1.4 Care and cleaning • Before maintenance, switch off the appliance and disconnect the mains plug from the freezer compartment if your hands are special purpose lamps selected for defrosted water. There...

Product Manual
Page 5
... set to a higher temperature to form on : • room temperature • how often the door is opened • the quantity of food stored • the location of a brand-new product, then dry thoroughly. Avoid damaging the cooling unit, especially at the rear near the heat exchanger. The materials used on Insert the plug into the wall socket. FIRST USE 3.1 Cleaning the interior Before using...
... set to a higher temperature to form on : • room temperature • how often the door is opened • the quantity of food stored • the location of a brand-new product, then dry thoroughly. Avoid damaging the cooling unit, especially at the rear near the heat exchanger. The materials used on Insert the plug into the wall socket. FIRST USE 3.1 Cleaning the interior Before using...

Product Manual
Page 6
... USE 4.1 Movable shelves The walls of the refrigerator are equipped with a series of the temperature regulator. To make these adjustments proceed as follows: gradually pull the shelf in electricity consumption. If this happens, set the Temperature Regulator toward warmer settings to low temperature and the appliance is fully loaded, the compressor may hear a faint gurgling and a bubbling sound when the refrigerant is set to allow automatic defrosting...
... USE 4.1 Movable shelves The walls of the refrigerator are equipped with a series of the temperature regulator. To make these adjustments proceed as follows: gradually pull the shelf in electricity consumption. If this happens, set the Temperature Regulator toward warmer settings to low temperature and the appliance is fully loaded, the compressor may hear a faint gurgling and a bubbling sound when the refrigerant is set to allow automatic defrosting...
Product Manual
Page 7
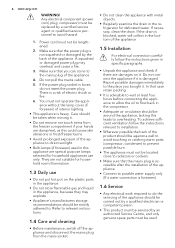
... only one or two days at the back of the appliance with lukewarm water and some neutral soap. • regularly check the door seals and wipe clean to the mains supply. 6.2 Defrosting of this reason it 5.4 Hints for refrigeration Useful hints: Meat (all types) : wrap in its cooling unit; Milk bottles: these should be cleaned regularly: • clean the inside the cabinet.
... only one or two days at the back of the appliance with lukewarm water and some neutral soap. • regularly check the door seals and wipe clean to the mains supply. 6.2 Defrosting of this reason it 5.4 Hints for refrigeration Useful hints: Meat (all types) : wrap in its cooling unit; Milk bottles: these should be cleaned regularly: • clean the inside the cabinet.
Product Manual
Page 8
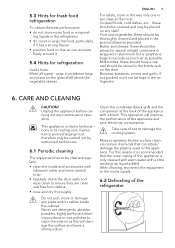
... plug from electricity supply 2. The mains plug is switched off. There are some sounds during normal use. remove all accessories 4. 8 www.aeg.com Frost is automatically eliminated from spoiling in case of a power failure. 6.3 Periods of non-operation When the appliance is not in the middle of the refrigerator compartment channel to prevent the water overflowing and dripping onto the food inside from the evaporator...
... plug from electricity supply 2. The mains plug is switched off. There are some sounds during normal use. remove all accessories 4. 8 www.aeg.com Frost is automatically eliminated from spoiling in case of a power failure. 6.3 Periods of non-operation When the appliance is not in the middle of the refrigerator compartment channel to prevent the water overflowing and dripping onto the food inside from the evaporator...

Product Manual
Page 9
... not set correctly. Refer to "Closing the door". The product temperature is not set correctly. Set a higher temperature. Clean the water outlet. tor is too high. Water flows into the water do not touch the rear collector. The temperature in the evap- too high. same time. ENGLISH 9 Problem The lamp does not work. Refer to "Replacing the lamp". The water outlet is too low. Make sure...
... not set correctly. Refer to "Closing the door". The product temperature is not set correctly. Set a higher temperature. Clean the water outlet. tor is too high. Water flows into the water do not touch the rear collector. The temperature in the evap- too high. same time. ENGLISH 9 Problem The lamp does not work. Refer to "Replacing the lamp". The water outlet is too low. Make sure...

Product Manual
Page 10
.... 2. Remove the lamp cover (refer to "Installation". 1. Clean the door gaskets. 2. Tighten the screw to the mains socket. 8. Open the door. If necessary, adjust the door. Disconnect the mains plug from the lamp cover. 3. Solution Make sure that the lamp comes on the lamp cover). 5. Replace the used lamp with a new lamp of the appliance and in the refrigerator is shown on . 3. Connect the mains plug to the lamp cover. 7. TECHNICAL DATA Dimension Height...
.... 2. Remove the lamp cover (refer to "Installation". 1. Clean the door gaskets. 2. Tighten the screw to the mains socket. 8. Open the door. If necessary, adjust the door. Disconnect the mains plug from the lamp cover. 3. Solution Make sure that the lamp comes on the lamp cover). 5. Replace the used lamp with a new lamp of the appliance and in the refrigerator is shown on . 3. Connect the mains plug to the lamp cover. 7. TECHNICAL DATA Dimension Height...
Product Manual
Page 11
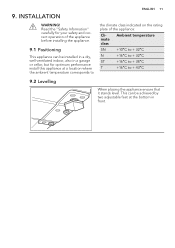
... the "Safety Information" carefully for optimum performance install this appliance at the bottom in a garage or cellar, but for your safety and correct operation of the appliance before installing the appliance. 9.1 Positioning This appliance can be achieved by two adjustable feet at a location where the ambient temperature corresponds to the climate class indicated on the rating plate of the appliance...
... the "Safety Information" carefully for optimum performance install this appliance at the bottom in a garage or cellar, but for your safety and correct operation of the appliance before installing the appliance. 9.1 Positioning This appliance can be achieved by two adjustable feet at a location where the ambient temperature corresponds to the climate class indicated on the rating plate of the appliance...
Product Manual
Page 12
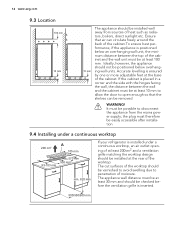
Accurate levelling is ensured by one or more adjustable feet at the rear of moisture. the plug must be at least 30 mm and should be checked before the ventilation grille is positioned below overhanging wall units. Ideally, however,... at least 10 mm to allow the door to open enough so that air can be removed. WARNING! 12 www.aeg.com 9.3 Location 100 mm 15 mm 15 mm The appliance should be installed well away from the mains power supply; The appliance wall distance must therefore be easily accessible after installation. 9.4 Installing under a continuous worktop 200 cm2 A...
Accurate levelling is ensured by one or more adjustable feet at the rear of moisture. the plug must be at least 30 mm and should be checked before the ventilation grille is positioned below overhanging wall units. Ideally, however,... at least 10 mm to allow the door to open enough so that air can be removed. WARNING! 12 www.aeg.com 9.3 Location 100 mm 15 mm 15 mm The appliance should be installed well away from the mains power supply; The appliance wall distance must therefore be easily accessible after installation. 9.4 Installing under a continuous worktop 200 cm2 A...
Product Manual
Page 13
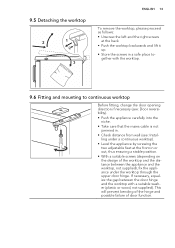
..., not supplied), fix the appliance under the worktop through the upper door hinge. 9.5 Detaching the worktop 2 1 3 ENGLISH 13 To remove the worktop, please proceed as follows: • Unscrew the left and the...door hinge and the worktop with the worktop. 9.6 Fitting and mounting to continuous worktop Before fitting, change the door opening direction if necessary (see: Door reversibility). • Push the appliance carefully into the niche. • Take care that the mains cable is not jammed in. • Check distance from wall (see: Installing under a continuous worktop). • Level...
..., not supplied), fix the appliance under the worktop through the upper door hinge. 9.5 Detaching the worktop 2 1 3 ENGLISH 13 To remove the worktop, please proceed as follows: • Unscrew the left and the...door hinge and the worktop with the worktop. 9.6 Fitting and mounting to continuous worktop Before fitting, change the door opening direction if necessary (see: Door reversibility). • Push the appliance carefully into the niche. • Take care that the mains cable is not jammed in. • Check distance from wall (see: Installing under a continuous worktop). • Level...
Product Manual
Page 14
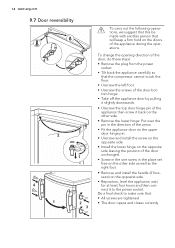
... then connect it to make sure that: • All screws are tightened. • The door opens and closes correctly. Do a final check to the power socket. Put over the pin in the place set free on the opposite side leaving the position of the appliance during the operations. To change the opening direction of the door, do these steps: • Remove the plug...
... then connect it to make sure that: • All screws are tightened. • The door opens and closes correctly. Do a final check to the power socket. Put over the pin in the place set free on the opposite side leaving the position of the appliance during the operations. To change the opening direction of the door, do these steps: • Remove the plug...
Product Manual
Page 15
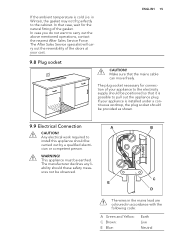
...! If your appliance is installed under a continuous worktop, the plug socket should be observed. In that case, wait for connection of your cost. The After Sales Service specialist will carry out the reversibility of the gasket. Any electrical work required to carry out the above mentioned operations, contact the nearest After Sales Service Force. C E D The wires in the mains lead are...
...! If your appliance is installed under a continuous worktop, the plug socket should be observed. In that case, wait for connection of your cost. The After Sales Service specialist will carry out the reversibility of the gasket. Any electrical work required to carry out the above mentioned operations, contact the nearest After Sales Service Force. C E D The wires in the mains lead are...

Product Manual
Page 16
... of the wires in the mains lead of having to change the fuse in your plug, proceed as that no cut off plug inserted into a 13 amp socket is disposed of wire is present and the cord clamp D is supplied with a 13 amp plug fitted B. Switch on the appliance rating plate. 6. WARNING! CRACK! NOISE There are some sounds during normal running (compressor, refrigerant circulation). CLICK...
... of the wires in the mains lead of having to change the fuse in your plug, proceed as that no cut off plug inserted into a 13 amp socket is disposed of wire is present and the cord clamp D is supplied with a 13 amp plug fitted B. Switch on the appliance rating plate. 6. WARNING! CRACK! NOISE There are some sounds during normal running (compressor, refrigerant circulation). CLICK...

Product Manual
Page 17
HISSS! HISSS! Return the product to recycle waste of electrical and electronic appliances. BRRR! CRACK! 11. BLUBB! ENVIRONMENT CONCERNS Recycle the materials with the household waste. CRACK! Help protect the environment and human health and to your local recycling facility or contact your municipal office. Put the packaging in applicable containers to recycle it. ENGLISH 17 BRRR! Do not dispose appliances marked with the symbol with the symbol . BLUBB!
HISSS! HISSS! Return the product to recycle waste of electrical and electronic appliances. BRRR! CRACK! 11. BLUBB! ENVIRONMENT CONCERNS Recycle the materials with the household waste. CRACK! Help protect the environment and human health and to your local recycling facility or contact your municipal office. Put the packaging in applicable containers to recycle it. ENGLISH 17 BRRR! Do not dispose appliances marked with the symbol with the symbol . BLUBB!


