Specification Sheet
Page 1
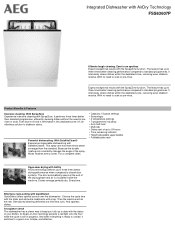
... settings • 7 programmes including: • Auto half load • Multi-tab • Delay start of your dishes. Choose the cycle time with the slider and add extra treatments with the status of up to 24 hours • Time remaining indicator • Height adjustable upper basket • Foldable plate rack Open-door drying with AirDry AirDry technology delivers up to three times better cleaning performance compared to soak or pre-rinse...
... settings • 7 programmes including: • Auto half load • Multi-tab • Delay start of your dishes. Choose the cycle time with the slider and add extra treatments with the status of up to 24 hours • Time remaining indicator • Height adjustable upper basket • Foldable plate rack Open-door drying with AirDry AirDry technology delivers up to three times better cleaning performance compared to soak or pre-rinse...
Specification Sheet
Page 2
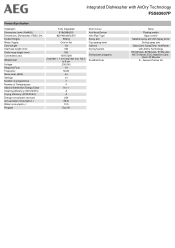
Generic Partner All Integrated Dishwasher with AirDry Technology FSS63607P Product Specification Installation Dimensions (mm) (HxWxD) Dimensions_Dishwasher_FSBU_DK Double Hinges Water Supply Cord Length Inlet hose length (mm) Outlet hose length (mm) Connected Load Wheels/feet Voltage Required Fuse Frequency Noise level, dB(A) Settings Number of programmes Number of Temperatures Second Generation Energy Class Cleaning efficiency (2010/30/EC) Drying efficiency (2010/30/EC) Energy consumption (annual) Annual water consumption, l Water consumption, l Program Fully Integrated 818x596x550 820-...
Generic Partner All Integrated Dishwasher with AirDry Technology FSS63607P Product Specification Installation Dimensions (mm) (HxWxD) Dimensions_Dishwasher_FSBU_DK Double Hinges Water Supply Cord Length Inlet hose length (mm) Outlet hose length (mm) Connected Load Wheels/feet Voltage Required Fuse Frequency Noise level, dB(A) Settings Number of programmes Number of Temperatures Second Generation Energy Class Cleaning efficiency (2010/30/EC) Drying efficiency (2010/30/EC) Energy consumption (annual) Annual water consumption, l Water consumption, l Program Fully Integrated 818x596x550 820-...
User Manual
Page 2
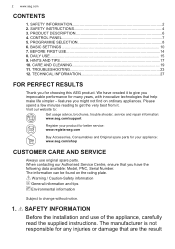
... the installation and use original spare parts. DAILY USE...15 9. HINTS AND TIPS 17 10. When contacting our Authorised Service Centre, ensure that are the result SAFETY INSTRUCTIONS 4 3. Please spend a few minutes reading to : Get usage advice, brochures, trouble shooter, service and repair information: www.aeg.com/support Register your appliance: www.aeg.com/shop CUSTOMER CARE AND SERVICE Always use of the appliance, carefully read the supplied instructions. CONTROL PANEL 7 5. We...
... the installation and use original spare parts. DAILY USE...15 9. HINTS AND TIPS 17 10. When contacting our Authorised Service Centre, ensure that are the result SAFETY INSTRUCTIONS 4 3. Please spend a few minutes reading to : Get usage advice, brochures, trouble shooter, service and repair information: www.aeg.com/support Register your appliance: www.aeg.com/shop CUSTOMER CARE AND SERVICE Always use of the appliance, carefully read the supplied instructions. CONTROL PANEL 7 5. We...
User Manual
Page 3
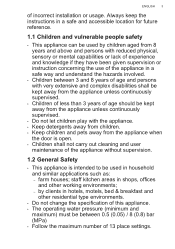
.... • Keep detergents away from children. • Keep children and pets away from the appliance when the door is open. • Children shall not carry out cleaning and user maintenance of the appliance without supervision. 1.2 General Safety • This appliance is intended to be between 0.5 (0.05) / 8 (0.8) bar (MPa) • Follow the maximum number of incorrect installation or usage. ENGLISH...
.... • Keep detergents away from children. • Keep children and pets away from the appliance when the door is open. • Children shall not carry out cleaning and user maintenance of the appliance without supervision. 1.2 General Safety • This appliance is intended to be between 0.5 (0.05) / 8 (0.8) bar (MPa) • Follow the maximum number of incorrect installation or usage. ENGLISH...
User Manual
Page 4
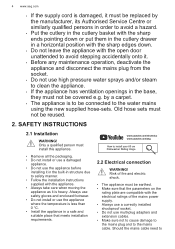
...; Follow the installation instructions supplied with the open door unattended to clean the appliance. • If the appliance has ventilation openings in structure due to the mains cable. SAFETY INSTRUCTIONS 2.1 Installation WARNING! Old hose sets must not be reused. 2. www.youtube.com/electrolux www.youtube.com/aeg How to Should the mains cable need to install your 60 cm Dishwasher Sliding Hinge 2.2 Electrical connection WARNING! by the...
...; Follow the installation instructions supplied with the open door unattended to clean the appliance. • If the appliance has ventilation openings in structure due to the mains cable. SAFETY INSTRUCTIONS 2.1 Installation WARNING! Old hose sets must not be reused. 2. www.youtube.com/electrolux www.youtube.com/aeg How to Should the mains cable need to install your 60 cm Dishwasher Sliding Hinge 2.2 Electrical connection WARNING! by the...
User Manual
Page 5
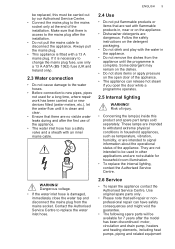
... the water hoses. • Before connection to replace the water inlet hose. 2.4 Use • Do not put flammable products or items that self-repair or nonprofessional repair can release hot steam if you open door of the appliance. • The water inlet hose has a safety valve and a sheath with a 13 A mains plug. Contact the Authorised Service Centre to new pipes, pipes not used in other applications and are not suitable for a long time, where repair work...
... the water hoses. • Before connection to replace the water inlet hose. 2.4 Use • Do not put flammable products or items that self-repair or nonprofessional repair can release hot steam if you open door of the appliance. • The water inlet hose has a safety valve and a sheath with a 13 A mains plug. Contact the Authorised Service Centre to new pipes, pipes not used in other applications and are not suitable for a long time, where repair work...
User Manual
Page 6
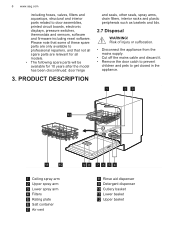
... from the mains supply. • Cut off the mains cable and discard it. • Remove the door catch to prevent children and pets to get closed in the appliance. 1 23 12 11 10 1 Ceiling spray arm 2 Upper spray arm 3 Lower spray arm 4 Filters 5 Rating plate 6 Salt container 7 Air vent 98 7 6 5 4 8 Rinse aid dispenser 9 Detergent dispenser 10 Cutlery basket 11 Lower basket 12 Upper basket 6 www.aeg.com including hoses, valves, filters and aquastops, structural and interior parts related to professional repairers, and that not...
... from the mains supply. • Cut off the mains cable and discard it. • Remove the door catch to prevent children and pets to get closed in the appliance. 1 23 12 11 10 1 Ceiling spray arm 2 Upper spray arm 3 Lower spray arm 4 Filters 5 Rating plate 6 Salt container 7 Air vent 98 7 6 5 4 8 Rinse aid dispenser 9 Detergent dispenser 10 Cutlery basket 11 Lower basket 12 Upper basket 6 www.aeg.com including hoses, valves, filters and aquastops, structural and interior parts related to professional repairers, and that not...
User Manual
Page 8
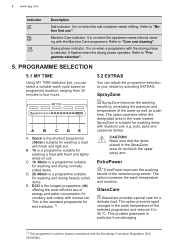
8 www.aeg.com Indicator Description Salt indicator. Drying phase indicator. PROGRAMME SELECTION 5.1 MY TIME Using MY TIME selection bar, you can adjust the programme selection to your needs by increasing the pressure and temperature of energy and water consumption for washing a load with stubborn soil, e.g. B. 1h is used to 45 °C. The option operates within the designated area in the SprayZone area do not block the upper spray arm. CAUTION...
8 www.aeg.com Indicator Description Salt indicator. Drying phase indicator. PROGRAMME SELECTION 5.1 MY TIME Using MY TIME selection bar, you can adjust the programme selection to your needs by increasing the pressure and temperature of energy and water consumption for washing a load with stubborn soil, e.g. B. 1h is used to 45 °C. The option operates within the designated area in the SprayZone area do not block the upper spray arm. CAUTION...
User Manual
Page 10
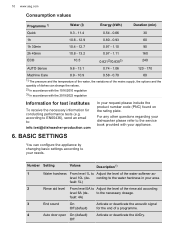
... receive the necessary information for the end of a programme. 4 Auto door open On (default) Activate or deactivate the AirDry. Number Setting Values Description1) 1 Water hardness From level 1L to Adjust the level of the water softener ac‐ level 10L (de‐ cording to the water hardness in your request please include the product number code (PNC) found on the rating plate. fault: 4A) 3 End sound On Activate or deactivate...
... receive the necessary information for the end of a programme. 4 Auto door open On (default) Activate or deactivate the AirDry. Number Setting Values Description1) 1 Water hardness From level 1L to Adjust the level of the water softener ac‐ level 10L (de‐ cording to the water hardness in your request please include the product number code (PNC) found on the rating plate. fault: 4A) 3 End sound On Activate or deactivate...
User Manual
Page 12
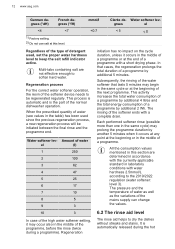
12 www.aeg.com German de‐ grees (°dH) French de‐ grees (°fH) mmol/l Clarke de‐ Water softener lev‐ grees el
12 www.aeg.com German de‐ grees (°dH) French de‐ grees (°fH) mmol/l Clarke de‐ Water softener lev‐ grees el
User Manual
Page 14
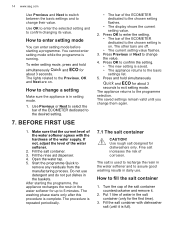
... new setting is in the salt container (only for dishwashers only. Start the programme Quick to confirm changing its value. Turn the cap of the water supply. Fill the rinse aid dispenser. 4. Use rough salt designed for the first time). 3. Make sure that the current level of the ECOMETER dedicated to change them again. 7.1 The salt container CAUTION! How to the chosen setting flashes. • The display shows the current setting...
... new setting is in the salt container (only for dishwashers only. Start the programme Quick to confirm changing its value. Turn the cap of the water supply. Fill the rinse aid dispenser. 4. Use rough salt designed for the first time). 3. Make sure that the current level of the ECOMETER dedicated to change them again. 7.1 The salt container CAUTION! How to the chosen setting flashes. • The display shows the current setting...
User Manual
Page 16
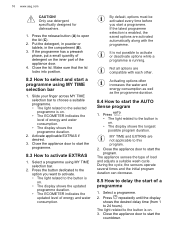
.... 3. Close the appliance door to delay the start the program. During the cycle, the sensors operate several times and the initial program duration can decrease. 8.5 How to start of a programme 1. The light related to this program. 2. If the programme has a prewash phase, put a small quantity of detergent on . • The display shows the updated programme duration. • The ECOMETER indicates the updated level of energy and water...
.... 3. Close the appliance door to delay the start the program. During the cycle, the sensors operate several times and the initial program duration can decrease. 8.5 How to start of a programme 1. The light related to this program. 2. If the programme has a prewash phase, put a small quantity of detergent on . • The display shows the updated programme duration. • The ECOMETER indicates the updated level of energy and water...
User Manual
Page 17
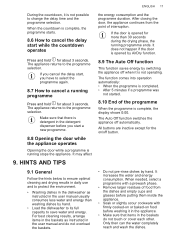
... display shows 0:00. For best cleaning results, arrange items in the baskets as instructed in the user manual and do not touch or cover each other. It does not happen if the door is opened for more than washing dishes by hand. • Load the dishwasher to its full capacity to cancel the delay start a new programme. 8.8 Opening the door while the appliance operates Opening the door while a programme is running stops the...
... display shows 0:00. For best cleaning results, arrange items in the baskets as instructed in the user manual and do not touch or cover each other. It does not happen if the door is opened for more than washing dishes by hand. • Load the dishwasher to its full capacity to cancel the delay start a new programme. 8.8 Opening the door while the appliance operates Opening the door while a programme is running stops the...
User Manual
Page 18
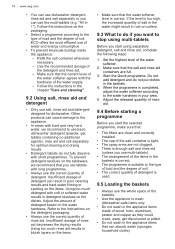
...: • The filters are clean and correctly installed. • The cap of the salt container is tight. • The spray arms are full. 3. Refer to use basic dishwasher detergent (powder, gel, tablets containing no additional agents), rinse aid and salt separately for dishwasher. Make sure that the current level of the water softener agrees with long programmes. • Always use the correct quantity of detergent. Make sure that...
...: • The filters are clean and correctly installed. • The cap of the salt container is tight. • The spray arms are full. 3. Refer to use basic dishwasher detergent (powder, gel, tablets containing no additional agents), rinse aid and salt separately for dishwasher. Make sure that the current level of the water softener agrees with long programmes. • Always use the correct quantity of detergent. Make sure that...
User Manual
Page 19
... indicators and flash. Close the appliance door to clean the appliance interior with a soft damp cloth. • Do not use abrasive products, abrasive cleaning pads, sharp tools, strong chemicals, scourer or solvents. • To maintain the performance of the door, with optimal results. Carefully follow the instructions on the packaging. pieces of the appliance. Dirty filters and clogged spray arms negatively affect the washing results. First remove...
... indicators and flash. Close the appliance door to clean the appliance interior with a soft damp cloth. • Do not use abrasive products, abrasive cleaning pads, sharp tools, strong chemicals, scourer or solvents. • To maintain the performance of the door, with optimal results. Carefully follow the instructions on the packaging. pieces of the appliance. Dirty filters and clogged spray arms negatively affect the washing results. First remove...
User Manual
Page 20
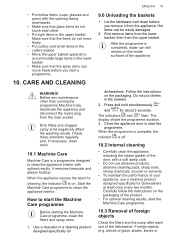
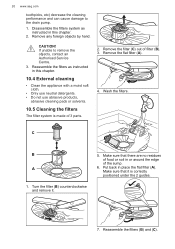
... drain pump. 1. Remove the flat filter (A). 4. Put back in this chapter. 10.4 External cleaning • Clean the appliance with a moist soft cloth. • Only use neutral detergents. • Do not use abrasive products, abrasive cleaning pads or solvents. 10.5 Cleaning the filters The filter system is correctly positioned under the 2 guides. 7. Wash the filters. Reassemble the filters as instructed in place the flat filter (A). Reassemble the filters (B) and (C). Turn the filter (B) counterclockwise and remove...
... drain pump. 1. Remove the flat filter (A). 4. Put back in this chapter. 10.4 External cleaning • Clean the appliance with a moist soft cloth. • Only use neutral detergents. • Do not use abrasive products, abrasive cleaning pads or solvents. 10.5 Cleaning the filters The filter system is correctly positioned under the 2 guides. 7. Wash the filters. Reassemble the filters as instructed in place the flat filter (A). Reassemble the filters (B) and (C). Turn the filter (B) counterclockwise and remove...

User Manual
Page 23
... the user. i5F. • Switch the appliance off and on possible problems. With some problems, the display shows an alarm code. The display shows i30. • Close the water tap. • Make sure that the appliance is not clogged. • Make sure that the filters are loaded as instructed in the inlet hose is correctly installed. • Make sure the baskets are clean. Improper repair of the water...
... the user. i5F. • Switch the appliance off and on possible problems. With some problems, the display shows an alarm code. The display shows i30. • Close the water tap. • Make sure that the appliance is not clogged. • Make sure that the filters are loaded as instructed in the inlet hose is correctly installed. • Make sure the baskets are clean. Improper repair of the water...

User Manual
Page 24
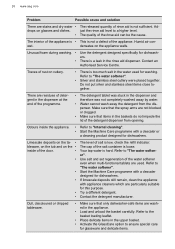
... outlet hose is not centred on . The appliance stops and • It is working correctly. Small leak from the baskets. The appliance trips the cir‐ cuit-beaker. • The amperage is not levelled. 24 www.aeg.com Problem and alarm code Possible cause and solution The temperature of the wa‐ ter inside the appliance is not levelled. The display shows...
... outlet hose is not centred on . The appliance stops and • It is working correctly. Small leak from the baskets. The appliance trips the cir‐ cuit-beaker. • The amperage is not levelled. 24 www.aeg.com Problem and alarm code Possible cause and solution The temperature of the wa‐ ter inside the appliance is not levelled. The display shows...
User Manual
Page 25
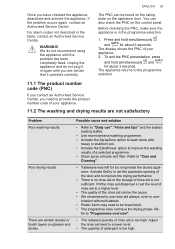
... product number code (PNC) If you contact an Authorised Service Centre, you need to a lower level. • The quantity of rinse aid is too high. Adjust the rinse aid level to be towel dried. • The programme does not have checked the appliance, deactivate and activate the appliance. The PNC can be the cause. • We recommend to use ", "Hints and tips" and the basket loading leaflet...
... product number code (PNC) If you contact an Authorised Service Centre, you need to a lower level. • The quantity of rinse aid is too high. Adjust the rinse aid level to be towel dried. • The programme does not have checked the appliance, deactivate and activate the appliance. The PNC can be the cause. • We recommend to use ", "Hints and tips" and the basket loading leaflet...
User Manual
Page 26
... wash away the detergent from opening. Refer to the basket loading leaflet. • Place delicate items in the upper basket. • Activate the GlassCare option to "The water softener". • Silver and stainless steel cutlery were placed together. Contact an Authorised Service Centre. Odours inside of the door. • • • • • • The level of rinse aid is low, check the refill indicator. 26 www.aeg...
... wash away the detergent from opening. Refer to the basket loading leaflet. • Place delicate items in the upper basket. • Activate the GlassCare option to "The water softener". • Silver and stainless steel cutlery were placed together. Contact an Authorised Service Centre. Odours inside of the door. • • • • • • The level of rinse aid is low, check the refill indicator. 26 www.aeg...


