
Specification Sheet
Page 1
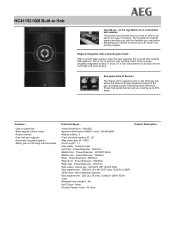
all the ingredients for a customized hob solution The kitchen environment has too much on glass hob •Steel capped control knobs •Rotary controls •Cast iron pan supports •Automatic integrated ignition •Safety gas cut off using thermocouples Technical Specs : • Hobs Dimensions : 360x520 •Aperture dimensions HxWxD in this is a hob that it 's a hob that deserves to be tied to 20% faster. Power/Diameter : 0W/0mm...
all the ingredients for a customized hob solution The kitchen environment has too much on glass hob •Steel capped control knobs •Rotary controls •Cast iron pan supports •Automatic integrated ignition •Safety gas cut off using thermocouples Technical Specs : • Hobs Dimensions : 360x520 •Aperture dimensions HxWxD in this is a hob that it 's a hob that deserves to be tied to 20% faster. Power/Diameter : 0W/0mm...
User Manual
Page 2
... features you for your appliance: www.aeg.com/shop CUSTOMER CARE AND SERVICE Always use of incorrect installation or SAFETY INSTRUCTIONS 5 3. INSTALLATION...12 9. We have the following data available: Model, PNC, Serial Number. ENERGY EFFICIENCY 19 FOR PERFECT RESULTS Thank you might not find on the rating plate. CARE AND CLEANING 10 7. SAFETY INFORMATION Before the installation and use original spare parts. PRODUCT DESCRIPTION 7 4. The manufacturer is...
... features you for your appliance: www.aeg.com/shop CUSTOMER CARE AND SERVICE Always use of incorrect installation or SAFETY INSTRUCTIONS 5 3. INSTALLATION...12 9. We have the following data available: Model, PNC, Serial Number. ENERGY EFFICIENCY 19 FOR PERFECT RESULTS Thank you might not find on the rating plate. CARE AND CLEANING 10 7. SAFETY INFORMATION Before the installation and use original spare parts. PRODUCT DESCRIPTION 7 4. The manufacturer is...
User Manual
Page 3
... then cover flame e.g. Accessible parts are hot. • If the appliance has a child safety device, this appliance when it is in a safe way and understand the hazards involved. • Do not let children play with the appliance. • Keep all times. 1.2 General Safety • WARNING: The appliance and its accessible parts become hot during use. Always keep the instructions...
... then cover flame e.g. Accessible parts are hot. • If the appliance has a child safety device, this appliance when it is in a safe way and understand the hazards involved. • Do not let children play with the appliance. • Keep all times. 1.2 General Safety • WARNING: The appliance and its accessible parts become hot during use. Always keep the instructions...
User Manual
Page 4
...; If the glass ceramic surface / glass surface is cracked, switch off all -pole isolating switch with parts that can cause accidents. do not use the appliance. • If the supply cord is damaged, it must be supervised. The earth cable is required. do not touch the appliance surface, - shut immediately off the appliance to the power supply, an all burners and any electrical heating element and isolate...
...; If the glass ceramic surface / glass surface is cracked, switch off all -pole isolating switch with parts that can cause accidents. do not use the appliance. • If the supply cord is damaged, it must be supervised. The earth cable is required. do not touch the appliance surface, - shut immediately off the appliance to the power supply, an all burners and any electrical heating element and isolate...
User Manual
Page 5
... not install or use safety gloves and enclosed footwear. • Seal the cut surfaces with the underside of the hob, an intermediate protection panel must be fastened in direct contact with a sealant to prevent moisture to a door or under a window. If not, contact an electrician. • Make sure the appliance is loose, do not connect the mains plug. 2. SAFETY INSTRUCTIONS...
... not install or use safety gloves and enclosed footwear. • Seal the cut surfaces with the underside of the hob, an intermediate protection panel must be fastened in direct contact with a sealant to prevent moisture to a door or under a window. If not, contact an electrician. • Make sure the appliance is loose, do not connect the mains plug. 2. SAFETY INSTRUCTIONS...
User Manual
Page 6
... the flame does not go out when you quickly turn the knob from the mains at a lower temperature than the dimensions of injury, burns and electrical shock. • Remove all poles. Always lift these objects up when you place food into hot oil, it may splash. Always pull the mains plug. • Use only correct isolation devices: line protecting cut-outs, fuses (screw type fuses removed...
... the flame does not go out when you quickly turn the knob from the mains at a lower temperature than the dimensions of injury, burns and electrical shock. • Remove all poles. Always lift these objects up when you place food into hot oil, it may splash. Always pull the mains plug. • Use only correct isolation devices: line protecting cut-outs, fuses (screw type fuses removed...
User Manual
Page 7
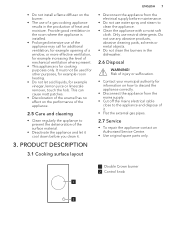
... electrical supply before you clean it . • Flat the external gas pipes. 2.7 Service • To repair the appliance contact an Authorised Service Centre. • Use original spare parts only. 1 Double Crown burner 2 Control knob 1 2 It must not be used for other purposes, for example room heating. • Do not let acid liquids, for example vinegar, lemon juice or limescale remover, touch the hob. Only use...
... electrical supply before you clean it . • Flat the external gas pipes. 2.7 Service • To repair the appliance contact an Authorised Service Centre. • Use original spare parts only. 1 Double Crown burner 2 Control knob 1 2 It must not be used for other purposes, for example room heating. • Do not let acid liquids, for example vinegar, lemon juice or limescale remover, touch the hob. Only use...
User Manual
Page 8
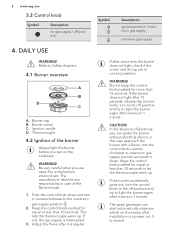
... to light the burner again after installation or a power cut. WARNING! In the absence of the flame misuse. 1. Be very careful when you switch on the cookware. Refer to light the burner again after some tries the burner does not light, check if the crown and its cap are in the kitchen environment. in this case approach the burner with a flame, turn the control knob counterclockwise to maximum gas supply...
... to light the burner again after installation or a power cut. WARNING! In the absence of the flame misuse. 1. Be very careful when you switch on the cookware. Refer to light the burner again after some tries the burner does not light, check if the crown and its cap are in the kitchen environment. in this case approach the burner with a flame, turn the control knob counterclockwise to maximum gas supply...
User Manual
Page 9
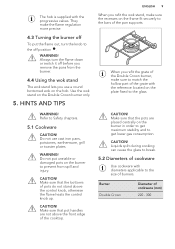
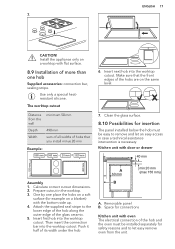
... the pan supports. CAUTION! Burner Double Crown Diameter of burners. Use the wok stand on the frame fit securely to get lower gas consumption. Do not put the flame out, turn the flame down or switch it off before you remove the pans from spill and injury. Make sure that the bottoms of the grate with the progressive valves. Do not use a round bottomed wok on the burner...
... the pan supports. CAUTION! Burner Double Crown Diameter of burners. Use the wok stand on the frame fit securely to get lower gas consumption. Do not put the flame out, turn the flame down or switch it off before you remove the pans from spill and injury. Make sure that the bottoms of the grate with the progressive valves. Do not use a round bottomed wok on the burner...

User Manual
Page 10
... put on metal pins installed in correct positions. 4. After you replace the pan supports to operate correctly, make sure that the arms of the pan supports are aligned with a soft cloth. 6.2 Pan supports The pan supports are not resistant to clean the surface of the glass or between the rims of the burners and the frame (if applicable). • Wash stainless steel parts with a paste cleaner. 3. For...
... put on metal pins installed in correct positions. 4. After you replace the pan supports to operate correctly, make sure that the arms of the pan supports are aligned with a soft cloth. 6.2 Pan supports The pan supports are not resistant to clean the surface of the glass or between the rims of the burners and the frame (if applicable). • Wash stainless steel parts with a paste cleaner. 3. For...
User Manual
Page 11
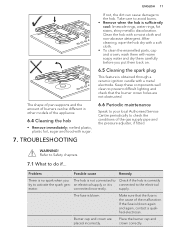
... holes are placed incorrectly. The fuse is obtained through a ceramic ignition candle with sugar. 7. Problem Possible cause Remedy There is no spark when you put them back on. 6.5 Cleaning the spark plug This feature is blown. After cleaning, wipe the hob dry with a soft cloth. • To clean the enamelled parts, cap and crown, wash them carefully before you The hob is not...
... holes are placed incorrectly. The fuse is obtained through a ceramic ignition candle with sugar. 7. Problem Possible cause Remedy There is no spark when you put them back on. 6.5 Cleaning the spark plug This feature is blown. After cleaning, wipe the hob dry with a soft cloth. • To clean the enamelled parts, cap and crown, wash them carefully before you The hob is not...
User Manual
Page 12
... send this part (if applicable). Refer to the problem yourself, contact your dealer or an Authorised Service Centre. Give the data from the rating Possible cause Remedy Thermocouple is food residues. The instructions about the Service Centre and conditions of charge, also during the warranty period. C. 12 www.aeg.com Problem The flame extinguishes immediately after ignition. The flame ring is clean. 7.2 If...
... send this part (if applicable). Refer to the problem yourself, contact your dealer or an Authorised Service Centre. Give the data from the rating Possible cause Remedy Thermocouple is food residues. The instructions about the Service Centre and conditions of charge, also during the warranty period. C. 12 www.aeg.com Problem The flame extinguishes immediately after ignition. The flame ring is clean. 7.2 If...
User Manual
Page 13
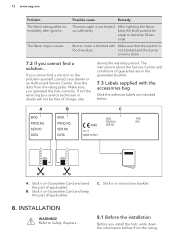
... a kitchen, a kitchen/diner or bed sitting room (with the Gas Safety (Installation and Use) Regulations (Current Edition) and the IEE Wiring Regulations (Current Edition). A B A. End of the hob. steel or copper. If it is 400 mm. For appliances installed in the diagram. The rating plate is fitted between 5 m³ and 10 m³ an air vent of effective area of 50 cm² is required, while...
... a kitchen, a kitchen/diner or bed sitting room (with the Gas Safety (Installation and Use) Regulations (Current Edition) and the IEE Wiring Regulations (Current Edition). A B A. End of the hob. steel or copper. If it is 400 mm. For appliances installed in the diagram. The rating plate is fitted between 5 m³ and 10 m³ an air vent of effective area of 50 cm² is required, while...

User Manual
Page 14
... an applicable pressure adjuster on the gas supply pipe. 8.5 Adjustment of minimum level To adjust the minimum level of the appliance obeys the recommended values. Remove the pan supports. 2. Replace the rating plate (it is essential that they agree to natural gas G20 20 mbar, undo the bypass screw approximately 1/4 of a turn. Light the burner. 2. Remove the knob. 4. Rigid connection: Carry out connection by using metal rigid pipes (copper with mobile parts or...
... an applicable pressure adjuster on the gas supply pipe. 8.5 Adjustment of minimum level To adjust the minimum level of the appliance obeys the recommended values. Remove the pan supports. 2. Replace the rating plate (it is essential that they agree to natural gas G20 20 mbar, undo the bypass screw approximately 1/4 of a turn. Light the burner. 2. Remove the knob. 4. Rigid connection: Carry out connection by using metal rigid pipes (copper with mobile parts or...
User Manual
Page 15
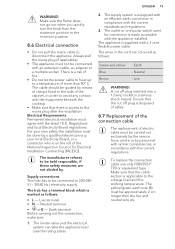
... the installation must be connected with a 3 core flexible power cable. Regulations and local Electricity Board regulations. The appliance is easily accessible with the current standards and regulations 3. Earth - Live terminal • N - The wires in order to the mains plug after the installation. Make sure the flame does not go out when you quickly turn the knob from the maximum position to the minimum position. 8.6 Electrical connection •...
... the installation must be connected with a 3 core flexible power cable. Regulations and local Electricity Board regulations. The appliance is easily accessible with the current standards and regulations 3. Earth - Live terminal • N - The wires in order to the mains plug after the installation. Make sure the flame does not go out when you quickly turn the knob from the maximum position to the minimum position. 8.6 Electrical connection •...
User Manual
Page 16
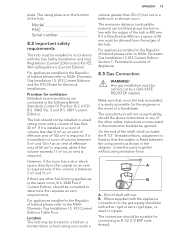
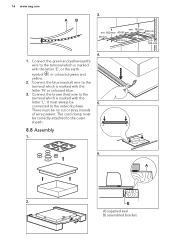
... sheath. 8.8 Assembly 1. 6. There must be connected to the network phase. 5. A 2. The cord clamp must always be no cut or stray strands of wire present. It must be correctly attached to the terminal which is marked with the letter 'E', or the earth symbol , or coloured green and yellow. 2. B A) supplied seal B) assembled bracket 16 www.aeg.com AB 3.
... sheath. 8.8 Assembly 1. 6. There must be connected to the network phase. 5. A 2. The cord clamp must always be no cut or stray strands of wire present. It must be correctly attached to the terminal which is marked with the letter 'E', or the earth symbol , or coloured green and yellow. 2. B A) supplied seal B) assembled bracket 16 www.aeg.com AB 3.
User Manual
Page 17
... cutout dimensions. 2. Attach the supplied seal stripe to let easy remove oven from the wall Depth Width minimum 50 mm 490 mm sum of all widths of hobs that the front edges of the hobs are on a blanket) with the bottom side up. 4. Than insert the connection bar into the worktop cutout. Space for connections Kitchen unit with oven The electrical connection of the glass ceramic...
... cutout dimensions. 2. Attach the supplied seal stripe to let easy remove oven from the wall Depth Width minimum 50 mm 490 mm sum of all widths of hobs that the front edges of the hobs are on a blanket) with the bottom side up. 4. Than insert the connection bar into the worktop cutout. Space for connections Kitchen unit with oven The electrical connection of the glass ceramic...
User Manual
Page 18
... POWER: Electric supply: Appliance category: Gas connection: Appliance class: Gas original: G20 (2H) 20 mbar = 4,5 kW Gas replacement: G30 (3+) 28-30 mbar = 327 g/h G31 (3+) 37 mbar = 321 g/h 220-240 V ~ 50/60 Hz II2H3+ R 1/2" 3 9.4 Gas burners for NATURAL GAS G20 20 mbar BURNER Double Crown burner NORMAL POWER kW MINIMUM POWER kW 4,5 1,42 INJECTOR MARK 150 9.5 Gas burners for LPG G30/G31 28-30/37 mbar BURNER NORMAL MINIMUM INJECTOR POWER kW POWER...
... POWER: Electric supply: Appliance category: Gas connection: Appliance class: Gas original: G20 (2H) 20 mbar = 4,5 kW Gas replacement: G30 (3+) 28-30 mbar = 327 g/h G31 (3+) 37 mbar = 321 g/h 220-240 V ~ 50/60 Hz II2H3+ R 1/2" 3 9.4 Gas burners for NATURAL GAS G20 20 mbar BURNER Double Crown burner NORMAL POWER kW MINIMUM POWER kW 4,5 1,42 INJECTOR MARK 150 9.5 Gas burners for LPG G30/G31 28-30/37 mbar BURNER NORMAL MINIMUM INJECTOR POWER kW POWER...
User Manual
Page 19
... the liquid starts to boil, turn down the flame to the size of burners. • Center the pot on the burner. • When you heat up water, use only the amount you need. • If it is possible, use of electrical and electronic appliances. ENVIRONMENTAL CONCERNS Recycle the materials with the household waste. Part 2-1 : Rational use a pressure cooker. Help protect the environment and...
... the liquid starts to boil, turn down the flame to the size of burners. • Center the pot on the burner. • When you heat up water, use only the amount you need. • If it is possible, use of electrical and electronic appliances. ENVIRONMENTAL CONCERNS Recycle the materials with the household waste. Part 2-1 : Rational use a pressure cooker. Help protect the environment and...


