Product Manual
Page 2
... you need to keep all your AEG appliances looking spotless and working perfectly. Please spend a few minutes reading to get the very best from bottle holders to delicate laundry bags... Visit the webshop at: www.aeg.com/shop 2 FOR PERFECT RESULTS Thank you for many years, with a wide range of accessories designed and built to the high...
... you need to keep all your AEG appliances looking spotless and working perfectly. Please spend a few minutes reading to get the very best from bottle holders to delicate laundry bags... Visit the webshop at: www.aeg.com/shop 2 FOR PERFECT RESULTS Thank you for many years, with a wide range of accessories designed and built to the high...
Product Manual
Page 3
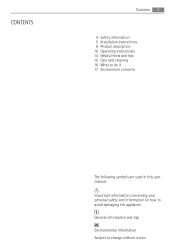
CONTENTS Contents 3 4 Safety information 5 Installation instructions 9 Product description 10 Operating instructions 14 Helpful hints and tips 15 Care and cleaning 16 What to do if... 17 Environment concerns The following symbols are used in this user manual: Important information concerning your personal safety and information on how to change without notice General information and tips Environmental information Subject to avoid damaging the appliance.
CONTENTS Contents 3 4 Safety information 5 Installation instructions 9 Product description 10 Operating instructions 14 Helpful hints and tips 15 Care and cleaning 16 What to do if... 17 Environment concerns The following symbols are used in this user manual: Important information concerning your personal safety and information on how to change without notice General information and tips Environmental information Subject to avoid damaging the appliance.
Product Manual
Page 4
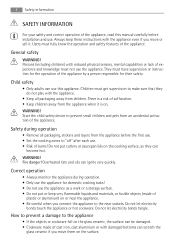
... appliance. Users must not use the appliance. General safety WARNING! WARNING! Do not put or keep these instructions with damaged bottoms can ignite very quickly. Do not let electricity bonds touch the appliance or hot cookware. ...use. • Set the cooking zones to the appliance • If the objects or cookware fall on the glass ceramic, the surface can use this manual carefully before installation and use the appliance for their safety. Safety during operation. • Only use . Do not let electricity bonds tangle. Children must have supervision or instruction...
... appliance. Users must not use the appliance. General safety WARNING! WARNING! Do not put or keep these instructions with damaged bottoms can ignite very quickly. Do not let electricity bonds touch the appliance or hot cookware. ...use. • Set the cooking zones to the appliance • If the objects or cookware fall on the glass ceramic, the surface can use this manual carefully before installation and use the appliance for their safety. Safety during operation. • Only use . Do not let electricity bonds tangle. Children must have supervision or instruction...
Product Manual
Page 5
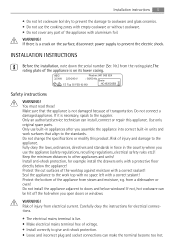
... not cover any part of the appliance from a dishwasher or oven! Installation instructions 5 • Do not let cookware boil dry to prevent the damage to cookware and glass ceramics. • Do not use the appliance (safety regulations, recycling regulations, electrical safety rules etc.)! INSTALLATION INSTRUCTIONS Before the installation, note down the serial number (Ser. You must read these! If it is live. • Make electrical mains terminal free...
... not cover any part of the appliance from a dishwasher or oven! Installation instructions 5 • Do not let cookware boil dry to prevent the damage to cookware and glass ceramics. • Do not use the appliance (safety regulations, recycling regulations, electrical safety rules etc.)! INSTALLATION INSTRUCTIONS Before the installation, note down the serial number (Ser. You must read these! If it is live. • Make electrical mains terminal free...
Product Manual
Page 6
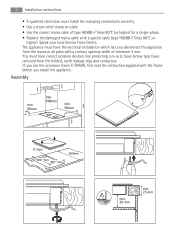
6 Installation instructions • A qualified electrician must install the clamping connections correctly. • Use a strain relief clamp on cable. • Use the correct mains cable of minimum 3 mm. You must have correct isolation devices: line protecting cut-outs, fuses (screw type fuses removed from the mains at all poles with a contact opening width of type H05BB-F Tmax 90°C (or higher) for a single-phase. • Replace the...
6 Installation instructions • A qualified electrician must install the clamping connections correctly. • Use a strain relief clamp on cable. • Use the correct mains cable of minimum 3 mm. You must have correct isolation devices: line protecting cut-outs, fuses (screw type fuses removed from the mains at all poles with a contact opening width of type H05BB-F Tmax 90°C (or higher) for a single-phase. • Replace the...

Product Manual
Page 7
... holes in the worktop cut out. min. 28 mm Installation instructions 7 • Seal the gap between the worktop and glass ceramic with silicone. • Put some soft surface, a blanket for example, with the scraper. The installation of more than one appliance Added parts:connection bar(s), heat resistant silicon, rubber shape, sealing strap. The worktop cut out Distance from the wall : minimum 50 mm Depth : 490...
... holes in the worktop cut out. min. 28 mm Installation instructions 7 • Seal the gap between the worktop and glass ceramic with silicone. • Put some soft surface, a blanket for example, with the scraper. The installation of more than one appliance Added parts:connection bar(s), heat resistant silicon, rubber shape, sealing strap. The worktop cut out Distance from the wall : minimum 50 mm Depth : 490...
Product Manual
Page 8
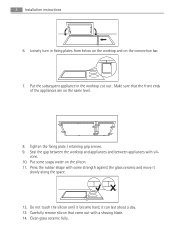
cone. 10. Carefully remove silicon that the front ends of the appliances are on the connection bar. 7. Make sure that came out with some soapy water on the silicon. 11. Clean glass ceramic fully. Loosely turn in the worktop cut out . Put the subsequent appliance in fixing plates ... screws. 9. Do not touch the silicon until it become hard, it slowly along the space. 12. Seal the gap between the worktop and appliances and between appliances with sili- Put some strength against the glass ceramic and move it can last about a day. 13. 8 Installation instructions 6.
cone. 10. Carefully remove silicon that the front ends of the appliances are on the connection bar. 7. Make sure that came out with some soapy water on the silicon. 11. Clean glass ceramic fully. Loosely turn in the worktop cut out . Put the subsequent appliance in fixing plates ... screws. 9. Do not touch the silicon until it become hard, it slowly along the space. 12. Seal the gap between the worktop and appliances and between appliances with sili- Put some strength against the glass ceramic and move it can last about a day. 13. 8 Installation instructions 6.
Product Manual
Page 9
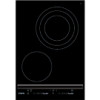
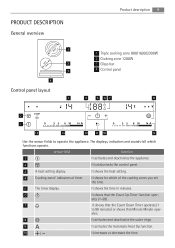
... the time. PRODUCT DESCRIPTION General overview 1 2 3 4 Control panel layout 3 mm145 12m0/m175/210 Product description 9 1 Triple cooking zone 800/1600/2300W 2 Cooking zone 1200W 3 Glass bar 4 Control panel 4 5 67 8 2 1 14 13 12 11 10 9 Use the sensor fields to 99 minutes) or shows that Minute Minder oper- It shows the heat setting. 4 Cooking zones' indicators of the cooking zones you set the time. 5 The timer...
... the time. PRODUCT DESCRIPTION General overview 1 2 3 4 Control panel layout 3 mm145 12m0/m175/210 Product description 9 1 Triple cooking zone 800/1600/2300W 2 Cooking zone 1200W 3 Glass bar 4 Control panel 4 5 67 8 2 1 14 13 12 11 10 9 Use the sensor fields to 99 minutes) or shows that Minute Minder oper- It shows the heat setting. 4 Cooking zones' indicators of the cooking zones you set the time. 5 The timer...
Product Manual
Page 10
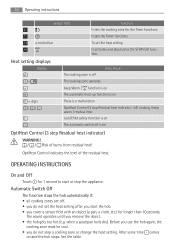
... OptiHeat Control (3 step Residual heat indicator): still cooking / keep warm / residual heat Lock/Child safety function is on The automatic switch off . • you start or stop a cooking zone or change the heat setting. Automatic Switch Off The function stops the hob automatically if: • all cooking zones are off is on and the hob stops. After some time comes on OptiHeat Control (3 step Residual heat indicator) WARNING...
... OptiHeat Control (3 step Residual heat indicator): still cooking / keep warm / residual heat Lock/Child safety function is on The automatic switch off . • you start or stop a cooking zone or change the heat setting. Automatic Switch Off The function stops the hob automatically if: • all cooking zones are off is on and the hob stops. After some time comes on OptiHeat Control (3 step Residual heat indicator) WARNING...

Product Manual
Page 11
... necessary. After 3 seconds comes on in the display). 2. play. Use the Count Down Timer to set how long the cooking zone operates for a cooking zone: 1. The Timer The Count Down Timer. Automatic Switch Off times Heat setting - You can get a necessary heat setting in the dis- To start the Automatic Heat Up function for only this one time. Touch ( comes...
... necessary. After 3 seconds comes on in the display). 2. play. Use the Count Down Timer to set how long the cooking zone operates for a cooking zone: 1. The Timer The Count Down Timer. Automatic Switch Off times Heat setting - You can get a necessary heat setting in the dis- To start the Automatic Heat Up function for only this one time. Touch ( comes...
Product Manual
Page 12
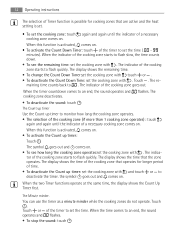
...heat setting is set. • To set the cooking zone: touch again and again until the indicator of the cooking zone starts to flash quickly. The Minute minder. When the time comes to 00 . When the two Timer functions operate at the same time, the display shows the Count Up Timer first. 12 Operating instructions...the sound operates and 00 flashes. The indicator of a necessary cooking zone comes on . • To see the remaining time: set the cooking zone with . Touch . The cooking zone deactivates. • To deactivate the sound: touch The Count up timer Use the Count up timer: ...
...heat setting is set. • To set the cooking zone: touch again and again until the indicator of the cooking zone starts to flash quickly. The Minute minder. When the time comes to 00 . When the two Timer functions operate at the same time, the display shows the Count Up Timer first. 12 Operating instructions...the sound operates and 00 flashes. The indicator of a necessary cooking zone comes on . • To see the remaining time: set the cooking zone with . Touch . The cooking zone deactivates. • To deactivate the sound: touch The Count up timer Use the Count up timer: ...
Product Manual
Page 13
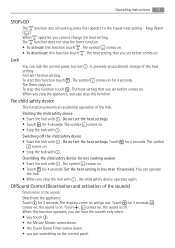
... Switching off . The symbol Overriding the child safety device for 4 seconds. The symbol comes on . You can lock the control panel, but not . Touch for 4 seconds. The function does not stop this function touch . Do not set before comes on . • Touch for one cooking ... hob with . Touch , comes on . When this function touch . Operating instructions 13 STOP+GO The function sets all cooking zones that you set the heat setting. Do not set the heat settings. • Touch for 4 seconds. Touch comes on the control panel. Set the heat setting in less than 10 seconds.
... Switching off . The symbol Overriding the child safety device for 4 seconds. The symbol comes on . You can lock the control panel, but not . Touch for 4 seconds. The function does not stop this function touch . Do not set before comes on . • Touch for one cooking ... hob with . Touch , comes on . When this function touch . Operating instructions 13 STOP+GO The function sets all cooking zones that you set the heat setting. Do not set the heat settings. • Touch for 4 seconds. Touch comes on the control panel. Set the heat setting in less than 10 seconds.

Product Manual
Page 14
...setting 1 Keep cooked foods warm as rice, stir milk dishes part way through Add a few tablespoons of liquid Use max. ¼ l water for guidance only. Energy saving • If possible, always put the lids on the cookware. • Put cookware on Add at least twice as much liquid as required... on cooking level and cooking time. comes on . The heating time reduction depends on glass ceramic surface. Examples of the cooking zone switches itself off . Touch for 3 seconds. HELPFUL HINTS AND TIPS Cookware • The bottom of the cookware must have the same dimension. ...
...setting 1 Keep cooked foods warm as rice, stir milk dishes part way through Add a few tablespoons of liquid Use max. ¼ l water for guidance only. Energy saving • If possible, always put the lids on the cookware. • Put cookware on Add at least twice as much liquid as required... on cooking level and cooking time. comes on . The heating time reduction depends on glass ceramic surface. Examples of the cooking zone switches itself off . Touch for 3 seconds. HELPFUL HINTS AND TIPS Cookware • The bottom of the cookware must have the same dimension. ...

Product Manual
Page 15
... glass surface at the lowest temperatures and do not clean the appliance with steam blasters or high-pressure cleaners. For your safety, do not brown food too much. Use a special cleaning agent for the glass . Use a special scraper for glass ceramic or stainless steel. 2. CARE AND CLEANING Clean the appliance after the appliance is sufficiently cool:limescale rings , water rings, fat stains, shiny metallic discolorations. Always use . Turn...
... glass surface at the lowest temperatures and do not clean the appliance with steam blasters or high-pressure cleaners. For your safety, do not brown food too much. Use a special cleaning agent for the glass . Use a special scraper for glass ceramic or stainless steel. 2. CARE AND CLEANING Clean the appliance after the appliance is sufficiently cool:limescale rings , water rings, fat stains, shiny metallic discolorations. Always use . Turn...
Product Manual
Page 16
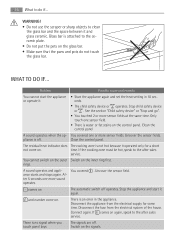
... control panel. Clean the control panel. The residual heat indicator does The cooking zone is an error in 10 seconds. • The child safety device or operates. rings. and number come on The automatic switch off . There is off operates. A sound operates and appliance starts and stops again. There is not hot because it and glass ceramic. Switch on . Connect again. Disconnect the appliance from the electrical...
... control panel. Clean the control panel. The residual heat indicator does The cooking zone is an error in 10 seconds. • The child safety device or operates. rings. and number come on The automatic switch off . There is off operates. A sound operates and appliance starts and stops again. There is not hot because it and glass ceramic. Switch on . Connect again. Disconnect the appliance from the electrical...

Product Manual
Page 17
... of the cooking surface) and an error message that this product may not be treated as household waste. Packaging material The packaging materials are in the corner of this product. The instructions about recycling of guarantee are friendly to your household waste disposal service or the shop where you will not be free of electrical and electronic...
... of the cooking surface) and an error message that this product may not be treated as household waste. Packaging material The packaging materials are in the corner of this product. The instructions about recycling of guarantee are friendly to your household waste disposal service or the shop where you will not be free of electrical and electronic...


