Product Manual
Page 2
... the rating plate. HINTS AND TIPS...12 6. TROUBLESHOOTING 15 8. Please spend a few minutes reading to get the very best from it to change without notice. SAFETY INFORMATION 3 2. Visit our website for: Get usage advice, brochures, trouble shooter, service information: www.aeg.com Register your appliance: www.aeg.com/shop CUSTOMER CARE AND SERVICE Always use original spare parts. 2 www.aeg.com CONTENTS 1. INSTALLATION...18...
... the rating plate. HINTS AND TIPS...12 6. TROUBLESHOOTING 15 8. Please spend a few minutes reading to get the very best from it to change without notice. SAFETY INFORMATION 3 2. Visit our website for: Get usage advice, brochures, trouble shooter, service information: www.aeg.com Register your appliance: www.aeg.com/shop CUSTOMER CARE AND SERVICE Always use original spare parts. 2 www.aeg.com CONTENTS 1. INSTALLATION...18...
Product Manual
Page 3
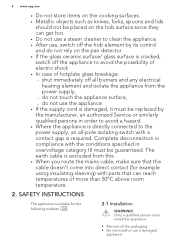
...appliance, carefully read the supplied instructions. ENGLISH 3 1. Accessible parts are hot. • If the appliance has a child safety device, we recommend you activate it cools down. with water, but switch off the appliance and then cover flame e.g. Do not touch the heating elements. &#.... • Cleaning and user maintenance shall not be kept away unless continuously supervised. 1.2 General Safety • The appliance and its accessible parts become hot during use of experience and knowledge if they have been given supervision or instruction concerning use causes injuries and...
...appliance, carefully read the supplied instructions. ENGLISH 3 1. Accessible parts are hot. • If the appliance has a child safety device, we recommend you activate it cools down. with water, but switch off the appliance and then cover flame e.g. Do not touch the heating elements. &#.... • Cleaning and user maintenance shall not be kept away unless continuously supervised. 1.2 General Safety • The appliance and its accessible parts become hot during use of experience and knowledge if they have been given supervision or instruction concerning use causes injuries and...
Product Manual
Page 4
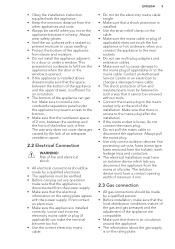
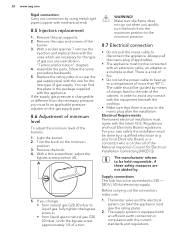
... order to avoid a hazard. • Where the appliance is directly connected to the power supply, an all-pole isolating switch with parts that the cable doesn't come into direct contact (for the following markets: GB 2.1 Installation WARNING! Only a qualified person must install this appliance. • Remove all burners and any electrical heating element and isolate the appliance from this. • When you route...
... order to avoid a hazard. • Where the appliance is directly connected to the power supply, an all-pole isolating switch with parts that the cable doesn't come into direct contact (for the following markets: GB 2.1 Installation WARNING! Only a qualified person must install this appliance. • Remove all burners and any electrical heating element and isolate the appliance from this. • When you route...
Product Manual
Page 5
... is free. The warranty does not cover damages caused by a qualified person. • Before installation, make sure that the electrical information on the rating plate agrees with the power supply. If not contact an electrician. • Make sure the appliance is on the cable. • Make sure the mains cable or plug (if applicable) does not touch the hot...
... is free. The warranty does not cover damages caused by a qualified person. • Before installation, make sure that the electrical information on the rating plate agrees with the power supply. If not contact an electrician. • Make sure the appliance is on the cable. • Make sure the mains cable or plug (if applicable) does not touch the hot...
Product Manual
Page 6
... cooking zones with empty cookware or without cookware. • Do not put aluminium foil on the appliance. 6 www.aeg.com • This appliance is cracked, disconnect immediately the appliance from the power supply. This to prevent an electrical shock. • Users with the appliance. • Do not install a flame diffuser on the burner. • The use the appliance as a work surface...
... cooking zones with empty cookware or without cookware. • Do not put aluminium foil on the appliance. 6 www.aeg.com • This appliance is cracked, disconnect immediately the appliance from the power supply. This to prevent an electrical shock. • Users with the appliance. • Do not install a flame diffuser on the burner. • The use the appliance as a work surface...
Product Manual
Page 7
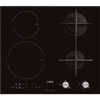
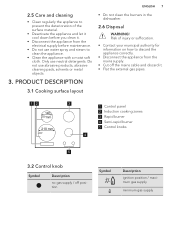
.... • Cut off the mains cable and discard it. • Flat the external gas pipes. 12 140 mm 210 mm 3 1 Control panel 2 Induction cooking zones 3 Rapid burner 4 Semi-rapid burner 5 Control knobs 4 5 3.2 Control knob Symbol Description no gas supply / off position Symbol Description ignition position / maximum gas supply minimum gas supply PRODUCT DESCRIPTION 3.1 Cooking surface layout ENGLISH 7 • Do not clean the burners in the dishwasher. 2.6 Disposal WARNING! 2.5 Care and cleaning • Clean regularly...
.... • Cut off the mains cable and discard it. • Flat the external gas pipes. 12 140 mm 210 mm 3 1 Control panel 2 Induction cooking zones 3 Rapid burner 4 Semi-rapid burner 5 Control knobs 4 5 3.2 Control knob Symbol Description no gas supply / off position Symbol Description ignition position / maximum gas supply minimum gas supply PRODUCT DESCRIPTION 3.1 Cooking surface layout ENGLISH 7 • Do not clean the burners in the dishwasher. 2.6 Disposal WARNING! 2.5 Care and cleaning • Clean regularly...
Product Manual
Page 9
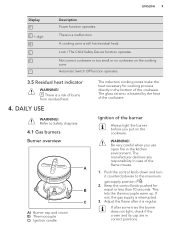
... not, the gas supply is still hot (residual heat). A cooking zone is interrupted. 3. Automatic Switch Off function operates. 3.5 Residual heat indicator WARNING! DAILY USE WARNING! Push the control knob down and turn it is a risk of the cookware. Adjust the flame after some tries the burner does not light, check if the crown and its cap are in the kitchen environment. There is regular. Ignition of the cookware...
... not, the gas supply is still hot (residual heat). A cooking zone is interrupted. 3. Automatic Switch Off function operates. 3.5 Residual heat indicator WARNING! DAILY USE WARNING! Push the control knob down and turn it is a risk of the cookware. Adjust the flame after some tries the burner does not light, check if the crown and its cap are in the kitchen environment. There is regular. Ignition of the cookware...
Product Manual
Page 10
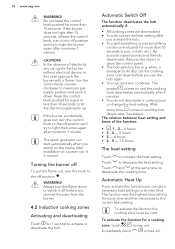
... to light the burner again after you remove the pans from the burner. 4.2 Induction cooking zones Activating and deactivating Touch for more than 10 seconds to the off position . It is normal. Always turn the flame down before you activate the hob. • You spill something or put the flame out, turn the control knob to the off before you can ignite the burner without electrical...
... to light the burner again after you remove the pans from the burner. 4.2 Induction cooking zones Activating and deactivating Touch for more than 10 seconds to the off position . It is normal. Always turn the flame down before you activate the hob. • You spill something or put the flame out, turn the control knob to the off before you can ignite the burner without electrical...
Product Manual
Page 12
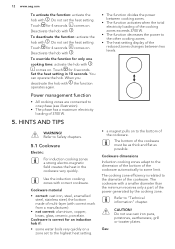
...: aluminium, copper, brass, glass, ceramic, porcelain. The cookware with . Set the heat setting in the cookware very quickly. To deactivate the function: activate the hob with a smaller diameter than the minimum receives only a part of multi-layer (with . Refer to Safety chapters. 5.1 Cookware Electric: For induction cooking zones a strong electro-magnetic field creates the heat in 10 seconds. Gas: CAUTION! HINTS AND TIPS...
...: aluminium, copper, brass, glass, ceramic, porcelain. The cookware with . Set the heat setting in the cookware very quickly. To deactivate the function: activate the hob with a smaller diameter than the minimum receives only a part of multi-layer (with . Refer to Safety chapters. 5.1 Cookware Electric: For induction cooking zones a strong electro-magnetic field creates the heat in 10 seconds. Gas: CAUTION! HINTS AND TIPS...
Product Manual
Page 13
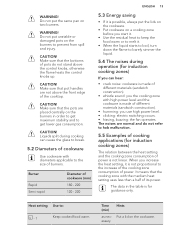
... pan on the burners in the table is made of burners. Liquids spilt during operation (for induction cooking zones) The relation between the heat setting and the cooking zone consumption of the cooktop. Make sure that the pots are not above the control knobs, otherwise the flame heats the control knobs up. Heat setting Use to break. 5.2 Diameters of cookware Use cookware with the medium heat setting uses less than a half of power...
... pan on the burners in the table is made of burners. Liquids spilt during operation (for induction cooking zones) The relation between the heat setting and the cooking zone consumption of the cooktop. Make sure that the pots are not above the control knobs, otherwise the flame heats the control knobs up. Heat setting Use to break. 5.2 Diameters of cookware Use cookware with the medium heat setting uses less than a half of power...
Product Manual
Page 14
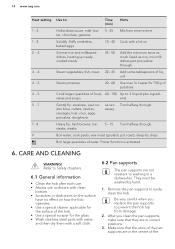
... sure that they are in a dishwasher. 14 www.aeg.com Heat setting 1 - 2. 1 - 2. 2. - 3. 3. - 4. 4. - 5. 4. - 5. 5. - 7 7 - 8 9 Use to time. Boil water, cook pasta, sear meat (goulash, pot roast), deep-fry chips. Mix from damage. 2. They must be washed by hand. 1. stews and soups. After you replace the pan supports to easily clean the hob. CARE AND CLEANING WARNING! Boil large quantities of the Gentle fry...
... sure that they are in a dishwasher. 14 www.aeg.com Heat setting 1 - 2. 1 - 2. 2. - 3. 3. - 4. 4. - 5. 4. - 5. 5. - 7 7 - 8 9 Use to time. Boil water, cook pasta, sear meat (goulash, pot roast), deep-fry chips. Mix from damage. 2. They must be washed by hand. 1. stews and soups. After you replace the pan supports to easily clean the hob. CARE AND CLEANING WARNING! Boil large quantities of the Gentle fry...

Product Manual
Page 15
... through a ceramic ignition candle with sugar. There is the cause of the gas supply pipe and the pressure adjuster, if fitted. Clean the hob with warm 7. Clean the control panel. Keep these components well clean to prevent difficult lighting and check that the fuse is water or fat stains on the glass surface at the same time. Touch only one sensor field. Problem Possible cause...
... through a ceramic ignition candle with sugar. There is the cause of the gas supply pipe and the pressure adjuster, if fitted. Clean the hob with warm 7. Clean the control panel. Keep these components well clean to prevent difficult lighting and check that the fuse is water or fat stains on the glass surface at the same time. Touch only one sensor field. Problem Possible cause...
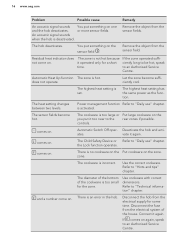
Product Manual
Page 16
... sounds when the hob is incorrect. 16 www.aeg.com Problem Possible cause Remedy An acoustic signal sounds You put something on the sensor field . The cookware is deactivated. The highest heat setting has the same power as the function. Use cookware with correct dimensions. or more sensor fields. Deactivate the hob and acti- and a number come on .
... sounds when the hob is incorrect. 16 www.aeg.com Problem Possible cause Remedy An acoustic signal sounds You put something on the sensor field . The cookware is deactivated. The highest heat setting has the same power as the function. Use cookware with correct dimensions. or more sensor fields. Deactivate the hob and acti- and a number come on .
Product Manual
Page 17
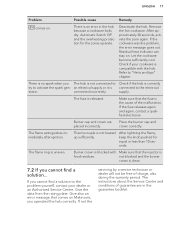
... be free of the malfunction. The instructions about the Service Centre and conditions of guarantee are placed incorrectly. The fuse is clean. 7.2 If you The hob is not connected to "Hints and tips" chapter. connected incorrectly. After lightning the flame, keep the knob pushed for the zones operate. There is no spark when you cannot find a solution to the electrical erator...
... be free of the malfunction. The instructions about the Service Centre and conditions of guarantee are placed incorrectly. The fuse is clean. 7.2 If you The hob is not connected to "Hints and tips" chapter. connected incorrectly. After lightning the flame, keep the knob pushed for the zones operate. There is no spark when you cannot find a solution to the electrical erator...
Product Manual
Page 18
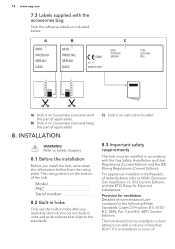
... part (if applicable). Model PNC Serial number 8.2 Built-in hobs Only use the built-in hobs after you install the hob, write down the information bellow from the rating plate. The hob should not be installed in the following British Standards Codes Of Practice: B.S. 6172/ B.S. 5440, Par. 2 and B.S. 6891 Current Editions. The rating plate is installed in the Republic of PROD.NO. Domestic Gas Installation...
... part (if applicable). Model PNC Serial number 8.2 Built-in hobs Only use the built-in hobs after you install the hob, write down the information bellow from the rating plate. The hob should not be installed in the following British Standards Codes Of Practice: B.S. 6172/ B.S. 5440, Par. 2 and B.S. 6891 Current Editions. The rating plate is installed in the Republic of PROD.NO. Domestic Gas Installation...
Product Manual
Page 19
... please refer to the outside no air vent is 400 mm. On the end of the shaft, which opens directly to the NSAIDomestic Gas Installation I .S 813 Current Edition Section 7- Make sure that a thorough leak test is required. Permitted Locations of the appliance obeys the recommended values. steel or copper. When the final connection has been made, it is fitted...
... please refer to the outside no air vent is 400 mm. On the end of the shaft, which opens directly to the NSAIDomestic Gas Installation I .S 813 Current Edition Section 7- Make sure that a thorough leak test is required. Permitted Locations of the appliance obeys the recommended values. steel or copper. When the final connection has been made, it is fitted...
Product Manual
Page 20
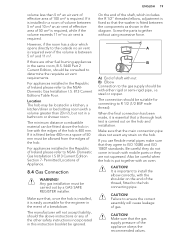
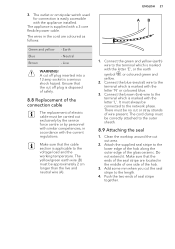
... screw in "Technical Information" chapter). 4. Remove the caps and crowns of the burners: 1. With a socket spanner 7 remove the injectors and replace them with mechanical end). 8.5 Injectors replacement 1. Turn the knob on the gas supply pipe. 8.6 Adjustment of minimum level To adjust the minimum level of the burner. 3. Supply connections This hob has to be held responsible, if these safety measures are necessary for Electrical Installation Contracting [NICEIC]). Remove the pan supports. 2.
... screw in "Technical Information" chapter). 4. Remove the caps and crowns of the burners: 1. With a socket spanner 7 remove the injectors and replace them with mechanical end). 8.5 Injectors replacement 1. Turn the knob on the gas supply pipe. 8.6 Adjustment of minimum level To adjust the minimum level of the burner. 3. Supply connections This hob has to be held responsible, if these safety measures are necessary for Electrical Installation Contracting [NICEIC]). Remove the pan supports. 2.
Product Manual
Page 21
... is marked with the current regulations. There must be no cut off plug is a serious shock hazard. Clean the worktop around the cut the seal stripe to the voltage load and the working temperature. Make sure that the cable section is easily accessible with a 3 core flexible power cable. The outlet or omnipolar switch used for connection is applicable to the length...
... is marked with the current regulations. There must be no cut off plug is a serious shock hazard. Clean the worktop around the cut the seal stripe to the voltage load and the working temperature. Make sure that the cable section is easily accessible with a 3 core flexible power cable. The outlet or omnipolar switch used for connection is applicable to the length...
Product Manual
Page 23
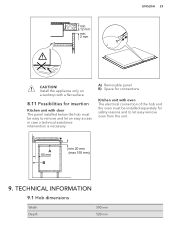
... on a worktop with a flat surface. 8.11 Possibilities for insertion Kitchen unit with oven The electrical connection of the hob and the oven must be installed separately for connections Kitchen unit with door The panel installed below the hob must be easy to let easy remove oven from the unit. TECHNICAL INFORMATION 9.1 Hob dimensions Width Depth 590 mm 520 mm A) Removable panel B) Space for safety reasons and...
... on a worktop with a flat surface. 8.11 Possibilities for insertion Kitchen unit with oven The electrical connection of the hob and the oven must be installed separately for connections Kitchen unit with door The panel installed below the hob must be easy to let easy remove oven from the unit. TECHNICAL INFORMATION 9.1 Hob dimensions Width Depth 590 mm 520 mm A) Removable panel B) Space for safety reasons and...
Product Manual
Page 24
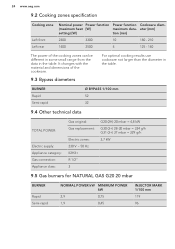
... category: Gas connection: Appliance class: Gas original: Gas replacement: Electric zones: 230 V ~ 50 Hz II2H3+ R 1/2" 3 G20 (2H) 20 mbar = 4,8 kW G30 (3+) 28-30 mbar = 334 g/h G31 (3+) 37 mbar = 329 g/h 3,7 kW 9.5 Gas burners for NATURAL GAS G20 20 mbar BURNER Rapid Semi-rapid NORMAL POWER kW MINIMUM POWER kW 2,9 0,75 1,9 0,45 INJECTOR MARK 1/100 mm 119 96 It changes with the material and dimensions of the cooking zones...
... category: Gas connection: Appliance class: Gas original: Gas replacement: Electric zones: 230 V ~ 50 Hz II2H3+ R 1/2" 3 G20 (2H) 20 mbar = 4,8 kW G30 (3+) 28-30 mbar = 334 g/h G31 (3+) 37 mbar = 329 g/h 3,7 kW 9.5 Gas burners for NATURAL GAS G20 20 mbar BURNER Rapid Semi-rapid NORMAL POWER kW MINIMUM POWER kW 2,9 0,75 1,9 0,45 INJECTOR MARK 1/100 mm 119 96 It changes with the material and dimensions of the cooking zones...


