Product Manual
Page 2
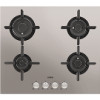
... might not find on the rating plate. TROUBLESHOOTING 10 8. We have the following data available: Model, PNC, Serial Number. PRODUCT DESCRIPTION 7 4. INSTALLATION...11 9. Visit our website for: Get usage advice, brochures, trouble shooter, service information: www.aeg.com Register your appliance: www.aeg.com/shop CUSTOMER CARE AND SERVICE Always use original spare parts. DAILY USE...7 5. CARE AND CLEANING 9 7. When contacting our Authorised Service Centre, ensure that help make...
... might not find on the rating plate. TROUBLESHOOTING 10 8. We have the following data available: Model, PNC, Serial Number. PRODUCT DESCRIPTION 7 4. INSTALLATION...11 9. Visit our website for: Get usage advice, brochures, trouble shooter, service information: www.aeg.com Register your appliance: www.aeg.com/shop CUSTOMER CARE AND SERVICE Always use original spare parts. DAILY USE...7 5. CARE AND CLEANING 9 7. When contacting our Authorised Service Centre, ensure that help make...
Product Manual
Page 3
ENGLISH 3 1. Do not touch the heating elements. • Do not operate the appliance by means of the appliance, carefully read the supplied instructions. SAFETY INFORMATION Before the installation and use of an external timer or separate remote-control system. • Unattended cooking on a hob with fat or oil can be used by children without supervision. • Children of the appliance...
ENGLISH 3 1. Do not touch the heating elements. • Do not operate the appliance by means of the appliance, carefully read the supplied instructions. SAFETY INFORMATION Before the installation and use of an external timer or separate remote-control system. • Unattended cooking on a hob with fat or oil can be used by children without supervision. • Children of the appliance...
Product Manual
Page 4
... conditions specified in overvoltage category III must be replaced by the manufacturer, an authorized Service or similarly qualified persons in order to avoid a hazard. • Where the appliance is directly connected to the power supply, an all the packaging. • Do not install or use a damaged appliance. • Obey the installation instruction supplied with a sealant to prevent moisture to...
... conditions specified in overvoltage category III must be replaced by the manufacturer, an authorized Service or similarly qualified persons in order to avoid a hazard. • Where the appliance is directly connected to the power supply, an all the packaging. • Do not install or use a damaged appliance. • Obey the installation instruction supplied with a sealant to prevent moisture to...
Product Manual
Page 5
Always pull the mains plug. ENGLISH 5 • Use only correct isolation devices: line protecting cut-outs, fuses (screw type fuses removed from the holder), earth leakage trips and contactors. • The electrical installation must have a contact opening width of minimum 3 mm. 2.3 Gas connection • All gas connections should be made by a qualified electrician. • The appliance must be earthed. • Before carrying out any operation make...
Always pull the mains plug. ENGLISH 5 • Use only correct isolation devices: line protecting cut-outs, fuses (screw type fuses removed from the holder), earth leakage trips and contactors. • The electrical installation must have a contact opening width of minimum 3 mm. 2.3 Gas connection • All gas connections should be made by a qualified electrician. • The appliance must be earthed. • Before carrying out any operation make...

Product Manual
Page 6
... the minimum position. • Use only the accessories supplied with the appliance. • Do not install a flame diffuser on the burner. • The use of a gas cooking appliance results in , near or on the burners. • Make sure the flame does not go out when you quickly turn the knob from the electrical supply before you clean it . • Flat the external gas pipes. 2.7 Service • To repair...
... the minimum position. • Use only the accessories supplied with the appliance. • Do not install a flame diffuser on the burner. • The use of a gas cooking appliance results in , near or on the burners. • Make sure the flame does not go out when you quickly turn the knob from the electrical supply before you clean it . • Flat the external gas pipes. 2.7 Service • To repair...
Product Manual
Page 7
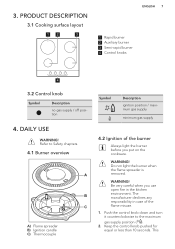
...! WARNING! Be very careful when you put on the cookware. Push the control knob down and turn it counterclockwise to Safety chapters. 4.1 Burner overview A B C A) Flame spreader B) Ignition candle C) Thermocouple Symbol Description ignition position / maximum gas supply minimum gas supply 4.2 Ignition of the burner Always light the burner before you use open fire in case of the flame misuse. 1. WARNING! 3. This Do not light the burner when the flame spreader is removed.
...! WARNING! Be very careful when you put on the cookware. Push the control knob down and turn it counterclockwise to Safety chapters. 4.1 Burner overview A B C A) Flame spreader B) Ignition candle C) Thermocouple Symbol Description ignition position / maximum gas supply minimum gas supply 4.2 Ignition of the burner Always light the burner before you use open fire in case of the flame misuse. 1. WARNING! 3. This Do not light the burner when the flame spreader is removed.
Product Manual
Page 8
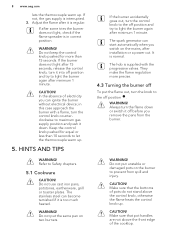
... too much heated. WARNING! CAUTION! in correct position. Refer to prevent from the burner. Do not use cast iron pans, potstones, earthenware, grill or toaster plates. The hob is interrupted. 3. CAUTION! 8 www.aeg.com lets the thermocouple warm up . 5. Adjust the flame after minimum 1 minute. WARNING! They make the flame regulation more than 10 seconds to light the burner again after installation or a power cut. CAUTION...
... too much heated. WARNING! CAUTION! in correct position. Refer to prevent from the burner. Do not use cast iron pans, potstones, earthenware, grill or toaster plates. The hob is interrupted. 3. CAUTION! 8 www.aeg.com lets the thermocouple warm up . 5. Adjust the flame after minimum 1 minute. WARNING! They make the flame regulation more than 10 seconds to light the burner again after installation or a power cut. CAUTION...
Product Manual
Page 9
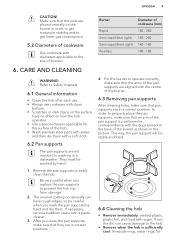
...Remove when the hob is positioned in correspondence with the grips placed at the base of the burner as shown in order to get maximum stability and to get lower gas consumption. 5.2 Diameters of cookware Use cookware with diameters applicable to the size of the hob. • Wash stainless steel parts with a soft cloth. 6.2 Pan supports The pan supports... the burner. 6.3 Removing pan supports After cleaning hobs, make sure that pan supports are in correct positions. For the burner to Safety chapters. 6.1 General information • Clean the hob after each use. • Always use cookware...
...Remove when the hob is positioned in correspondence with the grips placed at the base of the burner as shown in order to get maximum stability and to get lower gas consumption. 5.2 Diameters of cookware Use cookware with diameters applicable to the size of the hob. • Wash stainless steel parts with a soft cloth. 6.2 Pan supports The pan supports... the burner. 6.3 Removing pan supports After cleaning hobs, make sure that pan supports are in correct positions. For the burner to Safety chapters. 6.1 General information • Clean the hob after each use. • Always use cookware...
Product Manual
Page 10
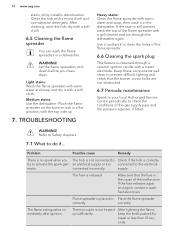
... and non-abrasive detergent. WARNING! The fuse is correctly try to activate the spark gen- Place the flame spreader correctly. Let the flame spreaders cool down before you The hob is not connected to the electrical erator. TROUBLESHOOTING Heavy stains: Clean the flame spreader with a grill cleaner and run through a ceramic ignition candle with a metal electrode. Problem Possible cause Remedy There is no...
... and non-abrasive detergent. WARNING! The fuse is correctly try to activate the spark gen- Place the flame spreader correctly. Let the flame spreaders cool down before you The hob is not connected to the electrical erator. TROUBLESHOOTING Heavy stains: Clean the flame spreader with a grill cleaner and run through a ceramic ignition candle with a metal electrode. Problem Possible cause Remedy There is no...
Product Manual
Page 11
INSTALLATION WARNING! Model PNC Serial number 8.2 Important safety requirements This hob must be free of charge, also during the warranty period. Remedy Make sure that the flame spreader is clean. 7.2 If you install the hob, write down the information bellow from the rating plate. TYPE PROD.NO. SER.NO. The rating plate is uneven. If not the servicing by a service technician or dealer will not be...
INSTALLATION WARNING! Model PNC Serial number 8.2 Important safety requirements This hob must be free of charge, also during the warranty period. Remedy Make sure that the flame spreader is clean. 7.2 If you install the hob, write down the information bellow from the rating plate. TYPE PROD.NO. SER.NO. The rating plate is uneven. If not the servicing by a service technician or dealer will not be...
Product Manual
Page 12
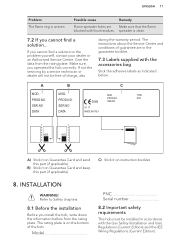
... directly to the gas supply should the above the hob in line with an oven. For appliances installed in the Republic of Ireland please refer to determine the requisite air vent requirements. The minimum distance combustible material can be consulted to the NSAIDomestic Gas Installation I.S. 813 Current Editions Table Four. Screw the parts together without using excessive force. Provision for connecting to NSAI- Permitted Locations...
... directly to the gas supply should the above the hob in line with an oven. For appliances installed in the Republic of Ireland please refer to determine the requisite air vent requirements. The minimum distance combustible material can be consulted to the NSAIDomestic Gas Installation I.S. 813 Current Editions Table Four. Screw the parts together without using excessive force. Provision for connecting to NSAI- Permitted Locations...
Product Manual
Page 13
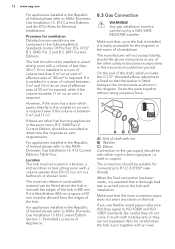
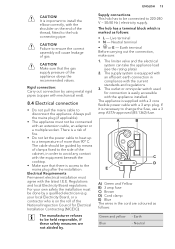
... the power cable to heat up to a temperature of gas. Make sure that there is on the end of the cabinet, in order to avoid any contact with mechanical end). 8.4 Electrical connection • Do not pull the mains cable to the hob connecting pipe. The cable should be guided by a qualified electrician (e.g. The outlet or omnipolar switch used for Electrical Installation Contracting...
... the power cable to heat up to a temperature of gas. Make sure that there is on the end of the cabinet, in order to avoid any contact with mechanical end). 8.4 Electrical connection • Do not pull the mains cable to the hob connecting pipe. The cable should be guided by a qualified electrician (e.g. The outlet or omnipolar switch used for Electrical Installation Contracting...
Product Manual
Page 14
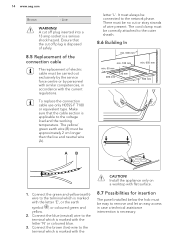
... must be correctly attached to remove and let an easy access in accordance with the current regulations. Install the appliance only on a worktop with the CAUTION! AB letter 'L'. To replace the connection cable use only H05SS-F T180 or equivalent type. Connect the brown (live and neutral wire (A). 14 www.aeg.com Brown - Connect the blue (neutral) wire to the terminal which is...
... must be correctly attached to remove and let an easy access in accordance with the current regulations. Install the appliance only on a worktop with the CAUTION! AB letter 'L'. To replace the connection cable use only H05SS-F T180 or equivalent type. Connect the brown (live and neutral wire (A). 14 www.aeg.com Brown - Connect the blue (neutral) wire to the terminal which is...
Product Manual
Page 15
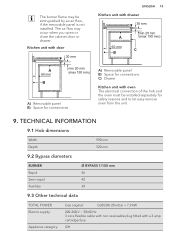
... mm (max 150 mm) A) Removable panel B) Space for connections A) Removable panel B) Space for safety reasons and to let easy remove oven from the unit. 9. TECHNICAL INFORMATION 9.1 Hob dimensions Width Depth 9.2 Bypass diameters 590 mm 520 mm BURNER Rapid Semi-rapid Auxiliary Ø BYPASS 1/100 mm 56 42 34 9.3 Other technical data TOTAL POWER: Electric supply: Appliance category: Gas original: G20 (2H) 20...
... mm (max 150 mm) A) Removable panel B) Space for connections A) Removable panel B) Space for safety reasons and to let easy remove oven from the unit. 9. TECHNICAL INFORMATION 9.1 Hob dimensions Width Depth 9.2 Bypass diameters 590 mm 520 mm BURNER Rapid Semi-rapid Auxiliary Ø BYPASS 1/100 mm 56 42 34 9.3 Other technical data TOTAL POWER: Electric supply: Appliance category: Gas original: G20 (2H) 20...
Product Manual
Page 16
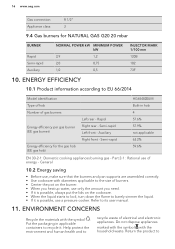
... it is possible, use , make sure that the burners and pan supports are assembled correctly. • Use cookware with diameters applicable to recycle waste of burners. • Center the pot on the burner. • When you heat up water, use of gas burners Energy efficiency per gas burner (EE gas burner) Energy efficiency for NATURAL GAS G20 20 mbar BURNER Rapid Semi-rapid Auxiliary NORMAL POWER kW MINIMUM POWER kW 2,9 1,2 2,0 0,75...
... it is possible, use , make sure that the burners and pan supports are assembled correctly. • Use cookware with diameters applicable to recycle waste of burners. • Center the pot on the burner. • When you heat up water, use of gas burners Energy efficiency per gas burner (EE gas burner) Energy efficiency for NATURAL GAS G20 20 mbar BURNER Rapid Semi-rapid Auxiliary NORMAL POWER kW MINIMUM POWER kW 2,9 1,2 2,0 0,75...


