Specification Sheet
Page 1
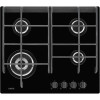
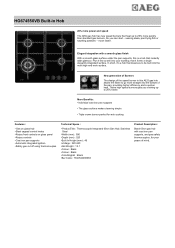
...% more power and speed The AEG gas hob has new speed burners that instantly adds glamour. Elegant integration with cast iron pan supports, and gas safety thermocouples, for wok cooking Features : • Gas on glass hob •Steel capped control knobs •Rotary front controls on glass panel •Rotary controls •Cast iron pan supports •Automatic integrated ignition •Safety gas cut off using thermocouples Technical Specs : • ProductTitle : Thermocouple Integrated 60cm Gas Hob, Stainless Steel •...
...% more power and speed The AEG gas hob has new speed burners that instantly adds glamour. Elegant integration with cast iron pan supports, and gas safety thermocouples, for wok cooking Features : • Gas on glass hob •Steel capped control knobs •Rotary front controls on glass panel •Rotary controls •Cast iron pan supports •Automatic integrated ignition •Safety gas cut off using thermocouples Technical Specs : • ProductTitle : Thermocouple Integrated 60cm Gas Hob, Stainless Steel •...
User Manual
Page 2
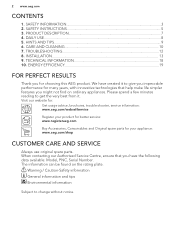
..., trouble shooter, service information: www.aeg.com/webselfservice Register your product for better service: www.registeraeg.com Buy Accessories, Consumables and Original spare parts for your appliance: www.aeg.com/shop CUSTOMER CARE AND SERVICE Always use original spare parts. DAILY USE...8 5. 2 www.aeg.com CONTENTS 1. HINTS AND TIPS...9 6. Please spend a few minutes reading to get the very best from it to change without notice. TROUBLESHOOTING...
..., trouble shooter, service information: www.aeg.com/webselfservice Register your product for better service: www.registeraeg.com Buy Accessories, Consumables and Original spare parts for your appliance: www.aeg.com/shop CUSTOMER CARE AND SERVICE Always use original spare parts. DAILY USE...8 5. 2 www.aeg.com CONTENTS 1. HINTS AND TIPS...9 6. Please spend a few minutes reading to get the very best from it to change without notice. TROUBLESHOOTING...
User Manual
Page 3
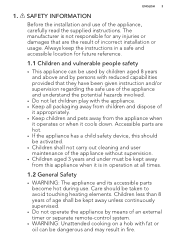
...; Keep all times. 1.2 General Safety • WARNING: The appliance and its accessible parts become hot during use of incorrect installation or usage. Care should be activated. • Children shall not carry out cleaning and user maintenance of the appliance without ...control system. • WARNING: Unattended cooking on a hob with fat or oil can be taken to avoid touching heating elements. ENGLISH 3 1. Accessible parts are the result of the appliance, carefully read the supplied instructions. The manufacturer is in fire. SAFETY INFORMATION Before the installation and use...
...; Keep all times. 1.2 General Safety • WARNING: The appliance and its accessible parts become hot during use of incorrect installation or usage. Care should be activated. • Children shall not carry out cleaning and user maintenance of the appliance without ...control system. • WARNING: Unattended cooking on a hob with fat or oil can be taken to avoid touching heating elements. ENGLISH 3 1. Accessible parts are the result of the appliance, carefully read the supplied instructions. The manufacturer is in fire. SAFETY INFORMATION Before the installation and use...

User Manual
Page 4
shut immediately off all -pole isolating switch with a contact gap is directly connected to the power supply, an all burners and any electrical heating element and isolate the appliance from this. • When you route the mains cable, make sure that the cable doesn't come into direct contact (for example using insulating sleeving) with a lid or a fire blanket. • CAUTION: The cooking process...
shut immediately off all -pole isolating switch with a contact gap is directly connected to the power supply, an all burners and any electrical heating element and isolate the appliance from this. • When you route the mains cable, make sure that the cable doesn't come into direct contact (for example using insulating sleeving) with a lid or a fire blanket. • CAUTION: The cooking process...

User Manual
Page 5
... the installation instruction supplied with the underside of the hob, an intermediate protection panel must be fitted. • Plywood or kitchen carcass material is acceptable for the panel. • The panel must be removed without tools. • Connect the mains plug to the mains cable. Screws used to come in direct contact with the appliance. • Keep the minimum distance from the power...
... the installation instruction supplied with the underside of the hob, an intermediate protection panel must be fitted. • Plywood or kitchen carcass material is acceptable for the panel. • The panel must be removed without tools. • Connect the mains plug to the mains cable. Screws used to come in direct contact with the appliance. • Keep the minimum distance from the power...
User Manual
Page 6
... hot. • Do not operate the appliance with wet hands or when it may splash. Keep flames or heated objects away from the mains at a lower temperature than the dimensions of combustion. Always pull the mains plug. • Use only correct isolation devices: line protecting cut-outs, fuses (screw type fuses removed from the holder), earth leakage trips and contactors. • The electrical installation...
... hot. • Do not operate the appliance with wet hands or when it may splash. Keep flames or heated objects away from the mains at a lower temperature than the dimensions of combustion. Always pull the mains plug. • Use only correct isolation devices: line protecting cut-outs, fuses (screw type fuses removed from the holder), earth leakage trips and contactors. • The electrical installation...
User Manual
Page 7
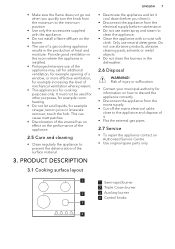
... appliance. 2.5 Care and cleaning • Clean regularly the appliance to the minimum position. • Use only the accessories supplied with a moist soft cloth. Provide good ventilation in the room where the appliance is installed. • Prolonged intensive use neutral detergents. PRODUCT DESCRIPTION 3.1 Cooking surface layout ENGLISH 7 • Deactivate the appliance and let it cool down before you quickly turn the knob from...
... appliance. 2.5 Care and cleaning • Clean regularly the appliance to the minimum position. • Use only the accessories supplied with a moist soft cloth. Provide good ventilation in the room where the appliance is installed. • Prolonged intensive use neutral detergents. PRODUCT DESCRIPTION 3.1 Cooking surface layout ENGLISH 7 • Deactivate the appliance and let it cool down before you quickly turn the knob from...
User Manual
Page 8
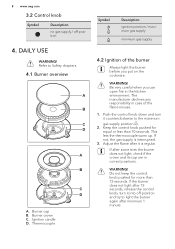
... gas supply position ( ). 2. Burner cap B. WARNING! Keep the control knob pushed for more than 10 seconds. Adjust the flame after some tries the burner does not light, check if the crown and its cap are in the kitchen environment. Do not keep the control knob pushed for equal or less than 15 seconds. Thermocouple Symbol Description ignition position / maximum gas supply minimum gas supply 4.2 Ignition of the flame misuse. 1. Burner...
... gas supply position ( ). 2. Burner cap B. WARNING! Keep the control knob pushed for more than 10 seconds. Adjust the flame after some tries the burner does not light, check if the crown and its cap are in the kitchen environment. Do not keep the control knob pushed for equal or less than 15 seconds. Thermocouple Symbol Description ignition position / maximum gas supply minimum gas supply 4.2 Ignition of the flame misuse. 1. Burner...
User Manual
Page 9
... refit the grate of the Triple Crown burner, make sure to match the hollow part of electricity you can start automatically when you refit the wok stand, make the flame regulation more precise. 4.3 Turning the burner off position . 5. If the burner accidentally goes out, turn the control knob counterclockwise to light the burner again after installation or a power cut. It is supplied with the progressive valves. Use the wok stand on...
... refit the grate of the Triple Crown burner, make sure to match the hollow part of electricity you can start automatically when you refit the wok stand, make the flame regulation more precise. 4.3 Turning the burner off position . 5. If the burner accidentally goes out, turn the control knob counterclockwise to light the burner again after installation or a power cut. It is supplied with the progressive valves. Use the wok stand on...
User Manual
Page 10
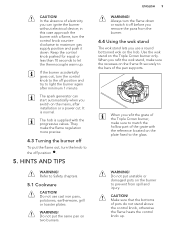
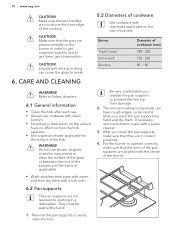
... glass to clean the surface of the glass or between the rims of the cooktop. 10 www.aeg.com CAUTION! Liquids spilt during cooking can have no effect on the burner in a dishwasher. Remove the pan supports to the size of cookware (mm) 180 - 260 120 - 220 80 - 180 WARNING! CAUTION! WARNING! Refer to Safety chapters. 6.1 General information • Clean the hob after each use...
... glass to clean the surface of the glass or between the rims of the cooktop. 10 www.aeg.com CAUTION! Liquids spilt during cooking can have no effect on the burner in a dishwasher. Remove the pan supports to the size of cookware (mm) 180 - 260 120 - 220 80 - 180 WARNING! CAUTION! WARNING! Refer to Safety chapters. 6.1 General information • Clean the hob after each use...
User Manual
Page 11
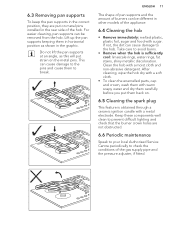
... to avoid burns. • Remove when the hob is obtained through a ceramic ignition candle with a moist cloth and non-abrasive detergent. 6.3 Removing pan supports To keep the pan supports in the correct position, they are not obstructed. 6.6 Periodic maintenance Speak to your local Authorised Service Centre periodically to check the conditions of the gas supply pipe and the pressure adjuster, if fitted.
... to avoid burns. • Remove when the hob is obtained through a ceramic ignition candle with a moist cloth and non-abrasive detergent. 6.3 Removing pan supports To keep the pan supports in the correct position, they are not obstructed. 6.6 Periodic maintenance Speak to your local Authorised Service Centre periodically to check the conditions of the gas supply pipe and the pressure adjuster, if fitted.
User Manual
Page 12
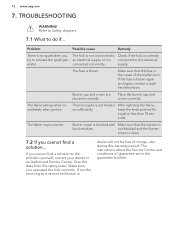
... food residues. The fuse is uneven. Place the burner cap and crown correctly. The flame ring is blown. If you cannot find a solution to activate the spark gen- The instructions about the Service Centre and conditions of charge, also during the warranty period. If the fuse is not heated up sufficiently. After lightning the flame, keep the knob pushed for equal or...
... food residues. The fuse is uneven. Place the burner cap and crown correctly. The flame ring is blown. If you cannot find a solution to activate the spark gen- The instructions about the Service Centre and conditions of charge, also during the warranty period. If the fuse is not heated up sufficiently. After lightning the flame, keep the knob pushed for equal or...
User Manual
Page 13
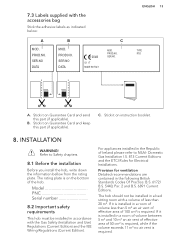
...; no air vent is required. PROD.NO. The hob should not be installed in a room of volume between 5 m³ and 10 m³ an air vent of effective area of volume less than 20 m³. 7.3 Labels supplied with the Gas Safety (Installation and Use) Regulations (Current Edition) and the IEE Wiring Regulations (Current Edition). PROD.NO. B. ENGLISH 13 TYPE IP20 A. If it on instruction booklet...
...; no air vent is required. PROD.NO. The hob should not be installed in a room of volume between 5 m³ and 10 m³ an air vent of effective area of volume less than 20 m³. 7.3 Labels supplied with the Gas Safety (Installation and Use) Regulations (Current Edition) and the IEE Wiring Regulations (Current Edition). PROD.NO. B. ENGLISH 13 TYPE IP20 A. If it on instruction booklet...
User Manual
Page 14
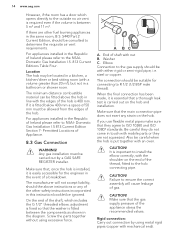
... put together with nut B. For appliances installed in line with mechanical end). Any gas installation must be ignored. Be careful they do not come in touch with a volume greater than 20 m³), but not in a kitchen, a kitchen/diner or bed sitting room (with mobile parts or they agree to determine the requisite air vent requirements. Location The hob may be carried out...
... put together with nut B. For appliances installed in line with mechanical end). Any gas installation must be ignored. Be careful they do not come in touch with a volume greater than 20 m³), but not in a kitchen, a kitchen/diner or bed sitting room (with mobile parts or they agree to determine the requisite air vent requirements. Location The hob may be carried out...
User Manual
Page 15
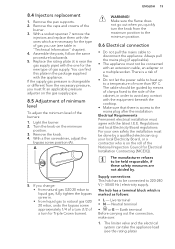
... sure the flame does not go out when you change: • from the necessary pressure, you use (see the rating plate) Always pull the mains plug (if applicable). • The appliance must fit an applicable pressure adjuster on the gas supply pipe. 8.5 Adjustment of minimum level To adjust the minimum level of the cabinet, in "Technical Information" chapter). 4. Electrical Requirements Permanent electrical installation must be guided by means of...
... sure the flame does not go out when you change: • from the necessary pressure, you use (see the rating plate) Always pull the mains plug (if applicable). • The appliance must fit an applicable pressure adjuster on the gas supply pipe. 8.5 Adjustment of minimum level To adjust the minimum level of the cabinet, in "Technical Information" chapter). 4. Electrical Requirements Permanent electrical installation must be guided by means of...
User Manual
Page 16
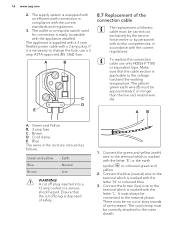
... switch used for connection is supplied with a 3 core flexible power cable with the current standards and regulations 3. Brown D. There must be approximately 2 cm longer than the live ) wire to the voltage load and the working temperature. 16 www.aeg.com 2. Earth - Connect the green and yellow (earth) wire to change the fuse, use only H05SS-F T180 or equivalent type. Connect the brown (live and neutral wire...
... switch used for connection is supplied with a 3 core flexible power cable with the current standards and regulations 3. Brown D. There must be approximately 2 cm longer than the live ) wire to the voltage load and the working temperature. 16 www.aeg.com 2. Earth - Connect the green and yellow (earth) wire to change the fuse, use only H05SS-F T180 or equivalent type. Connect the brown (live and neutral wire...

User Manual
Page 17
min. 100 mm min. 55 mm 480 mm 30 mm 4. min. 600 mm 7. 8.8 Assembly 1. min. 650 mm 560 mm 400 mm 8. 50 mm A B ENGLISH 17 If a furniture unit is installed at a distance of 400 mm above the hob, there must be a minimum safety distance of 50 mm to the left or right from the edge of the hob. 5. 2. 6. 3.
min. 100 mm min. 55 mm 480 mm 30 mm 4. min. 600 mm 7. 8.8 Assembly 1. min. 650 mm 560 mm 400 mm 8. 50 mm A B ENGLISH 17 If a furniture unit is installed at a distance of 400 mm above the hob, there must be a minimum safety distance of 50 mm to the left or right from the edge of the hob. 5. 2. 6. 3.
User Manual
Page 18
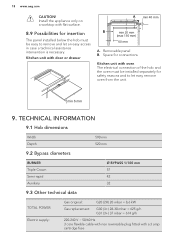
... flat surface. 8.9 Possibilities for insertion The panel installed below the hob must be installed separately for connections Kitchen unit with oven The electrical connection of the hob and the oven must be easy to let easy remove oven from the unit. Space for safety reasons and to remove and let an easy access in case a technical assistance intervention is necessary. Removable panel B. TECHNICAL INFORMATION 9.1 Hob dimensions...
... flat surface. 8.9 Possibilities for insertion The panel installed below the hob must be installed separately for connections Kitchen unit with oven The electrical connection of the hob and the oven must be easy to let easy remove oven from the unit. Space for safety reasons and to remove and let an easy access in case a technical assistance intervention is necessary. Removable panel B. TECHNICAL INFORMATION 9.1 Hob dimensions...
User Manual
Page 19
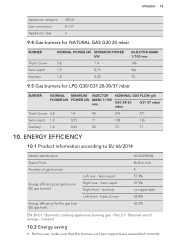
... to EU 66/2014 Model identification HG674550VB Type of hob Number of energy - Semi-rapid Right front - Auxiliary Left front - Part 2-1 : Rational use , make sure that the burners and pan supports are assembled correctly. Triple Crown 57.9% not applicable 52.8% Energy efficiency for LPG G30/G31 28-30/37 mbar BURNER NORMAL MINIMUM INJECTOR NOMINAL GAS FLOW g/h POWER kW POWER kW MARK 1/100 mm...
... to EU 66/2014 Model identification HG674550VB Type of hob Number of energy - Semi-rapid Right front - Auxiliary Left front - Part 2-1 : Rational use , make sure that the burners and pan supports are assembled correctly. Triple Crown 57.9% not applicable 52.8% Energy efficiency for LPG G30/G31 28-30/37 mbar BURNER NORMAL MINIMUM INJECTOR NOMINAL GAS FLOW g/h POWER kW POWER kW MARK 1/100 mm...
User Manual
Page 20
... to boil, turn down the flame to recycle waste of burners. • Center the pot on the burner. • When you heat up water, use only the amount you need. • If it is possible, use a pressure cooker. 20 www.aeg.com • Use cookware with diameters applicable to the size of electrical and electronic appliances. Return the product to its user manual. 11. Refer...
... to boil, turn down the flame to recycle waste of burners. • Center the pot on the burner. • When you heat up water, use only the amount you need. • If it is possible, use a pressure cooker. 20 www.aeg.com • Use cookware with diameters applicable to the size of electrical and electronic appliances. Return the product to its user manual. 11. Refer...


