
Product Manual
Page 2
... get the very best from it to change without notice. Model, PNC, Serial Number. 2 www.aeg.com CONTENTS 1. TROUBLESHOOTING 10 8. features you for your appliance: www.aeg.com/shop CUSTOMER CARE AND SERVICE We recommend the use of original spare parts. The information can be found on ordinary appliances. INSTALLATION 11 9. PRODUCT DESCRIPTION 6 4. SAFETY INSTRUCTIONS 4 3. When contacting Service, ensure that you impeccable performance for many...
... get the very best from it to change without notice. Model, PNC, Serial Number. 2 www.aeg.com CONTENTS 1. TROUBLESHOOTING 10 8. features you for your appliance: www.aeg.com/shop CUSTOMER CARE AND SERVICE We recommend the use of original spare parts. The information can be found on ordinary appliances. INSTALLATION 11 9. PRODUCT DESCRIPTION 6 4. SAFETY INSTRUCTIONS 4 3. When contacting Service, ensure that you impeccable performance for many...
Product Manual
Page 3
... INFORMATION ENGLISH 3 Before the installation and use of experience and knowledge if they are hot. • If the appliance has a child safety device, we recommend that you activate it. • Cleaning and user maintenance shall not be made ...General Safety • The appliance and its accessible parts become hot during use causes injuries and damages. Always keep the instructions with fat or oil can be dangerous and may result in fire. Do not touch the heating elements. • Do not operate the appliance by an adult or a person who is not responsible if an incorrect installation...
... INFORMATION ENGLISH 3 Before the installation and use of experience and knowledge if they are hot. • If the appliance has a child safety device, we recommend that you activate it. • Cleaning and user maintenance shall not be made ...General Safety • The appliance and its accessible parts become hot during use causes injuries and damages. Always keep the instructions with fat or oil can be dangerous and may result in fire. Do not touch the heating elements. • Do not operate the appliance by an adult or a person who is not responsible if an incorrect installation...
Product Manual
Page 4
... not be careful when you connect the appliance to install a noncombustile separation panel under a window. We recommend to the near sockets • Make sure the appliance is installed. • Use the strain relief clamp on the hob surface since they can get hot. • If the glass ceramic surface is cracked, switch off the appliance and then cover flame e.g. Loose and incorrect electricity mains cable...
... not be careful when you connect the appliance to install a noncombustile separation panel under a window. We recommend to the near sockets • Make sure the appliance is installed. • Use the strain relief clamp on the hob surface since they can get hot. • If the glass ceramic surface is cracked, switch off the appliance and then cover flame e.g. Loose and incorrect electricity mains cable...
Product Manual
Page 5
..., fuses (screw type fuses removed from the maximum to let objects or cookware fall on the glass ceramic. Keep flames or heated objects away from fats and oils when you quickly turn the knob from the holder), earth leakage trips and contactors. The isolation device must have an isolation device which evacuates the products of the appliance is not connected to change the specification...
..., fuses (screw type fuses removed from the maximum to let objects or cookware fall on the glass ceramic. Keep flames or heated objects away from fats and oils when you quickly turn the knob from the holder), earth leakage trips and contactors. The isolation device must have an isolation device which evacuates the products of the appliance is not connected to change the specification...
Product Manual
Page 6
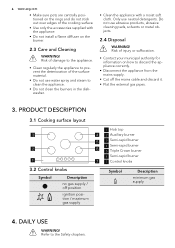
... from the mains supply. • Cut off position ignition position / maximum gas supply Symbol Description minimum gas supply 4. Do not use neutral detergents. Only use abrasive products, abrasive cleaning pads, solvents or metal objects. 2.4 Disposal WARNING! PRODUCT DESCRIPTION 3.1 Cooking surface layout 1 Hob top 3 4 2 Auxiliary burner 5 3 Semi-rapid burner 4 Semi-rapid burner 2 6 5 Triple Crown burner 6 Semi-rapid burner 1 7 7 Control knobs 3.2 Control knobs Symbol Description no gas supply / off the mains cable...
... from the mains supply. • Cut off position ignition position / maximum gas supply Symbol Description minimum gas supply 4. Do not use neutral detergents. Only use abrasive products, abrasive cleaning pads, solvents or metal objects. 2.4 Disposal WARNING! PRODUCT DESCRIPTION 3.1 Cooking surface layout 1 Hob top 3 4 2 Auxiliary burner 5 3 Semi-rapid burner 4 Semi-rapid burner 2 6 5 Triple Crown burner 6 Semi-rapid burner 1 7 7 Control knobs 3.2 Control knobs Symbol Description no gas supply / off the mains cable...
Product Manual
Page 7
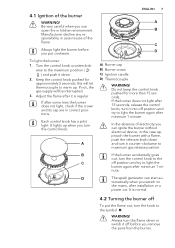
..., release the control knob, turn the flame down or switch it off position and try to light the burner again after minimum 1 minute. Always turn it counter-clockwise to the off To put cookware. If after installation or a power cut. In the absence of electricity you remove the pans from the burner. in correct positions. The spark generator can ignite the burner without electrical device; 4.1 Ignition of the flame Always light the burner before you...
..., release the control knob, turn the flame down or switch it off position and try to light the burner again after minimum 1 minute. Always turn it counter-clockwise to the off To put cookware. If after installation or a power cut. In the absence of electricity you remove the pans from the burner. in correct positions. The spark generator can ignite the burner without electrical device; 4.1 Ignition of the flame Always light the burner before you...
Product Manual
Page 8
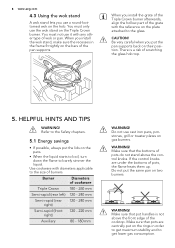
... the pan supports back on the Triple Crown burner. CAUTION! Be very careful when you install the wok stand, make sure the recesses in order to get maximum stability and to the glass. Use cookware with any other type of pots, the flame heats them up. Do not use the wok stand on their position. 8 www.aeg.com 4.3 Using the wok stand A wok stand lets you install the grate...
... the pan supports back on the Triple Crown burner. CAUTION! Be very careful when you install the wok stand, make sure the recesses in order to get maximum stability and to the glass. Use cookware with any other type of pots, the flame heats them up. Do not use the wok stand on their position. 8 www.aeg.com 4.3 Using the wok stand A wok stand lets you install the grate...
Product Manual
Page 9
... rough edges. Liquids spilt during cooking can remove the pan supports to easily clean the hob. • To clean the enamelled parts, cap and crown, wash them with a clean cloth. Do not put them back. • Wash stainless steel parts with water, and then dry them with a soft cloth. • The pan supports are in the centre of the burner. • Be very careful when you replace the pan supports...
... rough edges. Liquids spilt during cooking can remove the pan supports to easily clean the hob. • To clean the enamelled parts, cap and crown, wash them with a clean cloth. Do not put them back. • Wash stainless steel parts with water, and then dry them with a soft cloth. • The pan supports are in the centre of the burner. • Be very careful when you replace the pan supports...
Product Manual
Page 10
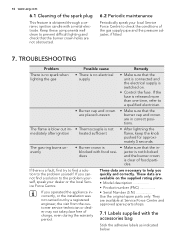
...; Make sure that the burner cap and crown are placed uneven • Make sure that the unit is connected and the electrical supply is clear of the gas supply pipe and the pressure adjuster, if fitted. 7. jector is not blocked dues and the burner crown is switched on the supplied rating plate. • Model description Product number (PNC Serial Number (S.N Use the original spare parts only.
...; Make sure that the burner cap and crown are placed uneven • Make sure that the unit is connected and the electrical supply is clear of the gas supply pipe and the pressure adjuster, if fitted. 7. jector is not blocked dues and the burner crown is switched on the supplied rating plate. • Model description Product number (PNC Serial Number (S.N Use the original spare parts only.
Product Manual
Page 11
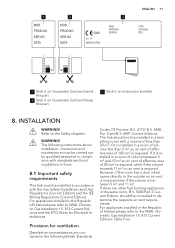
...air vent requirements. For appliances installed in the following instructions about installation, connection and maintenance must be carried out by qualified personnel in compliance with standards and local regulations in force. 8.1 Important safety requirements This hob must be consulted to the NSAI- Provision for Electrical Installations. If it is installed... Gas Safety (Installation and Use) Regulations (Current Edition) and the IEE Wiring Regulations (Current Edition). However, if the room has a door which opens directly to the Safety chapters. PROD.NO. Domestic Gas Installation ...
...air vent requirements. For appliances installed in the following instructions about installation, connection and maintenance must be carried out by qualified personnel in compliance with standards and local regulations in force. 8.1 Important safety requirements This hob must be consulted to the NSAI- Provision for Electrical Installations. If it is installed... Gas Safety (Installation and Use) Regulations (Current Edition) and the IEE Wiring Regulations (Current Edition). However, if the room has a door which opens directly to the Safety chapters. PROD.NO. Domestic Gas Installation ...
Product Manual
Page 12
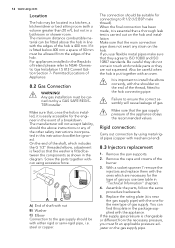
.... Remove the pan supports. 2. The minimum distance combustible material can find this instruction booklet be allowed from the necessary pressure, you use (see table in the Republic of gas. steel or copper. Remove the caps and crowns of the appliance obeys the recommended values. Replace the rating plate (it is essential that the gas supply pressure of the burner. 3. Domestic Gas Installation I.S 813 Current Edition Section 7- Any gas installation must...
.... Remove the pan supports. 2. The minimum distance combustible material can find this instruction booklet be allowed from the necessary pressure, you use (see table in the Republic of gas. steel or copper. Remove the caps and crowns of the appliance obeys the recommended values. Replace the rating plate (it is essential that the gas supply pressure of the burner. 3. Domestic Gas Installation I.S 813 Current Edition Section 7- Any gas installation must...
Product Manual
Page 13
...; N - Remove the knob. 4. 8.4 Adjustment of minimum level To adjust the minimum level of a turn for Triple Crown burner). Always pull the mains plug. • The appliance must be guided by a qualified electrician (e.g. The manufacturer refuses to be connected to the mains plug after the installation. The limiter valve and the electrical system can take the appliance load (see the rating plate) 2. The outlet or omnipolar switch used for connection...
...; N - Remove the knob. 4. 8.4 Adjustment of minimum level To adjust the minimum level of a turn for Triple Crown burner). Always pull the mains plug. • The appliance must be guided by a qualified electrician (e.g. The manufacturer refuses to be connected to the mains plug after the installation. The limiter valve and the electrical system can take the appliance load (see the rating plate) 2. The outlet or omnipolar switch used for connection...
Product Manual
Page 14
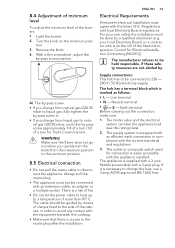
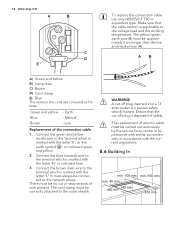
... symbol , or coloured green and yellow. 2. Earth - Live Replacement of electric cable must be approximately 2 cm longer than the live ) wire to the terminal which is applicable to the terminal which is disposed of wire present. A cut off plug inserted into a 13 amp socket is marked with the current regulations. 8.6 Building In min. 100 mm min. 45 mm...
... symbol , or coloured green and yellow. 2. Earth - Live Replacement of electric cable must be approximately 2 cm longer than the live ) wire to the terminal which is applicable to the terminal which is disposed of wire present. A cut off plug inserted into a 13 amp socket is marked with the current regulations. 8.6 Building In min. 100 mm min. 45 mm...
Product Manual
Page 15
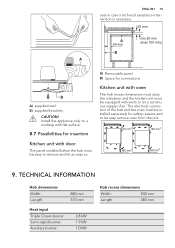
The electrical connection of air. Install the appliance only on a worktop with flat surface. 8.7 Possibilities for insertion Kitchen unit with door The panel installed below the hob must be installed separately for connections Kitchen unit with oven The hob recess dimensions must obey the indication and the kitchen unit must be equipped with vents to let a continuous supply of the hob and the oven must be easy to...
The electrical connection of air. Install the appliance only on a worktop with flat surface. 8.7 Possibilities for insertion Kitchen unit with door The panel installed below the hob must be installed separately for connections Kitchen unit with oven The hob recess dimensions must obey the indication and the kitchen unit must be equipped with vents to let a continuous supply of the hob and the oven must be easy to...
Product Manual
Page 16
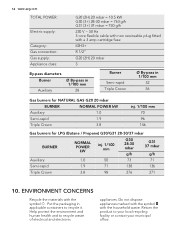
...in 1/100 mm 32 56 Gas burners for NATURAL GAS G20 20 mbar BURNER NORMAL POWER kW Auxiliary 1.0 Semi-rapid 1.9 Triple Crown 3.8 inj. 1/100 mm 70 96 146 Gas burners for LPG (Butane / Propane) G30/G31 28-30/37 mbar BURNER NORMAL POWER kW inj. 1/100 mm ...aeg.com TOTAL POWER: Electric supply: Category: Gas connection: Gas supply: Appliance class: G20 (2H) 20 mbar = 10.5 kW G30 (3+) 28-30 mbar = 763 g/h G31 (3+) 37 mbar = 750 g/h 230 V ~ 50 Hz 3 core flexible cable with non rewireable plug fitted with a 3 amp cartridge fuse II2H3+ R 1/2" G20 (2H) 20 mbar 3 By-pass diameters Burner...
...in 1/100 mm 32 56 Gas burners for NATURAL GAS G20 20 mbar BURNER NORMAL POWER kW Auxiliary 1.0 Semi-rapid 1.9 Triple Crown 3.8 inj. 1/100 mm 70 96 146 Gas burners for LPG (Butane / Propane) G30/G31 28-30/37 mbar BURNER NORMAL POWER kW inj. 1/100 mm ...aeg.com TOTAL POWER: Electric supply: Category: Gas connection: Gas supply: Appliance class: G20 (2H) 20 mbar = 10.5 kW G30 (3+) 28-30 mbar = 763 g/h G31 (3+) 37 mbar = 750 g/h 230 V ~ 50 Hz 3 core flexible cable with non rewireable plug fitted with a 3 amp cartridge fuse II2H3+ R 1/2" G20 (2H) 20 mbar 3 By-pass diameters Burner...


