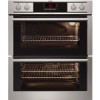
AEG IsoFrontPlus Integrated 60cm Double Mutlifunctional Oven Stainless Steel NC4013001M Support and Manuals
Get Help and Manuals for this AEG item
View All Support Options Below
Free AEG IsoFrontPlus Integrated 60cm Double Mutlifunctional Oven Stainless Steel NC4013001M manuals!
Problems with AEG IsoFrontPlus Integrated 60cm Double Mutlifunctional Oven Stainless Steel NC4013001M?
Ask a Question
Free AEG IsoFrontPlus Integrated 60cm Double Mutlifunctional Oven Stainless Steel NC4013001M manuals!
Problems with AEG IsoFrontPlus Integrated 60cm Double Mutlifunctional Oven Stainless Steel NC4013001M?
Ask a Question
Popular AEG IsoFrontPlus Integrated 60cm Double Mutlifunctional Oven Stainless Steel NC4013001M Manual Pages
Product Manual - Page 2
...We have the following data available: Model, PNC, Serial Number.
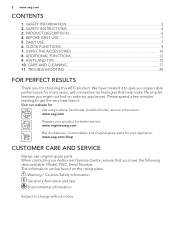
SAFETY INFORMATION 3 2. SAFETY INSTRUCTIONS 4 3. CLOCK FUNCTIONS...9 7. Please spend a few minutes reading to get the very best from it to change without notice. 2 www.aeg.com
CONTENTS
1. Visit our website for:
Get usage advice, brochures, trouble shooter, service information: www.aeg.com
Register your product for...
Product Manual - Page 4
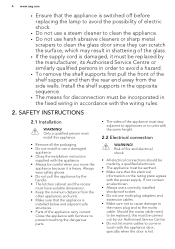
... wiring in accordance with the power supply. SAFETY INSTRUCTIONS
2.1 Installation
WARNING! Close the appliance with furniture to prevent touching the dangerous parts.
• The sides of fire and electrical shock... its Authorised Service Centre or similarly qualified persons in order to avoid a hazard. • To remove the shelf supports first pull the front of the shelf support and then the...
Product Manual - Page 5
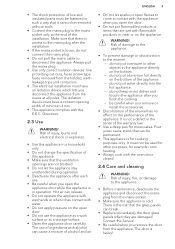
... is in operation. Contact the Service. • Be careful when...• Do not change the specification of this appliance. • ...can break. • Replace immediately the door glass...
• Always cook with the oven door closed.
2.4 Care and cleaning... of live and insulated parts must be fastened in such... contactors.
• The electrical installation must have a contact opening width...
Product Manual - Page 6

...6 www.aeg.com
...oven temperature 8 Heating element 9 Lamp 10 Fan 11 Shelf support...specifications.
2.6 Disposal
WARNING! Do not use abrasive products, abrasive cleaning pads, solvents or metal objects.
• If you use it . • Remove the door catch to prevent children and pets to collect fat.
• Trivet
For roasting and grilling. Do not use an oven spray, obey the safety instructions...
Product Manual - Page 7

... button to Safety chapters.
4.1 Initial Cleaning
Remove all accessories and removable shelf supports from the appliance. After approximately five seconds, the flashing stops and the display shows the time of Day function flashes. DAILY USE
WARNING!
To set . Preheat the two ovens. Set the functions listed below, if applicable. 1. Let the appliance operate for...
Product Manual - Page 8

... cakes with crispy bottom and to dry food.
True Fan Cooking
To bake on up . • The lamp comes on 1 shelf position. 8 www.aeg.com
5.2 Activating and deactivating the top / main oven
It depends on the model if your appliance has knob symbols, indicators or lamps: • The indicator comes on
when the...
Product Manual - Page 9

... deactivate.
CLOCK FUNCTIONS
6.1 Clock functions table
Clock function Time of day
Application To set the cooking time of day. To set , change or check the time of the oven.
ENGLISH 9
5.5 Display
The electronic programmer works only with the main oven.
End
To set the time.
A
B
C
A) Function indicators B) Time display C) Function indicator
5.6 Buttons
Button
Function MINUS...
Product Manual - Page 10

... to the off position. Press or to set an oven function and temperature of the shelf support. When the time ends the indicator of the shelf support and make sure that the feet point down...accessories
Wire shelf: Push the shelf between the guide bars of cooking. 10 www.aeg.com
You can use the functions Duration and End at the same time to set .
7.
The display shows the indicator for...
Product Manual - Page 11

...deep pan together: Push the deep pan between the guide bars of burns.
There is a risk of the shelf support and the wire shelf on the guide bars above. Baking tray or deep pan: Put... the cookware from slipping.
7.2 Telescopic runners inserting the accessories
CAUTION! Be careful when you close the oven door. Wire shelf: Put the wire shelf on the telescopic runners.
7.3 Trivet and Grill- / ...
Product Manual - Page 12

... settings for a special recipe, look for cooking larger quantities of the two ovens. If this occurs, do not always brown equally at first.
The temperature and baking times in the tables.
• The manufacturer recommends that you bake cakes on the necessary shelf position. It gives especially good results when used .
9.1 Double oven
Top oven...
Product Manual - Page 13
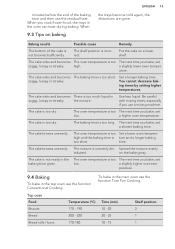
... is incorrect.
Spread the mixture evenly
tributed. on baking
ENGLISH 13
the trays become cold again, the distortions are gone.
The oven temperature is too The next time you bake, set
low.
The shelf position is too dry.
high. The cake browns unevenly. the mixture.
minutes before the end of the cake...
Product Manual - Page 16

...oven with the maximum temperature setting. CAUTION! Use the first shelf position from burning onto the pan, put the food on a plate. Main oven
Remove the food packaging and put some liquid into the shelf position as recommended in the top oven... - Top oven Food
Time ...30
Toasted Sandwiches
3 - 4
Steaks:
- Set the shelf into the deep pan.
•...oven door closed. Always set the...
Product Manual - Page 17
...15 10 - 15
60
- Refer to the nonstick coating.
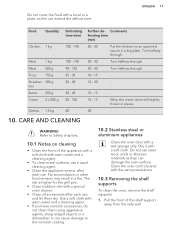
10.2 Stainless steel or aluminium appliances
Clean the oven door with a special oven cleaner.
• Clean all accessories after each use and let them ...interior after each use. Clean the oven control panel with the same precautions.
10.3 Removing the shelf supports
To clean the oven, remove the shelf supports. 1. Whip the cream when still...
Product Manual - Page 18
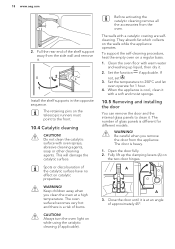
...Set the temperature to 250ºC and let oven operate for different models. Be careful when you clean the oven...installing the door
You can remove the door and the internal glass panels to the front.
10.4 Catalytic cleaning
CAUTION! Close the door until it . 18 www.aeg.com
2. The retaining pins on catalytic properties. When the appliance is cool, clean it .
2
1
Install the shelf supports...
Product Manual - Page 20

Refer to the operating instructions for the built-in the oven for longer than 15 20 minutes after the cooking process ends.
Activate the oven.
The oven does not heat up . The necessary settings are correct.
The lamp is deactivated.
Reset the clock.
11.2 Service data
If you write the data here:
Model (MOD.)
Product number (PNC)
Serial...
AEG IsoFrontPlus Integrated 60cm Double Mutlifunctional Oven Stainless Steel NC4013001M Reviews
We have not received any reviews for AEG yet.