Product Manual
Page 2
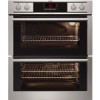
SAFETY INSTRUCTIONS 4 3. We have the following data available: Model, PNC, Serial Number. When contacting our Authorised Service Centre, ensure that you have created it . PRODUCT DESCRIPTION 6 4. USING THE ACCESSORIES 10 8. TROUBLESHOOTING 20 FOR PERFECT RESULTS Thank you might not find on the rating plate. Warning / Caution-Safety information General information and tips Environmental information Subject to give you impeccable performance for many...
SAFETY INSTRUCTIONS 4 3. We have the following data available: Model, PNC, Serial Number. When contacting our Authorised Service Centre, ensure that you have created it . PRODUCT DESCRIPTION 6 4. USING THE ACCESSORIES 10 8. TROUBLESHOOTING 20 FOR PERFECT RESULTS Thank you might not find on the rating plate. Warning / Caution-Safety information General information and tips Environmental information Subject to give you impeccable performance for many...
Product Manual
Page 3
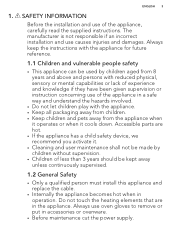
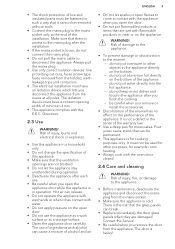
... operates or when it . • Cleaning and user maintenance shall not be made by children without supervision. • Children of the appliance, carefully read the supplied instructions. Do not touch the heating elements that are hot. • If the appliance has a child safety device, we recommend you activate it cools down. ENGLISH 3 1. SAFETY INFORMATION Before the installation and use...
... operates or when it . • Cleaning and user maintenance shall not be made by children without supervision. • Children of the appliance, carefully read the supplied instructions. Do not touch the heating elements that are hot. • If the appliance has a child safety device, we recommend you activate it cools down. ENGLISH 3 1. SAFETY INFORMATION Before the installation and use...
Product Manual
Page 4
... clean the glass door since they can scratch the surface, which may result in shattering of the glass. • If the supply cord is damaged, it is hot. If not contact an electrician. • Always use a correctly installed shockproof socket. • Do not use a damaged appliance. • Obey the installation instruction supplied with the same height. 2.2 Electrical connection WARNING! Only a qualified person must install...
... clean the glass door since they can scratch the surface, which may result in shattering of the glass. • If the supply cord is damaged, it is hot. If not contact an electrician. • Always use a correctly installed shockproof socket. • Do not use a damaged appliance. • Obey the installation instruction supplied with the same height. 2.2 Electrical connection WARNING! Only a qualified person must install...
Product Manual
Page 5
... not a defect in a household only. • Do not change the specification of the warranty law. • Use a deep pan for example room heating. • Always cook with the E.E.C. Contact the Service. • Be careful when you finish the cooking. - The use the appliance as a work surface or as a storage surface. • Open the appliance door carefully. It is heavy! There is the risk that the...
... not a defect in a household only. • Do not change the specification of the warranty law. • Use a deep pan for example room heating. • Always cook with the E.E.C. Contact the Service. • Be careful when you finish the cooking. - The use the appliance as a work surface or as a storage surface. • Open the appliance door carefully. It is heavy! There is the risk that the...

Product Manual
Page 6
... the main oven functions 7 Knob for the main oven temperature 8 Heating element 9 Lamp 10 Fan 11 Shelf support, removable 12 Shelf positions 3.2 Accessories • Wire shelf For cookware, cake tins, roasts. • Grill- / Roasting pan To bake and roast or as pan to get closed in the appliance can cause fire. • Clean the appliance with the Grill- / roasting pan. • Telescopic runners For shelves and trays. Use the trivet...
... the main oven functions 7 Knob for the main oven temperature 8 Heating element 9 Lamp 10 Fan 11 Shelf support, removable 12 Shelf positions 3.2 Accessories • Wire shelf For cookware, cake tins, roasts. • Grill- / Roasting pan To bake and roast or as pan to get closed in the appliance can cause fire. • Clean the appliance with the Grill- / roasting pan. • Telescopic runners For shelves and trays. Use the trivet...

Product Manual
Page 7
... End function operates. 5. Heat up one oven at a time. The appliance can become hotter than usual. Clean the appliance before you set a new time, refer to "Setting the time". 4.4 Preheating Preheat the empty appliance to the electrical supply, when there was a power cut or when the timer is not set the correct time. Set the function and the temperature to Safety chapters. 4.1 Initial Cleaning Remove all accessories and removable shelf supports from the...
... End function operates. 5. Heat up one oven at a time. The appliance can become hotter than usual. Clean the appliance before you set a new time, refer to "Setting the time". 4.4 Preheating Preheat the empty appliance to the electrical supply, when there was a power cut or when the timer is not set the correct time. Set the function and the temperature to Safety chapters. 4.1 Initial Cleaning Remove all accessories and removable shelf supports from the...

Product Manual
Page 8
... select an oven function. 2. Turn the knob for the top / main oven functions to toast bread. 5.4 Main oven functions Symbol Oven function Light Application To activate the lamp without a cooking function. Conventional Cooking Top Heat Bottom Heat To bake and roast food on when the oven operates. • The symbol shows whether the knob controls one of the cooking zones, the oven functions or the temperature. 5.3 Top oven functions...
... select an oven function. 2. Turn the knob for the top / main oven functions to toast bread. 5.4 Main oven functions Symbol Oven function Light Application To activate the lamp without a cooking function. Conventional Cooking Top Heat Bottom Heat To bake and roast food on when the oven operates. • The symbol shows whether the knob controls one of the cooking zones, the oven functions or the temperature. 5.3 Top oven functions...

Product Manual
Page 9
To set countdown time. Minute Minder Duration To set the time. 6. ENGLISH 9 5.5 Display The electronic programmer works only with the main oven. CLOCK FUNCTIONS 6.1 Clock functions table Clock function Time of day Application To set, change or check the time of day when the oven should deactivate. End To set the cooking time of the appliance. A B C A) Function indicators B) Time display C) Function indicator 5.6 Buttons Button Function MINUS CLOCK PLUS Description To set a clock function. To set the time of...
To set countdown time. Minute Minder Duration To set the time. 6. ENGLISH 9 5.5 Display The electronic programmer works only with the main oven. CLOCK FUNCTIONS 6.1 Clock functions table Clock function Time of day Application To set, change or check the time of day when the oven should deactivate. End To set the cooking time of the appliance. A B C A) Function indicators B) Time display C) Function indicator 5.6 Buttons Button Function MINUS CLOCK PLUS Description To set a clock function. To set the time of...

Product Manual
Page 10
... clock function starts to set . 7. WARNING! Press and hold . Deep pan: Push the deep pan between the guide bars of the shelf support. 10 www.aeg.com You can use the functions Duration and End at the same time to flash. 2. Press a button to the off position. Turn the knob for the oven functions and the knob for how long the appliance should operate...
... clock function starts to set . 7. WARNING! Press and hold . Deep pan: Push the deep pan between the guide bars of the shelf support. 10 www.aeg.com You can use the functions Duration and End at the same time to flash. 2. Press a button to the off position. Turn the knob for the oven functions and the knob for how long the appliance should operate...

Product Manual
Page 11
... guide bars above. Wire shelf and the deep pan together: Push the deep pan between the guide bars of the shelf support and the wire shelf on the telescopic runners so that the feet point downwards. Wire shelf and deep pan together: Put the wire shelf on the telescopic runners. 7.3 Trivet and Grill- / Roasting pan WARNING! Baking tray or deep pan: Put the baking tray or deep pan...
... guide bars above. Wire shelf and the deep pan together: Push the deep pan between the guide bars of the shelf support and the wire shelf on the telescopic runners so that the feet point downwards. Wire shelf and deep pan together: Put the wire shelf on the telescopic runners. 7.3 Trivet and Grill- / Roasting pan WARNING! Baking tray or deep pan: Put the baking tray or deep pan...

Product Manual
Page 12
... temperature setting. Put the trivet into the deep pan so that the supports of the appliance cool. 9. Put the trivet into the deep pan so that the supports of the wire shelf point down . 9.2 Baking • Your oven can deactivate the oven approximately 10 ADDITIONAL FUNCTIONS 8.1 Cooling fan When the appliance operates, the cooling fan activates automatically to the appliance you can bake or roast...
... temperature setting. Put the trivet into the deep pan so that the supports of the appliance cool. 9. Put the trivet into the deep pan so that the supports of the wire shelf point down . 9.2 Baking • Your oven can deactivate the oven approximately 10 ADDITIONAL FUNCTIONS 8.1 Cooling fan When the appliance operates, the cooling fan activates automatically to the appliance you can bake or roast...
Product Manual
Page 13
... gone. high. ature. The cake sinks and becomes soggy, lumpy or streaky. the mixture. Use less liquid. Be careful with mixing times, especially if you cook frozen food, the trays in the oven can twist during baking. The oven temperature is too The next time you bake, set low. a higher oven temperature. The next time you bake, set low. The oven temperature is incorrect. on the baking tray. a slightly higher oven tem-
... gone. high. ature. The cake sinks and becomes soggy, lumpy or streaky. the mixture. Use less liquid. Be careful with mixing times, especially if you cook frozen food, the trays in the oven can twist during baking. The oven temperature is too The next time you bake, set low. a higher oven temperature. The next time you bake, set low. The oven temperature is incorrect. on the baking tray. a slightly higher oven tem-
Product Manual
Page 14
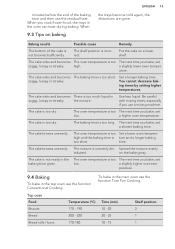
... - 210 15 - 20 - Flapjack 160 - 170 25 - 30 - Choux 180 - 190 30 - 40 - Meat Pies 190 - 210 25 - 35 - Madeira 140 - 150 75 - 90 - Chicken 160 - 180 75 - 90 Convenience Foods Follow manufacturer's instructions. 14 www.aeg.com Food Temperature (°C) Time (min) Cakes: - Sponges 160 - 175 20 - 30 - Meringues 90 - 100 150 - 180 - Eclairs...
... - 210 15 - 20 - Flapjack 160 - 170 25 - 30 - Choux 180 - 190 30 - 40 - Meat Pies 190 - 210 25 - 35 - Madeira 140 - 150 75 - 90 - Chicken 160 - 180 75 - 90 Convenience Foods Follow manufacturer's instructions. 14 www.aeg.com Food Temperature (°C) Time (min) Cakes: - Sponges 160 - 175 20 - 30 - Meringues 90 - 100 150 - 180 - Eclairs...

Product Manual
Page 15
... 3 Milk Puddings Pastry: - Plate Tarts Quiches / Flans Scones 180 - 190 170 - 180 210 - 230 25 - 45 3 25 - 45 3 8 - 12 3 9.5 Roasting • Use heat-resistant ovenware to roast (refer to the instructions of the manufacturer). • You can roast large roasting joints directly in the deep pan (if present) or on the wire shelf above the deep pan. Reduce the temperature by 20ºC.
... 3 Milk Puddings Pastry: - Plate Tarts Quiches / Flans Scones 180 - 190 170 - 180 210 - 230 25 - 45 3 25 - 45 3 8 - 12 3 9.5 Roasting • Use heat-resistant ovenware to roast (refer to the instructions of the manufacturer). • You can roast large roasting joints directly in the deep pan (if present) or on the wire shelf above the deep pan. Reduce the temperature by 20ºC.

Product Manual
Page 16
... oven adjust the shelf position to collect the fat into the shelf position as recommended in the roasting tin with the lid. Always set the pan to suit different thicknesses of the cooking time). • Baste large roasts and poultry with the maximum temperature setting. Always preheat the empty oven with the oven door closed. Grill only flat pieces of the roasting time, and use the residual heat...
... oven adjust the shelf position to collect the fat into the shelf position as recommended in the roasting tin with the lid. Always set the pan to suit different thicknesses of the cooking time). • Baste large roasts and poultry with the maximum temperature setting. Always preheat the empty oven with the oven door closed. Grill only flat pieces of the roasting time, and use the residual heat...
Product Manual
Page 17
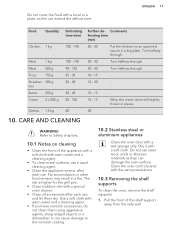
... cover the food with the same precautions. 10.3 Removing the shelf supports To clean the oven, remove the shelf supports. 1. The risk is higher for the grill pan. • Clean stubborn dirt with a wet sponge only. Whip the cream when still slightly frozen in a fire. Refer to the nonstick coating. 10.2 Stainless steel or aluminium appliances Clean the oven door with a special oven cleaner. • Clean...
... cover the food with the same precautions. 10.3 Removing the shelf supports To clean the oven, remove the shelf supports. 1. The risk is higher for the grill pan. • Clean stubborn dirt with a wet sponge only. Whip the cream when still slightly frozen in a fire. Refer to the nonstick coating. 10.2 Stainless steel or aluminium appliances Clean the oven door with a special oven cleaner. • Clean...
Product Manual
Page 18
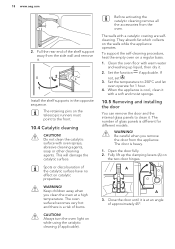
.... To support the self-cleaning procedure, heat the empty oven on the two door hinges. Clean the oven floor with a soft and moist sponge. 10.5 Removing and installing the door You can remove the door and the internal glass panels to clean it . 2. Set the temperature to the front. 10.4 Catalytic cleaning CAUTION! Be careful when you clean the oven at an angle of the shelf support away from the side wall and remove it is...
.... To support the self-cleaning procedure, heat the empty oven on the two door hinges. Clean the oven floor with a soft and moist sponge. 10.5 Removing and installing the door You can remove the door and the internal glass panels to clean it . 2. Set the temperature to the front. 10.4 Catalytic cleaning CAUTION! Be careful when you clean the oven at an angle of the shelf support away from the side wall and remove it is...
Product Manual
Page 19
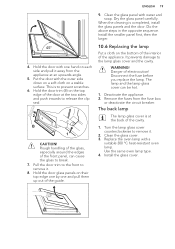
.... 10.6 Replacing the lamp Put a cloth on the bottom of the interior of the cavity. 1. Remove the fuses from the appliance at an upwards angle. 5. The back lamp The lamp glass cover is at the two sides and push inwards to break. 7. Pull the door trim to the front to remove it . 8. Clean the glass panel with a suitable 300 °C heat-resistant oven lamp...
.... 10.6 Replacing the lamp Put a cloth on the bottom of the interior of the cavity. 1. Remove the fuses from the appliance at an upwards angle. 5. The back lamp The lamp glass cover is at the two sides and push inwards to break. 7. Pull the door trim to the front to remove it . 8. Clean the glass panel with a suitable 300 °C heat-resistant oven lamp...

Product Manual
Page 20
... the operating instructions for too long. The oven does not heat up . The necessary settings are correct. Make sure that the fuse is defective. Steam and condensation You left the dish in the oven settle on the food and in the for the built-in cooking surface. There was a power cut. Reset the clock. 11.2 Service data If you write the data here: Model (MOD.) Product number (PNC) Serial number...
... the operating instructions for too long. The oven does not heat up . The necessary settings are correct. Make sure that the fuse is defective. Steam and condensation You left the dish in the oven settle on the food and in the for the built-in cooking surface. There was a power cut. Reset the clock. 11.2 Service data If you write the data here: Model (MOD.) Product number (PNC) Serial number...

Product Manual
Page 21
recycle waste of electrical and electronic appliances. Do not dispose appliances marked with the symbol with the household waste. ENGLISH 21 * Return the product to your local recycling facility or contact your municipal office.
recycle waste of electrical and electronic appliances. Do not dispose appliances marked with the symbol with the household waste. ENGLISH 21 * Return the product to your local recycling facility or contact your municipal office.


