
Product Manual
Page 2
... change without notice. 2 www.aeg.com CONTENTS 1. PRODUCT DESCRIPTION 6 4. DAILY USE...7 6. SAFETY INSTRUCTIONS 4 3. TROUBLESHOOTING 23 FOR PERFECT RESULTS Thank you for your product for better service: www.registeraeg.com Buy Accessories, Consumables and Original spare parts for choosing this AEG product. Visit our website for: Get usage advice, brochures, trouble shooter, service information: www.aeg.com Register your appliance: www.aeg.com/shop CUSTOMER CARE AND SERVICE...
... change without notice. 2 www.aeg.com CONTENTS 1. PRODUCT DESCRIPTION 6 4. DAILY USE...7 6. SAFETY INSTRUCTIONS 4 3. TROUBLESHOOTING 23 FOR PERFECT RESULTS Thank you for your product for better service: www.registeraeg.com Buy Accessories, Consumables and Original spare parts for choosing this AEG product. Visit our website for: Get usage advice, brochures, trouble shooter, service information: www.aeg.com Register your appliance: www.aeg.com/shop CUSTOMER CARE AND SERVICE...
Product Manual
Page 3
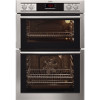
...installation and use oven gloves to remove or put in accessories or ovenware. • Before maintenance cut the power supply. Accessible parts are in operation. ENGLISH 3 1. Always keep the instructions with the appliance. • Keep all packaging away from children. • Keep children and pets away from the appliance when it operates or when it . • Cleaning and user... if an incorrect installation and use of experience and knowledge if they have been given supervision or instruction concerning use causes injuries and damages. Do not touch the heating elements that are hot....
...installation and use oven gloves to remove or put in accessories or ovenware. • Before maintenance cut the power supply. Accessible parts are in operation. ENGLISH 3 1. Always keep the instructions with the appliance. • Keep all packaging away from children. • Keep children and pets away from the appliance when it operates or when it . • Cleaning and user... if an incorrect installation and use of experience and knowledge if they have been given supervision or instruction concerning use causes injuries and damages. Do not touch the heating elements that are hot....

Product Manual
Page 4
... appliances or to units with the wiring rules. 2. 4 www.aeg.com • Ensure that the appliance is switched off before replacing the lamp to avoid the possibility of electric shock. • Do not use a steam cleaner to clean the appliance. • Do not use harsh abrasive cleaners or sharp metal scrapers to clean the glass door since they can scratch the surface...
... appliances or to units with the wiring rules. 2. 4 www.aeg.com • Ensure that the appliance is switched off before replacing the lamp to avoid the possibility of electric shock. • Do not use a steam cleaner to clean the appliance. • Do not use harsh abrasive cleaners or sharp metal scrapers to clean the glass door since they can scratch the surface...
Product Manual
Page 5
... protecting cut-outs, fuses (screw type fuses removed from the mains at the end of the installation. Directives. 2.3 Use WARNING! ENGLISH 5 • Do not put ovenware or other purposes, for other objects in operation. Risk of the appliance. do not put flammable products or items that can break. • Replace immediately the door glass panels when they are wet with the oven door closed. 2.4 Care and cleaning...
... protecting cut-outs, fuses (screw type fuses removed from the mains at the end of the installation. Directives. 2.3 Use WARNING! ENGLISH 5 • Do not put ovenware or other purposes, for other objects in operation. Risk of the appliance. do not put flammable products or items that can break. • Replace immediately the door glass panels when they are wet with the oven door closed. 2.4 Care and cleaning...
Product Manual
Page 6
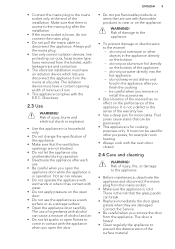
... main oven functions 7 Knob for the main oven temperature 8 Heating element 9 Lamp 10 Fan 11 Shelf support, removable 12 Shelf positions 3.2 Accessories • Wire shelf For cookware, cake tins, roasts. • Grill- / Roasting pan To bake and roast or as pan to collect fat. • Trivet For roasting and grilling. Risk of electrical shock. • Before replacing the lamp, disconnect the appliance from the mains supply. • Cut off...
... main oven functions 7 Knob for the main oven temperature 8 Heating element 9 Lamp 10 Fan 11 Shelf support, removable 12 Shelf positions 3.2 Accessories • Wire shelf For cookware, cake tins, roasts. • Grill- / Roasting pan To bake and roast or as pan to collect fat. • Trivet For roasting and grilling. Risk of electrical shock. • Before replacing the lamp, disconnect the appliance from the mains supply. • Cut off...
Product Manual
Page 7
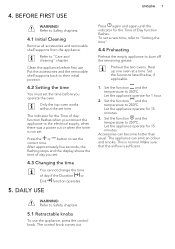
... connect the appliance to burn off the remaining grease. Accessories can emit an odour and smoke. DAILY USE WARNING! Clean the appliance before you set the correct time. Only the top oven works without the set a new time, refer to "Setting the time". 4.4 Preheating Preheat the empty appliance to the electrical supply, when there was a power cut or when the timer is sufficient. To set time. Let the appliance operate...
... connect the appliance to burn off the remaining grease. Accessories can emit an odour and smoke. DAILY USE WARNING! Clean the appliance before you set the correct time. Only the top oven works without the set a new time, refer to "Setting the time". 4.4 Preheating Preheat the empty appliance to the electrical supply, when there was a power cut or when the timer is sufficient. To set time. Let the appliance operate...
Product Manual
Page 8
.... Turn the knob for the top / main oven functions to select an oven function. 2. Set the temperature 20 - 40 °C lower than for the top / main oven functions to the off position. True Fan Cooking To bake on up . • The lamp comes on when the oven operates. • The symbol shows whether the knob controls the oven functions or the temperature. 5.3 Top oven functions...
.... Turn the knob for the top / main oven functions to select an oven function. 2. Set the temperature 20 - 40 °C lower than for the top / main oven functions to the off position. True Fan Cooking To bake on up . • The lamp comes on when the oven operates. • The symbol shows whether the knob controls the oven functions or the temperature. 5.3 Top oven functions...

Product Manual
Page 9
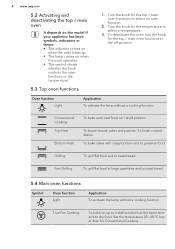
To roast larger meat joints or poultry with the main oven. A B C A) Function indicators B) Time display C) Function indicator 5.6 Buttons Button Function MINUS CLOCK PLUS Description To set a clock function. Fast Grilling Turbo Grilling To grill flat food in large quantities and to preserve food. Also to make gratins and to toast bread. Bottom Heat Defrost To bake cakes with crispy bottom and to toast...
To roast larger meat joints or poultry with the main oven. A B C A) Function indicators B) Time display C) Function indicator 5.6 Buttons Button Function MINUS CLOCK PLUS Description To set a clock function. Fast Grilling Turbo Grilling To grill flat food in large quantities and to preserve food. Also to make gratins and to toast bread. Bottom Heat Defrost To bake cakes with crispy bottom and to toast...
Product Manual
Page 10
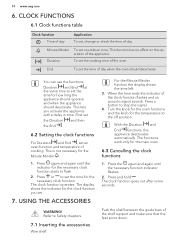
... function the display shows the time left. 3. The clock function goes out after some seconds. 10 www.aeg.com 6. The display shows the indicator for the necessary clock function starts to set countdown time. First set the Duration and then the End . 6.2 Setting the clock functions For Duration and End , set the cooking time of day. To set an oven function and temperature of the shelf support and make...
... function the display shows the time left. 3. The clock function goes out after some seconds. 10 www.aeg.com 6. The display shows the indicator for the necessary clock function starts to set countdown time. First set the Duration and then the End . 6.2 Setting the clock functions For Duration and End , set the cooking time of day. To set an oven function and temperature of the shelf support and make...

Product Manual
Page 11
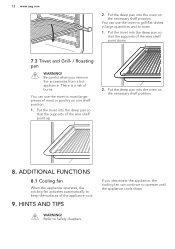
Deep pan: Push the deep pan between the guide bars of the shelf support. Wire shelf and the deep pan together: Push the deep pan between the guide bars of the shelf support and the wire shelf on the guide bars above. Baking tray or deep pan: Put the baking tray or deep pan on the telescopic runners. The ...sure you push back the telescopic runners fully in the appliance before you close the oven door. Wire shelf: Put the wire shelf on the deep pan. Wire shelf and deep pan together: Put the wire shelf on the telescopic runners so that the feet point downwards. The indentations are ...
Deep pan: Push the deep pan between the guide bars of the shelf support. Wire shelf and the deep pan together: Push the deep pan between the guide bars of the shelf support and the wire shelf on the guide bars above. Baking tray or deep pan: Put the baking tray or deep pan on the telescopic runners. The ...sure you push back the telescopic runners fully in the appliance before you close the oven door. Wire shelf: Put the wire shelf on the deep pan. Wire shelf and deep pan together: Put the wire shelf on the telescopic runners so that the feet point downwards. The indentations are ...
Product Manual
Page 12
... to roast larger pieces of the wire shelf point down . If you remove the accessories from a hot appliance. Be careful when you deactivate the appliance, the cooling fan can continue to toast. 1. HINTS AND TIPS WARNING! Put the trivet into the deep pan so that the supports of meat or poultry on one shelf position. 1. You can use the...
... to roast larger pieces of the wire shelf point down . If you remove the accessories from a hot appliance. Be careful when you deactivate the appliance, the cooling fan can continue to toast. 1. HINTS AND TIPS WARNING! Put the trivet into the deep pan so that the supports of meat or poultry on one shelf position. 1. You can use the...
Product Manual
Page 13
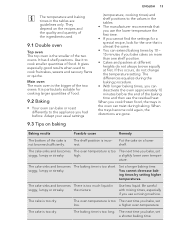
... of the baking time and then use the residual heat. Be careful with mixing times, especially if you bake, set low. a higher oven temperature. Baking results Possible cause Remedy The bottom of the two ovens. Set a longer baking time. Use less liquid....use a mixing machine. When the trays become cold again, the distortions are guidelines only. Put the cake on more than one shelf position. • Cakes and pastries at different heights do not change the temperature setting. high. a slightly lower oven temper- The baking time is too The next time you bake...
... of the baking time and then use the residual heat. Be careful with mixing times, especially if you bake, set low. a higher oven temperature. Baking results Possible cause Remedy The bottom of the two ovens. Set a longer baking time. Use less liquid....use a mixing machine. When the trays become cold again, the distortions are guidelines only. Put the cake on more than one shelf position. • Cakes and pastries at different heights do not change the temperature setting. high. a slightly lower oven temper- The baking time is too The next time you bake...

Product Manual
Page 14
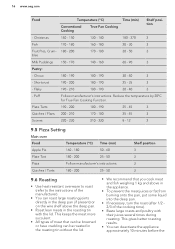
... position 2 1 1 2 2 2 2 2 2 2 2 2 1 1 2 2 high and the baking time is too Set a lower oven tempera- Shortbread 130 - 150 45 - 65 Casseroles: - The cake is not ready in the top oven use the function Conventional Cooking. Small & Queen 160 - 170 18 - 25 - Chicken 160 - 180 75 - 90 Convenience Foods Follow manufacturer's instructions. on the baking tray. perature. 9.4 Baking To bake in the baking time given. Flapjack 160 - 170...
... position 2 1 1 2 2 2 2 2 2 2 2 2 1 1 2 2 high and the baking time is too Set a lower oven tempera- Shortbread 130 - 150 45 - 65 Casseroles: - The cake is not ready in the top oven use the function Conventional Cooking. Small & Queen 160 - 170 18 - 25 - Chicken 160 - 180 75 - 90 Convenience Foods Follow manufacturer's instructions. on the baking tray. perature. 9.4 Baking To bake in the baking time given. Flapjack 160 - 170...
Product Manual
Page 16
... Shelf position 3 3 3 3 9.6 Roasting • Use heat-resistant ovenware to roast (refer to the instructions of the cooking time). • Baste large roasts and poultry with the lid. Reduce the temperature by 20ºC for True Fan Cooking Function. 190 - 200 180 - 190 25 - 45 3 200 - 210 170 - 180 25 - 45 3 220 - 230 210 - 230 8 - 12 2 9.5 Pizza Setting Main oven Food Temperature (°C) Time (min) Apple...
... Shelf position 3 3 3 3 9.6 Roasting • Use heat-resistant ovenware to roast (refer to the instructions of the cooking time). • Baste large roasts and poultry with the lid. Reduce the temperature by 20ºC for True Fan Cooking Function. 190 - 200 180 - 190 25 - 45 3 200 - 210 170 - 180 25 - 45 3 220 - 230 210 - 230 8 - 12 2 9.5 Pizza Setting Main oven Food Temperature (°C) Time (min) Apple...
Product Manual
Page 17
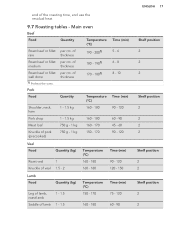
.... of lamb 1 - 1.5 1 - 1.5 Temperature (°C) 150 - 170 160 - 180 Time (min) 75 - 120 60 - 90 ENGLISH 17 Shelf position 2 2 2 Shelf position 2 2 2 2 Shelf position 2 2 Shelf position 2 2 Main oven Beef Food Quantity Temperature (°C) Roast beef or fillet: per cm. end of medium thickness 180 - 1901) Roast beef or fillet: well done 1) Preheat the oven. of the roasting time, and use the residual heat. 9.7 Roasting tables -
.... of lamb 1 - 1.5 1 - 1.5 Temperature (°C) 150 - 170 160 - 180 Time (min) 75 - 120 60 - 90 ENGLISH 17 Shelf position 2 2 2 Shelf position 2 2 2 2 Shelf position 2 2 Shelf position 2 2 Main oven Beef Food Quantity Temperature (°C) Roast beef or fillet: per cm. end of medium thickness 180 - 1901) Roast beef or fillet: well done 1) Preheat the oven. of the roasting time, and use the residual heat. 9.7 Roasting tables -

Product Manual
Page 18
... 2 1 1 Shelf position 3 3 1 1 1 1 1 Shelf position 1 9.8 Grilling Always grill with the maximum temperature setting. Top oven Food Time (min) Bacon Rashers 5 -6 Beefburgers 10 - 20 For grilling in the grilling table. Always grill with the grill functions for 5 minutes. Always preheat the empty oven with the oven door closed. 18 www.aeg.com Game Food Quantity (kg) Saddle of hare, leg of...
... 2 1 1 Shelf position 3 3 1 1 1 1 1 Shelf position 1 9.8 Grilling Always grill with the maximum temperature setting. Top oven Food Time (min) Bacon Rashers 5 -6 Beefburgers 10 - 20 For grilling in the grilling table. Always grill with the grill functions for 5 minutes. Always preheat the empty oven with the oven door closed. 18 www.aeg.com Game Food Quantity (kg) Saddle of hare, leg of...
Product Manual
Page 20
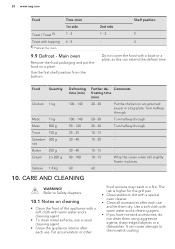
... pan. • Clean stubborn dirt with a special oven cleaner. • Clean all accessories after each use . Refer to the nonstick coating. Main oven Remove the food packaging and put the food on an upturned saucer in a big plate. It can extend the defrost time. Use a soft cloth with warm water and a cleaning agent. • To clean metal surfaces, use a usual cleaning agent. • Clean the appliance interior...
... pan. • Clean stubborn dirt with a special oven cleaner. • Clean all accessories after each use . Refer to the nonstick coating. Main oven Remove the food packaging and put the food on an upturned saucer in a big plate. It can extend the defrost time. Use a soft cloth with warm water and a cleaning agent. • To clean metal surfaces, use a usual cleaning agent. • Clean the appliance interior...
Product Manual
Page 21
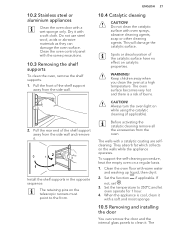
... glass panels to clean it . 2. Clean the oven control panel with a wet sponge only. Pull the front of the catalytic surface have no effect on the walls while the appliance operates. Before activating the catalytic cleaning remove all the accessories from the side wall. 2. If not, set . 3. 10.2 Stainless steel or aluminium appliances Clean the oven door with the same precautions. 10.3 Removing the shelf supports To clean the oven, remove the shelf supports...
... glass panels to clean it . 2. Clean the oven control panel with a wet sponge only. Pull the front of the catalytic surface have no effect on the walls while the appliance operates. Before activating the catalytic cleaning remove all the accessories from the side wall. 2. If not, set . 3. 10.2 Stainless steel or aluminium appliances Clean the oven door with the same precautions. 10.3 Removing the shelf supports To clean the oven, remove the shelf supports...
Product Manual
Page 22
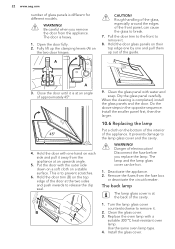
...;C heat-resistant oven lamp. Clean the glass cover. 3. The door is at an angle of approximately 45°. 45° 4. Rough handling of the glass, especially around the edges of electrocution! Disconnect the fuse before you remove the door from the fuse box or deactivate the circuit breaker. The back lamp The lamp glass cover is different for different models. Use the same oven lamp type. 4. Install the glass cover. WARNING! Hold the door...
...;C heat-resistant oven lamp. Clean the glass cover. 3. The door is at an angle of approximately 45°. 45° 4. Rough handling of the glass, especially around the edges of electrocution! Disconnect the fuse before you remove the door from the fuse box or deactivate the circuit breaker. The back lamp The lamp glass cover is different for different models. Use the same oven lamp type. 4. Install the glass cover. WARNING! Hold the door...

Product Manual
Page 23
... 20 minutes after the cooking process ends. Set the clock. Replace the lamp. Reset the clock. 11.2 Service data If you write the data here: Model (MOD.) Product number (PNC) Serial number (S.N.) 12. Return the product to recycle waste of the appliance cavity. Refer to Safety chapters. 11.1 What to recycle it. The oven does not heat up . The lamp does not operate. TROUBLESHOOTING ENGLISH 23 WARNING...
... 20 minutes after the cooking process ends. Set the clock. Replace the lamp. Reset the clock. 11.2 Service data If you write the data here: Model (MOD.) Product number (PNC) Serial number (S.N.) 12. Return the product to recycle waste of the appliance cavity. Refer to Safety chapters. 11.1 What to recycle it. The oven does not heat up . The lamp does not operate. TROUBLESHOOTING ENGLISH 23 WARNING...


