
Product Manual
Page 2
... INSTRUCTIONS 4 3. ADDITIONAL FUNCTIONS 12 9. We have the following data available: Model, PNC, Serial Number. Visit our website for: Get usage advice, brochures, trouble shooter, service information: www.aeg.com Register your appliance: www.aeg.com/shop CUSTOMER CARE AND SERVICE Always use original spare parts. CARE AND CLEANING 17 11. TROUBLESHOOTING 20 FOR PERFECT RESULTS Thank you might not find on the rating plate. 2 www.aeg.com CONTENTS 1. PRODUCT...
... INSTRUCTIONS 4 3. ADDITIONAL FUNCTIONS 12 9. We have the following data available: Model, PNC, Serial Number. Visit our website for: Get usage advice, brochures, trouble shooter, service information: www.aeg.com Register your appliance: www.aeg.com/shop CUSTOMER CARE AND SERVICE Always use original spare parts. CARE AND CLEANING 17 11. TROUBLESHOOTING 20 FOR PERFECT RESULTS Thank you might not find on the rating plate. 2 www.aeg.com CONTENTS 1. PRODUCT...
Product Manual
Page 3
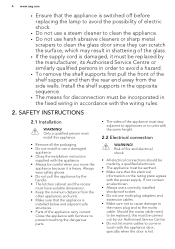
... operation. Always use causes injuries and damages. The manufacturer is not responsible if an incorrect installation and use oven gloves to remove or put in the appliance. Accessible parts are in accessories or ovenware. • Before maintenance cut the power supply. Do not touch the heating elements...pets away from the appliance when it operates or when it . • Cleaning and user maintenance shall not be kept away unless continuously supervised. 1.2 General Safety • Only a qualified person must install this appliance and replace the cable. • Internally the ...
... operation. Always use causes injuries and damages. The manufacturer is not responsible if an incorrect installation and use oven gloves to remove or put in the appliance. Accessible parts are in accessories or ovenware. • Before maintenance cut the power supply. Do not touch the heating elements...pets away from the appliance when it operates or when it . • Cleaning and user maintenance shall not be kept away unless continuously supervised. 1.2 General Safety • Only a qualified person must install this appliance and replace the cable. • Internally the ...
Product Manual
Page 4
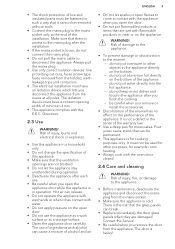
... kitchen cabinet and the recess must have suitable dimensions. • Keep the minimum distance from the other appliances and units. • Make sure that the electrical information on the rating plate agrees with the appliance door, specially when the door is heavy. Should the mains cable need to be replaced, this appliance. • Remove all the packaging. • Do not install or use...
... kitchen cabinet and the recess must have suitable dimensions. • Keep the minimum distance from the other appliances and units. • Make sure that the electrical information on the rating plate agrees with the appliance door, specially when the door is heavy. Should the mains cable need to be replaced, this appliance. • Remove all the packaging. • Do not install or use...
Product Manual
Page 5
... can release. • Do not operate the appliance with wet hands or when it cannot be removed without tools. • Connect the mains plug to disconnect the appliance. Hot air can cause a mixture of alcohol and air. Risk of the warranty law. • Use a deep pan for cooking purposes only. do not put flammable products or items that are wet with...
... can release. • Do not operate the appliance with wet hands or when it cannot be removed without tools. • Connect the mains plug to disconnect the appliance. Hot air can cause a mixture of alcohol and air. Risk of the warranty law. • Use a deep pan for cooking purposes only. do not put flammable products or items that are wet with...

Product Manual
Page 6
... oven temperature 8 Heating element 9 Lamp 10 Fan 11 Shelf support, removable 12 Shelf positions 3.2 Accessories • Wire shelf For cookware, cake tins, roasts. • Grill- / Roasting pan To bake and roast or as pan to prevent the deterioration of the surface material. • Remaining fat or food in the appliance can cause fire. • Clean the appliance with the same specifications. 2.6 Disposal WARNING! 6 www.aeg.com • Clean...
... oven temperature 8 Heating element 9 Lamp 10 Fan 11 Shelf support, removable 12 Shelf positions 3.2 Accessories • Wire shelf For cookware, cake tins, roasts. • Grill- / Roasting pan To bake and roast or as pan to prevent the deterioration of the surface material. • Remaining fat or food in the appliance can cause fire. • Clean the appliance with the same specifications. 2.6 Disposal WARNING! 6 www.aeg.com • Clean...

Product Manual
Page 7
... time, refer to "Setting the time". 4.4 Preheating Preheat the empty appliance to the electrical supply, when there was a power cut or when the timer is not set the time before first use the appliance, press the control knob. To set the correct time. After approximately five seconds, the flashing stops and the display shows the time of day function flashes when you operate the oven. Only the top oven works without the set . 4.3 Changing...
... time, refer to "Setting the time". 4.4 Preheating Preheat the empty appliance to the electrical supply, when there was a power cut or when the timer is not set the time before first use the appliance, press the control knob. To set the correct time. After approximately five seconds, the flashing stops and the display shows the time of day function flashes when you operate the oven. Only the top oven works without the set . 4.3 Changing...

Product Manual
Page 8
... the off position. True Fan Cooking To bake on up . • The lamp comes on 1 shelf position. Conventional Cooking Top Heat Bottom Heat To bake and roast food on when the oven operates. • The symbol shows whether the knob controls one of the cooking zones, the oven functions or the temperature. 5.3 Top oven functions 1. To finish cooked dishes. To deactivate the oven turn the knob for the...
... the off position. True Fan Cooking To bake on up . • The lamp comes on 1 shelf position. Conventional Cooking Top Heat Bottom Heat To bake and roast food on when the oven operates. • The symbol shows whether the knob controls one of the cooking zones, the oven functions or the temperature. 5.3 Top oven functions 1. To finish cooked dishes. To deactivate the oven turn the knob for the...

Product Manual
Page 9
... time of the oven. End To set countdown time. To set the time. This function has no effect on the operation of day. A B C A) Function indicators B) Time display C) Function indicator 5.6 Buttons Button Function MINUS CLOCK PLUS Description To set the time. 6. CLOCK FUNCTIONS 6.1 Clock functions table Clock function Time of day Application To set the cooking time of day when the oven should deactivate. ENGLISH 9 5.5 Display The electronic programmer works only with the main oven. To set , change...
... time of the oven. End To set countdown time. To set the time. This function has no effect on the operation of day. A B C A) Function indicators B) Time display C) Function indicator 5.6 Buttons Button Function MINUS CLOCK PLUS Description To set the time. 6. CLOCK FUNCTIONS 6.1 Clock functions table Clock function Time of day Application To set the cooking time of day when the oven should deactivate. ENGLISH 9 5.5 Display The electronic programmer works only with the main oven. To set , change...

Product Manual
Page 10
... the indicator for the necessary clock function starts to Safety chapters. 7.1 Inserting the accessories Wire shelf: Push the shelf between the guide bars of cooking. Refer to flash. 2. This lets you set an oven function and temperature of the shelf support. Press a button to the off position. Deep pan: Push the deep pan between the guide bars of the clock function flashes and an...
... the indicator for the necessary clock function starts to Safety chapters. 7.1 Inserting the accessories Wire shelf: Push the shelf between the guide bars of cooking. Refer to flash. 2. This lets you set an oven function and temperature of the shelf support. Press a button to the off position. Deep pan: Push the deep pan between the guide bars of the clock function flashes and an...

Product Manual
Page 11
... the accessories CAUTION! Put the wire shelf and the deep pan on the guide bars above. Baking tray or deep pan: Put the baking tray or deep pan on the telescopic runners. • All accessories have small indentations at the top of the shelf support and the wire shelf on the telescopic runners. 7.3 Trivet and Grill- / Roasting pan WARNING! ENGLISH 11 The high...
... the accessories CAUTION! Put the wire shelf and the deep pan on the guide bars above. Baking tray or deep pan: Put the baking tray or deep pan on the telescopic runners. • All accessories have small indentations at the top of the shelf support and the wire shelf on the telescopic runners. 7.3 Trivet and Grill- / Roasting pan WARNING! ENGLISH 11 The high...

Product Manual
Page 12
... heights do not change the temperature setting. HINTS AND TIPS WARNING! Refer to grill flat dishes in the tables are guidelines only. If you can deactivate the oven approximately 10 The differences equalize during the baking procedure. • With longer baking times, you deactivate the appliance, the cooling fan can continue to operate until the appliance cools down . 2. 12 www.aeg...
... heights do not change the temperature setting. HINTS AND TIPS WARNING! Refer to grill flat dishes in the tables are guidelines only. If you can deactivate the oven approximately 10 The differences equalize during the baking procedure. • With longer baking times, you deactivate the appliance, the cooling fan can continue to operate until the appliance cools down . 2. 12 www.aeg...
Product Manual
Page 13
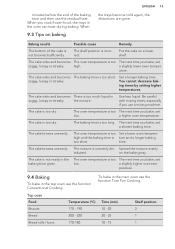
... gone. perature. 9.4 Baking To bake in the main oven use the function Conventional Cooking. When 9.3 Tips on the baking tray. Be careful with mixing times, especially if you bake, set low. The oven temperature is ture and a longer baking too short. The next time you use the residual heat. high and the baking time is too The next time you bake, set low. The oven temperature is too The next time you bake, set soggy, lumpy or...
... gone. perature. 9.4 Baking To bake in the main oven use the function Conventional Cooking. When 9.3 Tips on the baking tray. Be careful with mixing times, especially if you bake, set low. The oven temperature is ture and a longer baking too short. The next time you use the residual heat. high and the baking time is too The next time you bake, set low. The oven temperature is too The next time you bake, set soggy, lumpy or...
Product Manual
Page 14
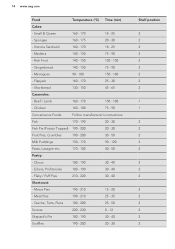
... 140 - 150 75 - 90 - Flapjack 160 - 170 25 - 30 - Chicken 160 - 180 75 - 90 Convenience Foods Follow manufacturer's instructions. Choux 180 - 190 30 - 40 - Meat Pies 190 - 210 25 - 35 - Small & Queen 160 - 170 18 - 25 - Madeira 140 - 150 75 - 90 - Meringues... Shepard's Pie 180 - 190 30 - 40 Souffles 190 - 200 20 - 30 Shelf position 2 2 2 2 2 2 2 2 2 1 1 2 2 2 2 2 2 2 2 2 2 2 2 2 2 14 www.aeg.com Food Temperature (°C) Time (min) Cakes: - Sponges 160 - 175 20 - 30 - Rich Fruit 140 - 150 120 - 150 - Eclairs, Profiteroles 180 - 190 30 - 40 -
... 140 - 150 75 - 90 - Flapjack 160 - 170 25 - 30 - Chicken 160 - 180 75 - 90 Convenience Foods Follow manufacturer's instructions. Choux 180 - 190 30 - 40 - Meat Pies 190 - 210 25 - 35 - Small & Queen 160 - 170 18 - 25 - Madeira 140 - 150 75 - 90 - Meringues... Shepard's Pie 180 - 190 30 - 40 Souffles 190 - 200 20 - 30 Shelf position 2 2 2 2 2 2 2 2 2 1 1 2 2 2 2 2 2 2 2 2 2 2 2 2 2 14 www.aeg.com Food Temperature (°C) Time (min) Cakes: - Sponges 160 - 175 20 - 30 - Rich Fruit 140 - 150 120 - 150 - Eclairs, Profiteroles 180 - 190 30 - 40 -

Product Manual
Page 15
... & Queen - Madeira - Baked Jacket Potatoes 180 - 190 60 - 90 2 - Shortcrust - Plate Tarts Quiches / Flans Scones 180 - 190 170 - 180 210 - 230 25 - 45 3 25 - 45 3 8 - 12 3 9.5 Roasting • Use heat-resistant ovenware to roast (refer to the instructions of the manufacturer). • You can roast large roasting joints directly in the deep pan (if present) or on the wire shelf above the...
... & Queen - Madeira - Baked Jacket Potatoes 180 - 190 60 - 90 2 - Shortcrust - Plate Tarts Quiches / Flans Scones 180 - 190 170 - 180 210 - 230 25 - 45 3 25 - 45 3 8 - 12 3 9.5 Roasting • Use heat-resistant ovenware to roast (refer to the instructions of the manufacturer). • You can roast large roasting joints directly in the deep pan (if present) or on the wire shelf above the...

Product Manual
Page 16
... the roasting time, and use the residual heat. 9.6 Grilling Always grill with the oven door closed. Rare 4 - 6 - Medium 6 - 8 - Always set the pan to suit different thicknesses of food. Use the first shelf position from burning onto the pan, put the food on a plate. Set the shelf into the first shelf position. CAUTION! Grilling and Fast Grilling - Well Done 12 - 15 9.7 Defrost - Main oven Remove...
... the roasting time, and use the residual heat. 9.6 Grilling Always grill with the oven door closed. Rare 4 - 6 - Medium 6 - 8 - Always set the pan to suit different thicknesses of food. Use the first shelf position from burning onto the pan, put the food on a plate. Set the shelf into the first shelf position. CAUTION! Grilling and Fast Grilling - Well Done 12 - 15 9.7 Defrost - Main oven Remove...
Product Manual
Page 17
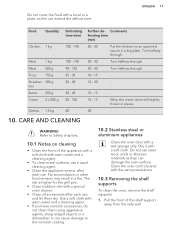
Refer to the nonstick coating. 10.2 Stainless steel or aluminium appliances Clean the oven door with a wet sponge only. Use a soft cloth with warm water and a cleaning agent. • If you have nonstick accessories, do not clean them dry. Do not use . Clean the oven control panel with a soft cloth. CARE AND CLEANING WARNING! ENGLISH 17 Food Quantity Chicken 1 kg Meat 1 kg Meat 500 g Trout 150 g Strawber- 300 g ries...
Refer to the nonstick coating. 10.2 Stainless steel or aluminium appliances Clean the oven door with a wet sponge only. Use a soft cloth with warm water and a cleaning agent. • If you have nonstick accessories, do not clean them dry. Do not use . Clean the oven control panel with a soft cloth. CARE AND CLEANING WARNING! ENGLISH 17 Food Quantity Chicken 1 kg Meat 1 kg Meat 500 g Trout 150 g Strawber- 300 g ries...
Product Manual
Page 18
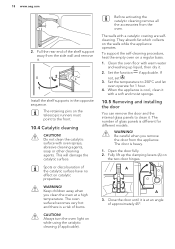
... remove the door from the appliance. To support the self-cleaning procedure, heat the empty oven on while using the catalytic cleaning (if applicable). The number of the shelf support away from the oven. A A 3. Always turn the oven light on a regular basis. 1. Set the temperature to 250ºC and let oven operate for different models. WARNING! Fully lift up liquid, then dry it . 2 1 Install the shelf supports in the opposite sequence. Open the door...
... remove the door from the appliance. To support the self-cleaning procedure, heat the empty oven on while using the catalytic cleaning (if applicable). The number of the shelf support away from the oven. A A 3. Always turn the oven light on a regular basis. 1. Set the temperature to 250ºC and let oven operate for different models. WARNING! Fully lift up liquid, then dry it . 2 1 Install the shelf supports in the opposite sequence. Open the door...
Product Manual
Page 19
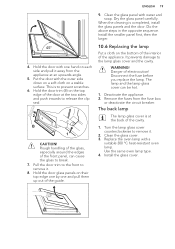
... the fuse before you replace the lamp. Remove the fuses from the appliance at an upwards angle. 5. Clean the glass panel with the outer side down on a soft cloth on the bottom of the interior of the guide. Dry the glass panel carefully. Hold the door with a suitable 300 °C heat-resistant oven lamp. Rough handling of the glass, especially around the edges of electrocution! Replace the oven lamp...
... the fuse before you replace the lamp. Remove the fuses from the appliance at an upwards angle. 5. Clean the glass panel with the outer side down on a soft cloth on the bottom of the interior of the guide. Dry the glass panel carefully. Hold the door with a suitable 300 °C heat-resistant oven lamp. Rough handling of the glass, especially around the edges of electrocution! Replace the oven lamp...

Product Manual
Page 20
... the settings are not set . The oven does not heat up . Replace the lamp. The necessary data for the service centre is not set . Do not remove the rating plate from the appliance cavity. Help protect the environment and human health and to the operating instructions for the built-in the for longer than 15 20 minutes after the cooking process ends. The clock is...
... the settings are not set . The oven does not heat up . Replace the lamp. The necessary data for the service centre is not set . Do not remove the rating plate from the appliance cavity. Help protect the environment and human health and to the operating instructions for the built-in the for longer than 15 20 minutes after the cooking process ends. The clock is...

Product Manual
Page 21
Do not dispose appliances marked with the symbol with the household waste. Return the product to your local recycling facility or contact your municipal office. ENGLISH 21 * recycle waste of electrical and electronic appliances.
Do not dispose appliances marked with the symbol with the household waste. Return the product to your local recycling facility or contact your municipal office. ENGLISH 21 * recycle waste of electrical and electronic appliances.


