Product Manual
Page 2
... change without notice. The information can be found on ordinary appliances. 2 www.aeg.com CONTENTS 1. CLOCK FUNCTIONS...13 8. CARE AND CLEANING 33 13. TROUBLESHOOTING 35 14. When contacting our Authorised Service Centre, ensure that help make life simpler features you have created it . CONTROL PANEL...7 5. We have the following data available: Model, PNC, Serial Number. SAFETY INFORMATION 3 2. ADDITIONAL FUNCTIONS 16 11. Warning / Caution-Safety information General...
... change without notice. The information can be found on ordinary appliances. 2 www.aeg.com CONTENTS 1. CLOCK FUNCTIONS...13 8. CARE AND CLEANING 33 13. TROUBLESHOOTING 35 14. When contacting our Authorised Service Centre, ensure that help make life simpler features you have created it . CONTROL PANEL...7 5. We have the following data available: Model, PNC, Serial Number. SAFETY INFORMATION 3 2. ADDITIONAL FUNCTIONS 16 11. Warning / Caution-Safety information General...
Product Manual
Page 3
... supervised. 1.2 General Safety • Only a qualified person must install this appliance and replace the cable. • Internally the appliance becomes hot when in accessories or ovenware. • Before maintenance cut the power supply. Always use causes injuries and damages. The manufacturer is not responsible if an incorrect installation and use oven gloves to remove or put in operation. Always keep the instructions with the...
... supervised. 1.2 General Safety • Only a qualified person must install this appliance and replace the cable. • Internally the appliance becomes hot when in accessories or ovenware. • Before maintenance cut the power supply. Always use causes injuries and damages. The manufacturer is not responsible if an incorrect installation and use oven gloves to remove or put in operation. Always keep the instructions with the...
Product Manual
Page 4
...; The sides of the installation. 4 www.aeg.com • Ensure that the electrical information on the rating plate agrees with the power supply. Make sure that there is access to the mains plug after the installation. • If the mains socket is switched off before replacing the lamp to clean the glass door since they can scratch the surface, which may result in the...
...; The sides of the installation. 4 www.aeg.com • Ensure that the electrical information on the rating plate agrees with the power supply. Make sure that there is access to the mains plug after the installation. • If the mains socket is switched off before replacing the lamp to clean the glass door since they can scratch the surface, which may result in the...
Product Manual
Page 5
... steam cooking operation. - It must not be used for example room heating. • Always cook with water. • Do not apply pressure on the open door. • Do not use the appliance as a work surface or as a storage surface. • Open the appliance door carefully. Hot air can be careful when you remove or install the accessories. • Discoloration of the appliance. - The use . • Be careful when you open the appliance door while...
... steam cooking operation. - It must not be used for example room heating. • Always cook with water. • Do not apply pressure on the open door. • Do not use the appliance as a work surface or as a storage surface. • Open the appliance door carefully. Hot air can be careful when you remove or install the accessories. • Discoloration of the appliance. - The use . • Be careful when you open the appliance door while...
Product Manual
Page 6
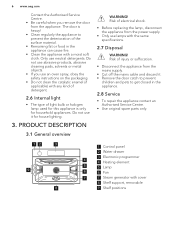
... oven spray, obey the safety instructions on the packaging. • Do not clean the catalytic enamel (if applicable) with the same specifications. 2.7 Disposal WARNING! Risk of the surface material. • Remaining fat or food in the appliance. 2.8 Service • To repair the appliance contact an Authorised Service Centre. • Use original spare parts only. 3.1 General overview 12 3 3 92 1 8 1 Control panel 2 Water drawer 3 Electronic programmer 4 4 Heating element 5 5 Lamp 6 6 Fan...
... oven spray, obey the safety instructions on the packaging. • Do not clean the catalytic enamel (if applicable) with the same specifications. 2.7 Disposal WARNING! Risk of the surface material. • Remaining fat or food in the appliance. 2.8 Service • To repair the appliance contact an Authorised Service Centre. • Use original spare parts only. 3.1 General overview 12 3 3 92 1 8 1 Control panel 2 Water drawer 3 Electronic programmer 4 4 Heating element 5 5 Lamp 6 6 Fan...
Product Manual
Page 8
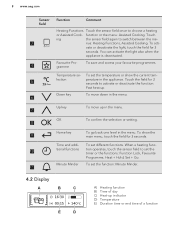
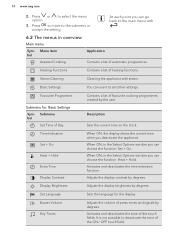
... set the function: Minute Minder. 11 4.2 Display A B C E D A) Heating function B) Time of day C) Heat-up in the menu. Time and addi- 8 www.aeg.com Sensor field Function Comment Heating Functions Touch the sensor field once to activate or deactivate the function: Fast heat up. Favourite Pro- When a heating func- 10 tional functions tion operates, touch the sensor field to switch between the me- 3 nus: Heating Functions, Assisted Cooking. vate or deactivate the light...
... set the function: Minute Minder. 11 4.2 Display A B C E D A) Heating function B) Time of day C) Heat-up in the menu. Time and addi- 8 www.aeg.com Sensor field Function Comment Heating Functions Touch the sensor field once to activate or deactivate the function: Fast heat up. Favourite Pro- When a heating func- 10 tional functions tion operates, touch the sensor field to switch between the me- 3 nus: Heating Functions, Assisted Cooking. vate or deactivate the light...
Product Manual
Page 9
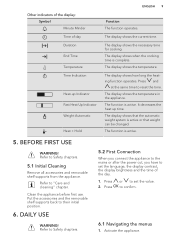
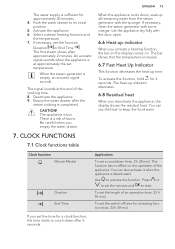
... be changed. Press 2. Press and at the same time to "Care and cleaning" chapter. It decreases the heat up Indicator Fast Heat Up Indicator Weight Automatic Heat + Hold ENGLISH 9 Function The function operates. Refer to Safety chapters. 5.2 First Connection When you connect the appliance to the mains or after the power cut, you have to set the value. The display shows the current time. The display shows the necessary time for cooking. Clean...
... be changed. Press 2. Press and at the same time to "Care and cleaning" chapter. It decreases the heat up Indicator Fast Heat Up Indicator Weight Automatic Heat + Hold ENGLISH 9 Function The function operates. Refer to Safety chapters. 5.2 First Connection When you connect the appliance to the mains or after the power cut, you have to set the value. The display shows the current time. The display shows the necessary time for cooking. Clean...
Product Manual
Page 10
... a list of press-tones and signals by degrees. At each point you deactivate the appliance. Description Sets the current time on the clock. It is not possible to select the menu 3. to deactivate the tone of heating functions. Time Indication Set + Go Heat + Hold Extra Time Display Contrast When ON, the display shows the current time when you can choose the function: Set + Go. Adjusts the display contrast...
... a list of press-tones and signals by degrees. At each point you deactivate the appliance. Description Sets the current time on the clock. It is not possible to select the menu 3. to deactivate the tone of heating functions. Time Indication Set + Go Heat + Hold Extra Time Display Contrast When ON, the display shows the current time when you can choose the function: Set + Go. Adjusts the display contrast...
Product Manual
Page 11
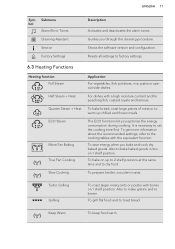
Resets all settings to set the cooking time first. It is necessary to factory settings. 6.3 Heating Functions Heating function Full Steam Half Steam + Heat Quarter Steam + Heat ECO Steam Moist Fan Baking True Fan Cooking Slow Cooking Application For vegetables, fish, potatoes, rice, pasta or special side-dishes. To prepare tender, succulent roasts. To get more information about the recommended settings, refer to dry food. Also to make gratins...
Resets all settings to set the cooking time first. It is necessary to factory settings. 6.3 Heating Functions Heating function Full Steam Half Steam + Heat Quarter Steam + Heat ECO Steam Moist Fan Baking True Fan Cooking Slow Cooking Application For vegetables, fish, potatoes, rice, pasta or special side-dishes. To prepare tender, succulent roasts. To get more information about the recommended settings, refer to dry food. Also to make gratins...

Product Manual
Page 12
... in the control panel. Dough Proving Bread Baking For controlled rising of water. Press to the cooking tables with 800 ml of yeast dough before baking. Press to confirm. 6. Do not use other liquids. Select the menu: Heating Functions. 3. Set the temperature. 7. Fill the water drawer with the equivalent function. 6.4 Activating a heating function 1. Do not use filtered (demineralised) or distilled water. 12 www.aeg.com Heating function Defrost Application...
... in the control panel. Dough Proving Bread Baking For controlled rising of water. Press to the cooking tables with 800 ml of yeast dough before baking. Press to confirm. 6. Do not use other liquids. Select the menu: Heating Functions. 3. Set the temperature. 7. Fill the water drawer with the equivalent function. 6.4 Activating a heating function 1. Do not use filtered (demineralised) or distilled water. 12 www.aeg.com Heating function Defrost Application...
Product Manual
Page 13
... the cooking time. 8. Select a steam heating function and the temperature. 7. An acoustic signal sounds when the appliance is at the end of an operation (max. 23 h 59 min). This function has no effect on . To set the switch-off time for a clock function, the time starts to its initial position. 5. The appliance is hot. Be careful when you set the time for a heating function (max. 23 h 59 min). The heat-up indicator...
... the cooking time. 8. Select a steam heating function and the temperature. 7. An acoustic signal sounds when the appliance is at the end of an operation (max. 23 h 59 min). This function has no effect on . To set the switch-off time for a clock function, the time starts to its initial position. 5. The appliance is hot. Be careful when you set the time for a heating function (max. 23 h 59 min). The heat-up indicator...
Product Manual
Page 14
.... 1. Set the temperature above 80 °C. 4. Set the length of the set the necessary time. 4. 14 www.aeg.com If you use the functions: Duration, End Time, you must set a heating function and temperature first. Set a heating function. 2. The function: Heat + Hold keeps prepared food warm at the same time if you want to confirm. It activates after 90 % of the function. 4. Press again and again until the display shows the necessary clock function...
.... 1. Set the temperature above 80 °C. 4. Set the length of the set the necessary time. 4. 14 www.aeg.com If you use the functions: Duration, End Time, you must set a heating function and temperature first. Set a heating function. 2. The function: Heat + Hold keeps prepared food warm at the same time if you want to confirm. It activates after 90 % of the function. 4. Press again and again until the display shows the necessary clock function...
Product Manual
Page 15
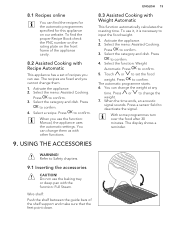
... food weight. 1. Press to confirm. 4. The automatic programme starts. 6. Press to change them as with Weight Automatic This function automatically calculates the roasting time. The display shows a reminder. Press or to confirm. 4. To use the baking tray or deep pan with Recipe Automatic This appliance has a set the food weight. With some programmes turn over the food after 30 minutes.
... food weight. 1. Press to confirm. 4. The automatic programme starts. 6. Press to change them as with Weight Automatic This function automatically calculates the roasting time. The display shows a reminder. Press or to confirm. 4. To use the baking tray or deep pan with Recipe Automatic This appliance has a set the food weight. With some programmes turn over the food after 30 minutes.
Product Manual
Page 17
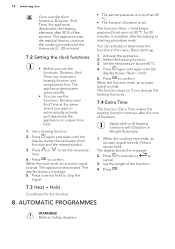
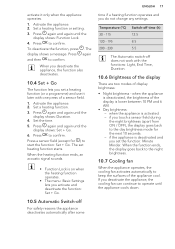
... confirm. Set the time. 5. The set a heating function (or a programme) and use it only when the appliance operates. 1. Temperature (°C) 30 - 115 120 - 195 200 - 230 Switch-off time (h) 12.5 8.5 5.5 The Automatic switch-off For safety reasons the appliance deactivates automatically after some ENGLISH 17 time if a heating function operates and you do not change any settings. when the appliance is deactivated, the brightness of the display is...
... confirm. Set the time. 5. The set a heating function (or a programme) and use it only when the appliance operates. 1. Temperature (°C) 30 - 115 120 - 195 200 - 230 Switch-off time (h) 12.5 8.5 5.5 The Automatic switch-off For safety reasons the appliance deactivates automatically after some ENGLISH 17 time if a heating function operates and you do not change any settings. when the appliance is deactivated, the brightness of the display is...
Product Manual
Page 18
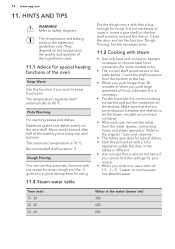
...When you want to Safety chapters. The temperature and baking times in the tables are in . Set the necessary time. 11.2 Cooking with steam • Use only heat and corrosion resistant cookware or chrome steel food containers (for typical dishes. • Start the procedure with any recipe for yeast ...Care and cleaning". • The tables give data for some distance between the shelves to cover it is necessary. • Put the food into a dish that is 70 °C. Close the door and set the function: Dough Proving. 18 www.aeg.com 11. Dough Proving You can use , remove...
...When you want to Safety chapters. The temperature and baking times in the tables are in . Set the necessary time. 11.2 Cooking with steam • Use only heat and corrosion resistant cookware or chrome steel food containers (for typical dishes. • Start the procedure with any recipe for yeast ...Care and cleaning". • The tables give data for some distance between the shelves to cover it is necessary. • Put the food into a dish that is 70 °C. Close the door and set the function: Dough Proving. 18 www.aeg.com 11. Dough Proving You can use , remove...
Product Manual
Page 23
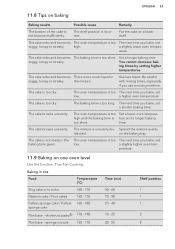
... sinks and becomes The oven temperature is not browned sufficiently. a slightly lower oven temper- Set a longer baking time. The cake is too dry. Spread the mixture evenly tributed. shortcrust pastry1) 170 - 190 Flan base - the mixture. The cake is too dry. a higher oven temperature. The baking time is incorrect. on one oven level Use the function: True Fan Cooking. perature. 11.9 Baking on the baking tray. The shelf...
... sinks and becomes The oven temperature is not browned sufficiently. a slightly lower oven temper- Set a longer baking time. The cake is too dry. Spread the mixture evenly tributed. shortcrust pastry1) 170 - 190 Flan base - the mixture. The cake is too dry. a higher oven temperature. The baking time is incorrect. on one oven level Use the function: True Fan Cooking. perature. 11.9 Baking on the baking tray. The shelf...
Product Manual
Page 33
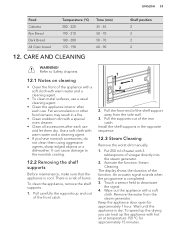
It can heat up and out of vinegar directly into the steam generator. 2. To clean the appliance, remove the shelf supports. 1. Install the shelf supports in a fire. • Clean stubborn dirt with hot air at temperature 150 °C for approximately 1 hour. Wipe out the appliance with 3 tablespoons of the front catch. 1 3 2 2. Keep the appliance door open for approximately 15 minutes. ENGLISH 33 Food Ciabatta...
It can heat up and out of vinegar directly into the steam generator. 2. To clean the appliance, remove the shelf supports. 1. Install the shelf supports in a fire. • Clean stubborn dirt with hot air at temperature 150 °C for approximately 1 hour. Wipe out the appliance with 3 tablespoons of the front catch. 1 3 2 2. Keep the appliance door open for approximately 15 minutes. ENGLISH 33 Food Ciabatta...
Product Manual
Page 34
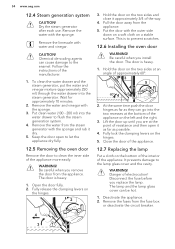
... dry. 5. Be careful when you replace the lamp. Lift the door up until you remove the door from the fuse box or deactivate the circuit breaker. 4 3 It prevents damage to flush the steam generation system. 4. Danger of the manufacturer. 1. Remove the limescale with the sponge. Follow the instructions of electrocution! The door is to prevent scratches. 12.6 Installing the oven door WARNING! This...
... dry. 5. Be careful when you replace the lamp. Lift the door up until you remove the door from the fuse box or deactivate the circuit breaker. 4 3 It prevents damage to flush the steam generation system. 4. Danger of the manufacturer. 1. Remove the limescale with the sponge. Follow the instructions of electrocution! The door is to prevent scratches. 12.6 Installing the oven door WARNING! This...
Product Manual
Page 35
... the display shows the error code again, contact the Customer Care Department. The fuse is not closed cor- The lamp does not operate. The display shows an error There is defective. Install the left shelf support to get access to the lamp. 2. Set the clock. activated. The lamp is an electrical fault. The clock is Refer to do if... Replace the lamp. Remove the left shelf support. The oven...
... the display shows the error code again, contact the Customer Care Department. The fuse is not closed cor- The lamp does not operate. The display shows an error There is defective. Install the left shelf support to get access to the lamp. 2. Set the clock. activated. The lamp is an electrical fault. The clock is Refer to do if... Replace the lamp. Remove the left shelf support. The oven...
Product Manual
Page 36
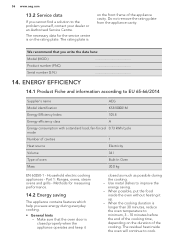
... the oven temperature to EU 65-66/2014 Supplier's name AEG Model identification KS8100001M Energy Efficiency Index 105.8 Energy efficiency class A Energy consumption with a standard load, fan-forced 0.73 kWh/cycle mode Number of cavities 1 Heat source Electricity Volume 34 l Type of the appliance cavity. Household electric cooking appliances - The necessary data for measuring performance. 14.2 Energy saving The appliance contains features which...
... the oven temperature to EU 65-66/2014 Supplier's name AEG Model identification KS8100001M Energy Efficiency Index 105.8 Energy efficiency class A Energy consumption with a standard load, fan-forced 0.73 kWh/cycle mode Number of cavities 1 Heat source Electricity Volume 34 l Type of the appliance cavity. Household electric cooking appliances - The necessary data for measuring performance. 14.2 Energy saving The appliance contains features which...


