
Specification Sheet
Page 1
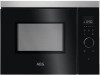
... cleaning Cleaning is a touch to open the microwave The microwave oven has been designed with this microwave oven. Just a smooth glass surface. It's convenience, at its most convenient with an electronic, touch-activated door. Designed to co-ordinate with the favourite functions. No need to customised functions Frequently used microwave settings can be saved and accessed quickly with your traditional AEG oven, widening the range of cooking...
... cleaning Cleaning is a touch to open the microwave The microwave oven has been designed with this microwave oven. Just a smooth glass surface. It's convenience, at its most convenient with an electronic, touch-activated door. Designed to co-ordinate with the favourite functions. No need to customised functions Frequently used microwave settings can be saved and accessed quickly with your traditional AEG oven, widening the range of cooking...
Specification Sheet
Page 2
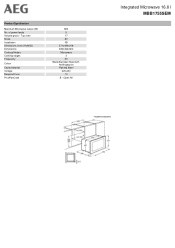
Top oven Noise Installation Dimensions (mm) (HxWxD) Dimensions Cooking Modes Cooking stages Frequency Colour Cavity Material Voltage Required Fuse ProdPartCode 800 5 17 60 FB 371x494x316 360x462x300 Microwave 3 50 Black/Stainless Steel with Antifingerprint Painted Steel 220-240 10 B - Open All Integrated Microwave 16.8 l MBB1755SEM Product Specification Maximum Microwave output (W) No. of power levels Volume gross -
Top oven Noise Installation Dimensions (mm) (HxWxD) Dimensions Cooking Modes Cooking stages Frequency Colour Cavity Material Voltage Required Fuse ProdPartCode 800 5 17 60 FB 371x494x316 360x462x300 Microwave 3 50 Black/Stainless Steel with Antifingerprint Painted Steel 220-240 10 B - Open All Integrated Microwave 16.8 l MBB1755SEM Product Specification Maximum Microwave output (W) No. of power levels Volume gross -

User Manual
Page 2
... INFORMATION 25 10. COOKING CHARTS ...16 7. We have the following data available. Model, PNC, Serial Number. TROUBLESHOOTING ...24 9. features you impeccable performance for many years, with innovative technologies that you for your appliance: www.aeg.com/shop CUSTOMER CARE AND SERVICE We recommend the use of original spare parts. INSTALLATION ...7 3. BEFORE FIRST USE...12 5. The information can be found on ordinary appliances. Please spend...
... INFORMATION 25 10. COOKING CHARTS ...16 7. We have the following data available. Model, PNC, Serial Number. TROUBLESHOOTING ...24 9. features you impeccable performance for many years, with innovative technologies that you for your appliance: www.aeg.com/shop CUSTOMER CARE AND SERVICE We recommend the use of original spare parts. INSTALLATION ...7 3. BEFORE FIRST USE...12 5. The information can be found on ordinary appliances. Please spend...
User Manual
Page 3
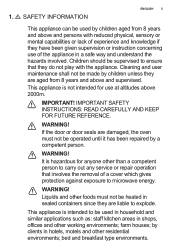
... for anyone other working environments; IMPORTANT! WARNING! This appliance is intended to ensure that involves the removal of experience and knowledge if they have been given supervision or instruction concerning use at altitudes above 2000m. SAFETY INFORMATION ENGLISH 3 This appliance can be used by a competent person. WARNING! Cleaning and user maintenance shall not be heated in hotels, motels...
... for anyone other working environments; IMPORTANT! WARNING! This appliance is intended to ensure that involves the removal of experience and knowledge if they have been given supervision or instruction concerning use at altitudes above 2000m. SAFETY INFORMATION ENGLISH 3 This appliance can be used by a competent person. WARNING! Cleaning and user maintenance shall not be heated in hotels, motels...
User Manual
Page 4
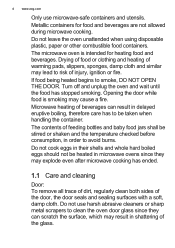
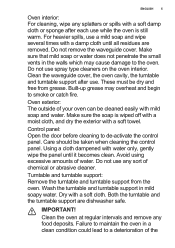
... cooking has ended. 1.1 Care and cleaning Door: To remove all trace of dirt, regularly clean both sides of the door, the door seals and sealing surfaces with a soft, damp cloth. If food being heated begins to avoid burns. The contents of feeding bottles and baby food jars shall be taken when handling the container. Metallic containers for heating food and beverages. 4 www.aeg...
... cooking has ended. 1.1 Care and cleaning Door: To remove all trace of dirt, regularly clean both sides of the door, the door seals and sealing surfaces with a soft, damp cloth. If food being heated begins to avoid burns. The contents of feeding bottles and baby food jars shall be taken when handling the container. Metallic containers for heating food and beverages. 4 www.aeg...
User Manual
Page 5
... may cause damage to smoke or catch fire. Control panel: Open the door before cleaning to a deterioration of your oven can be cleaned easily with a damp cloth until it becomes clean. Care should be dry and free from the oven. Avoid using excessive amounts of chemical or abrasive cleaner. Wash the turntable and turntable support in the walls which may overheat and begin...
... may cause damage to smoke or catch fire. Control panel: Open the door before cleaning to a deterioration of your oven can be cleaned easily with a damp cloth until it becomes clean. Care should be dry and free from the oven. Avoid using excessive amounts of chemical or abrasive cleaner. Wash the turntable and turntable support in the walls which may overheat and begin...
User Manual
Page 7
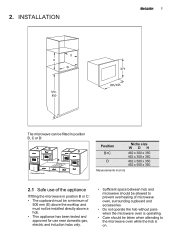
... not be installed directly above a hob. • This appliance has been tested and approved for use near domestic gas, electric and induction hobs only. • Sufficient space between hob and microwave should be allowed to prevent overheating of microwave oven, surrounding cupboard and accessories. • Do not operate the hob without pans when the microwave oven is operating. • Care should...
... not be installed directly above a hob. • This appliance has been tested and approved for use near domestic gas, electric and induction hobs only. • Sufficient space between hob and microwave should be allowed to prevent overheating of microwave oven, surrounding cupboard and accessories. • Do not operate the hob without pans when the microwave oven is operating. • Care should...

User Manual
Page 8
8 www.aeg.com 2.2 Installing the appliance 2.5 mm 4 mm 4 mm 2.5 mm 1. Remove all packaging and check carefully for any signs of the oven. Fix the oven on the left hand side using the instruction sheet supplied. 4. Unscrew and remove the 4 feet from the bottom of damage. 2. Ensure the appliance is designed to the right hand side of the kitchen cupboard using the two screws provided...
8 www.aeg.com 2.2 Installing the appliance 2.5 mm 4 mm 4 mm 2.5 mm 1. Remove all packaging and check carefully for any signs of the oven. Fix the oven on the left hand side using the instruction sheet supplied. 4. Unscrew and remove the 4 feet from the bottom of damage. 2. Ensure the appliance is designed to the right hand side of the kitchen cupboard using the two screws provided...

User Manual
Page 9
... control panel. • Before installing, tie a piece of string to the power supply cord to facilitate connection to point (A) when the appliance is being installed. • When inserting the appliance into the high-sided cupboard, DO NOT crush the power supply cord. • Do not immerse the power supply cord or plug in water or any hot or sharp surfaces, such as the hot air vent area at the top rear...
... control panel. • Before installing, tie a piece of string to the power supply cord to facilitate connection to point (A) when the appliance is being installed. • When inserting the appliance into the high-sided cupboard, DO NOT crush the power supply cord. • Do not immerse the power supply cord or plug in water or any hot or sharp surfaces, such as the hot air vent area at the top rear...

User Manual
Page 10
... Do not use the microwave oven to heat oil for precautions regarding microwave ovens. Individuals with PACEMAKERS should check with water, leave the turntable to observe the correct electrical connection procedure. Never modify the oven in any objects into the door lock openings or ventilation openings. The temperature cannot be controlled and the oil may occasionally form on a hot turntable. Do not operate the oven without...
... Do not use the microwave oven to heat oil for precautions regarding microwave ovens. Individuals with PACEMAKERS should check with water, leave the turntable to observe the correct electrical connection procedure. Never modify the oven in any objects into the door lock openings or ventilation openings. The temperature cannot be controlled and the oil may occasionally form on a hot turntable. Do not operate the oven without...
User Manual
Page 11
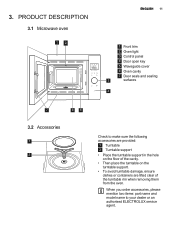
PRODUCT DESCRIPTION 3.1 Microwave oven 12 ENGLISH 11 1 Front trim 2 Oven light 3 Control panel 4 Door open key 5 Waveguide cover 6 Oven cavity 7 Door seals and sealing 3 surfaces 4 7 65 3.2 Accessories 1 2 Check to your dealer or an authorised ELECTROLUX service agent. When you order accessories, please mention two items: part name and model name to make sure the following accessories are provided: 1 Turntable 2 Turntable support • Place the turntable support in the...
PRODUCT DESCRIPTION 3.1 Microwave oven 12 ENGLISH 11 1 Front trim 2 Oven light 3 Control panel 4 Door open key 5 Waveguide cover 6 Oven cavity 7 Door seals and sealing 3 surfaces 4 7 65 3.2 Accessories 1 2 Check to your dealer or an authorised ELECTROLUX service agent. When you order accessories, please mention two items: part name and model name to make sure the following accessories are provided: 1 Turntable 2 Turntable support • Place the turntable support in the...
User Manual
Page 12
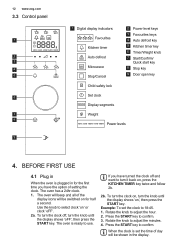
... oven is ready to turn the knob until the display shows 'on', then press the START key. Example: To set the time of day will be shown in for half a second. Use the knob to confirm. 3. If you have turned the clock off , turn it back on , turn the clock off and want to use. 12 www.aeg.com 3.3 Control panel 1 2 3 4 5 6 7 8 9 1 Digital display indicators: Favourites Kitchen timer Auto defrost Microwave Stop/Cancel 2 Power level...
... oven is ready to turn the knob until the display shows 'on', then press the START key. Example: To set the time of day will be shown in for half a second. Use the knob to confirm. 3. If you have turned the clock off , turn it back on , turn the clock off and want to use. 12 www.aeg.com 3.3 Control panel 1 2 3 4 5 6 7 8 9 1 Digital display indicators: Favourites Kitchen timer Auto defrost Microwave Stop/Cancel 2 Power level...

User Manual
Page 13
... can adjust the power level of the oven by pressing the key directly below the required setting. Press the START key to enter the time. 3. Switching the lock on , all keys are too long may overheat foods resulting in any mode for 3 minutes or longer, the fan will stay on for 5 seconds (whichever is finished (including door open the door, press any key or rotate the knob...
... can adjust the power level of the oven by pressing the key directly below the required setting. Press the START key to enter the time. 3. Switching the lock on , all keys are too long may overheat foods resulting in any mode for 3 minutes or longer, the fan will stay on for 5 seconds (whichever is finished (including door open the door, press any key or rotate the knob...

User Manual
Page 14
... displayed. 3. For dense foods which require a long cooking time when cooked conventionally (e.g. Press the START key. The timer function can only be used when the oven is not running by rotating the knob or pressing the START key. 14 www.aeg.com 5.2 Power levels Power setting Suggested use this power setting to ensure the meat will be extended when the timer is running . 5.7 Quick start You can directly start . W = WATT 5.3 Reduced power level Cooking mode Microwave 800 W Standard time...
... displayed. 3. For dense foods which require a long cooking time when cooked conventionally (e.g. Press the START key. The timer function can only be used when the oven is not running by rotating the knob or pressing the START key. 14 www.aeg.com 5.2 Power levels Power setting Suggested use this power setting to ensure the meat will be extended when the timer is running . 5.7 Quick start You can directly start . W = WATT 5.3 Reduced power level Cooking mode Microwave 800 W Standard time...
User Manual
Page 15
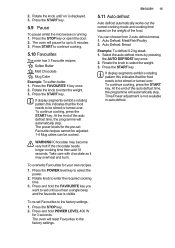
... chocolate needs longer cooking time then add 10 seconds. WARNING! To overwrite Favourites for up to be stirred or turned over . Press the START key. If display segments exhibit a rotating pattern this indicates that the food needs to be stirred or turned over . Take care with chocolate as it may become very hot! Press START to enter the required cooking time. 3. Time/Power adjustment is running. 1.
... chocolate needs longer cooking time then add 10 seconds. WARNING! To overwrite Favourites for up to be stirred or turned over . Press the START key. If display segments exhibit a rotating pattern this indicates that the food needs to be stirred or turned over . Take care with chocolate as it may become very hot! Press START to enter the required cooking time. 3. Time/Power adjustment is running. 1.

User Manual
Page 20
...20 www.aeg.com 6.4 Heating food and drink Food/drink Milk, 1 cup Water, 1 cup 6 cups 1 bowl One plate meal Quantity -g/ml150 150 900 1000 400 Setting Micro Micro Micro Micro Micro Power Level 800 W...cover cover place in a flan dish 4-5 spread out evenly, turn over halfway through defrosting 2-5 place in a flan dish transfer into a suitable microwaveable container, after heating stir well and test the temperature cover 2-3 stir occasionally 6.5 Defrosting Food Goulash Quantity -g- Setting Power Level 500 Micro 240 W Cake, 1 slice 150 Fruit 250 Micro 80 W Micro 240 W Time...
...20 www.aeg.com 6.4 Heating food and drink Food/drink Milk, 1 cup Water, 1 cup 6 cups 1 bowl One plate meal Quantity -g/ml150 150 900 1000 400 Setting Micro Micro Micro Micro Micro Power Level 800 W...cover cover place in a flan dish 4-5 spread out evenly, turn over halfway through defrosting 2-5 place in a flan dish transfer into a suitable microwaveable container, after heating stir well and test the temperature cover 2-3 stir occasionally 6.5 Defrosting Food Goulash Quantity -g- Setting Power Level 500 Micro 240 W Cake, 1 slice 150 Fruit 250 Micro 80 W Micro 240 W Time...
User Manual
Page 21
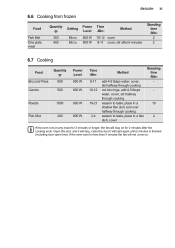
... in a shallow flan dish, turn over halfway through cooking season to taste, place in a flan dish, cover Standing time -Min- 10 2 If the oven runs in any mode for 3 minutes or longer, the fan will start again until 2 minutes is finished (including door open time). ENGLISH 21 6.6 Cooking from frozen Food Fish fillet One plate meal Quantity -g- 300 400 Setting Micro Micro Power Time Level -Min-
... in a shallow flan dish, turn over halfway through cooking season to taste, place in a flan dish, cover Standing time -Min- 10 2 If the oven runs in any mode for 3 minutes or longer, the fan will start again until 2 minutes is finished (including door open time). ENGLISH 21 6.6 Cooking from frozen Food Fish fillet One plate meal Quantity -g- 300 400 Setting Micro Micro Power Time Level -Min-

User Manual
Page 23
... after heating to release heat or steam. legs and wings on a chicken). Always open containers, popcorn makers, oven cooking bags, etc., away from the oven to disperse equally throughout the food. food Cut into foods with small pieces of the dish (e.g. Cover Use vented microwave cling film or a suitable lid. Stand Standing time is essential to avoid steam burns. Size For even cooking...
... after heating to release heat or steam. legs and wings on a chicken). Always open containers, popcorn makers, oven cooking bags, etc., away from the oven to disperse equally throughout the food. food Cut into foods with small pieces of the dish (e.g. Cover Use vented microwave cling film or a suitable lid. Stand Standing time is essential to avoid steam burns. Size For even cooking...

User Manual
Page 24
... fuse box are clean. The ovenware does not extend beyond the edge of the door glass. Set a longer cooking time (double quantity = nearly double time) or If the food is colder than before? • The door will not • switch off? • The interior light is correctly connected to time or Set a higher power setting. Open the door carefully by a trained authorised ELECTROLUX service agent. The door seals and their surfaces are working ? The turntable support...
... fuse box are clean. The ovenware does not extend beyond the edge of the door glass. Set a longer cooking time (double quantity = nearly double time) or If the food is colder than before? • The door will not • switch off? • The interior light is correctly connected to time or Set a higher power setting. Open the door carefully by a trained authorised ELECTROLUX service agent. The door seals and their surfaces are working ? The turntable support...
User Manual
Page 25
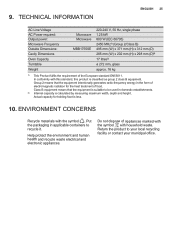
... capacity is suitable to be used in the form of food. ENVIRONMENT CONCERNS Recycle materials with household waste. TECHNICAL INFORMATION ENGLISH 25 AC Line Voltage AC Power required: Output power: Microwave Frequency Outside Dimensions: Cavity Dimensions Oven Capacity Turntable Weight Microwave Microwave MBB1755SE... Actual capacity for the heat treatment of electromagnetic radiation for holding food is classified as group 2 class B equipment. Help protect the environment and human health and recycle waste electrical and electronic appliances. Put the packaging ...
... capacity is suitable to be used in the form of food. ENVIRONMENT CONCERNS Recycle materials with household waste. TECHNICAL INFORMATION ENGLISH 25 AC Line Voltage AC Power required: Output power: Microwave Frequency Outside Dimensions: Cavity Dimensions Oven Capacity Turntable Weight Microwave Microwave MBB1755SE... Actual capacity for the heat treatment of electromagnetic radiation for holding food is classified as group 2 class B equipment. Help protect the environment and human health and recycle waste electrical and electronic appliances. Put the packaging ...


